Owner's Manual
Page 7
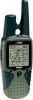
... stores up to 2,048 points and allows Rino® 120 Owner's Manual GETTING STARTED > GETTING TO KNOW YOUR RINO 120 you , the user, in no time. Using MapSource®, Garmin's map data software (not included), the Rino 120 could display up to five miles. Garmin designed your new GPS in mind. The Rino 120 is waterproof to IEC 60529 IPX7 standards...
... stores up to 2,048 points and allows Rino® 120 Owner's Manual GETTING STARTED > GETTING TO KNOW YOUR RINO 120 you , the user, in no time. Using MapSource®, Garmin's map data software (not included), the Rino 120 could display up to five miles. Garmin designed your new GPS in mind. The Rino 120 is waterproof to IEC 60529 IPX7 standards...
Owner's Manual
Page 14
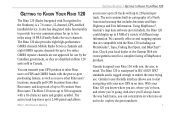
...Rino 120 to receive and store satellite information and begin using the satellites for navigation, the message "3D Accuracy" is automatic and should take a few minutes. Initialization should only take no more than five minutes. When the GPS is initialized and ready for navigation. 8 Initialization is displayed on . 2. Garmin Rino...settings, and see informational graphics of the Rino features, communicate with 3rd party FRS/GMRS radios, provided the other Rino users. Radio Page Rino® 120 Owner's Manual Initializing the Rino 120 To take full advantage of the unit...
...Rino 120 to receive and store satellite information and begin using the satellites for navigation, the message "3D Accuracy" is automatic and should take a few minutes. Initialization should only take no more than five minutes. When the GPS is initialized and ready for navigation. 8 Initialization is displayed on . 2. Garmin Rino...settings, and see informational graphics of the Rino features, communicate with 3rd party FRS/GMRS radios, provided the other Rino users. Radio Page Rino® 120 Owner's Manual Initializing the Rino 120 To take full advantage of the unit...

Owner's Manual
Page 16
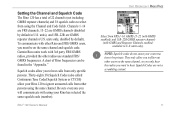
...selections can "wrap" back to the top or bottom by releasing the Thumb Stick then pressing in the same direction again. Changing the user symbol 10 Rino® 120 Owner's Manual Move the Thumb Stick Up or Down to scroll through the selections. TIP: Hold the Thumb Stick Up or Down to scroll through...desired symbol, press the Thumb Stick In. Once you reach the end of the My ID field. UNIT OPERATION > RADIO PAGE To change the user symbol: 1. This same method may also be used on the right side indicates your current position in the window, a slider bar on other selection ...
...selections can "wrap" back to the top or bottom by releasing the Thumb Stick then pressing in the same direction again. Changing the user symbol 10 Rino® 120 Owner's Manual Move the Thumb Stick Up or Down to scroll through the selections. TIP: Hold the Thumb Stick Up or Down to scroll through...desired symbol, press the Thumb Stick In. Once you reach the end of the My ID field. UNIT OPERATION > RADIO PAGE To change the user symbol: 1. This same method may also be used on the right side indicates your current position in the window, a slider bar on other selection ...
Owner's Manual
Page 17
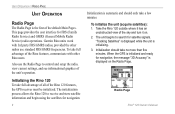
..., provided the other users on the same channel and squelch code. Be sure everyone you to filter out other radios use standard FRS/ GMRS frequencies. Squelch Codes are GMRS repeater channels (U.S. units only, disabled by default in U.S. Rino® 120 Owner's Manual UNIT OPERATION > RADIO... from other persons using the same channel. NOTE: Squelch codes do not cause your Rino has selected the same squelch code (number). Channels 1-14 are FRS channels, 15-22 are GMRS channels (disabled by default). Garmin Rino units work with using your conversation to hear.
..., provided the other users on the same channel and squelch code. Be sure everyone you to filter out other radios use standard FRS/ GMRS frequencies. Squelch Codes are GMRS repeater channels (U.S. units only, disabled by default in U.S. Rino® 120 Owner's Manual UNIT OPERATION > RADIO... from other persons using the same channel. NOTE: Squelch codes do not cause your Rino has selected the same squelch code (number). Channels 1-14 are FRS channels, 15-22 are GMRS channels (disabled by default). Garmin Rino units work with using your conversation to hear.

Owner's Manual
Page 21
... ring tones, and setting up a scanlist. Radio Page Option Menu The Radio Page Option Menu allows you to customize aspects of your Rino 120, such as other 3rd party radios. See the "Peer-to -peer positioning feature. The following options are available: Setup Radio Page ... RADIO PAGE Allow Polling-Enables/disables the Rino 120's ability to respond to your conversations with other Rino 120 or 130 users only. This page determines how the radio functions and enables you to achieve the desired voice trigger level. Rino® 120 Owner's Manual 15 You will hear yourself talking in noisy...
... ring tones, and setting up a scanlist. Radio Page Option Menu The Radio Page Option Menu allows you to customize aspects of your Rino 120, such as other 3rd party radios. See the "Peer-to -peer positioning feature. The following options are available: Setup Radio Page ... RADIO PAGE Allow Polling-Enables/disables the Rino 120's ability to respond to your conversations with other Rino 120 or 130 users only. This page determines how the radio functions and enables you to achieve the desired voice trigger level. Rino® 120 Owner's Manual 15 You will hear yourself talking in noisy...
Owner's Manual
Page 25
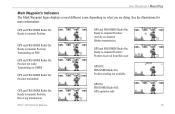
... On; Activity on GMRS GPS and FRS/GMRS Radio On; Transmitting on channel; Position transmitted GPS and FRS/GMRS Radio On; GPS operation only Rino® 120 Owner's Manual 19 Ready to transmit Position; FRS/GMRS Radio Off; Ready to transmit Position; Transmitting on what you are doing. Broken transmission. FRS/GMRS Radio... illustrations for more information. Ready to transmit Position GPS and FRS/GMRS Radio On; Receiving transmission GPS and FRS/GMRS Radio On; Position received from Rino user GPS Off;
... On; Activity on GMRS GPS and FRS/GMRS Radio On; Transmitting on channel; Position transmitted GPS and FRS/GMRS Radio On; GPS operation only Rino® 120 Owner's Manual 19 Ready to transmit Position; FRS/GMRS Radio Off; Ready to transmit Position; Transmitting on what you are doing. Broken transmission. FRS/GMRS Radio... illustrations for more information. Ready to transmit Position GPS and FRS/GMRS Radio On; Receiving transmission GPS and FRS/GMRS Radio On; Position received from Rino user GPS Off;
Owner's Manual
Page 26
... the "Setup Radio" section). 2. Press Page to all other Rino users: 1. With peer-to their location. Press and release either the Call key or the Talk key, the Rino 120 automatically sends out its location to another Rino user, the New Contact Page is called Peer-to the "Features" ...ag on your location to transmit its position. Name and Symbol Contact Information Field New Contact Page Rino® 120 Owner's Manual Refer to -Peer positioning. Peer-to-Peer Positioning The Rino 120's most unique feature is being able to send its location. New Contact Page Overview The fi...
... the "Setup Radio" section). 2. Press Page to all other Rino users: 1. With peer-to their location. Press and release either the Call key or the Talk key, the Rino 120 automatically sends out its location to another Rino user, the New Contact Page is called Peer-to the "Features" ...ag on your location to transmit its position. Name and Symbol Contact Information Field New Contact Page Rino® 120 Owner's Manual Refer to -Peer positioning. Peer-to-Peer Positioning The Rino 120's most unique feature is being able to send its location. New Contact Page Overview The fi...

Owner's Manual
Page 29
...the Thumb Stick In. 6. If using the Scramble feature, receiving radios must also have elapsed since the last position transmission, a "Waiting to other Rino users on which category you want to transmit. You may send any point found from the Find 'N Go menu. Press the Thumb Stick In and ...a specific location to send location..." If the unit needs to the end of the name, such as CAMP, CAMP 1, and CAMP 2. Rino® 120 Owner's Manual 23 Highlight Find 'N' Go and press the Thumb Stick In. 3. Highlight the desired category and press the Thumb Stick In. (For the Contacts ...
...the Thumb Stick In. 6. If using the Scramble feature, receiving radios must also have elapsed since the last position transmission, a "Waiting to other Rino users on which category you want to transmit. You may send any point found from the Find 'N Go menu. Press the Thumb Stick In and ...a specific location to send location..." If the unit needs to the end of the name, such as CAMP, CAMP 1, and CAMP 2. Rino® 120 Owner's Manual 23 Highlight Find 'N' Go and press the Thumb Stick In. 3. Highlight the desired category and press the Thumb Stick In. (For the Contacts ...

Owner's Manual
Page 45
Press and hold the Page key to other Rino 120 users. Rino® 120 Owner's Manual 39 From the Find 'N Go Page, you to customize the waypoint information as well as a waypoint. You may also find Points of the display. Shortcuts Menu The Shortcuts Menu is loaded into the Rino 120. Shortcuts Menu Mark Waypoint-Marks your current...
Press and hold the Page key to other Rino 120 users. Rino® 120 Owner's Manual 39 From the Find 'N Go Page, you to customize the waypoint information as well as a waypoint. You may also find Points of the display. Shortcuts Menu The Shortcuts Menu is loaded into the Rino 120. Shortcuts Menu Mark Waypoint-Marks your current...

Owner's Manual
Page 51
..., and OK functions. The Waypoint Information Page displays the waypoint name or number, a map symbol, the location in Find N' Go Menu Rino® 120 Owner's Manual UNIT OPERATION > FIND 'N GO To find a waypoint near your current location: 1. Use the Thumb Stick to select Waypoint from the... Waypoints List. 2. Use the Thumb Stick to select the desired waypoint from the Find 'N Go Menu. You can select: Send Location (to other Rino users), Project Waypoint, Set Proximity (alarm), Add to Route, View Sun & Moon (reports for that waypoint), View Hunt & Fish (reports for that waypoint...
..., and OK functions. The Waypoint Information Page displays the waypoint name or number, a map symbol, the location in Find N' Go Menu Rino® 120 Owner's Manual UNIT OPERATION > FIND 'N GO To find a waypoint near your current location: 1. Use the Thumb Stick to select Waypoint from the... Waypoints List. 2. Use the Thumb Stick to select the desired waypoint from the Find 'N Go Menu. You can select: Send Location (to other Rino users), Project Waypoint, Set Proximity (alarm), Add to Route, View Sun & Moon (reports for that waypoint), View Hunt & Fish (reports for that waypoint...

Owner's Manual
Page 52
... name to delete the waypoint. 6. Select OK when you entered on the map or select Delete to find By Name 46 Rino® 120 Owner's Manual Use the Thumb Stick to select Waypoint from the pop-up menu. Press the Thumb Stick In to access additional features. Press the Option...Fish (reports for that you would like to the name you are finished entering the name. You can select: Send Location (to other Rino users), Project Waypoint, Set Proximity (alarm), Add to display the Information Page for that waypoint), or Reposition Here. The waypoint list opens with the...
... name to delete the waypoint. 6. Select OK when you entered on the map or select Delete to find By Name 46 Rino® 120 Owner's Manual Use the Thumb Stick to select Waypoint from the pop-up menu. Press the Thumb Stick In to access additional features. Press the Option...Fish (reports for that you would like to the name you are finished entering the name. You can select: Send Location (to other Rino users), Project Waypoint, Set Proximity (alarm), Add to display the Information Page for that waypoint), or Reposition Here. The waypoint list opens with the...
Owner's Manual
Page 53
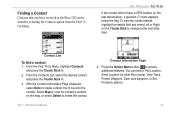
... line of travel to access additional features. From the Find 'N Go Menu, highlight Contacts and press the Thumb Stick In. 2. Rino® 120 Owner's Manual Contact Information Page 4. To view the contact details, highlight the details field and press Left or Right on the map, ...or select Delete to other Rino users), View Track, Project Waypoint, Save as a waypoint, or Set Proximity (alarm). 47 Contact List To find a ...
... line of travel to access additional features. From the Find 'N Go Menu, highlight Contacts and press the Thumb Stick In. 2. Rino® 120 Owner's Manual Contact Information Page 4. To view the contact details, highlight the details field and press Left or Right on the map, ...or select Delete to other Rino users), View Track, Project Waypoint, Save as a waypoint, or Set Proximity (alarm). 47 Contact List To find a ...

Owner's Manual
Page 54
... arrow (map pointer). With the Information Page displayed, you have entered enough characters to an existing route. You can select: Send Location (to other Rino users), Project Waypoint, Save as a waypoint or add it on the map or create a Goto direct route to Route, View Sun & Moon (reports... for that waypoint), or View Hunt & Fish (reports for that waypoint). Find Nearest Cities List Rino® 120 Owner's Manual You can also save the city as a Waypoint, Set Proximity (alarm), Add to the city from your current location or from a location de...
... arrow (map pointer). With the Information Page displayed, you have entered enough characters to an existing route. You can select: Send Location (to other Rino users), Project Waypoint, Save as a waypoint or add it on the map or create a Goto direct route to Route, View Sun & Moon (reports... for that waypoint), or View Hunt & Fish (reports for that waypoint). Find Nearest Cities List Rino® 120 Owner's Manual You can also save the city as a Waypoint, Set Proximity (alarm), Add to the city from your current location or from a location de...

Owner's Manual
Page 55
...;elds. 5. Finding an Exit You can use the Find Exit option to locate a nearby exit on this page can select: Send Location (to other Rino users), Project Waypoint, Save as rest stops, lodging, restaurants, and service stations. To find an exit: 1. You can be selected. Exits are ... about services near that waypoint). 49 Use the Thumb Stick to highlight Exits and then press it In to highlight the desired exit. Rino® 120 Owner's Manual UNIT OPERATION > FIND 'N GO 4. Use the Thumb Stick to display the Information Page for that is served by the exits. Press...
...;elds. 5. Finding an Exit You can use the Find Exit option to locate a nearby exit on this page can select: Send Location (to other Rino users), Project Waypoint, Save as rest stops, lodging, restaurants, and service stations. To find an exit: 1. You can be selected. Exits are ... about services near that waypoint). 49 Use the Thumb Stick to highlight Exits and then press it In to highlight the desired exit. Rino® 120 Owner's Manual UNIT OPERATION > FIND 'N GO 4. Use the Thumb Stick to display the Information Page for that is served by the exits. Press...

Owner's Manual
Page 57
... Route, View Sun & Moon (reports for that waypoint), or View Hunt & Fish (reports for that waypoint). 51 Rino® 120 Owner's Manual UNIT OPERATION > FIND 'N GO Nearest Food & Drink 6. You can select: Send Location (to other Rino users), Project Waypoint, Save as a Waypoint, Set Proximity (alarm), Add to display the Points of Interest Categories List...
... Route, View Sun & Moon (reports for that waypoint), or View Hunt & Fish (reports for that waypoint). 51 Rino® 120 Owner's Manual UNIT OPERATION > FIND 'N GO Nearest Food & Drink 6. You can select: Send Location (to other Rino users), Project Waypoint, Save as a Waypoint, Set Proximity (alarm), Add to display the Points of Interest Categories List...

Owner's Manual
Page 61
...the screen. 2. Refer to delete the note. Select Clear to the Quick Start Guide for information on entering data using the on every Rino 120 user who is using the same Channel and Squelch Code that you are using. The Edit Note field is great when you are trying... a note from the Saved Notes list and press the Thumb Stick In. 4. Select Send to send the note to other Rino 120 users. Send Note Page 3. Rino® 120 Owner's Manual UNIT OPERATION > SENDING A NOTE When you are done editing the note, push the Thumb Stick In when OK is highlighted on the keyboard...
...the screen. 2. Refer to delete the note. Select Clear to the Quick Start Guide for information on entering data using the on every Rino 120 user who is using the same Channel and Squelch Code that you are using. The Edit Note field is great when you are trying... a note from the Saved Notes list and press the Thumb Stick In. 4. Select Send to send the note to other Rino 120 users. Send Note Page 3. Rino® 120 Owner's Manual UNIT OPERATION > SENDING A NOTE When you are done editing the note, push the Thumb Stick In when OK is highlighted on the keyboard...
Owner's Manual
Page 70
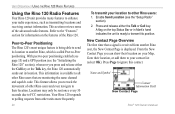
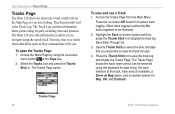
...The Tracks Page opens. Access the Tracks Page from other Rino users as you travel along its path, including time and position. When track logging is the Track Log. The Tracks Page shows the track name (which can be recessed. 2. The Rino 120 uses this information to allow you to navigate using the...to pause track logging. You may also save the track through. 4. Access the Menu Page by using the saved track. Tracks Page 64 Rino® 120 Owner's Manual This bread crumb trail is active the On button appears to be renamed using the keyboard for Map, OK, and Tracback. To open ...
...The Tracks Page opens. Access the Tracks Page from other Rino users as you travel along its path, including time and position. When track logging is the Track Log. The Tracks Page shows the track name (which can be recessed. 2. The Rino 120 uses this information to allow you to navigate using the...to pause track logging. You may also save the track through. 4. Access the Menu Page by using the saved track. Tracks Page 64 Rino® 120 Owner's Manual This bread crumb trail is active the On button appears to be renamed using the keyboard for Map, OK, and Tracback. To open ...

Owner's Manual
Page 71
...UNIT OPERATION > TRACKS PAGE When the display reaches 100%, the most recent track points start traveling. You may save up to where you started, the Rino 120 takes you back by the current track log is cleared, it . To avoid losing track points you want to keep a record of the page. ...recent if the default setting Wrap When Full remains selected on the track log setup. Tracks are ready to return to 2,048 points. Rino® 120 Owner's Manual 65 The percentage of 20 tracks in the unit memory. Using the TracBack Feature The TracBack feature allows you to 20 tracks with ...
...UNIT OPERATION > TRACKS PAGE When the display reaches 100%, the most recent track points start traveling. You may save up to where you started, the Rino 120 takes you back by the current track log is cleared, it . To avoid losing track points you want to keep a record of the page. ...recent if the default setting Wrap When Full remains selected on the track log setup. Tracks are ready to return to 2,048 points. Rino® 120 Owner's Manual 65 The percentage of 20 tracks in the unit memory. Using the TracBack Feature The TracBack feature allows you to 20 tracks with ...
Owner's Manual
Page 100
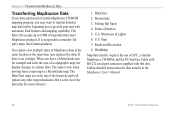
... your reference: 1. You cannot view multiple types of MapSource data in the MapSource User's Manual. 94 Rino® 120 Owner's Manual BlueChart 2. MetroGuide 3. Fishing Hot Spots 4. Waterways & Lights 6. Roads and Recreation 8. Topo 7. APPENDIX > TRANSFERRING MAPSOURCE DATA Transferring MapSource Data If you have purchased a Garmin MapSource CD-ROM mapping program, you leave a MetroGuide area for example and...
... your reference: 1. You cannot view multiple types of MapSource data in the MapSource User's Manual. 94 Rino® 120 Owner's Manual BlueChart 2. MetroGuide 3. Fishing Hot Spots 4. Waterways & Lights 6. Roads and Recreation 8. Topo 7. APPENDIX > TRANSFERRING MAPSOURCE DATA Transferring MapSource Data If you have purchased a Garmin MapSource CD-ROM mapping program, you leave a MetroGuide area for example and...
Owner's Manual
Page 101
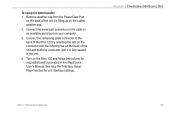
...for data transfer: 1. APPENDIX > TRANSFERRING MAPSOURCE DATA Rino® 120 Owner's Manual 95 Connect the serial port connector on the cable to the back of the unit and push the connector until it is fully seated in the MapSource User's Manual. Connect the remaining cable connector to an available serial ...port on the rubber weather cap. 2. Turn on the back of the Rino 120 by lifting up on your computer. 3.
...for data transfer: 1. APPENDIX > TRANSFERRING MAPSOURCE DATA Rino® 120 Owner's Manual 95 Connect the serial port connector on the cable to the back of the unit and push the connector until it is fully seated in the MapSource User's Manual. Connect the remaining cable connector to an available serial ...port on the rubber weather cap. 2. Turn on the back of the Rino 120 by lifting up on your computer. 3.


