SAR Specific Absorption Rate Statement
Page 1
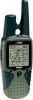
...exposure. It is determined at the highest certified power level, the actual SAR level of scientific studies. in measurements. © 2008 Garmin Ltd. The standard incorporates a substantial margin of safety to give additional protection for the public and to account for any variations in... W/kg averaged over one gram of age or health. A Printed in the Owner's Manual) 1.03 W/kg 1.48 W/kg 1.54 W/kg While there may be within the guidelines. Specific Absorption Rate Data Rino® 110/120/130/520HCx/530HCx This model wireless radio meets the requirements for exposure to the...
...exposure. It is determined at the highest certified power level, the actual SAR level of scientific studies. in measurements. © 2008 Garmin Ltd. The standard incorporates a substantial margin of safety to give additional protection for the public and to account for any variations in... W/kg averaged over one gram of age or health. A Printed in the Owner's Manual) 1.03 W/kg 1.48 W/kg 1.54 W/kg While there may be within the guidelines. Specific Absorption Rate Data Rino® 110/120/130/520HCx/530HCx This model wireless radio meets the requirements for exposure to the...

Owner's Manual
Page 3
... using the page and its features. Rino® 120 Owner's Manual i The Appendix includes additional information about the Rino 120. This Owner's Manual describes the Main Pages of some basic unit operations to describe each of the operating features. INTRODUCTION This manual is to familiarize you with you for choosing the Garmin® Rino® 120 (Radio Integrated with Navigation for using...
... using the page and its features. Rino® 120 Owner's Manual i The Appendix includes additional information about the Rino 120. This Owner's Manual describes the Main Pages of some basic unit operations to describe each of the operating features. INTRODUCTION This manual is to familiarize you with you for choosing the Garmin® Rino® 120 (Radio Integrated with Navigation for using...
Owner's Manual
Page 4
...OF CONTENTS Introduction i Getting to Know Your Rino 120 1 Front of the Rino 120 2 Back of the Rino 120 3 Main Page Sequence 4 Operating the Rino 120 5 Status Bar Overview 6 Understanding GPS 7 Unit Operation 8 Radio Page 8 Initializing the Rino 120 8 Using My ID and Symbol Fields 9...Informational Picture 18 GPS Status 18 Radio Transmission Status 18 ii Mark Waypoint's Indicators 19 Using the Rino 120 Radio Features 20 Peer-to-Peer Positioning 20 New Contact Page Overview 20 Sending a Location 23 ...Trip Computer Page Options 35 Main Menu Page 36 Rino® 120 Owner's Manual
...OF CONTENTS Introduction i Getting to Know Your Rino 120 1 Front of the Rino 120 2 Back of the Rino 120 3 Main Page Sequence 4 Operating the Rino 120 5 Status Bar Overview 6 Understanding GPS 7 Unit Operation 8 Radio Page 8 Initializing the Rino 120 8 Using My ID and Symbol Fields 9...Informational Picture 18 GPS Status 18 Radio Transmission Status 18 ii Mark Waypoint's Indicators 19 Using the Rino 120 Radio Features 20 Peer-to-Peer Positioning 20 New Contact Page Overview 20 Sending a Location 23 ...Trip Computer Page Options 35 Main Menu Page 36 Rino® 120 Owner's Manual

Owner's Manual
Page 5
... 55 Using a Goto 56 Route Page 57 Creating and Using a Route 57 Editing a Route 58 Adding or Editing from the Route Map Page 61 Rino® 120 Owner's Manual INTRODUCTION > TABLE OF CONTENTS Navigating a Route 62 Stopping Navigation 63 Data Fields for the Route Page 63 Data field options for Route Page 63...
... 55 Using a Goto 56 Route Page 57 Creating and Using a Route 57 Editing a Route 58 Adding or Editing from the Route Map Page 61 Rino® 120 Owner's Manual INTRODUCTION > TABLE OF CONTENTS Navigating a Route 62 Stopping Navigation 63 Data Fields for the Route Page 63 Data field options for Route Page 63...
Owner's Manual
Page 6
...finitions 103 Interface Information 105 FCC Compliance Information 106 FCC Licensing Information 107 Limited Warranty 108 Software License Agreement 110 Product Registration 110 Contact Garmin 110 Warnings and Cautions 111 Index 114 Rino® 120 Owner's Manual
...finitions 103 Interface Information 105 FCC Compliance Information 106 FCC Licensing Information 107 Limited Warranty 108 Software License Agreement 110 Product Registration 110 Contact Garmin 110 Warnings and Cautions 111 Index 114 Rino® 120 Owner's Manual
Owner's Manual
Page 7
... eight GMRS repeater channels for up to 2,048 points and allows Rino® 120 Owner's Manual GETTING STARTED > GETTING TO KNOW YOUR RINO 120 you 're going. The Rino 120 stores up to IEC 60529 IPX7 standards and is a 7.6 ounce..., 12-channel, GPS-enabled handheld device. The unit contains built-in cartography of up to 8 MB of a variety of MapSource products. Using MapSource®, Garmin's map data software (not included), the Rino 120...
... eight GMRS repeater channels for up to 2,048 points and allows Rino® 120 Owner's Manual GETTING STARTED > GETTING TO KNOW YOUR RINO 120 you 're going. The Rino 120 stores up to IEC 60529 IPX7 standards and is a 7.6 ounce..., 12-channel, GPS-enabled handheld device. The unit contains built-in cartography of up to 8 MB of a variety of MapSource products. Using MapSource®, Garmin's map data software (not included), the Rino 120...
Owner's Manual
Page 8
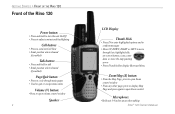
GETTING STARTED > FRONT OF THE RINO 120 Front of the Rino 120 Power button: • Press and hold to turn the unit On/Off • Press to adjust contrast and backlighting Call button: • Press to send ..., enter data, or move the map panning arrow • Press IN and hold to open Zoom control Microphone: • Hold unit 3-4 inches away when talking Rino® 120 Owner's Manual Zoom/Map (Z) button: • From the Map Page, press to open Zoom control window • From any other page, press to display Map Page...
GETTING STARTED > FRONT OF THE RINO 120 Front of the Rino 120 Power button: • Press and hold to turn the unit On/Off • Press to adjust contrast and backlighting Call button: • Press to send ..., enter data, or move the map panning arrow • Press IN and hold to open Zoom control Microphone: • Hold unit 3-4 inches away when talking Rino® 120 Owner's Manual Zoom/Map (Z) button: • From the Map Page, press to open Zoom control window • From any other page, press to display Map Page...
Owner's Manual
Page 9
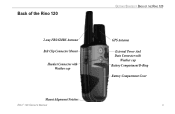
Back of the Rino 120 2-way FRS/GMRS Antenna Belt Clip Connector Mount Headset Connector with Weather cap Mount Alignment Notches Rino® 120 Owner's Manual GETTING STARTED > BACK OF THE RINO 120 GPS Antenna External Power And Data Connector with Weather cap Battery Compartment D-Ring Battery Compartment Cover 3
Back of the Rino 120 2-way FRS/GMRS Antenna Belt Clip Connector Mount Headset Connector with Weather cap Mount Alignment Notches Rino® 120 Owner's Manual GETTING STARTED > BACK OF THE RINO 120 GPS Antenna External Power And Data Connector with Weather cap Battery Compartment D-Ring Battery Compartment Cover 3
Owner's Manual
Page 10
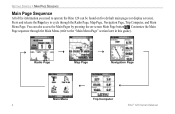
Radio Page Map Page Navigation Page Main Menu Trip Computer 4 Rino® 120 Owner's Manual You can be found on -screen Main Page button . GETTING STARTED > MAIN PAGE SEQUENCE Main Page Sequence All of the information you need to the "... Page, Navigation Page, Trip Computer, and Main Menu Page. Press and release the Page key to cycle through the Main Menu (refer to operate the Rino 120 can also access the Main Pages by pressing the on five default main pages (or display screens).
Radio Page Map Page Navigation Page Main Menu Trip Computer 4 Rino® 120 Owner's Manual You can be found on -screen Main Page button . GETTING STARTED > MAIN PAGE SEQUENCE Main Page Sequence All of the information you need to the "... Page, Navigation Page, Trip Computer, and Main Menu Page. Press and release the Page key to cycle through the Main Menu (refer to operate the Rino 120 can also access the Main Pages by pressing the on five default main pages (or display screens).
Owner's Manual
Page 11
...-up Message 5 To close without making a selection, move the map panning arrow • Press In and hold to access the Shortcuts Menu. Rino® 120 Owner's Manual GETTING STARTED > OPERATING THE RINO 120 2. To lock/unlock the keys: 1. To unlock, press and hold the Thumb Stick In to display the Shortcuts Menu. Refer to the "Initializing...
...-up Message 5 To close without making a selection, move the map panning arrow • Press In and hold to access the Shortcuts Menu. Rino® 120 Owner's Manual GETTING STARTED > OPERATING THE RINO 120 2. To lock/unlock the keys: 1. To unlock, press and hold the Thumb Stick In to display the Shortcuts Menu. Refer to the "Initializing...

Owner's Manual
Page 12
... Radio On Peer-To-Peer On/Location Ready to Send Keylock On Alarm Clock On GPS On, Position Ready GPS On, Position Not Ready Rino® 120 Owner's Manual As you move around any of the screen displays on the Status Bar are displayed as you may see are shown and described below: Option...
... Radio On Peer-To-Peer On/Location Ready to Send Keylock On Alarm Clock On GPS On, Position Ready GPS On, Position Not Ready Rino® 120 Owner's Manual As you move around any of the screen displays on the Status Bar are displayed as you may see are shown and described below: Option...
Owner's Manual
Page 13
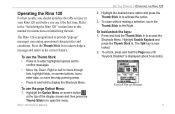
... it typically computes a fix within a couple minutes. Longer initialization (AutoLocate) is also called initializing the receiver or unit. Rino® 120 Owner's Manual 7 GPS signals are relatively weak and do not travel through rocks, buildings, people, or metal: So, remember to keep a... Positioning System (GPS) consists of the satellites in a very precise orbit and transmit information to Earth. Because the Rino 120 relies on GPS. Visit the Garmin Web site at all times for more information on satellite signals to maintain the location fix. In a nutshell, the...
... it typically computes a fix within a couple minutes. Longer initialization (AutoLocate) is also called initializing the receiver or unit. Rino® 120 Owner's Manual 7 GPS signals are relatively weak and do not travel through rocks, buildings, people, or metal: So, remember to keep a... Positioning System (GPS) consists of the satellites in a very precise orbit and transmit information to Earth. Because the Rino 120 relies on GPS. Visit the Garmin Web site at all times for more information on satellite signals to maintain the location fix. In a nutshell, the...
Owner's Manual
Page 14
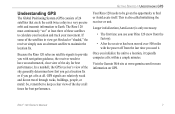
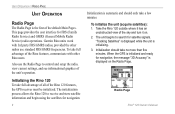
... UNIT OPERATION > RADIO PAGE UNIT OPERATION Radio Page The Radio Page is the first of the Rino 120 features, the GPS receiver must be initialized. Garmin Rino units work with other radios use the Radio Page to search for navigation, the message "3D Accuracy" ...is initializing. 3. Also use standard FRS/GMRS frequencies. The initialization process allows the Rino 120 to receive and store satellite information and begin using the satellites for FRS (Family Radio Service) and GMRS (General Mobile Radio Service) radio operations. Radio Page Rino® 120 Owner's Manual
... UNIT OPERATION > RADIO PAGE UNIT OPERATION Radio Page The Radio Page is the first of the Rino 120 features, the GPS receiver must be initialized. Garmin Rino units work with other radios use the Radio Page to search for navigation, the message "3D Accuracy" ...is initializing. 3. Also use standard FRS/GMRS frequencies. The initialization process allows the Rino 120 to receive and store satellite information and begin using the satellites for FRS (Family Radio Service) and GMRS (General Mobile Radio Service) radio operations. Radio Page Rino® 120 Owner's Manual
Owner's Manual
Page 15
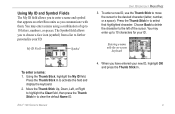
... and press the Thumb Stick In. 9 You may enter a name using a combination of the cursor. Using the Thumb Stick, highlight the My ID field. Rino® 120 Owner's Manual 4. My ID Field Symbol UNIT OPERATION > RADIO PAGE 3. Move the Thumb Stick Up, Down, Left, or Right to highlight the Clear field, then...
... and press the Thumb Stick In. 9 You may enter a name using a combination of the cursor. Using the Thumb Stick, highlight the My ID field. Rino® 120 Owner's Manual 4. My ID Field Symbol UNIT OPERATION > RADIO PAGE 3. Move the Thumb Stick Up, Down, Left, or Right to highlight the Clear field, then...

Owner's Manual
Page 16
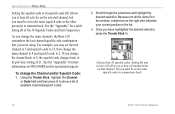
... Up or Down to the top or bottom by releasing the Thumb Stick then pressing in the same direction again. Changing the user symbol 10 Rino® 120 Owner's Manual Once you reach the end of available face symbols (icons). 2. Once you can fit in the list. This same method may also be used...
... Up or Down to the top or bottom by releasing the Thumb Stick then pressing in the same direction again. Changing the user symbol 10 Rino® 120 Owner's Manual Once you reach the end of available face symbols (icons). 2. Once you can fit in the list. This same method may also be used...
Owner's Manual
Page 17
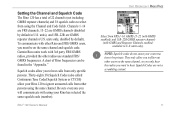
... allow you must be private. Setting the Channel and Squelch Code The Rino 120 has a total of Rino frequencies can be found in the "Appendix." To communicate with GMRS and Repeater Channels enabled; Rino® 120 Owner's Manual UNIT OPERATION > RADIO PAGE Select from other Rino and FRS/GMRS users, you to filter out other radios use... the other users on the same channel and squelch code. units only, disabled by default in U.S. units), and 15R-22R are not a scrambling system! 11 Garmin Rino units work with using the Channel and Code fields.
... allow you must be private. Setting the Channel and Squelch Code The Rino 120 has a total of Rino frequencies can be found in the "Appendix." To communicate with GMRS and Repeater Channels enabled; Rino® 120 Owner's Manual UNIT OPERATION > RADIO PAGE Select from other Rino and FRS/GMRS users, you to filter out other radios use... the other users on the same channel and squelch code. units only, disabled by default in U.S. units), and 15R-22R are not a scrambling system! 11 Garmin Rino units work with using the Channel and Code fields.
Owner's Manual
Page 18
... same squelch code as the other person(s) to transmit back. To change the main channel to 8 and squelch code to communicate back. 12 Rino® 120 Owner's Manual Scroll through the selections and highlight the desired selection. Setting the unit to zero will allow you to show a list of the 38 Squelch... hear all transmissions on FRS/GMRS and its previous setting of 21. Choose from 38 squelch codes. As you change the main channels, the Rino 120 remembers the last channel/squelch code combination that channel, but you must be set the unit channel to 5 and squelch code to 21, then...
... same squelch code as the other person(s) to transmit back. To change the main channel to 8 and squelch code to communicate back. 12 Rino® 120 Owner's Manual Scroll through the selections and highlight the desired selection. Setting the unit to zero will allow you to show a list of the 38 Squelch... hear all transmissions on FRS/GMRS and its previous setting of 21. Choose from 38 squelch codes. As you change the main channels, the Rino 120 remembers the last channel/squelch code combination that channel, but you must be set the unit channel to 5 and squelch code to 21, then...

Owner's Manual
Page 19
... continues scanning. When the Rino 120 is scanning or monitoring channels. The Rino series automatically squelches a frequency to that Squelch Code when it receives an incoming signal, the Rino 120 automatically decodes the Squelch Code used by the incoming signal. The Rino 120 then uses that unit. Scanning... to hear all the channels can take time: Selecting only specific channels/squelch codes decreases the scan time and Rino® 120 Owner's Manual UNIT OPERATION > RADIO PAGE helps prevent the chances of missing a transmission. You may use the Set Scanlist option to...
... continues scanning. When the Rino 120 is scanning or monitoring channels. The Rino series automatically squelches a frequency to that Squelch Code when it receives an incoming signal, the Rino 120 automatically decodes the Squelch Code used by the incoming signal. The Rino 120 then uses that unit. Scanning... to hear all the channels can take time: Selecting only specific channels/squelch codes decreases the scan time and Rino® 120 Owner's Manual UNIT OPERATION > RADIO PAGE helps prevent the chances of missing a transmission. You may use the Set Scanlist option to...

Owner's Manual
Page 20
... option, highlight the button again and press the Thumb Stick In. Refer to add/remove the check mark in the Radio Page Option Menu. 14 Rino® 120 Owner's Manual Choose Scan Current Codes and press the Thumb Stick In. To add/remove a channel from the list, highlight the channel and press the Thumb...
... option, highlight the button again and press the Thumb Stick In. Refer to add/remove the check mark in the Radio Page Option Menu. 14 Rino® 120 Owner's Manual Choose Scan Current Codes and press the Thumb Stick In. To add/remove a channel from the list, highlight the channel and press the Thumb...

Owner's Manual
Page 21
... tones, and setting up a scanlist. Radio Page Option Menu The Radio Page Option Menu allows you to customize aspects of your Rino 120, such as other 3rd party radios. Rino® 120 Owner's Manual 15 VOX Level-Controls the sensitivity level of any Voice Operated Transmission (VOX) accessory. You will hear yourself talking in noisy environments...
... tones, and setting up a scanlist. Radio Page Option Menu The Radio Page Option Menu allows you to customize aspects of your Rino 120, such as other 3rd party radios. Rino® 120 Owner's Manual 15 VOX Level-Controls the sensitivity level of any Voice Operated Transmission (VOX) accessory. You will hear yourself talking in noisy environments...


