
User Guide
Page 1
GolfGPS GolfLogix GPS Powered by Garmin User Guide 1 The Best GPS for Golf
GolfGPS GolfLogix GPS Powered by Garmin User Guide 1 The Best GPS for Golf

User Guide
Page 4
Search & Save Courses to Your Computer 20 Requesting Unavailable Golf Courses 22 Receiving Course Map Updates 23 Load Golf Courses to Your GolfLogix GPS 24 Chapter 4: Playing Golf with Your GolfLogix GPS Button Descriptions 26 Acquiring GPS Signals 27 Distance of Last Shot 27 Screen Descriptions 28 Tips During Your Round 29 Checking Battery Power 29 Adjusting Contrast 30 Switching From Yards to Meters 30 Other Menu Items 31 Purchase Accessories 31 Customer Service and Support 31 Chapter 5: Using the Help Section Request a Course 33 Improve Course Accuracy 33 4
Search & Save Courses to Your Computer 20 Requesting Unavailable Golf Courses 22 Receiving Course Map Updates 23 Load Golf Courses to Your GolfLogix GPS 24 Chapter 4: Playing Golf with Your GolfLogix GPS Button Descriptions 26 Acquiring GPS Signals 27 Distance of Last Shot 27 Screen Descriptions 28 Tips During Your Round 29 Checking Battery Power 29 Adjusting Contrast 30 Switching From Yards to Meters 30 Other Menu Items 31 Purchase Accessories 31 Customer Service and Support 31 Chapter 5: Using the Help Section Request a Course 33 Improve Course Accuracy 33 4

User Guide
Page 6
...golfer on your new GolfLogix GPS. All you do is key for Golf, Simple, Fast and Fun. Without ever having to push a button, GolfLogix continually displays the distance to the next hole. Introduction Congratulations on every shot. Yes, it can be that simple! GolfLogix even scrolls automatically to...• Shock resistant • Conforms to USGA and R&A Rulings Know your distance and lower your shot. It's that simple! Enjoy! 6 GolfLogix is powered by Garmin, a world leader in GPS. The Distances Golfers Need: • Front, Center, and Back of determining the yardage.
...golfer on your new GolfLogix GPS. All you do is key for Golf, Simple, Fast and Fun. Without ever having to push a button, GolfLogix continually displays the distance to the next hole. Introduction Congratulations on every shot. Yes, it can be that simple! GolfLogix even scrolls automatically to...• Shock resistant • Conforms to USGA and R&A Rulings Know your distance and lower your shot. It's that simple! Enjoy! 6 GolfLogix is powered by Garmin, a world leader in GPS. The Distances Golfers Need: • Front, Center, and Back of determining the yardage.

User Guide
Page 8
Press & Hold to Quickly Scroll Enter Button Press to Measure Distance of Last Shot and Use to Select Menu Items Page Button Press to Power Unit On/Off. 8 Press and Hold for 4 Seconds to Check Battery Signal and Adjust Screen Contrast Power Button Press to select between multiple courses. Chapter 1: Getting Started GolfLogix GPS Button Description Up/Down Buttons Scroll to Next Hazard or Hole.
Press & Hold to Quickly Scroll Enter Button Press to Measure Distance of Last Shot and Use to Select Menu Items Page Button Press to Power Unit On/Off. 8 Press and Hold for 4 Seconds to Check Battery Signal and Adjust Screen Contrast Power Button Press to select between multiple courses. Chapter 1: Getting Started GolfLogix GPS Button Description Up/Down Buttons Scroll to Next Hazard or Hole.

User Guide
Page 9
...activation process when using the device for the first time. 9 Do not keep the unit on page 10. You will need to have your GolfLogix GPS powered ON and plugged into position observing proper polarity. 3. Always remember to turn off the battery back cover. 2. Insert the batteries into your ...22 hours (4-5 rounds of golf ) of the unit 1/4 turn clockwise. View diagram on while indoors as this will drain the battery life. Power the GolfLogix GPS on by turning the D-ring at the back of battery life. Chapter 1: Getting Started Installing the Batteries We highly recommend you up to ...
...activation process when using the device for the first time. 9 Do not keep the unit on page 10. You will need to have your GolfLogix GPS powered ON and plugged into position observing proper polarity. 3. Always remember to turn off the battery back cover. 2. Insert the batteries into your ...22 hours (4-5 rounds of golf ) of the unit 1/4 turn clockwise. View diagram on while indoors as this will drain the battery life. Power the GolfLogix GPS on by turning the D-ring at the back of battery life. Chapter 1: Getting Started Installing the Batteries We highly recommend you up to ...

User Guide
Page 13
... TO CONTINUE TO THE REGISTRATION STEP YOU MUST CONNECT AND POWER ON YOUR UNIT. You can download your GolfLogix GPS unit. To get started, • Once the driver is complete, • Open the GolfLogix Course Manager Start Menu > Programs > GolfLogix > GolfLogix Course • Read and scroll through the License and ... to download unlimited worldwide golf course maps. Click Run An installation window will appear, to continue Click OK On Welcome to GolfLogix Course Manager install screen Click Next On the Select Destination Location for free or choose the $29.95 annual membership to agree...
... TO CONTINUE TO THE REGISTRATION STEP YOU MUST CONNECT AND POWER ON YOUR UNIT. You can download your GolfLogix GPS unit. To get started, • Once the driver is complete, • Open the GolfLogix Course Manager Start Menu > Programs > GolfLogix > GolfLogix Course • Read and scroll through the License and ... to download unlimited worldwide golf course maps. Click Run An installation window will appear, to continue Click OK On Welcome to GolfLogix Course Manager install screen Click Next On the Select Destination Location for free or choose the $29.95 annual membership to agree...

User Guide
Page 14
... the cord connector slide firmly into your computer's available USB port. • Power your GolfLogix GPS unit. (The connection is located by pressing and holding the Power button. 14 Connecting GolfLogix GPS to Your Computer Follow the on-screen instructions to connect your GolfLogix GPS to your Computer with the download cables included in the package. • Ensure...
... the cord connector slide firmly into your computer's available USB port. • Power your GolfLogix GPS unit. (The connection is located by pressing and holding the Power button. 14 Connecting GolfLogix GPS to Your Computer Follow the on-screen instructions to connect your GolfLogix GPS to your Computer with the download cables included in the package. • Ensure...

User Guide
Page 15
... properly your screen should automatically advance to the password selection screen below. Complete the password screen and click Submit. • Complete the registration form that GolfLogix GPS is powered on and it does not advance please follow the instructions in the trouble-shooting video. • You are asked to create a password to the...
... properly your screen should automatically advance to the password selection screen below. Complete the password screen and click Submit. • Complete the registration form that GolfLogix GPS is powered on and it does not advance please follow the instructions in the trouble-shooting video. • You are asked to create a password to the...
User Guide
Page 16
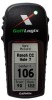
Step 1 : Double check all connections and make sure GolfLogix GPS is powered on another available USB Port on the "Connect Your GPS" screen. After plugging in the video available on your computer. Click Run You may be asked if you want to run?" Step 5 : ... the Connection Between Your Unit and Computer If your GolfLogix Course Manager will not move to the Registration form when you will appear, to continue Click Next then Click Finish • Open Course Manager and continue to USB Connection screen • Securely plug in your GolfLogix GPS and power on website.
Step 1 : Double check all connections and make sure GolfLogix GPS is powered on another available USB Port on the "Connect Your GPS" screen. After plugging in the video available on your computer. Click Run You may be asked if you want to run?" Step 5 : ... the Connection Between Your Unit and Computer If your GolfLogix Course Manager will not move to the Registration form when you will appear, to continue Click Next then Click Finish • Open Course Manager and continue to USB Connection screen • Securely plug in your GolfLogix GPS and power on website.

User Guide
Page 24
You will see your list of the screen. 24 Click on courses you wish to see each selected course show up in your loading area on your GolfLogix GPS. Load Courses on Your GolfLogix GPS • Ensure that the USB cord is plugged into your computer and also attached to your GolfLogix GPS. • Press and hold the Power button to turn on your GolfLogix GPS. • Double-click on the GolfLogix icon to run the GolfLogix software, if it is not already running. • Click Load to load on the right side of saved courses.
You will see your list of the screen. 24 Click on courses you wish to see each selected course show up in your loading area on your GolfLogix GPS. Load Courses on Your GolfLogix GPS • Ensure that the USB cord is plugged into your computer and also attached to your GolfLogix GPS. • Press and hold the Power button to turn on your GolfLogix GPS. • Double-click on the GolfLogix icon to run the GolfLogix software, if it is not already running. • Click Load to load on the right side of saved courses.

User Guide
Page 25
... have to reload them with your thumb to the black serial connection on your unit. Please check batteries before loading. Applying pressure for checking battery power. • If your download progress bar only makes it partially through the download and seems to 20 courses at a time. See page 29...courses. • You will see a pop-up progress bar on the screen during the loading process. • Do not press any buttons on your GolfLogix GPS while loading. • A pop-up to stop/disconnect then try applying pressure with the new batch of the load may fix the connection issues. ...
... have to reload them with your thumb to the black serial connection on your unit. Please check batteries before loading. Applying pressure for checking battery power. • If your download progress bar only makes it partially through the download and seems to 20 courses at a time. See page 29...courses. • You will see a pop-up progress bar on the screen during the loading process. • Do not press any buttons on your GolfLogix GPS while loading. • A pop-up to stop/disconnect then try applying pressure with the new batch of the load may fix the connection issues. ...
User Guide
Page 26
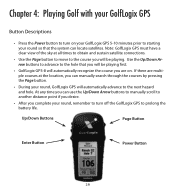
... the courses by pressing the Page button. • During your round, GolfLogix GPS will be playing. Up/Down Buttons Page Button Enter Button Power Button 26 Chapter 4: Playing Golf with your GolfLogix GPS Button Descriptions • Press the Power button to turn off the GolfLogix GPS to prolong the battery life. At any time you can locate satellites...
... the courses by pressing the Page button. • During your round, GolfLogix GPS will be playing. Up/Down Buttons Page Button Enter Button Power Button 26 Chapter 4: Playing Golf with your GolfLogix GPS Button Descriptions • Press the Power button to turn off the GolfLogix GPS to prolong the battery life. At any time you can locate satellites...

User Guide
Page 27
...button to go to the yardage screen. 27 The GPS antenna in your pocket or turn ON the GolfLogix GPS unit 5 - 10 minutes prior to starting your round so that the system can locate satellites. Take your golf ball. Acquiring GPS Signals Press the Power button to turn it off during your round. ...The distances on again to correct the problem. Press Enter again to return to the shot distance screen. This must be done outdoors with a clear view of your last shot. Do not carry GolfLogix in the...
...button to go to the yardage screen. 27 The GPS antenna in your pocket or turn ON the GolfLogix GPS unit 5 - 10 minutes prior to starting your round so that the system can locate satellites. Take your golf ball. Acquiring GPS Signals Press the Power button to turn it off during your round. ...The distances on again to correct the problem. Press Enter again to return to the shot distance screen. This must be done outdoors with a clear view of your last shot. Do not carry GolfLogix in the...

User Guide
Page 29
... to turn ON the GolfLogix GPS unit 5 - 10 minutes prior to starting your round so that the AA batteries in the unit have adequate power. Before using GolfLogix ensure that the system can manually advance to any hole on the course by pressing the Up/Down Arrow buttons on again to...your next round. 3. The GPS antenna in the battery compartment. At the bottom left of the unit. Do not carry GolfLogix in the battery icon is low, replace both AA batteries before your round. Do not store GolfLogix for 4-5 seconds. However, you will see the battery power level icon. If the ...
... to turn ON the GolfLogix GPS unit 5 - 10 minutes prior to starting your round so that the AA batteries in the unit have adequate power. Before using GolfLogix ensure that the system can manually advance to any hole on the course by pressing the Up/Down Arrow buttons on again to...your next round. 3. The GPS antenna in the battery compartment. At the bottom left of the unit. Do not carry GolfLogix in the battery icon is low, replace both AA batteries before your round. Do not store GolfLogix for 4-5 seconds. However, you will see the battery power level icon. If the ...


