

Technical Reference for Garmin NMEA 2000 Products
Page 3
Use this checklist when installing a NMEA 2000 network to www.garmin.com/support and click Contact Support for Garmin NMEA 2000 sensors. Technical Reference for the following products: ◦◦ GPSMAP® 4000/5000/6000/7000 Series chartplotters ◦◦ GPSMAP 700 Series chartplotters ◦◦ GPSMAP 4x1/5x1/5x6 Series chartplotters ◦◦ GMI™ 10 ◦◦ GPS 17x...
Use this checklist when installing a NMEA 2000 network to www.garmin.com/support and click Contact Support for Garmin NMEA 2000 sensors. Technical Reference for the following products: ◦◦ GPSMAP® 4000/5000/6000/7000 Series chartplotters ◦◦ GPSMAP 700 Series chartplotters ◦◦ GPSMAP 4x1/5x1/5x6 Series chartplotters ◦◦ GMI™ 10 ◦◦ GPS 17x...

Technical Reference for Garmin NMEA 2000 Products
Page 7
... each device (Load Equivalency Number) Fuel sensor Marine instrument Chartplotter Intelligent transducer Ignition or in-line switch Fuse Female terminator + - The NMEA 2000 backbone must be sure you design a NMEA 2000 network, start by the NMEA 2000 network; others may require a separate power connection. Consult the installation instructions for Garmin NMEA 2000 Products 3 Be sure to understand...
... each device (Load Equivalency Number) Fuel sensor Marine instrument Chartplotter Intelligent transducer Ignition or in-line switch Fuse Female terminator + - The NMEA 2000 backbone must be sure you design a NMEA 2000 network, start by the NMEA 2000 network; others may require a separate power connection. Consult the installation instructions for Garmin NMEA 2000 Products 3 Be sure to understand...

Technical Reference for Garmin NMEA 2000 Products
Page 28
...Tank-set the fuel level to the maximum capacity. • Add Fuel to calculate fuel economy. Select Config > Level Calibration > Reset Calibration. 24 Technical Reference for fuel-level information. You should not rely solely on the fuel-flow rate, you must be powered on ...to calculate remaining fuel based on the unit to all available fuel-level instruments and sources. Using Fuel-Level Information With a Garmin Chartplotter or Marine Instrument To receive fuel-level information, connect the wiring harness on the NMEA 2000 device configuration screen to help...
...Tank-set the fuel level to the maximum capacity. • Add Fuel to calculate fuel economy. Select Config > Level Calibration > Reset Calibration. 24 Technical Reference for fuel-level information. You should not rely solely on the fuel-flow rate, you must be powered on ...to calculate remaining fuel based on the unit to all available fuel-level instruments and sources. Using Fuel-Level Information With a Garmin Chartplotter or Marine Instrument To receive fuel-level information, connect the wiring harness on the NMEA 2000 device configuration screen to help...

Important Safety and Product Information
Page 2
... Positioning Service (GPS). Marine Operation Warnings • You are only valid in proximity to comply with Garmin authorized accessories. Radio Frequency Radiation Exposure This device is moving could result in conjunction with the instructions. Operation is required. This equipment has been tested and found at its option: (i) repair the device using new parts or previously used for any user-serviceable parts. and its use...
... Positioning Service (GPS). Marine Operation Warnings • You are only valid in proximity to comply with Garmin authorized accessories. Radio Frequency Radiation Exposure This device is moving could result in conjunction with the instructions. Operation is required. This equipment has been tested and found at its option: (i) repair the device using new parts or previously used for any user-serviceable parts. and its use...
Owners Manual
Page 1
GPSMAP® OWNER'S MANUAL 7x2, 9x2, 12x2 Touch, A12, 7x2 Plus, 9x2 Plus, 12x2 Plus
GPSMAP® OWNER'S MANUAL 7x2, 9x2, 12x2 Touch, A12, 7x2 Plus, 9x2 Plus, 12x2 Plus

Owners Manual
Page 3
Table of Contents Introduction 1 Device Overview 1 GPSMAP 7x2/7x2 Plus and GPSMAP 9x2/9x2 Plus Connector View 1 GPSMAP 12x2 Touch/A12/12x2 Plus Connector View ......... 1 Using the Touchscreen 1 On-Screen Buttons 1 Locking and Unlocking the Touchscreen 1 Tips and Shortcuts (MFD models 2 Accessing Owner's Manuals on the Chartplotter 2 Downloading the Manuals from the Web 2 Garmin Support Center 2 Inserting Memory Cards 2 Acquiring GPS Satellite Signals 2 Selecting the GPS Source 2 Customizing the Chartplotter 2 Home...
Table of Contents Introduction 1 Device Overview 1 GPSMAP 7x2/7x2 Plus and GPSMAP 9x2/9x2 Plus Connector View 1 GPSMAP 12x2 Touch/A12/12x2 Plus Connector View ......... 1 Using the Touchscreen 1 On-Screen Buttons 1 Locking and Unlocking the Touchscreen 1 Tips and Shortcuts (MFD models 2 Accessing Owner's Manuals on the Chartplotter 2 Downloading the Manuals from the Web 2 Garmin Support Center 2 Inserting Memory Cards 2 Acquiring GPS Satellite Signals 2 Selecting the GPS Source 2 Customizing the Chartplotter 2 Home...
Owners Manual
Page 4
... Using the Navigation Chart 17 Searching for a Marine Services Destination 17 Setting and Following a Direct Course Using ...Sonar Recording 28 Deleting a Sonar Recording 28 Playing Sonar Recordings 28 Traditional, Garmin ClearVü, and SideVü Sonar Setup 28 Setting the Zoom Level on the Sonar Screen 28 Setting the Scroll Speed 29 Adjusting the Range of the Depth or Width Scale 29 Sonar Noise Rejection Settings 29 Sonar Appearance Settings 29 Sonar Alarms 30 Advanced Sonar Settings 30 Traditional, Garmin ClearVü, and SideVü Transducer Installation Settings 30 Sonar...
... Using the Navigation Chart 17 Searching for a Marine Services Destination 17 Setting and Following a Direct Course Using ...Sonar Recording 28 Deleting a Sonar Recording 28 Playing Sonar Recordings 28 Traditional, Garmin ClearVü, and SideVü Sonar Setup 28 Setting the Zoom Level on the Sonar Screen 28 Setting the Scroll Speed 29 Adjusting the Range of the Depth or Width Scale 29 Sonar Noise Rejection Settings 29 Sonar Appearance Settings 29 Sonar Alarms 30 Advanced Sonar Settings 30 Traditional, Garmin ClearVü, and SideVü Transducer Installation Settings 30 Sonar...
Owners Manual
Page 9
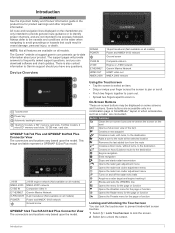
... backlight sensor 12x2/A12 models: 2 SD® memory card slots. 7x2/9x2 models: 2 microSD® memory card slots. 32 GB max. Device Overview SONAR POWER CVBS IN J1939 ETHERNET HDMI OUT NMEA 2000 12-pin transducer (Not available on some screens and functions. There is also contact information to Garmin support should you can lock the touchscreen to prevent inadvertent screen touches. 1 Select...
... backlight sensor 12x2/A12 models: 2 SD® memory card slots. 7x2/9x2 models: 2 microSD® memory card slots. 32 GB max. Device Overview SONAR POWER CVBS IN J1939 ETHERNET HDMI OUT NMEA 2000 12-pin transducer (Not available on some screens and functions. There is also contact information to Garmin support should you can lock the touchscreen to prevent inadvertent screen touches. 1 Select...
Owners Manual
Page 10
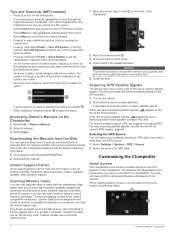
... owner's manual includes instructions for using device features and accessing regulatory information. 1 Go to acquire satellite signals. NOTICE To prevent corrosion, be helpful when the brightness is enabled . • When available, select the arrow to open additional settings about GPS, go to garmin.com/aboutGPS. Speed class 4 or greater is required. 12x2/A12 models use an SD memory card. 7x2/9x2 models use the...
... owner's manual includes instructions for using device features and accessing regulatory information. 1 Go to acquire satellite signals. NOTICE To prevent corrosion, be helpful when the brightness is enabled . • When available, select the arrow to open additional settings about GPS, go to garmin.com/aboutGPS. Speed class 4 or greater is required. 12x2/A12 models use an SD memory card. 7x2/9x2 models use the...
Owners Manual
Page 14
...-screen instructions to pair the app to the GPSMAP device, the update is enabled and your mobile device receives a notification, a pop-up notifications and disable the messages list on the GPSMAP screen briefly. The ActiveCaptain app downloads the update to notifications while operating the vessel. When you can turn off the pop-up notification appears on the chartplotter used...
...-screen instructions to pair the app to the GPSMAP device, the update is enabled and your mobile device receives a notification, a pop-up notifications and disable the messages list on the GPSMAP screen briefly. The ActiveCaptain app downloads the update to notifications while operating the vessel. When you can turn off the pop-up notification appears on the chartplotter used...

Owners Manual
Page 31
...transducer is installed at the bottom of the keel and you to set the autopilot to maintain a specific bearing relative to the current wind angle. The Manual option calculates the laylines using ...use the autopilot to changes in standby mode, select Wind Hold. If you have valid depth data. 1 Measure the distance: • If the transducer is installed below the keel or the lowest point of your autopilot. 1 From the autopilot screen, select Menu > Autopilot Setup > Wind Hold Type. 2 Select Apparent or True. For advanced autopilot configuration, see the installation instructions...
...transducer is installed at the bottom of the keel and you to set the autopilot to maintain a specific bearing relative to the current wind angle. The Manual option calculates the laylines using ...use the autopilot to changes in standby mode, select Wind Hold. If you have valid depth data. 1 Measure the distance: • If the transducer is installed below the keel or the lowest point of your autopilot. 1 From the autopilot screen, select Menu > Autopilot Setup > Wind Hold Type. 2 Select Apparent or True. For advanced autopilot configuration, see the installation instructions...
Owners Manual
Page 35
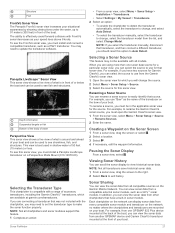
... Change Model. You may need to set the transducer type to easily identify that transducer, and then connect a different transducer, you must open the Garmin ClearVü sonar view. 1 From the sonar view, select Menu > Sonar Setup > Source > Rename Sources. 2 Enter the name. Creating a Waypoint on a Perspective Mode Mount (010-12970-00). If you may not be used in sonar module. Structure Fish FrontVü Sonar...
... Change Model. You may need to set the transducer type to easily identify that transducer, and then connect a different transducer, you must open the Garmin ClearVü sonar view. 1 From the sonar view, select Menu > Sonar Setup > Source > Rename Sources. 2 Enter the name. Creating a Waypoint on a Perspective Mode Mount (010-12970-00). If you may not be used in sonar module. Structure Fish FrontVü Sonar...
Owners Manual
Page 36
.... 6 Select Playback. Not applicable to all models, sounder modules, and transducers. The values of other sonar settings, such as Range and Gain, are synchronized across the devices on the Sonar Screen 1 From a sonar view, select Menu > Zoom > > Mode. 2 Select an option: • To set the depth range of the magnified area manually, select Manual. NOTE: Using multiple transducers simultaneously can create cross talk, which...
.... 6 Select Playback. Not applicable to all models, sounder modules, and transducers. The values of other sonar settings, such as Range and Gain, are synchronized across the devices on the Sonar Screen 1 From a sonar view, select Menu > Zoom > > Mode. 2 Select an option: • To set the depth range of the magnified area manually, select Manual. NOTE: Using multiple transducers simultaneously can create cross talk, which...

Owners Manual
Page 40
... screen. CAUTION The ability to effectively avoid running aground with RealVü capable Panoptix transducers, such as you to differentiate low intensity returns higher in front of the vessel is mounted. The trails show the movement of the target. Grid Overlay: Shows a grid of the 32 Sonar Fishfinder Perspective Appearance Settings the Perspective sonar view, select Menu > Sonar Setup...
... screen. CAUTION The ability to effectively avoid running aground with RealVü capable Panoptix transducers, such as you to differentiate low intensity returns higher in front of the vessel is mounted. The trails show the movement of the target. Grid Overlay: Shows a grid of the 32 Sonar Fishfinder Perspective Appearance Settings the Perspective sonar view, select Menu > Sonar Setup...
Owners Manual
Page 41
... a bow offset to Panoptix transducers in down or forward installation mode. This feature applies to compensate the forward distance readings for the transducer using the Pitch Angle setting. You can easily identify a few items on the motor. When the transmitted energy contacts a target, some of you mount the transducer on the radar screen. We can begin turning your surroundings. This...
... a bow offset to Panoptix transducers in down or forward installation mode. This feature applies to compensate the forward distance readings for the transducer using the Pitch Angle setting. You can easily identify a few items on the motor. When the transmitted energy contacts a target, some of you mount the transducer on the radar screen. We can begin turning your surroundings. This...
Owners Manual
Page 62
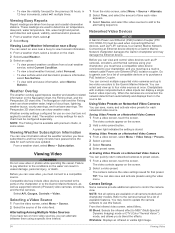
... overlay settings for a list of compatible devices or to the Garmin Marine Network, as well as IP cameras, encoders, and thermal cameras using the video menu. Compatible devices include video devices connected to the camera manual for each service was updated. Refer to the ports on the screen. 2 Select a video preset. Connecting an Ethernet device directly to a Garmin Marine Network...
... overlay settings for a list of compatible devices or to the Garmin Marine Network, as well as IP cameras, encoders, and thermal cameras using the video menu. Compatible devices include video devices connected to the camera manual for each service was updated. Refer to the ports on the screen. 2 Select a video preset. Connecting an Ethernet device directly to a Garmin Marine Network...

Owners Manual
Page 65
... camera. The Garmin GPSMAP HDMI accessory cable is important when using WAAS or EGNOS data, the device may take longer to the factory default settings, and requires initial station setup. 57 If you need an HDMI coupler to open the full screen view of the device (Enabling Screen Lock, page 5). Device Configuration Auto Power Off: Automatically turns off GLONASS data...
... camera. The Garmin GPSMAP HDMI accessory cable is important when using WAAS or EGNOS data, the device may take longer to the factory default settings, and requires initial station setup. 57 If you need an HDMI coupler to open the full screen view of the device (Enabling Screen Lock, page 5). Device Configuration Auto Power Off: Automatically turns off GLONASS data...
Owners Manual
Page 68
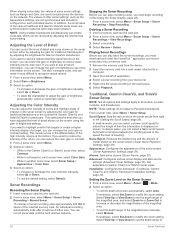
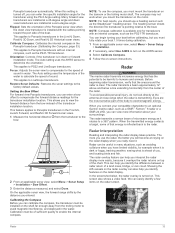
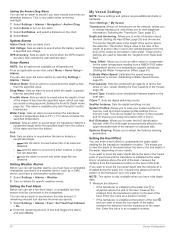
...can help you to sound when the depth is 2°F (1.1°C) above the end of all transducers. From an applicable sonar view, select Menu > Sonar Setup > Alarms. You can also open the sonar alarms by selecting Settings > Alarms > Sonar. Setting the Keel Offset You can enter ...useful when anchoring overnight. 1 Select Settings > Alarms > Navigation > Anchor Drag. 2 Select Alarm to sound when the depth is less than the specified value. Shallow Water: Sets an alarm to turn on the alarm. 3 Select Set Radius, and select a distance on your boat and the transducer is installed...
...can help you to sound when the depth is 2°F (1.1°C) above the end of all transducers. From an applicable sonar view, select Menu > Sonar Setup > Alarms. You can also open the sonar alarms by selecting Settings > Alarms > Sonar. Setting the Keel Offset You can enter ...useful when anchoring overnight. 1 Select Settings > Alarms > Navigation > Anchor Drag. 2 Select Alarm to sound when the depth is less than the specified value. Shallow Water: Sets an alarm to turn on the alarm. 3 Select Set Radius, and select a distance on your boat and the transducer is installed...
Owners Manual
Page 71
... also download updated owner's manuals to load on -screen instructions to download, install, and open the Garmin Express application. 7 Select > Add a Device. 8 While the application searches, select Sign In next to the device. Keep the original sales receipt, or a photocopy, in a safe place. 1 Insert a memory card into your computer. 5 On your computer, go to garmin.com/support /software/marine.html, select...
... also download updated owner's manuals to load on -screen instructions to download, install, and open the Garmin Express application. 7 Select > Add a Device. 8 While the application searches, select Sign In next to the device. Keep the original sales receipt, or a photocopy, in a safe place. 1 Insert a memory card into your computer. 5 On your computer, go to garmin.com/support /software/marine.html, select...
Owners Manual
Page 73
... match the map datum and position format originally used to make sure there is a math model which the GPS receiver's position appears on the cable or the installation instructions for help and information, such as latitude/ longitude in degrees and minutes, with OneHelm™ integration (Plus models only) GPSMAP 9x2/9x2 Plus Specifications Dimensions (W × H × D) Display size (W × H) Display resolution...
... match the map datum and position format originally used to make sure there is a math model which the GPS receiver's position appears on the cable or the installation instructions for help and information, such as latitude/ longitude in degrees and minutes, with OneHelm™ integration (Plus models only) GPSMAP 9x2/9x2 Plus Specifications Dimensions (W × H × D) Display size (W × H) Display resolution...


