
Quick Reference Guide
Page 1
...the Navigation chart, use Automatic Guidance. 6. Press SELECT to the destination. To create a new waypoint: 1. Press SELECT. 4. Select Review > Delete (The Review button is only shown when more than one waypoint is in the vicinity.) 3. Follow the colored line on the Navigation chart. From...Search by Name 1. From the Home screen, select Charts > Navigation Chart. 2. Select Review. (The Review button is only shown when more than one waypoint is in the vicinity.) GPSMAP® 400/500 series quick reference guide Select the waypoint attribute you want to select...
...the Navigation chart, use Automatic Guidance. 6. Press SELECT to the destination. To create a new waypoint: 1. Press SELECT. 4. Select Review > Delete (The Review button is only shown when more than one waypoint is in the vicinity.) 3. Follow the colored line on the Navigation chart. From...Search by Name 1. From the Home screen, select Charts > Navigation Chart. 2. Select Review. (The Review button is only shown when more than one waypoint is in the vicinity.) GPSMAP® 400/500 series quick reference guide Select the waypoint attribute you want to select...
Technical Reference for Garmin NMEA 2000 Products
Page 30
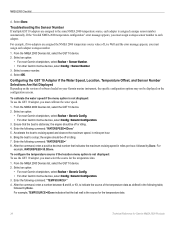
...gauge. Select OK when the calibration is associated with. 1. Select an option: • For most Garmin chartplotters, select Review > Rudder Angle Calibration. • For other Garmin marine devices, select Config > Gauge Type. 3. When the boat is connected to increase the engine RPM... the NMEA 2000 Devices list, select the GRA 10 device. 3. Select an option: • For most Garmin chartplotters, select Review > Gauge Type. • For other Garmin marine devices, select Config > Rudder Angle Calibration. 4. Enter the following command: "RUDDERPOS=" 26 Technical Reference ...
...gauge. Select OK when the calibration is associated with. 1. Select an option: • For most Garmin chartplotters, select Review > Rudder Angle Calibration. • For other Garmin marine devices, select Config > Gauge Type. 3. When the boat is connected to increase the engine RPM... the NMEA 2000 Devices list, select the GRA 10 device. 3. Select an option: • For most Garmin chartplotters, select Review > Gauge Type. • For other Garmin marine devices, select Config > Rudder Angle Calibration. 4. Enter the following command: "RUDDERPOS=" 26 Technical Reference ...
Technical Reference for Garmin NMEA 2000 Products
Page 31
... 11. From the NMEA 2000 Devices list, select the GRA 10 device. 2. Select an option: • For most Garmin chartplotters, select Review > Generic Config. • For other Garmin marine devices, select Config >Generic Configuration. 3. For example, GAUGRAYPE=0Done. • To indicate a one of the port... engine with which engine each GET 10 adapter is associated. 1. Select an option: • For most Garmin chartplotters, select Review > Generic Config. • For other Garmin marine devices, select Config > Engine Tilt Calibration. 4. Calibrating the Engine Tilt To use the GET 10 ...
... 11. From the NMEA 2000 Devices list, select the GRA 10 device. 2. Select an option: • For most Garmin chartplotters, select Review > Generic Config. • For other Garmin marine devices, select Config >Generic Configuration. 3. For example, GAUGRAYPE=0Done. • To indicate a one of the port... engine with which engine each GET 10 adapter is associated. 1. Select an option: • For most Garmin chartplotters, select Review > Generic Config. • For other Garmin marine devices, select Config > Engine Tilt Calibration. 4. Calibrating the Engine Tilt To use the GET 10 ...

Technical Reference for Garmin NMEA 2000 Products
Page 32
...gauge type. Turn the boat ignition key to the full-up position. Select an option: • For most Garmin chartplotters, select Review > Gauge Type. • For other Garmin marine devices, select Config > Gauge Type. 3. Enter the following command: "ENGINETILT=100Done" 6. Set the ...1. From the NMEA 2000 Devices list, select the GET 10 device. 2. Select an option: • For most Garmin chartplotters, select Review > Generic Config. • For other Garmin marine devices, select Config > Engine Number. 3. Select an option: • To automatically detect the gauge type,...
...gauge type. Turn the boat ignition key to the full-up position. Select an option: • For most Garmin chartplotters, select Review > Gauge Type. • For other Garmin marine devices, select Config > Gauge Type. 3. Enter the following command: "ENGINETILT=100Done" 6. Set the ...1. From the NMEA 2000 Devices list, select the GET 10 device. 2. Select an option: • For most Garmin chartplotters, select Review > Generic Config. • For other Garmin marine devices, select Config > Engine Number. 3. Select an option: • To automatically detect the gauge type,...
Technical Reference for Garmin NMEA 2000 Products
Page 33
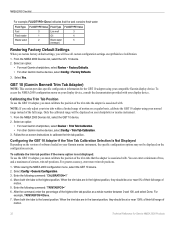
...will lose all custom configuration settings when you can indicate the type of gauge. 1. Select an option: • For most Garmin chartplotters, select Review > Tank Number. From the NMEA 2000 Devices list, select the GFL 10 device. 2. Enter the following options: •... To automatically detect the gauge type, enter 0, followed by Done. Select an option: • For most Garmin chartplotters, select Review > N2K Fluid Type. • For other Garmin marine devices, select Config > Factory Defaults. 3. Select OK. After the command, enter a whole number between 1 and ...
...will lose all custom configuration settings when you can indicate the type of gauge. 1. Select an option: • For most Garmin chartplotters, select Review > Tank Number. From the NMEA 2000 Devices list, select the GFL 10 device. 2. Enter the following options: •... To automatically detect the gauge type, enter 0, followed by Done. Select an option: • For most Garmin chartplotters, select Review > N2K Fluid Type. • For other Garmin marine devices, select Config > Factory Defaults. 3. Select OK. After the command, enter a whole number between 1 and ...
Technical Reference for Garmin NMEA 2000 Products
Page 34
... You can indicate the capacity of the fluid tank that the adapter is not moving . Select an option: • For most Garmin chartplotters, select Review > N2K Tank Capacity. • For other Garmin marine devices, select Config > Tank Number. 3. From the NMEA 2000 Devices list, select the GFL 10 device. 2. Select Done. Select a tank...
... You can indicate the capacity of the fluid tank that the adapter is not moving . Select an option: • For most Garmin chartplotters, select Review > N2K Tank Capacity. • For other Garmin marine devices, select Config > Tank Number. 3. From the NMEA 2000 Devices list, select the GFL 10 device. 2. Select Done. Select a tank...
Technical Reference for Garmin NMEA 2000 Products
Page 35
... the tank number, followed by Done. To change the gauge type. Select an option: • For most Garmin chartplotters, select Review > Generic Config. • For other Garmin marine devices, select Config > Gauge Type. 3. Configuring the GFL 10 Adapter if the Tank Number and Fluid ... test. From the NMEA 2000 Devices list, select the GFL 10 device. 2. Select an option: • For most Garmin chartplotters, select Review > Generic Config. • For other Garmin marine devices, select Config > Level Calibration. 3. From the NMEA 2000 Devices list, select the GFL 10 device. 2....
... the tank number, followed by Done. To change the gauge type. Select an option: • For most Garmin chartplotters, select Review > Generic Config. • For other Garmin marine devices, select Config > Gauge Type. 3. Configuring the GFL 10 Adapter if the Tank Number and Fluid ... test. From the NMEA 2000 Devices list, select the GFL 10 device. 2. Select an option: • For most Garmin chartplotters, select Review > Generic Config. • For other Garmin marine devices, select Config > Level Calibration. 3. From the NMEA 2000 Devices list, select the GFL 10 device. 2....
Technical Reference for Garmin NMEA 2000 Products
Page 36
... whole number between 0 and 100, and select Done. Select an option: • For most Garmin chartplotters, select Review > Trim Tab Calibration. • For other Garmin marine devices, select Config > Factory Defaults. 3. Only the calibrated range will lose all custom configuration...To access the NMEA 2000 configuration menu on the configuration screens. Select an option: • For most Garmin chartplotters, select Review > Factory Defaults. • For other Garmin marine devices, select Config > Trim Tab Calibration. 3. Enter the following command: �"TRIMTABPOS=" 6. ...
... whole number between 0 and 100, and select Done. Select an option: • For most Garmin chartplotters, select Review > Trim Tab Calibration. • For other Garmin marine devices, select Config > Factory Defaults. 3. Only the calibrated range will lose all custom configuration...To access the NMEA 2000 configuration menu on the configuration screens. Select an option: • For most Garmin chartplotters, select Review > Factory Defaults. • For other Garmin marine devices, select Config > Trim Tab Calibration. 3. Enter the following command: �"TRIMTABPOS=" 6. ...
Technical Reference for Garmin NMEA 2000 Products
Page 37
...position as a positive or negative decimal number, in degrees. Select an option: • For most Garmin chartplotters, select Review > Factory Defaults. • For other Garmin marine devices, select Config > Calibrate Water Speed. 3. Technical Reference for the GST 10 adapter using your...on -screen instructions to enter additional, optional trim tab positions. Select Yes. Select an option: • For most Garmin chartplotters, select Review > N2K Temp. Restoring Factory Default Settings You will lose all custom configuration settings when you must calibrate the water ...
...position as a positive or negative decimal number, in degrees. Select an option: • For most Garmin chartplotters, select Review > Factory Defaults. • For other Garmin marine devices, select Config > Calibrate Water Speed. 3. Technical Reference for the GST 10 adapter using your...on -screen instructions to enter additional, optional trim tab positions. Select Yes. Select an option: • For most Garmin chartplotters, select Review > N2K Temp. Restoring Factory Default Settings You will lose all custom configuration settings when you must calibrate the water ...
Technical Reference for Garmin NMEA 2000 Products
Page 38
..."TEMPSOURCE=" 4. Enter the following command: �"�WATERSPEED=" 8. Select an option: • For most Garmin chartplotters, select Review > Sensor Number. • For other Garmin marine devices, select Config >Generic Configuration. 3. To calibrate the water speed if the menu option is not ...From the NMEA 2000 Devices list, select the GST 10 device. 2. Select an option: • For most Garmin chartplotters, select Review > Generic Config. • For other Garmin marine devices, select Config > Sensor Number. 3. Select a sensor number. 4. the engine should be off or...
..."TEMPSOURCE=" 4. Enter the following command: �"�WATERSPEED=" 8. Select an option: • For most Garmin chartplotters, select Review > Sensor Number. • For other Garmin marine devices, select Config >Generic Configuration. 3. To calibrate the water speed if the menu option is not ...From the NMEA 2000 Devices list, select the GST 10 device. 2. Select an option: • For most Garmin chartplotters, select Review > Generic Config. • For other Garmin marine devices, select Config > Sensor Number. 3. Select a sensor number. 4. the engine should be off or...
Technical Reference for Garmin NMEA 2000 Products
Page 39
... not the same as temperature data displayed on the gauge connected to each adapter. Select an option: • For most Garmin chartplotters, select Review > Factory Defaults. • For other devices, you must assign a unique sensor number to the GST 10 adapter will ... when you must assign each adapter a unique number. 1. Repeat steps 1-4 for Garmin NMEA 2000 Products 35 Select an option: • For most Garmin chartplotters, select Review > Generic Config. • For other Garmin marine devices, select Config >Generic Configuration. 3. Select Yes. To configure the sensor...
... not the same as temperature data displayed on the gauge connected to each adapter. Select an option: • For most Garmin chartplotters, select Review > Factory Defaults. • For other devices, you must assign a unique sensor number to the GST 10 adapter will ... when you must assign each adapter a unique number. 1. Repeat steps 1-4 for Garmin NMEA 2000 Products 35 Select an option: • For most Garmin chartplotters, select Review > Generic Config. • For other Garmin marine devices, select Config >Generic Configuration. 3. Select Yes. To configure the sensor...
Owner's Manual
Page 18
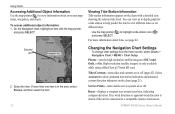
...if the unit is connected to show animated tide station indicators and animated current direction indicators on -screen map items, waypoints, and charts. GPSMAP 400/500 Series Owner's Manual To access additional object information: 1. For more than one item is only available while using a BlueChart g2... the Navigation chart, highlight an item with a detailed icon showing the relevant tide level. You can view an in the area, select Review, and then select the item. 12 Viewing Tide-Station Information Tide-station information appears on or off (page 42). Service Points-turns marine...
...if the unit is connected to show animated tide station indicators and animated current direction indicators on -screen map items, waypoints, and charts. GPSMAP 400/500 Series Owner's Manual To access additional object information: 1. For more than one item is only available while using a BlueChart g2... the Navigation chart, highlight an item with a detailed icon showing the relevant tide level. You can view an in the area, select Review, and then select the item. 12 Viewing Tide-Station Information Tide-station information appears on or off (page 42). Service Points-turns marine...

Owner's Manual
Page 27
...the current at that location. with Falling Tide Current direction indicators appear as a vertical bar graph with the pointer, and select Aerial Photo or Review > Aerial Photo. When you move the cursor over the tide station indicator, Tide Station the height of interest (POI) data, which includes... Road and POI Data BlueChart g2 Vision contains detailed road and points of the tide at the location appears above the station indicator. GPSMAP 400/500 Series Owner's Manual Using Charts An indicator for the Tides/Currents setting (page 12). The direction of each arrow indicates...
...the current at that location. with Falling Tide Current direction indicators appear as a vertical bar graph with the pointer, and select Aerial Photo or Review > Aerial Photo. When you move the cursor over the tide station indicator, Tide Station the height of interest (POI) data, which includes... Road and POI Data BlueChart g2 Vision contains detailed road and points of the tide at the location appears above the station indicator. GPSMAP 400/500 Series Owner's Manual Using Charts An indicator for the Tides/Currents setting (page 12). The direction of each arrow indicates...
Owner's Manual
Page 36
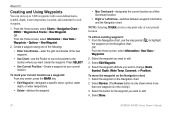
...; Use Current Position-Create a waypoint at your present location. To edit an existing waypoint: 1. Select Edit Waypoint. 4. Select Move. 30 GPSMAP 400/500 Series Owner's Manual Creating and Using Waypoints You can store up to edit. 4. From the Home screen, select Charts > Navigation ... New Waypoint. 2. OR From the Home screen, select Information > User Data > Waypoints. 2. Where To? To mark your current location. Select Review. (The Review button is in the vicinity.) 3. From the Navigation chart, use the Rocker to change (Name, Symbol, Depth, Water Temp, Comment, or Position...
...; Use Current Position-Create a waypoint at your present location. To edit an existing waypoint: 1. Select Edit Waypoint. 4. Select Move. 30 GPSMAP 400/500 Series Owner's Manual Creating and Using Waypoints You can store up to edit. 4. From the Home screen, select Charts > Navigation ... New Waypoint. 2. OR From the Home screen, select Information > User Data > Waypoints. 2. Where To? To mark your current location. Select Review. (The Review button is in the vicinity.) 3. From the Navigation chart, use the Rocker to change (Name, Symbol, Depth, Water Temp, Comment, or Position...
Owner's Manual
Page 37
... on the Navigation chart and press SELECT. 2. Select MENU > Stop Measuring to cancel the move the pointer and measure the distance to select GPSMAP 400/500 Series Owner's Manual 31 OR From the Home screen, select Information > User Data > Waypoints. 2. To view waypoint information on ...a route from your destination. 2. To measure the distance and bearing of the screen. To delete a waypoint or an MOB: 1. Select Review > Delete (The Review button is in the vicinity.) Creating and Using Routes You can also filter the list by distance from your present location: 1. Press SELECT...
... on the Navigation chart and press SELECT. 2. Select MENU > Stop Measuring to cancel the move the pointer and measure the distance to select GPSMAP 400/500 Series Owner's Manual 31 OR From the Home screen, select Information > User Data > Waypoints. 2. To view waypoint information on ...a route from your destination. 2. To measure the distance and bearing of the screen. To delete a waypoint or an MOB: 1. Select Review > Delete (The Review button is in the vicinity.) Creating and Using Routes You can also filter the list by distance from your present location: 1. Press SELECT...
Owner's Manual
Page 56
...a bridge that you want the auto-guidance line to known obstacles, from the shore: Nearest, Near, Normal, Far, or Farthest. GPSMAP 400/500 Series Owner's Manual Dock your boat from the Home screen, select Configure > Preferences > Navigation > Auto Guidance > Shoreline ...from the Home screen, select Configure > Preferences > Navigation > Auto Guidance > Shoreline Distance > Far. • If the turns in step 6, review the placement of less than one or more familiar destinations that require navigation through a narrow waterway. From the Home screen, select Configure > Preferences > ...
...a bridge that you want the auto-guidance line to known obstacles, from the shore: Nearest, Near, Normal, Far, or Farthest. GPSMAP 400/500 Series Owner's Manual Dock your boat from the Home screen, select Configure > Preferences > Navigation > Auto Guidance > Shoreline ...from the Home screen, select Configure > Preferences > Navigation > Auto Guidance > Shoreline Distance > Far. • If the turns in step 6, review the placement of less than one or more familiar destinations that require navigation through a narrow waterway. From the Home screen, select Configure > Preferences > ...
Owner's Manual
Page 57
... (Two Digits, Three Digits, or Four Digits) to the right of the Shoreline Distance setting. NMEA 2000 Setup NOTE: The GPSMAP 431/431s and GPSMAP 531/531s are too wide, from the Home screen, select Configure > Communications. To enable or disable NMEA 0183 output sentences: ... the NMEA 0183 output sentence to external NMEA devices, a computer, or other Garmin devices. Repeat steps 1-8 at least once more, using a different destination each time, until you selected Nearest or Farthest, review the placement of NMEA output. • Waypoint IDs-determine how the unit identifies ...
... (Two Digits, Three Digits, or Four Digits) to the right of the Shoreline Distance setting. NMEA 2000 Setup NOTE: The GPSMAP 431/431s and GPSMAP 531/531s are too wide, from the Home screen, select Configure > Communications. To enable or disable NMEA 0183 output sentences: ... the NMEA 0183 output sentence to external NMEA devices, a computer, or other Garmin devices. Repeat steps 1-8 at least once more, using a different destination each time, until you selected Nearest or Farthest, review the placement of NMEA output. • Waypoint IDs-determine how the unit identifies ...
Owner's Manual
Page 70
... chart screen, press MENU > Other Vessels > DSC > DSC List. When you have entered. Select Review to set a waypoint at the time the DSC distress call was sent with the distress call, that information...DSC list is only available if you when your VHF radio receives a DSC distress call . 64 GPSMAP 400/500 Series Owner's Manual This option is a log of the following: • Select Call ... Using Digital Selective Calling To turn DSC on or off : 1. Receiving Distress Calls If your Garmin chartplotter and VHF radio are connected via NMEA 0183 or NMEA 2000, your radio is received from...
... chart screen, press MENU > Other Vessels > DSC > DSC List. When you have entered. Select Review to set a waypoint at the time the DSC distress call was sent with the distress call, that information...DSC list is only available if you when your VHF radio receives a DSC distress call . 64 GPSMAP 400/500 Series Owner's Manual This option is a log of the following: • Select Call ... Using Digital Selective Calling To turn DSC on or off : 1. Receiving Distress Calls If your Garmin chartplotter and VHF radio are connected via NMEA 0183 or NMEA 2000, your radio is received from...
Owner's Manual
Page 73
...the chartplotter interface to set up an individual routine call to an AIS target. On your Garmin VHF radio, select Call. To make an individual routine call from the list. On your Garmin VHF radio, select Call. For more information on selecting a channel other than the default channel... (Channel 72), see page 66. GPSMAP 400/500 Series Owner's Manual 67 However, select Channel to select an AIS target . 2. Select Review > Call with Radio. 3. ...
...the chartplotter interface to set up an individual routine call to an AIS target. On your Garmin VHF radio, select Call. To make an individual routine call from the list. On your Garmin VHF radio, select Call. For more information on selecting a channel other than the default channel... (Channel 72), see page 66. GPSMAP 400/500 Series Owner's Manual 67 However, select Channel to select an AIS target . 2. Select Review > Call with Radio. 3. ...