
Owner's Manual
Page 1
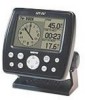
GPS 152 gps trackplotter owner's ZOOM manual and reference guide
GPS 152 gps trackplotter owner's ZOOM manual and reference guide
Owner's Manual
Page 3
...online registration today! This allows you to familiarize you to create an unsurpassed marine navigation system. If you to the GPS 152 and provides a Getting Started tour to concentrate on page iv of GARMIN GPS to register your new GARMIN unit, take the time to read this manual. ) NOTE: We ...to its fullest potential. To get the most out of your GARMIN product purchase using our NEW online system. Also, be sure to record your GPS 152 handy and connect to our web site (www.garmin.com). The GARMIN GPS 152 utilizes the proven performance of this owner's manual and learn ...
...online registration today! This allows you to familiarize you to create an unsurpassed marine navigation system. If you to the GPS 152 and provides a Getting Started tour to concentrate on page iv of GARMIN GPS to register your new GARMIN unit, take the time to read this manual. ) NOTE: We ...to its fullest potential. To get the most out of your GARMIN product purchase using our NEW online system. Also, be sure to record your GPS 152 handy and connect to our web site (www.garmin.com). The GARMIN GPS 152 utilizes the proven performance of this owner's manual and learn ...

Owner's Manual
Page 4
...Part 15 regulations. These limits are more stringent than "outdoor" requirements. The GPS 152 does not contain any interference received, including interference that may cause undesired operation. ii If this device must accept... any user-serviceable parts. Introduction FCC Compliance Statement FCC Compliance The GPS 152 complies with the instructions, may cause harmful interference to radio communications. This equipment generates, uses and can be made by an authorized GARMIN...
...Part 15 regulations. These limits are more stringent than "outdoor" requirements. The GPS 152 does not contain any interference received, including interference that may cause undesired operation. ii If this device must accept... any user-serviceable parts. Introduction FCC Compliance Statement FCC Compliance The GPS 152 complies with the instructions, may cause harmful interference to radio communications. This equipment generates, uses and can be made by an authorized GARMIN...
Owner's Manual
Page 5
... country in this product prudently. PLEASE READ THIS AGREEMENT CAREFULLY. Software License Agreement BY USING THE GPS 152, YOU AGREE TO BE BOUND BY THE TERMS AND CONDITIONS OF THE FOLLOWING SOFTWARE LICENSE AGREEMENT. Although the GARMIN GPS 152 is solely responsible for any NAVAID can be used only as a navigational aid and must not...
... country in this product prudently. PLEASE READ THIS AGREEMENT CAREFULLY. Software License Agreement BY USING THE GPS 152, YOU AGREE TO BE BOUND BY THE TERMS AND CONDITIONS OF THE FOLLOWING SOFTWARE LICENSE AGREEMENT. Although the GARMIN GPS 152 is solely responsible for any NAVAID can be used only as a navigational aid and must not...
Owner's Manual
Page 6
...or offer a full refund of this period, GARMIN will void your warranty and may not apply to any way will at no charge to the equipment. The unit should be sent, freight charges prepaid, to you. Serial Number: * * , The GPS 152 is required. This warranty does not cover ...failures due to keep your local GARMIN authorized dealer. Or call your original sales receipt in normal use. To obtain warranty service, an original or ...
...or offer a full refund of this period, GARMIN will void your warranty and may not apply to any way will at no charge to the equipment. The unit should be sent, freight charges prepaid, to you. Serial Number: * * , The GPS 152 is required. This warranty does not cover ...failures due to keep your local GARMIN authorized dealer. Or call your original sales receipt in normal use. To obtain warranty service, an original or ...
Owner's Manual
Page 7
... v Precision Performance • High-contrast, four-level gray, FSTN display with adjustable backlighting • 12-channel parallel receiver tracks and uses up to 1 Megabytes of WAAS (Wide Area Augmentation System) satellites to give you the navigation information you... positioning • Differential-Ready - receive signals from over 3000 tide stations around the U.S. just add an optional GARMIN beacon receiver for better than 5-meter accuracy • WAAS Capable - Designed for detailed electronic trackplotting capability, the GARMIN GPS 152 is a powerful device that can give...
... v Precision Performance • High-contrast, four-level gray, FSTN display with adjustable backlighting • 12-channel parallel receiver tracks and uses up to 1 Megabytes of WAAS (Wide Area Augmentation System) satellites to give you the navigation information you... positioning • Differential-Ready - receive signals from over 3000 tide stations around the U.S. just add an optional GARMIN beacon receiver for better than 5-meter accuracy • WAAS Capable - Designed for detailed electronic trackplotting capability, the GARMIN GPS 152 is a powerful device that can give...
Owner's Manual
Page 8
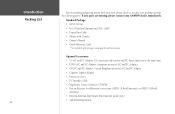
...vi Before installing and getting started with package containing the internal antenna. Standard Package: • GPS 152 Unit • GA 29 External Antenna and 30-ft. Optional Accessories: • US A/C...; Cigarette Lighter Adapter • Protective Cover • PC Interface Cable • MapSource Points of Interest CD-ROM • Beacon Receiver for differential corrections: GBR21 (E-Field Antenna), or GBR23 (H-Field Antenna) • Internal Antenna, Bail Mount (International model only) &#... following items. If any parts are missing, please contact your GARMIN dealer immediately.
...vi Before installing and getting started with package containing the internal antenna. Standard Package: • GPS 152 Unit • GA 29 External Antenna and 30-ft. Optional Accessories: • US A/C...; Cigarette Lighter Adapter • Protective Cover • PC Interface Cable • MapSource Points of Interest CD-ROM • Beacon Receiver for differential corrections: GBR21 (E-Field Antenna), or GBR23 (H-Field Antenna) • Internal Antenna, Bail Mount (International model only) &#... following items. If any parts are missing, please contact your GARMIN dealer immediately.
Owner's Manual
Page 9
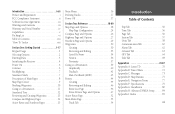
...Packing List vi Table of Contents viii "How To" Index viii Section One: Getting Started 1-17 Keypad Usage 1 Selecting Options 2 Entering Data 3 Initializing the Receiver 4 Power On 6 Contrast 6 Backlighting 7 Simulator Mode 7 Description of Main Pages 8 Map Page Cursor 9 Marking Waypoints 10 Going to a Destination 11 Simulated... Trip Tab 56 Time Tab 56 Page Tab 56 System Tab 57 Units Tab 58 Communication Tab 60 Alarm Tab 62 Celestial Tab 63 GPS Tab 64 Tide Tab 68 Appendices 70-87 Appendix A: Loran TD 70 Appendix B: Time Offsets 72 Appendix C: Messages 73 Appendix D:...
...Packing List vi Table of Contents viii "How To" Index viii Section One: Getting Started 1-17 Keypad Usage 1 Selecting Options 2 Entering Data 3 Initializing the Receiver 4 Power On 6 Contrast 6 Backlighting 7 Simulator Mode 7 Description of Main Pages 8 Map Page Cursor 9 Marking Waypoints 10 Going to a Destination 11 Simulated... Trip Tab 56 Time Tab 56 Page Tab 56 System Tab 57 Units Tab 58 Communication Tab 60 Alarm Tab 62 Celestial Tab 63 GPS Tab 64 Tide Tab 68 Appendices 70-87 Appendix A: Loran TD 70 Appendix B: Time Offsets 72 Appendix C: Messages 73 Appendix D:...
Owner's Manual
Page 10
... more important procedures you will use 4-5 Learn about the Map page 8-9, 18-26 Mark your new GPS 152. Introduction "How To" Index + The list to the right is provided to a destination 11-15, 39-43 Initialize the GPS receiver (first time use on your present location as a waypoint 10, 30-31 Operate the...
... more important procedures you will use 4-5 Learn about the Map page 8-9, 18-26 Mark your new GPS 152. Introduction "How To" Index + The list to the right is provided to a destination 11-15, 39-43 Initialize the GPS receiver (first time use on your present location as a waypoint 10, 30-31 Operate the...
Owner's Manual
Page 12
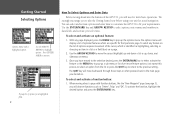
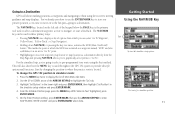
... to either activate the feature or the MENU key to fit your selections. You can select and activate options and enter data to customize the GPS 152 to pop-up , down a list or up a sub-menu or list of the cursor, which are specific for that particular page. Just... to activate. To select and activate a function button: 1. To select and activate an optional feature: 1. When moving ahead into the features of the GPS 152, you will move the cursor (highlight) up and down , and sideways on the list of options requires movement of yet more feature options. Press ENTER...
... to either activate the feature or the MENU key to fit your selections. You can select and activate options and enter data to customize the GPS 152 to pop-up , down a list or up a sub-menu or list of the cursor, which are specific for that particular page. Just... to activate. To select and activate a function button: 1. To select and activate an optional feature: 1. When moving ahead into the features of the GPS 152, you will move the cursor (highlight) up and down , and sideways on the list of options requires movement of yet more feature options. Press ENTER...
Owner's Manual
Page 14
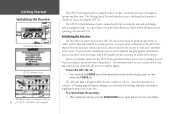
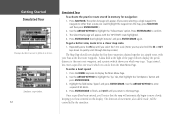
...itself" anywhere in a location with a clear and unobstructed view of navigation options and data entry. To speed up your new GPS 152, the receiver must be in the world. Press and hold the POWER key until you 're operating your vessel according to the keypad ...correctly installed on " lesson in Appendix G. Once the internal test is designed to allow the receiver to the next display. Getting Started Initializing the Receiver GPS 152 Self-Test Screen GPS 152 Warning Screen The Satellite Status screen displays until the power tone sounds and the display comes on...
...itself" anywhere in a location with a clear and unobstructed view of navigation options and data entry. To speed up your new GPS 152, the receiver must be in the world. Press and hold the POWER key until you 're operating your vessel according to the keypad ...correctly installed on " lesson in Appendix G. Once the internal test is designed to allow the receiver to the next display. Getting Started Initializing the Receiver GPS 152 Self-Test Screen GPS 152 Warning Screen The Satellite Status screen displays until the power tone sounds and the display comes on...
Owner's Manual
Page 15
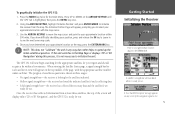
...to zoom in view will appear on the ARROW KEYPAD until the 'GPS' tab is highlighted, then press the MENU key once. 2. When viewing the Satellite Status page, a signal strength bar for each bar. the receiver is ready for the satellites indicated. • Hollow signal strength ... 200 miles. Once you to speed up the initial satellite acquisition. To graphically initialize the GPS 152: 1. The GPS 152 will display either "2D or 3D Navigation", and the GPS 152 is looking for use. the receiver has found the indicated satellite(s) and is lost. 5 Use the ARROW KEYPAD to move ...
...to zoom in view will appear on the ARROW KEYPAD until the 'GPS' tab is highlighted, then press the MENU key once. 2. When viewing the Satellite Status page, a signal strength bar for each bar. the receiver is ready for the satellites indicated. • Hollow signal strength ... 200 miles. Once you to speed up the initial satellite acquisition. To graphically initialize the GPS 152: 1. The GPS 152 will display either "2D or 3D Navigation", and the GPS 152 is looking for use. the receiver has found the indicated satellite(s) and is lost. 5 Use the ARROW KEYPAD to move ...
Owner's Manual
Page 16
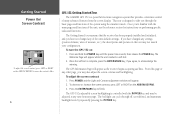
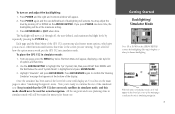
...To decrease or increase the screen contrast, press LEFT or RIGHT on : 1. The GPS Information Page will appear. 2. Press POWER and the Light and Contrast adjustment window will appear as the receiver begins acquiring satellites. The backlight can cycle through the basic pages and functions of many .../ Screen Contrast To adjust the screen contrast, press LEFT or RIGHT on the ARROW KEYPAD to move the contrast slider. 6 GPS 152 Getting Started Tour The GARMIN GPS 152 is complete, press the ENTER/MARK key, if you agree, to acknowledge the warning. This tour is controlled with the main...
...To decrease or increase the screen contrast, press LEFT or RIGHT on : 1. The GPS Information Page will appear. 2. Press POWER and the Light and Contrast adjustment window will appear as the receiver begins acquiring satellites. The backlight can cycle through the basic pages and functions of many .../ Screen Contrast To adjust the screen contrast, press LEFT or RIGHT on the ARROW KEYPAD to move the contrast slider. 6 GPS 152 Getting Started Tour The GARMIN GPS 152 is complete, press the ENTER/MARK key, if you agree, to acknowledge the warning. This tour is controlled with the main...
Owner's Manual
Page 17
...appears at the maximum setting. 3. Getting Started Backlighting/ Simulator Mode Press UP or DOWN on and adjust the backlighting: 1. To place the GPS 152 in simulator mode, and this level by repeatedly pressing the POWER key. Press POWER and the Light and Contrast window will now cycle through off...and maximum backlight levels by pressing UP or DOWN on the main pages to confirm the 'Running Simulator' message that the GPS 152 does not track satellites in simulator mode: 1. Press ENTER/MARK or QUIT when done. Press ENTER/MARK again to show "Simulating Navigation" status...
...appears at the maximum setting. 3. Getting Started Backlighting/ Simulator Mode Press UP or DOWN on and adjust the backlighting: 1. To place the GPS 152 in simulator mode, and this level by repeatedly pressing the POWER key. Press POWER and the Light and Contrast window will now cycle through off...and maximum backlight levels by pressing UP or DOWN on the main pages to confirm the 'Running Simulator' message that the GPS 152 does not track satellites in simulator mode: 1. Press ENTER/MARK or QUIT when done. Press ENTER/MARK again to show "Simulating Navigation" status...
Owner's Manual
Page 18
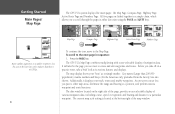
...waypoints and routes. Before you to a position, and perform various waypoint and route functions. City names (Larger than 200,000 population), marine markers and buoys (for the Americas only, preloaded from the factory) are linked together in either direction using the PAGE and QUIT keys....a simple chain, which allows you take off on the right side of the page, provides a user-selectable display of navigation data. The GPS 152's Map Page combines trackplotting with a user-selectable display of various navigation data, including course, speed over ground, and bearing and distance to ...
...waypoints and routes. Before you to a position, and perform various waypoint and route functions. City names (Larger than 200,000 population), marine markers and buoys (for the Americas only, preloaded from the factory) are linked together in either direction using the PAGE and QUIT keys....a simple chain, which allows you take off on the right side of the page, provides a user-selectable display of navigation data. The GPS 152's Map Page combines trackplotting with a user-selectable display of various navigation data, including course, speed over ground, and bearing and distance to ...
Owner's Manual
Page 19
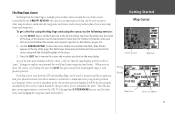
... to remove the cursor and re-center your boat on the map display. Controlled by the receiver, which should be, make sure that the map display actively scrolls or "pans," letting you 'll see how the GPS 152's keypad and ENTER/MARK key are used for using the Map Page and using the... cursor, try the following exercise: 1. Wherever you 've seen how the GPS tab and Map Page can be used to pan to your present position. This will be the spot where you have initialized the receiver and acquired a position as a waypoint (Since you're in simulator mode, the present...
... to remove the cursor and re-center your boat on the map display. Controlled by the receiver, which should be, make sure that the map display actively scrolls or "pans," letting you 'll see how the GPS 152's keypad and ENTER/MARK key are used for using the Map Page and using the... cursor, try the following exercise: 1. Wherever you 've seen how the GPS tab and Map Page can be used to pan to your present position. This will be the spot where you have initialized the receiver and acquired a position as a waypoint (Since you're in simulator mode, the present...
Owner's Manual
Page 20
... name. Repeat this exercise, change the name to represent your waypoint on the Map Page. 10 Marking Waypoints To mark your current position on the GPS 152 Quick Reference Guide. You may also be created graphically with the Map Page cursor or by manually entering position coordinates. To access the waypoint symbol...
... name. Repeat this exercise, change the name to represent your waypoint on the Map Page. 10 Marking Waypoints To mark your current position on the GPS 152 Quick Reference Guide. You may also be created graphically with the Map Page cursor or by manually entering position coordinates. To access the waypoint symbol...
Owner's Manual
Page 21
...', or 'Stop Navigation'. • Holding down NAV/MOB, or pressing the key two times, activates the MOB (Man OverBoard) feature. To change the GPS 152 position in the simulator setup window and press ENTER/MARK. 4. Highlight 'Set Options' in the lower right and press ENTER/MARK, then highlight 'Set Position...to display the list of the ARROW KEYPAD to "Go To". Start by changing the position to select a pre-programmed tour route using the receiver's steering guidance and map displays. The NAV/MOB key, located on to the fun part-going to where the practice route is located. ...
...', or 'Stop Navigation'. • Holding down NAV/MOB, or pressing the key two times, activates the MOB (Man OverBoard) feature. To change the GPS 152 position in the simulator setup window and press ENTER/MARK. 4. Highlight 'Set Options' in the lower right and press ENTER/MARK, then highlight 'Set Position...to display the list of the ARROW KEYPAD to "Go To". Start by changing the position to select a pre-programmed tour route using the receiver's steering guidance and map displays. The NAV/MOB key, located on to the fun part-going to where the practice route is located. ...
Owner's Manual
Page 22
... to quickly scroll through the map scales.) The Map Page should now display the first three waypoints chained together in a simple route, with the 'GPS TOUR' route highlighted. 4. To enter a boat speed: 1. A data field at the first route waypoint. Use the ARROW KEYPAD to display the Main Menu...
... to quickly scroll through the map scales.) The Map Page should now display the first three waypoints chained together in a simple route, with the 'GPS TOUR' route highlighted. 4. To enter a boat speed: 1. A data field at the first route waypoint. Use the ARROW KEYPAD to display the Main Menu...
Owner's Manual
Page 24
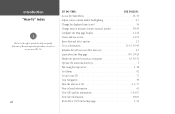
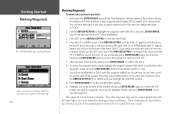
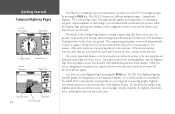
...Data Fields Desired Course Zoom Scale 14 Present Position Now that we're navigating to an actual destination, let's move on to the GPS 152 navigation pages by pressing the PAGE key. The middle of the Compass Page features a rotating 'compass ring' that indicates the direction of...the next waypoint as well as you move , indicating the direction you are not navigating to a waypoint, the compass will not appear. The GPS 152's Highway Page also provides graphic steering guidance to the waypoint. As you 're moving graphic "highway." This page provides better steering guidance than...
...Data Fields Desired Course Zoom Scale 14 Present Position Now that we're navigating to an actual destination, let's move on to the GPS 152 navigation pages by pressing the PAGE key. The middle of the Compass Page features a rotating 'compass ring' that indicates the direction of...the next waypoint as well as you move , indicating the direction you are not navigating to a waypoint, the compass will not appear. The GPS 152's Highway Page also provides graphic steering guidance to the waypoint. As you 're moving graphic "highway." This page provides better steering guidance than...


