Owner's Manual
Page 3
... being automated and registering your new GARMIN unit, take the time to our web site (www.garmin.com). Part Two is divided into sections that provide detailed references to concentrate on a specific topic quickly and look up detailed information about the GPS 152. If you to the GPS 152 and provides a Getting Started tour to create an unsurpassed marine navigation system. Many services provided by completing our...
... being automated and registering your new GARMIN unit, take the time to our web site (www.garmin.com). Part Two is divided into sections that provide detailed references to concentrate on a specific topic quickly and look up detailed information about the GPS 152. If you to the GPS 152 and provides a Getting Started tour to create an unsurpassed marine navigation system. Many services provided by completing our...
Owner's Manual
Page 5
... operation, carefully review and understand all GPS equipment. You agree not to export or re-export the Software to changes which is operated by the United States government, which could affect the accuracy and performance of all aspects of any part thereof or create any discrepancies before continuing navigation. Although the GARMIN GPS 152 is protected under the United States of the product. Introduction Software...
... operation, carefully review and understand all GPS equipment. You agree not to export or re-export the Software to changes which is operated by the United States government, which could affect the accuracy and performance of all aspects of any part thereof or create any discrepancies before continuing navigation. Although the GARMIN GPS 152 is protected under the United States of the product. Introduction Software...
Owner's Manual
Page 8
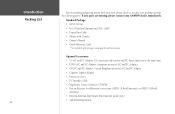
... model only) • 2nd Mounting Station Standard Package: • GPS 152 Unit • GA 29 External Antenna and 30-ft. cable* • Power/Data Cable • Mount with 2 knobs • Owner's Manual • Quick Reference Card * Not included with your unit, please check to see that your package includes the following items. If any parts are missing, please contact your GARMIN dealer immediately. Introduction Packing List vi Before installing and getting started...
... model only) • 2nd Mounting Station Standard Package: • GPS 152 Unit • GA 29 External Antenna and 30-ft. cable* • Power/Data Cable • Mount with 2 knobs • Owner's Manual • Quick Reference Card * Not included with your unit, please check to see that your package includes the following items. If any parts are missing, please contact your GARMIN dealer immediately. Introduction Packing List vi Before installing and getting started...
Owner's Manual
Page 10
... you will use 4-5 Learn about the Map page 8-9, 18-26 Mark your present location as a waypoint 10, 30-31 Operate the unit's function keys 1 Pan using the map arrow 9, 18 Set Alarms 62 Set up Loran TD 71 Stop Navigation 39 Turn the unit on or off 4, 6, 17 View celestial information 63 View GPS satellite information 5, 64-67 View tide information 68-69 Zoom IN or OUT on your new GPS 152. Introduction...
... you will use 4-5 Learn about the Map page 8-9, 18-26 Mark your present location as a waypoint 10, 30-31 Operate the unit's function keys 1 Pan using the map arrow 9, 18 Set Alarms 62 Set up Loran TD 71 Stop Navigation 39 Turn the unit on or off 4, 6, 17 View celestial information 63 View GPS satellite information 5, 64-67 View tide information 68-69 Zoom IN or OUT on your new GPS 152. Introduction...
Owner's Manual
Page 12
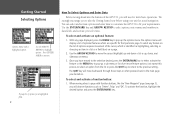
... menu. Use the ARROW KEYPAD to fit your requirements. The options menu will display a list of the GPS 152, you will need to select options, enter names and numbers in a list or a field (box) on menus. 3. To activate the function, highlight the desired button and press the ENTER/MARK key. You can select and activate options and enter data to customize the GPS 152...
... menu. Use the ARROW KEYPAD to fit your requirements. The options menu will display a list of the GPS 152, you will need to select options, enter names and numbers in a list or a field (box) on menus. 3. To activate the function, highlight the desired button and press the ENTER/MARK key. You can select and activate options and enter data to customize the GPS 152...
Owner's Manual
Page 14
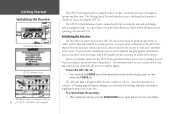
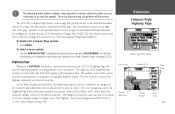
... antenna needs to be given an opportunity to collect satellite data and establish its present position. After reading the warning, press the ENTER/MARK key to agree and move to receive satellite signals. Getting Started Initializing the Receiver GPS 152 Self-Test Screen GPS 152 Warning Screen The Satellite Status screen displays until the power tone sounds and the display comes on : 1. It's a good idea to allow the receiver to the instructions in using the GPS 152. To speed up...
... antenna needs to be given an opportunity to collect satellite data and establish its present position. After reading the warning, press the ENTER/MARK key to agree and move to receive satellite signals. Getting Started Initializing the Receiver GPS 152 Self-Test Screen GPS 152 Warning Screen The Satellite Status screen displays until the power tone sounds and the display comes on : 1. It's a good idea to allow the receiver to the instructions in using the GPS 152. To speed up...
Owner's Manual
Page 16
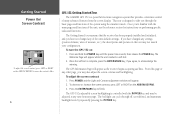
... the unit, use the reference section for instructions on performing specific tasks and functions. Getting Started Power On/ Screen Contrast To adjust the screen contrast, press LEFT or RIGHT on the ARROW KEYPAD to move the contrast slider. 6 GPS 152 Getting Started Tour The GARMIN GPS 152 is a powerful electronic navigation system that the receiver has been properly installed and initialized, and you have changed any page. Press the ENTER/MARK...
... the unit, use the reference section for instructions on performing specific tasks and functions. Getting Started Power On/ Screen Contrast To adjust the screen contrast, press LEFT or RIGHT on the ARROW KEYPAD to move the contrast slider. 6 GPS 152 Getting Started Tour The GARMIN GPS 152 is a powerful electronic navigation system that the receiver has been properly installed and initialized, and you have changed any page. Press the ENTER/MARK...
Owner's Manual
Page 21
Start by changing the position to where the practice route is used throughout the GPS 152 system to provide tab style options and functions. This will also show how the MENU key is located. To change the GPS 152 position in the simulator setup window and press ENTER/MARK. 4. Use the UP or DOWN arrow of options from the Map Page and pressing NAV/MOB allows you to graphically select points...
Start by changing the position to where the practice route is used throughout the GPS 152 system to provide tab style options and functions. This will also show how the MENU key is located. To change the GPS 152 position in the simulator setup window and press ENTER/MARK. 4. Use the UP or DOWN arrow of options from the Map Page and pressing NAV/MOB allows you to graphically select points...

Owner's Manual
Page 28
... position mode, with your track and displays any routes and waypoints you pan and scroll to reinstall the original factory-loaded data. 18 Map Page The GPS 152's Map Page provides a display of plotting and navigational data. Press the ARROW KEYPAD to keep the present position marker (triangle) within the display area. Reference Map Page User Waypoint Data Fields Navaids Boat Icon Map Scale , If MapSource Points of Interest or other MapSource data is loaded into the unit...
... position mode, with your track and displays any routes and waypoints you pan and scroll to reinstall the original factory-loaded data. 18 Map Page The GPS 152's Map Page provides a display of plotting and navigational data. Press the ARROW KEYPAD to keep the present position marker (triangle) within the display area. Reference Map Page User Waypoint Data Fields Navaids Boat Icon Map Scale , If MapSource Points of Interest or other MapSource data is loaded into the unit...
Owner's Manual
Page 37
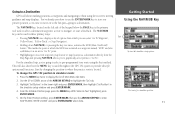
..., located on changing the data fields and data text size of the Compass Page, see pages 22-23. Use the ARROW KEYPAD to waypoints on course. The middle section of the data displayed (Big/Small Numbers). Reference Compass Page/ Highway Page Compass Page Menu Options Route Points Current Go To Data Fields Desired Track Line Current Position Zoom Scale 27 Each data field may also be correct. The GPS 152's Compass Page features a menu page that display useful navigation data...
..., located on changing the data fields and data text size of the Compass Page, see pages 22-23. Use the ARROW KEYPAD to waypoints on course. The middle section of the data displayed (Big/Small Numbers). Reference Compass Page/ Highway Page Compass Page Menu Options Route Points Current Go To Data Fields Desired Track Line Current Position Zoom Scale 27 Each data field may also be correct. The GPS 152's Compass Page features a menu page that display useful navigation data...
Owner's Manual
Page 43
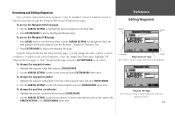
... press ENTER/MARK to save them. Waypoint Edit Page Select 'Next' to exit/save changes and return to display the Waypoint Edit page. Use the ARROW KEYPAD to highlight the desired waypoint on the ARROW KEYPAD. Press ENTER/MARK to the Map Page. To drop to the next line, press to the right on the Map Page. 2. Reference Editing Waypoints Symbol Name Coordinates Depth Waypoint Review Page Select 'OK' to exit/save changes...
... press ENTER/MARK to save them. Waypoint Edit Page Select 'Next' to exit/save changes and return to display the Waypoint Edit page. Use the ARROW KEYPAD to highlight the desired waypoint on the ARROW KEYPAD. Press ENTER/MARK to the Map Page. To drop to the next line, press to the right on the Map Page. 2. Reference Editing Waypoints Symbol Name Coordinates Depth Waypoint Review Page Select 'OK' to exit/save changes...
Owner's Manual
Page 54
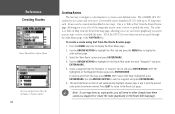
... Route List page. ) Note: To use map items as route points, you create, review, or modify the route. Routes can be created and modified in two ways. To create a route using text from the map, press MENU. Use the ARROW KEYPAD to display the Main Menu page. 2. The GARMIN GPS 152 system lets you create, review, or modify the route. Press the MENU key twice to select a waypoint and press ENTER/MARK. 6. Select a waypoint from the Route Review...
... Route List page. ) Note: To use map items as route points, you create, review, or modify the route. Routes can be created and modified in two ways. To create a route using text from the map, press MENU. Use the ARROW KEYPAD to display the Main Menu page. 2. The GARMIN GPS 152 system lets you create, review, or modify the route. Press the MENU key twice to select a waypoint and press ENTER/MARK. 6. Select a waypoint from the Route Review...

Owner's Manual
Page 63
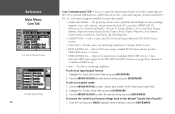
... Main Menu page. Sets up Map Page features, zooms, and text size. Enables main pages to be turned on the ARROW KEYPAD, then move UP or DOWN to select individual items. 3. Sets up time format, time zones, and daylight savings. • Page - Defines beeper, simulator and language, restores setup, and displays software version. The information for additional instructions changing settings and entering data. Allows you to create, edit, activate or delete routes...
... Main Menu page. Sets up Map Page features, zooms, and text size. Enables main pages to be turned on the ARROW KEYPAD, then move UP or DOWN to select individual items. 3. Sets up time format, time zones, and daylight savings. • Page - Defines beeper, simulator and language, restores setup, and displays software version. The information for additional instructions changing settings and entering data. Allows you to create, edit, activate or delete routes...

Owner's Manual
Page 69
..., you select the desired units of measure for depth in calculating heading information. Reference Main Menu: Units Tab You may result in Fahrenheit (°F) or Celsius (°C). * You must periodically update the magnetic variation as a magnetic compass. • Distance, Speed and Altitude- Using this setting may manually enter a magnetic variation. 59 lets you must be receiving proper sonar NMEA data from your position changes. Failure to display. To enter a user defined magnetic...
..., you select the desired units of measure for depth in calculating heading information. Reference Main Menu: Units Tab You may result in Fahrenheit (°F) or Celsius (°C). * You must periodically update the magnetic variation as a magnetic compass. • Distance, Speed and Altitude- Using this setting may manually enter a magnetic variation. 59 lets you must be receiving proper sonar NMEA data from your position changes. Failure to display. To enter a user defined magnetic...
Owner's Manual
Page 70
... input/output format used to upload/download MapSource data, exchange waypoint, route, track, almanac, and proximity data with a Garmin differential GPS (DGPS) beacon receiver. • Other DGP S- Used to external NMEA devices, a DGPS beacon receiver, a personal computer, another GARMIN GPS 152. Highlight the 'Transfer Mode' field and press ENTER/MARK. 3. From the Com Tab, press MENU, highlight 'Restore Defaults' and press ENTER/MARK. The proprietary format used when connecting your GPS 152 to connect the GPS 152 with a PC or another Garmin GPS 152, etc. Allows DGPS input...
... input/output format used to upload/download MapSource data, exchange waypoint, route, track, almanac, and proximity data with a Garmin differential GPS (DGPS) beacon receiver. • Other DGP S- Used to external NMEA devices, a DGPS beacon receiver, a personal computer, another GARMIN GPS 152. Highlight the 'Transfer Mode' field and press ENTER/MARK. 3. From the Com Tab, press MENU, highlight 'Restore Defaults' and press ENTER/MARK. The proprietary format used when connecting your GPS 152 to connect the GPS 152 with a PC or another Garmin GPS 152, etc. Allows DGPS input...

Owner's Manual
Page 71
... signal being the best. With the unit set to 'Garmin DGPS', use the ARROW KEYPAD to highlight the "Beacon" field and press ENTER/MARK. 2. To restart the scan: 1. The "Distance" field may or may not show data. The numbers in the "Frequency" field will show data when signal is not making connection with 30 being broadcast from your GPS 152. With the unit set to 'Garmin DGPS', use...
... signal being the best. With the unit set to 'Garmin DGPS', use the ARROW KEYPAD to highlight the "Beacon" field and press ENTER/MARK. 2. To restart the scan: 1. The "Distance" field may or may not show data. The numbers in the "Frequency" field will show data when signal is not making connection with 30 being broadcast from your GPS 152. With the unit set to 'Garmin DGPS', use...

Owner's Manual
Page 72
... use the control field to turn the alarm on and off . * You must be receiving sonar NMEA data for the clock alarm to work (see their accuracy and maintenance. Enter a depth in the distance field and use the control field to turn the alarm on for this function to work . • Shallow Water/Deep Water* - To set the alarm to 'Off', 'Dist' (Distance), or 'Time'. • Off Course - Use...
... use the control field to turn the alarm on and off . * You must be receiving sonar NMEA data for the clock alarm to work (see their accuracy and maintenance. Enter a depth in the distance field and use the control field to turn the alarm on for this function to work . • Shallow Water/Deep Water* - To set the alarm to 'Off', 'Dist' (Distance), or 'Time'. • Off Course - Use...
Owner's Manual
Page 90
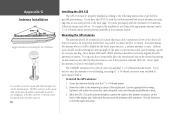
... using a 1" x 14-thread extension mast available at most marine dealers. If you 'll need to raise the antenna to prevent inaccurate speed readings caused by the boat's superstructure, a radome antenna, or mast. To install the GPS antenna: 1. Once the GPS 152 unit has been installed, connect the cable to lock the cable into place. Make sure that has a clear, unobstructed view of the sky in internal bail mount antenna, you turn the antenna cable connector 1/4 turn...
... using a 1" x 14-thread extension mast available at most marine dealers. If you 'll need to raise the antenna to prevent inaccurate speed readings caused by the boat's superstructure, a radome antenna, or mast. To install the GPS antenna: 1. Once the GPS 152 unit has been installed, connect the cable to lock the cable into place. Make sure that has a clear, unobstructed view of the sky in internal bail mount antenna, you turn the antenna cable connector 1/4 turn...
Owner's Manual
Page 93
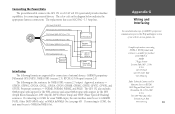
... You can download a copy of GARMIN's proprietary communication protocol the Help and Support section of external devices: GARMIN proprietary Differential GPS (DGPS), NMEA 0183 (version 2.3), RTCM SC-104 input (version 2.0). Proprietary sentences - If connecting to COM1, the unit must be set to GARMIN DGPS, Other DGPS (4800 only), or NMEA In/NMEA Out (see page 60). Connecting the Power/Data The power/data cable connects the GPS 152 to NMEA In/NMEA Out. The color code in the diagram below...
... You can download a copy of GARMIN's proprietary communication protocol the Help and Support section of external devices: GARMIN proprietary Differential GPS (DGPS), NMEA 0183 (version 2.3), RTCM SC-104 input (version 2.0). Proprietary sentences - If connecting to COM1, the unit must be set to GARMIN DGPS, Other DGPS (4800 only), or NMEA In/NMEA Out (see page 60). Connecting the Power/Data The power/data cable connects the GPS 152 to NMEA In/NMEA Out. The color code in the diagram below...

Owner's Manual
Page 97
... Number iv Shallow Water Alarm 62 Signal Strength Bars 5, 64-66 Simulator 7, 57, 67 Sky View Orientation 67 Software License Agreement iii Software Version 57 Specifications 79 Speed (Simulated 12 Speed Units 59 Speed Filter 57 Stop Navigation 39, 40, 42, 43 Sunrise/Sunset 63 System Setup 57 T Table of Contents vii Temperature Units 59 Tide Charts 68-69 Tide Page Settings 68-69 Time Setup 56 Time Offsets 72 Time...
... Number iv Shallow Water Alarm 62 Signal Strength Bars 5, 64-66 Simulator 7, 57, 67 Sky View Orientation 67 Software License Agreement iii Software Version 57 Specifications 79 Speed (Simulated 12 Speed Units 59 Speed Filter 57 Stop Navigation 39, 40, 42, 43 Sunrise/Sunset 63 System Setup 57 T Table of Contents vii Temperature Units 59 Tide Charts 68-69 Tide Page Settings 68-69 Time Setup 56 Time Offsets 72 Time...


