

Owner's Manual
Page 3
INTRODUCTION TABLE OF CONTENTS Introduction 5 Using Time and Distance About This Manual 5 Alerts 24 Getting Started 6 Charge the Battery 6 Position the Edge 10 Configure the Edge ..........12 Acquire Satellite Signals 13 Position the Heart Rate Monitor 14 Position the GSC10 Using Speed Alerts .......... 25 Using Heart Rate Alerts ... 26 Using Cadence ... History 43 Viewing History 43 Training 22 Deleting History 46 Auto Pause 22 Auto Lap 22 Alerts 24 Navigation 47 Navigating with the Map ..47 Edge™ 205/305 Owner's Manual 3
INTRODUCTION TABLE OF CONTENTS Introduction 5 Using Time and Distance About This Manual 5 Alerts 24 Getting Started 6 Charge the Battery 6 Position the Edge 10 Configure the Edge ..........12 Acquire Satellite Signals 13 Position the Heart Rate Monitor 14 Position the GSC10 Using Speed Alerts .......... 25 Using Heart Rate Alerts ... 26 Using Cadence ... History 43 Viewing History 43 Training 22 Deleting History 46 Auto Pause 22 Auto Lap 22 Alerts 24 Navigation 47 Navigating with the Map ..47 Edge™ 205/305 Owner's Manual 3

Owner's Manual
Page 6
...the unit. You can recharge with the USB cable and your Edge. To charge the Edge: 1. Charge the Battery The Edge is powered by a built-in lithium-ion battery that you begin using it. Charge the Edge for at least three hours before charging or connecting to a ...personal computer to set up and begin using your personal computer. mini-USB port under weather cap 6 Edge™ 205/305...
...the unit. You can recharge with the USB cable and your Edge. To charge the Edge: 1. Charge the Battery The Edge is powered by a built-in lithium-ion battery that you begin using it. Charge the Edge for at least three hours before charging or connecting to a ...personal computer to set up and begin using your personal computer. mini-USB port under weather cap 6 Edge™ 205/305...

Owner's Manual
Page 7
NOTE: The unit will not charge outside the temperature range of the charger into a standard wall outlet. Plug the mini-USB end of 0°C-50°C (32°F-122°F). 3. Plug the A/C charger into the mini-USB port on the Edge. Then plug the A/C charger into a standard wall outlet. Locate the A/C charger included in the product box. GETTING STARTED Edge™ 205/305 Owner's Manual 7 2. When the battery is completely charged, it can run for approximately 12 hours before recharging.
NOTE: The unit will not charge outside the temperature range of the charger into a standard wall outlet. Plug the mini-USB end of 0°C-50°C (32°F-122°F). 3. Plug the A/C charger into the mini-USB port on the Edge. Then plug the A/C charger into a standard wall outlet. Locate the A/C charger included in the product box. GETTING STARTED Edge™ 205/305 Owner's Manual 7 2. When the battery is completely charged, it can run for approximately 12 hours before recharging.
Owner's Manual
Page 9
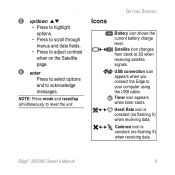
...Edge™ 205/305 Owner's Manual 9 Satellite icon changes from blank to your computer using the USB cable. Timer icon appears when timer starts. Cadence icon is constant (no flashing X) when receiving data. Heart Rate icon is constant (no flashing X) when receiving data. Icons GETTING STARTED Battery icon shows the current battery... charge level. USB connection icon appears when you connect the Edge to 3D when receiving satellite signals. NOTE: Press mode ...
...Edge™ 205/305 Owner's Manual 9 Satellite icon changes from blank to your computer using the USB cable. Timer icon appears when timer starts. Cadence icon is constant (no flashing X) when receiving data. Heart Rate icon is constant (no flashing X) when receiving data. Icons GETTING STARTED Battery icon shows the current battery... charge level. USB connection icon appears when you connect the Edge to 3D when receiving satellite signals. NOTE: Press mode ...

Owner's Manual
Page 21
Use a short backlight timeout setting to access the Main Menu. 2. Edge™ 205/305 Owner's Manual 21 Select the amount of screen contrast. Select Settings > System > Display. 3. GETTING STARTED NOTE: You can also adjust the screen contrast on . Press mode to conserve battery power. 4. Select the amount of time the backlight stays on the Satellite page using the arrows. Change the Backlight and Contrast Settings To change the Edge display: 1.
Use a short backlight timeout setting to access the Main Menu. 2. Edge™ 205/305 Owner's Manual 21 Select the amount of screen contrast. Select Settings > System > Display. 3. GETTING STARTED NOTE: You can also adjust the screen contrast on . Press mode to conserve battery power. 4. Select the amount of time the backlight stays on the Satellite page using the arrows. Change the Backlight and Contrast Settings To change the Edge display: 1.

Owner's Manual
Page 75
...trouble pairing, or if the readings are erratic, try the following suggestions: • Position the Edge within 3 meters of the sensor while pairing. • Stay far away from any other sensors while pairing. • ...59). • Make sure to enable the sensors on the Edge (see page 59). • Make sure the sensors are functioning correctly. • Replace the sensor battery. Dirt and sweat build-up on the sensors can create static ... heart rate monitor is snug against the heart rate monitor can weaken signals. Edge™ 205/305 Owner's Manual APPENDIX • Clean the sensors.
...trouble pairing, or if the readings are erratic, try the following suggestions: • Position the Edge within 3 meters of the sensor while pairing. • Stay far away from any other sensors while pairing. • ...59). • Make sure to enable the sensors on the Edge (see page 59). • Make sure the sensors are functioning correctly. • Replace the sensor battery. Dirt and sweat build-up on the sensors can create static ... heart rate monitor is snug against the heart rate monitor can weaken signals. Edge™ 205/305 Owner's Manual APPENDIX • Clean the sensors.

Owner's Manual
Page 81
...Physical Case: Fully-sealed, high-impact plastic alloy, waterproof to IEC 60529 IPX7 standards (waterproof to the unit. Water Immersion The Edge is waterproof to wipe dry and air dry the unit before using or charging. After submersion, be certain to IEC Standard 60529 ... 1.44"H (29.65 mm x 36.69 mm) Antenna: Internal patch Power Input: 910 mAh rechargeable, built-in, lithium-ion battery Battery Life: 12 hours, typical use Performance Receiver: High-sensitivity integrated GPS receiver by SiRF Acquisition Time: Hot Start: < 1 second Warm Start: < 38 seconds Cold Start: < 45 seconds Update Rate:...
...Physical Case: Fully-sealed, high-impact plastic alloy, waterproof to IEC 60529 IPX7 standards (waterproof to the unit. Water Immersion The Edge is waterproof to wipe dry and air dry the unit before using or charging. After submersion, be certain to IEC Standard 60529 ... 1.44"H (29.65 mm x 36.69 mm) Antenna: Internal patch Power Input: 910 mAh rechargeable, built-in, lithium-ion battery Battery Life: 12 hours, typical use Performance Receiver: High-sensitivity integrated GPS receiver by SiRF Acquisition Time: Hot Start: < 1 second Warm Start: < 38 seconds Cold Start: < 45 seconds Update Rate:...

Owner's Manual
Page 82
... distance from transmitter. Edge™ 205/305 Owner's Manual Heart Rate Monitor Physical size: 13.7"W x 1.4"H x 0.5"D Transmission range: approximately 3 m Battery: CR2032 (3 volts) Battery life: approximately 3 ...years (1 hour per day) Weight: 25 g NOTE: Specifications subject to 60° C) *Accuracy depends on view of the sky. 99%-clear view; 95%-typical. APPENDIX GPS Position Accuracy*: < 10 meters 50%, typical GPS...
... distance from transmitter. Edge™ 205/305 Owner's Manual Heart Rate Monitor Physical size: 13.7"W x 1.4"H x 0.5"D Transmission range: approximately 3 m Battery: CR2032 (3 volts) Battery life: approximately 3 ...years (1 hour per day) Weight: 25 g NOTE: Specifications subject to 60° C) *Accuracy depends on view of the sky. 99%-clear view; 95%-typical. APPENDIX GPS Position Accuracy*: < 10 meters 50%, typical GPS...

Owner's Manual
Page 83
NOTE: Dispose of the GSC10. Locate the circular battery cover on the cover. Remove the cover, and replace the battery positive side up. Be careful not to unlocked). 3. APPENDIX 4. Use a coin to twist the cover counter-... used battery properly. Replacing the Battery The heart rate monitor and GSC10 (shown) contain a userreplaceable CR2032 battery. battery cover To replace the battery: 1. CR2032 battery 2. Use a coin to twist the cover back into place (arrow points to locked). GSC10 Battery Installation battery cover arrow locked unlocked Edge™ 205/305 Owner's...
NOTE: Dispose of the GSC10. Locate the circular battery cover on the cover. Remove the cover, and replace the battery positive side up. Be careful not to unlocked). 3. APPENDIX 4. Use a coin to twist the cover counter-... used battery properly. Replacing the Battery The heart rate monitor and GSC10 (shown) contain a userreplaceable CR2032 battery. battery cover To replace the battery: 1. CR2032 battery 2. Use a coin to twist the cover back into place (arrow points to locked). GSC10 Battery Installation battery cover arrow locked unlocked Edge™ 205/305 Owner's...
Owner's Manual
Page 85
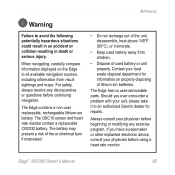
... including information from children. • Dispose of lithium-ion batteries. The Edge has no user-serviceable parts. Contact your unit, please take it to an authorized Garmin dealer for information on the Edge to avoid the following potentially hazardous situations could result in an... lithium-ion battery. The battery may present a risk of fire or chemical burn if mistreated. • Do not recharge out of the unit, disassemble, heat above 140°F (60°C), or incinerate. • Keep used battery or unit properly. Edge™ 205/305 Owner's Manual...
... including information from children. • Dispose of lithium-ion batteries. The Edge has no user-serviceable parts. Contact your unit, please take it to an authorized Garmin dealer for information on the Edge to avoid the following potentially hazardous situations could result in an... lithium-ion battery. The battery may present a risk of fire or chemical burn if mistreated. • Do not recharge out of the unit, disassemble, heat above 140°F (60°C), or incinerate. • Keep used battery or unit properly. Edge™ 205/305 Owner's Manual...

Owner's Manual
Page 91
... fields 64 icon 9 sensor 20 training 76 calories 46, 64 charging the battery 6 cleaning and care 80 Compass page 41, 49, 50 configure the Edge 12 contact Garmin 84 contrast 21, 57 courses 39 Edge™ 205/305 Owner's Manual INDEX creating 39 deleting 42 editing 42 starting 36 alerts 24 cadence...
... fields 64 icon 9 sensor 20 training 76 calories 46, 64 charging the battery 6 cleaning and care 80 Compass page 41, 49, 50 configure the Edge 12 contact Garmin 84 contrast 21, 57 courses 39 Edge™ 205/305 Owner's Manual INDEX creating 39 deleting 42 editing 42 starting 36 alerts 24 cadence...

Owner's Manual
Page 92
...26, 61, 71 heart rate monitor pairing 15, 74 positioning 14 92 replacing the battery 83 viewing data 71 history deleting 45, 46 totals 46 viewing 43 viewing laps 44 I icons 9 indoor use 56 installation Edge 10 GSC10 16 heart rate monitor 14 interference 74 interval workouts 32 L language 56 ...8 N navigation 47 P pairing 74 pedal magnet 17 power button 8 product support 84 Q quick workouts 30 Edge™ 205/305 Owner's Manual INDEX G Garmin Training Center 33, 34, 37, 39 installing 79 GPS 53 accuracy 65 turning on and off 56 GPS version 56 grade 66 GSC10 16, 76 pairing 74 replacing the bat-
...26, 61, 71 heart rate monitor pairing 15, 74 positioning 14 92 replacing the battery 83 viewing data 71 history deleting 45, 46 totals 46 viewing 43 viewing laps 44 I icons 9 indoor use 56 installation Edge 10 GSC10 16 heart rate monitor 14 interference 74 interval workouts 32 L language 56 ...8 N navigation 47 P pairing 74 pedal magnet 17 power button 8 product support 84 Q quick workouts 30 Edge™ 205/305 Owner's Manual INDEX G Garmin Training Center 33, 34, 37, 39 installing 79 GPS 53 accuracy 65 turning on and off 56 GPS version 56 grade 66 GSC10 16, 76 pairing 74 replacing the bat-


