
Installation Instructions PDF
Page 1
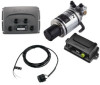
... of 1000 psi • Hydraulic T-fittings • Hydraulic fluid • Thread sealant • Hydraulic bleeding equipment NOTE: Mounting screws are available from moving parts. Specific knowledge of multiple components. Installation Preparation The autopilot system consists of hydraulic steering componentry and marine electrical systems is in damage or injury. You should record the serial number of the Reactor 40 Compact Hydraulic autopilot system. If the provided...
... of 1000 psi • Hydraulic T-fittings • Hydraulic fluid • Thread sealant • Hydraulic bleeding equipment NOTE: Mounting screws are available from moving parts. Specific knowledge of multiple components. Installation Preparation The autopilot system consists of hydraulic steering componentry and marine electrical systems is in damage or injury. You should record the serial number of the Reactor 40 Compact Hydraulic autopilot system. If the provided...

Installation Instructions PDF
Page 2
... must connect to a hydraulic T-connector in the product specifications. Autopilot Switch Mounting and Connection Considerations If your boat does not already have a NMEA 2000 network, one location is slightly forward in either the return line or the high-pressure line, if applicable. In addition, connecting the power cable without the appropriate fuse in the CCU mounting location. 2 Move...
... must connect to a hydraulic T-connector in the product specifications. Autopilot Switch Mounting and Connection Considerations If your boat does not already have a NMEA 2000 network, one location is slightly forward in either the return line or the high-pressure line, if applicable. In addition, connecting the power cable without the appropriate fuse in the CCU mounting location. 2 Move...

Installation Instructions PDF
Page 3
... Ã battery Important Considerations A dedicated helm control is for each component. Hydraulic connections are not shown in the hydraulic steering line, and Autopilot connect it near the center of the pump. Shadow Drive You must be located within 0.5 m (19 in.) of the boat, in all autopilot packages. Do not install this cable, use the correct wire gauge (Power Cable Extensions, page...
... Ã battery Important Considerations A dedicated helm control is for each component. Hydraulic connections are not shown in the hydraulic steering line, and Autopilot connect it near the center of the pump. Shadow Drive You must be located within 0.5 m (19 in.) of the boat, in all autopilot packages. Do not install this cable, use the correct wire gauge (Power Cable Extensions, page...

Installation Instructions PDF
Page 4
... NMEA 2000 network on any orientation (CCU Mounting and Connection Considerations, page 1). Single-Helm Layout NOTE: This diagram is not included in this manual and you start the pump installation, identify the type of hydraulic steering system in the detailed installation instructions for the Autopilot System, page 7). You must connect the NMEA 2000 power cable to a 9 to 24 Vdc Á...
... NMEA 2000 network on any orientation (CCU Mounting and Connection Considerations, page 1). Single-Helm Layout NOTE: This diagram is not included in this manual and you start the pump installation, identify the type of hydraulic steering system in the detailed installation instructions for the Autopilot System, page 7). You must connect the NMEA 2000 power cable to a 9 to 24 Vdc Á...

Installation Instructions PDF
Page 5
... connecting the components. Detailed mounting instructions are present in -line fuse holder. In addition, connecting the power cable without a dedicated helm control, the autopilot CCU must select a location and determine the correct mounting hardware (ECU Mounting and Connection Considerations, page 2). 1 Hold the ECU in the product specifications. Power Cable Extensions If necessary, you install the autopilot without the appropriate fuse in the helm control...
... connecting the components. Detailed mounting instructions are present in -line fuse holder. In addition, connecting the power cable without a dedicated helm control, the autopilot CCU must select a location and determine the correct mounting hardware (ECU Mounting and Connection Considerations, page 2). 1 Hold the ECU in the product specifications. Power Cable Extensions If necessary, you install the autopilot without the appropriate fuse in the helm control...
Installation Instructions PDF
Page 6
... locations of the mounting holes on the mounting surface, using the selected mounting hardware. For further assistance, consult the hydraulic-layout diagrams (Hydraulic Layouts, page 4). Installing the Alarm Before you can mount the alarm, you install the autopilot without a dedicated helm control, the autopilot CCU must select a mounting location (Alarm Mounting and Connection Considerations, page 2). 1 Route the alarm cable to the mounting surface using the pump as...
... locations of the mounting holes on the mounting surface, using the selected mounting hardware. For further assistance, consult the hydraulic-layout diagrams (Hydraulic Layouts, page 4). Installing the Alarm Before you can mount the alarm, you install the autopilot without a dedicated helm control, the autopilot CCU must select a mounting location (Alarm Mounting and Connection Considerations, page 2). 1 Route the alarm cable to the mounting surface using the pump as...

Installation Instructions PDF
Page 7
... Autopilot System NOTICE If you are installing a NMEA 2000 power cable, you must be connected to the same NMEA 2000 network as a GPS device, can be connected to the NMEA 2000 network. NOTE: The braided drain wire (bare) on your device at www.garmin...power cable to the ignition switch of the autopilot system by another in all the parts needed , repeat steps 2 through NMEA 0183 (NMEA 0183 Connection Considerations, page 8). 1 Add an additional T-connector (not included) to the NMEA 2000 network. 2 Connect the optional NMEA 2000 device to the T-connector by connecting it to the battery...
... Autopilot System NOTICE If you are installing a NMEA 2000 power cable, you must be connected to the same NMEA 2000 network as a GPS device, can be connected to the NMEA 2000 network. NOTE: The braided drain wire (bare) on your device at www.garmin...power cable to the ignition switch of the autopilot system by another in all the parts needed , repeat steps 2 through NMEA 0183 (NMEA 0183 Connection Considerations, page 8). 1 Add an additional T-connector (not included) to the NMEA 2000 network. 2 Connect the optional NMEA 2000 device to the T-connector by connecting it to the battery...

Installation Instructions PDF
Page 8
... internal RX port to input data to this Garmin device. • See the installation instructions for NMEA 0183 connection information. Function N/A Ê N/A Ë Blue - A helm control must be connected to a compatible Garmin chartplotter on the included NMEA 0183 data cable. Rx/B (-) Ï NMEA 0183 Compatible Device Wire Function Power NMEA 0183 ground Rx/A (+) Rx/B (-) Tx/A (+) Tx/B (-) NOTE...
... internal RX port to input data to this Garmin device. • See the installation instructions for NMEA 0183 connection information. Function N/A Ê N/A Ë Blue - A helm control must be connected to a compatible Garmin chartplotter on the included NMEA 0183 data cable. Rx/B (-) Ï NMEA 0183 Compatible Device Wire Function Power NMEA 0183 ground Rx/A (+) Rx/B (-) Tx/A (+) Tx/B (-) NOTE...

Installation Instructions PDF
Page 9
... IPX7* Power cable length 2.7 m (9 ft.) Input voltage From 11.5 to 30 Vdc Fuse 40 A, blade-type Main power usage 1...wire (Rx/B) from the helm control must be connected to NMEA 0183 ground. Function Blue - unconnected Í Brown - Specifications Compact Pump Specification Dimensions (H × W × D) Weight Temperature range Material ECU cable length Input voltage the ECU) (from Main power... Mounting bracket: 304 stainless steel 0.6 m (24 in.) 13.8 Vdc max. • Standby: Less than 1 A • Engaged: From 5 to 10 A • Peak: 34 A CCU Specification Measurement...
... IPX7* Power cable length 2.7 m (9 ft.) Input voltage From 11.5 to 30 Vdc Fuse 40 A, blade-type Main power usage 1...wire (Rx/B) from the helm control must be connected to NMEA 0183 ground. Function Blue - unconnected Í Brown - Specifications Compact Pump Specification Dimensions (H × W × D) Weight Temperature range Material ECU cable length Input voltage the ECU) (from Main power... Mounting bracket: 304 stainless steel 0.6 m (24 in.) 13.8 Vdc max. • Standby: Less than 1 A • Engaged: From 5 to 10 A • Peak: 34 A CCU Specification Measurement...
Installation Instructions PDF
Page 10
... 127251 Transmit/Receive rate of turn 127250 Vessel heading 127258 Magnetic variation 127488 Engine parameters: Rapid update 128259 Water speed 129025 Position: Rapid update 129026 COG & SOG: Rapid update 129283 Cross track error 129284 Navigation data 130306 Wind...update 129029 GNSS position data 129283 Cross-track error 129284 Navigation data 129285 Navigation: Route/Waypoint information 130306 Wind data 130576 Small craft status NMEA 0183 Information When connected to your Garmin account. This message also appears if navigation is stopped on a chartplotter before the autopilot...
... 127251 Transmit/Receive rate of turn 127250 Vessel heading 127258 Magnetic variation 127488 Engine parameters: Rapid update 128259 Water speed 129025 Position: Rapid update 129026 COG & SOG: Rapid update 129283 Cross track error 129284 Navigation data 130306 Wind...update 129029 GNSS position data 129283 Cross-track error 129284 Navigation data 129285 Navigation: Route/Waypoint information 130306 Wind data 130576 Small craft status NMEA 0183 Information When connected to your Garmin account. This message also appears if navigation is stopped on a chartplotter before the autopilot...

Installation Instructions PDF
Page 11
...®, and the NMEA 2000 logo are trademarks of the National Marine Electronics Association. 11 Reactor™ and Shadow Drive™ are trademarks of Garmin. Contacting Garmin Support • Go to support.garmin.com for help and information, such as product manuals, frequently asked questions, videos, and customer support. • In the USA, call 913-397-8200 or 1-800...
...®, and the NMEA 2000 logo are trademarks of the National Marine Electronics Association. 11 Reactor™ and Shadow Drive™ are trademarks of Garmin. Contacting Garmin Support • Go to support.garmin.com for help and information, such as product manuals, frequently asked questions, videos, and customer support. • In the USA, call 913-397-8200 or 1-800...

Configuration Guide PDF
Page 1
... the helm lock-to operate the autopilot on a chartplotter, select Switch Direction, and repeat steps 1 though 3. REACTOR™ 40 HYDRAULIC Configuration Guide Important Safety Information WARNING See the Important Safety and Product Information guide in the product box for proper installation. Learn to -lock. 11Review the results of the Dockside Wizard (Reviewing the Results of the Dockside Wizard...
... the helm lock-to operate the autopilot on a chartplotter, select Switch Direction, and repeat steps 1 though 3. REACTOR™ 40 HYDRAULIC Configuration Guide Important Safety Information WARNING See the Important Safety and Product Information guide in the product box for proper installation. Learn to -lock. 11Review the results of the Dockside Wizard (Reviewing the Results of the Dockside Wizard...
Configuration Guide PDF
Page 2
...Perform the Autotune procedure (Performing the Autotune Procedure, page 2). 6 Set north (Setting North, page 3), or set to GPS, configure the planing speed. • On a power boat with the tachometer (or tachometers) on -screen instructions. 2 Performing the Sea Trial Wizard 1 Drive your boat to an... chartplotter, select Settings > My Vessel > Autopilot Installation Setup > Compass Setup > Compass Cal. > Begin. 2 Follow the directions until calibration is not successful, select Retry and repeat steps 1 through the NMEA 2000 network or using an external GPS antenna mounted with the NMEA...
...Perform the Autotune procedure (Performing the Autotune Procedure, page 2). 6 Set north (Setting North, page 3), or set to GPS, configure the planing speed. • On a power boat with the tachometer (or tachometers) on -screen instructions. 2 Performing the Sea Trial Wizard 1 Drive your boat to an... chartplotter, select Settings > My Vessel > Autopilot Installation Setup > Compass Setup > Compass Cal. > Begin. 2 Follow the directions until calibration is not successful, select Retry and repeat steps 1 through the NMEA 2000 network or using an external GPS antenna mounted with the NMEA...
Configuration Guide PDF
Page 3
... this procedure as part of the Sea Trial Wizard, select Begin. • If you are performing this calibration outside of the Sea Trial Wizard on a helm control, from the heading screen, select Menu > Setup > Dealer Autopilot Setup > Autopilot Tuning > Acceleration Limiter. • On a chartplotter, select Settings > My Vessel > Autopilot Installation Setup > Autopilot Tuning > Accel. If the autopilot is connected to a GPS device that...
... this procedure as part of the Sea Trial Wizard, select Begin. • If you are performing this calibration outside of the Sea Trial Wizard on a helm control, from the heading screen, select Menu > Setup > Dealer Autopilot Setup > Autopilot Tuning > Acceleration Limiter. • On a chartplotter, select Settings > My Vessel > Autopilot Installation Setup > Autopilot Tuning > Accel. If the autopilot is connected to a GPS device that...
Configuration Guide PDF
Page 4
... available after a 2018 software update. If you can also manually define each setting are set to use the advanced configuration settings of boat: • If you set to adjust how tightly the rudder corrects the turn overshoot. You can optionally select an external NMEA 2000 GPS compass or other settings. An overactive autopilot can drain the battery at low speed or high...
... available after a 2018 software update. If you can also manually define each setting are set to use the advanced configuration settings of boat: • If you set to adjust how tightly the rudder corrects the turn overshoot. You can optionally select an external NMEA 2000 GPS compass or other settings. An overactive autopilot can drain the battery at low speed or high...

Configuration Guide PDF
Page 5
... select Settings > Communications > Preferred Sources. If the value does not match the value on the helm control or chartplotter, you can use this error by moving the rudder to adjust the RPM reading on the pump and drain the battery at... can overshoot a turn when attempting to counter the original turn the steering wheel from the heading screen, select Menu > Setup > Dealer Autopilot Setup > Steering System Setup > Rudder Sensor Setup. • On a chartplotter, select Settings > My Vessel > Autopilot Installation Setup > Steering System Setup > Rudder Sensor Setup. NOTE: Some ...
... select Settings > Communications > Preferred Sources. If the value does not match the value on the helm control or chartplotter, you can use this error by moving the rudder to adjust the RPM reading on the pump and drain the battery at... can overshoot a turn when attempting to counter the original turn the steering wheel from the heading screen, select Menu > Setup > Dealer Autopilot Setup > Steering System Setup > Rudder Sensor Setup. • On a chartplotter, select Settings > My Vessel > Autopilot Installation Setup > Steering System Setup > Rudder Sensor Setup. NOTE: Some ...

Configuration Guide PDF
Page 6
Stbd. or its subsidiaries. Ang.: Allows you to enter the angle at which your rudder turns furthest starboard. © 2017 Garmin Ltd. Reactor™ and Shadow Drive™ are trademarks of Garmin Ltd. These trademarks may not be used without the express permission of Garmin Ltd. NMEA®, NMEA 2000®, and the NMEA 2000 logo are trademarks of the National Marine Electronics Association. or its subsidiaries Garmin® and the Garmin logo are trademarks of Garmin. or its subsidiaries, registered in the USA and other countries. Max. Starboard Angle or Max.
Stbd. or its subsidiaries. Ang.: Allows you to enter the angle at which your rudder turns furthest starboard. © 2017 Garmin Ltd. Reactor™ and Shadow Drive™ are trademarks of Garmin Ltd. These trademarks may not be used without the express permission of Garmin Ltd. NMEA®, NMEA 2000®, and the NMEA 2000 logo are trademarks of the National Marine Electronics Association. or its subsidiaries Garmin® and the Garmin logo are trademarks of Garmin. or its subsidiaries, registered in the USA and other countries. Max. Starboard Angle or Max.


