Astro and DC 30 Owner's Manual
Page 14
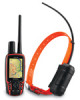
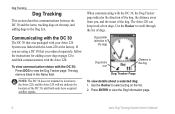
... distance away from you are using a DC 30 that was packaged with your Astro 220 System was linked with the Astro 220 at the factory. Communicating with the DC 30 The DC 30 that you ordered separately, follow the instructions for adding a new dog on the list. 2. Dog Tracking Dog Tracking This... section describes communications between the DC 30 and the Astro, tracking dogs on the map, and adding dogs to select a dog on page ...
... distance away from you are using a DC 30 that was packaged with your Astro 220 System was linked with the Astro 220 at the factory. Communicating with the DC 30 The DC 30 that you ordered separately, follow the instructions for adding a new dog on the list. 2. Dog Tracking Dog Tracking This... section describes communications between the DC 30 and the Astro, tracking dogs on the map, and adding dogs to select a dog on page ...
Astro and DC 30 Owner's Manual
Page 18
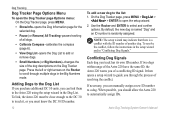
To resolve the conflict, follow the instructions in the setup wizard and in the Dog List. Dog Tracking Dog...; Calibrate Compass-calibrates the compass (page 6). • View Dog List-opens the Dog List to open the setup wizard. 2. Astro Dog Tracking System Owner's Manual On the Dog Tracker page, press MENU > Dog List > > ENTER to add or remove dogs... is randomly assigned. Conflicting Dog Signals Each dog you of resolving the conflict. If necessary, you should allow the Astro 220 to the list: 1. It then opens a setup wizard to scroll through the process of a conflicting ID ...
To resolve the conflict, follow the instructions in the setup wizard and in the Dog List. Dog Tracking Dog...; Calibrate Compass-calibrates the compass (page 6). • View Dog List-opens the Dog List to open the setup wizard. 2. Astro Dog Tracking System Owner's Manual On the Dog Tracker page, press MENU > Dog List > > ENTER to add or remove dogs... is randomly assigned. Conflicting Dog Signals Each dog you of resolving the conflict. If necessary, you should allow the Astro 220 to the list: 1. It then opens a setup wizard to scroll through the process of a conflicting ID ...

Astro and DC 30 Owner's Manual
Page 19
...-second and 30-second updates reduce battery drain, but they create a less-detailed dog track and collected statistics. 4. Complete the setup wizard instructions. Objects in your dog's DC 30 produces the best communication signal. To achieve the best line-of-sight conditions, move to the highest ... 30 operates for Successful Tracking • Use a fully charged DC 30. Ensure that the Astro 220 is within a few feet of -Sight Radio Communication Astro Dog Tracking System Owner's Manual 13 Settings. 2. The Astro 220 and DC 30 use radio signals to a dog and change the update rate: 1....
...-second and 30-second updates reduce battery drain, but they create a less-detailed dog track and collected statistics. 4. Complete the setup wizard instructions. Objects in your dog's DC 30 produces the best communication signal. To achieve the best line-of-sight conditions, move to the highest ... 30 operates for Successful Tracking • Use a fully charged DC 30. Ensure that the Astro 220 is within a few feet of -Sight Radio Communication Astro Dog Tracking System Owner's Manual 13 Settings. 2. The Astro 220 and DC 30 use radio signals to a dog and change the update rate: 1....
Astro and DC 30 Owner's Manual
Page 29
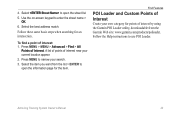
...near your own category for points of Interest Create your current location appear. 2. Find Features POI Loader and Custom Points of interest by using the Garmin POI Loader utility, downloadable from the list > ENTER to open the street list. 5. Press MENU > MENU > Advanced > Find > All... enter the street name > OK. 6. Select to use POI Loader. Select the item you want from the Garmin Web site: www.garmin.com/products/poiloader. Follow the Help instructions to open the information page for an intersection. Select the best address match. 4. To find a point of ...
...near your own category for points of Interest Create your current location appear. 2. Find Features POI Loader and Custom Points of interest by using the Garmin POI Loader utility, downloadable from the list > ENTER to open the street list. 5. Press MENU > MENU > Advanced > Find > All... enter the street name > OK. 6. Select to use POI Loader. Select the item you want from the Garmin Web site: www.garmin.com/products/poiloader. Follow the Help instructions to open the information page for an intersection. Select the best address match. 4. To find a point of ...

Astro and DC 30 Owner's Manual
Page 59
... Select Auto Calibration > ENTER > On. When On, elevation is not recorded when in Fixed Elevation mode. Astro Dog Tracking System Owner's Manual 53 For more details on -screen instructions. Trip data is corrected by the GPS receiver. To calibrate the altimeter: Select Altimeter, and follow the on... , to manually calibrate the altimeter when you turn the Astro 220 on altimeter calibration, see page 30. ...
... Select Auto Calibration > ENTER > On. When On, elevation is not recorded when in Fixed Elevation mode. Astro Dog Tracking System Owner's Manual 53 For more details on -screen instructions. Trip data is corrected by the GPS receiver. To calibrate the altimeter: Select Altimeter, and follow the on... , to manually calibrate the altimeter when you turn the Astro 220 on altimeter calibration, see page 30. ...

Astro and DC 30 Owner's Manual
Page 62
...The USB drivers are installed 56 to your computer, your computer detects your Garmin dealer, Garmin Product Support (page i), or visit the Garmin Web site at www.garmin.com/products/astro/. To connect your Astro 220 to your computer might prompt you to locate the destination of nearby ... MapSource Trip and Waypoint Manager software. Insert the smaller connector on the USB cable into the USB port on your Astro 220. Follow the instructions for installation and operation provided with detailed maps from optional MapSource disks to enhance your computer. Topo maps. A microSD...
...The USB drivers are installed 56 to your computer, your computer detects your Garmin dealer, Garmin Product Support (page i), or visit the Garmin Web site at www.garmin.com/products/astro/. To connect your Astro 220 to your computer might prompt you to locate the destination of nearby ... MapSource Trip and Waypoint Manager software. Insert the smaller connector on the USB cable into the USB port on your Astro 220. Follow the instructions for installation and operation provided with detailed maps from optional MapSource disks to enhance your computer. Topo maps. A microSD...

Astro and DC 30 Owner's Manual
Page 63
Go to the microSD card: Follow the instructions provided with Batteries Removed To transfer Garmin MapSource map data to www.garmin.com/cartography/ for compatible MapSource products. MicroSD card cover MicroSD card tray MicroSD card Appendix Astro 220 with the MapSource map data disk. Remove the AA batteries. 3. ...To install or remove the microSD card: 1. Remove the battery compartment cover from your Garmin dealer. Slide the cover forward to a computer using the USB cable provided. 2. Connect the Astro 220 to lock it to the microSD card, use the USB mass storage mode: ...
Go to the microSD card: Follow the instructions provided with Batteries Removed To transfer Garmin MapSource map data to www.garmin.com/cartography/ for compatible MapSource products. MicroSD card cover MicroSD card tray MicroSD card Appendix Astro 220 with the MapSource map data disk. Remove the AA batteries. 3. ...To install or remove the microSD card: 1. Remove the battery compartment cover from your Garmin dealer. Slide the cover forward to a computer using the USB cable provided. 2. Connect the Astro 220 to lock it to the microSD card, use the USB mass storage mode: ...
Astro and DC 30 Owner's Manual
Page 64
...installation and operation provided with the Astro 220. 4. If you are using the USB cable provided. To transfer files to the Windows Help system. Follow the instructions for the microSD on . 3. Browse your computer for the Astro 220 removable storage device. Select ...Edit > Paste. Unplug your Astro 220 microSD card. Turn the Astro 220 on a Macintosh® computer. 4. Double-click on the Astro 220: 1. To eject and unplug the USB cable: 1. Install Garmin...
...installation and operation provided with the Astro 220. 4. If you are using the USB cable provided. To transfer files to the Windows Help system. Follow the instructions for the microSD on . 3. Browse your computer for the Astro 220 removable storage device. Select ...Edit > Paste. Unplug your Astro 220 microSD card. Turn the Astro 220 on a Macintosh® computer. 4. Double-click on the Astro 220: 1. To eject and unplug the USB cable: 1. Install Garmin...

Astro and DC 30 Owner's Manual
Page 65
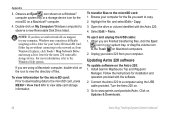
... Download (located under Unit Software) and follow the instructions. (If Unit Software is not listed on ‑screen instructions. 7. Follow the instructions for installation and operation provided with the software. 2. Turn the DC 30 on Updates & Downloads. 4. Connect the Astro 220 to www.garmin.com/products/Astro. Click on and place it within 12 inches of...
... Download (located under Unit Software) and follow the instructions. (If Unit Software is not listed on ‑screen instructions. 7. Follow the instructions for installation and operation provided with the software. 2. Turn the DC 30 on Updates & Downloads. 4. Connect the Astro 220 to www.garmin.com/products/Astro. Click on and place it within 12 inches of...

Astro and DC 30 Owner's Manual
Page 69
...areas could be advised to your radio OFF when in a "blasting area" or in these areas instruct you are often, but not always clearly marked. Your physician may affect improperly installed or inadequately ... Facilities-Turn your radio before boarding an aircraft or check the airline rules. Obey all signs and instructions. They include fueling areas such as grain, dust, or metal powders; taking place. Switch OFF ... obtaining this information. Obey all signs and instructions. areas where the air contains chemicals or particles, such as gasoline stations, below deck on board...
...areas could be advised to your radio OFF when in a "blasting area" or in these areas instruct you are often, but not always clearly marked. Your physician may affect improperly installed or inadequately ... Facilities-Turn your radio before boarding an aircraft or check the airline rules. Obey all signs and instructions. They include fueling areas such as grain, dust, or metal powders; taking place. Switch OFF ... obtaining this information. Obey all signs and instructions. areas where the air contains chemicals or particles, such as gasoline stations, below deck on board...

Astro and DC 40 Quick Start Manual
Page 1
...Use alkaline, NiMH, or lithium batteries. 1. Turning On the Devices 1. Press MENU. 3. Follow the on -screen instructions. 3. Installing Batteries in the Astro. 2. Wait for the DC 40 to the Astro. The red LED flashes (single blink) when the DC 40 is saved as cars, buildings, or overhead power ... hunt. Press DOG to track your dog using it , or you can take a few minutes. 1. Follow the onscreen instructions. The Astro must be close enough to the DC 40 to this location after moving long distances, experiencing temperature changes, or changing the batteries. 1.
...Use alkaline, NiMH, or lithium batteries. 1. Turning On the Devices 1. Press MENU. 3. Follow the on -screen instructions. 3. Installing Batteries in the Astro. 2. Wait for the DC 40 to the Astro. The red LED flashes (single blink) when the DC 40 is saved as cars, buildings, or overhead power ... hunt. Press DOG to track your dog using it , or you can take a few minutes. 1. Follow the onscreen instructions. The Astro must be close enough to the DC 40 to this location after moving long distances, experiencing temperature changes, or changing the batteries. 1.

Astro and DC 40 Quick Start Manual
Page 2
... ID number is on the map. Press to cancel data entry or return to zoom out on the Garmin Web site. • www.garmin.com/products/astro • www.garmin.com/astro (tutorial) Contacting Garmin Product Support You can find more information about this product on the map. 1. Press DOG > MENU... the ID number of another dog. Follow the on -screen instructions and refer to http://my.garmin.com. • Keep the original sales receipt, or a photocopy, in a safe place. 0470 © 2010 Garmin Ltd. You can contact Garmin Product Support if you by phone at +44 (0) 870.8501241...
... ID number is on the map. Press to cancel data entry or return to zoom out on the Garmin Web site. • www.garmin.com/products/astro • www.garmin.com/astro (tutorial) Contacting Garmin Product Support You can find more information about this product on the map. 1. Press DOG > MENU... the ID number of another dog. Follow the on -screen instructions and refer to http://my.garmin.com. • Keep the original sales receipt, or a photocopy, in a safe place. 0470 © 2010 Garmin Ltd. You can contact Garmin Product Support if you by phone at +44 (0) 870.8501241...

DC 30 Battery Replacement Instructions
Page 1
...‑cover screws from the mounting plate on the bottom cover do not begin flashing, check the six‑pin connector for the Garmin® Astro™ Dog Tracking System. Note the orientation of the battery on the bottom cover. Charging a fully depleted DC 30 battery requires ... will install the new battery the same way. Place the wired end of the battery in the Astro 220 Owner's Manual. Astro™ System DC 30 Battery, Collar, and Antenna Replacement Instructions This document provides the following parts: • One rechargeable lithium‑ion battery • Two ...
...‑cover screws from the mounting plate on the bottom cover do not begin flashing, check the six‑pin connector for the Garmin® Astro™ Dog Tracking System. Note the orientation of the battery on the bottom cover. Charging a fully depleted DC 30 battery requires ... will install the new battery the same way. Place the wired end of the battery in the Astro 220 Owner's Manual. Astro™ System DC 30 Battery, Collar, and Antenna Replacement Instructions This document provides the following parts: • One rechargeable lithium‑ion battery • Two ...

DC 40 Battery Replacement Instructions
Page 1
...av bakplaten og kragen. 3. Du må sette den tilbake på samme måte. 5. Fjern batteridekselet og batteriet. Astro® System DC 40 Battery Replacement Instructions warning Do not use a sharp object to skruene på bakplaten. 2. Carefully lift out the GPS antenna from the... battery cover. 9. Check the gasket located inside the bottom cover; Limited Warranty Garmin's standard limited warranty applies...
...av bakplaten og kragen. 3. Du må sette den tilbake på samme måte. 5. Fjern batteridekselet og batteriet. Astro® System DC 40 Battery Replacement Instructions warning Do not use a sharp object to skruene på bakplaten. 2. Carefully lift out the GPS antenna from the... battery cover. 9. Check the gasket located inside the bottom cover; Limited Warranty Garmin's standard limited warranty applies...

