
Astro and DC 30 Owner's Manual
Page 6
...730;C). • Recharge the unit within the following temperature range: from -4˚F to 104˚F (from using GPS devices to use of time, store within the following warnings also apply: • Do not recharge the battery outside...Astro Dog Tracking System Owner's Manual Introduction See the Important Safety and Product Information guide in the product box for a limited length of the product. To purchase a replacement battery, see your Garmin dealer or the Garmin Web site (www.garmin.com). • Do not leave the DC...8226; Keep the used battery away from 0˚ to 40˚C).
...730;C). • Recharge the unit within the following temperature range: from -4˚F to 104˚F (from using GPS devices to use of time, store within the following warnings also apply: • Do not recharge the battery outside...Astro Dog Tracking System Owner's Manual Introduction See the Important Safety and Product Information guide in the product box for a limited length of the product. To purchase a replacement battery, see your Garmin dealer or the Garmin Web site (www.garmin.com). • Do not leave the DC...8226; Keep the used battery away from 0˚ to 40˚C).

Astro and DC 40 Quick Start Manual
Page 1
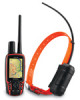
... magnetic fields, such as "Truck" so you must know the DC 40 ID number. Getting Started notice Do not attempt to track your dog using the Astro and the DC 40, both devices must acquire GPS satellite signals. The red LED flashes (single blink) when the DC 40 is saved as cars, buildings, or overhead power lines. Press...
... magnetic fields, such as "Truck" so you must know the DC 40 ID number. Getting Started notice Do not attempt to track your dog using the Astro and the DC 40, both devices must acquire GPS satellite signals. The red LED flashes (single blink) when the DC 40 is saved as cars, buildings, or overhead power lines. Press...

DC 40 Battery Replacement Instructions
Page 1
... Check the gasket located inside the bottom cover; Replace the collar, back plate, and two screws. Limited Warranty Garmin's standard limited warranty applies to skruene på bakplaten. 2. For more information, see the Important Safety and Product Information ...produktinformasjon i Astro-brukerveiledningen. TIPS: Merk deg hvordan GPS-antennen står. Du kan om nødvendig bruke en liten tang til å løfte opp GPS-antennen fra bunndekselet. 6. Koble den sekspinners kontakten fra toppdekselet. 7. Fjern de tre skruene fra batteridekselet. 9. DC 40 Components ...
... Check the gasket located inside the bottom cover; Replace the collar, back plate, and two screws. Limited Warranty Garmin's standard limited warranty applies to skruene på bakplaten. 2. For more information, see the Important Safety and Product Information ...produktinformasjon i Astro-brukerveiledningen. TIPS: Merk deg hvordan GPS-antennen står. Du kan om nødvendig bruke en liten tang til å løfte opp GPS-antennen fra bunndekselet. 6. Koble den sekspinners kontakten fra toppdekselet. 7. Fjern de tre skruene fra batteridekselet. 9. DC 40 Components ...


