
T5010 User's Guide
Page 9
Chapter 4 PC Cards 85 Installing PC Cards 86 Removing PC Cards 86 Smart Card Reader 87 Memory Upgrade Module 88 Installing Memory Upgrade Modules 88 Removing a Memory Upgrade Module 90 Checking the Memory Capacity 90 Device Ports 92 Internal LAN (RJ-...45) Jack 92 Modem (RJ-11) Jack 93 Port Replicator Connector 94 Universal Serial Bus Ports 94 IEEE 1394 Port 95 Headphone Jack 96 Microphone Jack 96 External Video Port 96 Troubleshooting Your LifeBook...
Chapter 4 PC Cards 85 Installing PC Cards 86 Removing PC Cards 86 Smart Card Reader 87 Memory Upgrade Module 88 Installing Memory Upgrade Modules 88 Removing a Memory Upgrade Module 90 Checking the Memory Capacity 90 Device Ports 92 Internal LAN (RJ-...45) Jack 92 Modem (RJ-11) Jack 93 Port Replicator Connector 94 Universal Serial Bus Ports 94 IEEE 1394 Port 95 Headphone Jack 96 Microphone Jack 96 External Video Port 96 Troubleshooting Your LifeBook...
T5010 User's Guide
Page 28
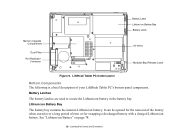
It can be opened for the removal of the battery when stored over a long period of your LifeBook Tablet PC's bottom panel components. Locating the Controls and Connectors LifeBook Tablet PC bottom panel Bottom Components The following is a brief description of time or for swapping a discharged battery with a charged Lithium... to secure the Lithium ion battery in the battery bay. See "Lithium ion Battery" on page 78. 28 - Memory Upgrade Compartment Dust Filter Port Replicator Connector Battery Latch Lithium ion Battery Bay Battery Latch Air Vents Modular Bay Release Latch Figure 6.
It can be opened for the removal of the battery when stored over a long period of your LifeBook Tablet PC's bottom panel components. Locating the Controls and Connectors LifeBook Tablet PC bottom panel Bottom Components The following is a brief description of time or for swapping a discharged battery with a charged Lithium... to secure the Lithium ion battery in the battery bay. See "Lithium ion Battery" on page 78. 28 - Memory Upgrade Compartment Dust Filter Port Replicator Connector Battery Latch Lithium ion Battery Bay Battery Latch Air Vents Modular Bay Release Latch Figure 6.

T5010 User's Guide
Page 29
...latch is used to help prevent dust and dirt from the modular bay. Memory Upgrade Compartment Your Tablet PC comes with high speed Double Data Rate 3 Synchronous Dynamic RAM (DDR3 1066 MHz SDRAM). See "Memory Upgrade Module" on page 124. 29 - THIS MAY REQUIRE PERIODIC CLEANING, ...system to open this compartment. The memory upgrade compartment allows you to connect the optional Port Replicator to expand the system memory capacity of your Tablet PC, thus improving overall performance. Locating the Controls and Connectors TO PROTECT YOUR TABLET PC FROM DAMAGE AND TO OPTIMIZE SYSTEM ...
...latch is used to help prevent dust and dirt from the modular bay. Memory Upgrade Compartment Your Tablet PC comes with high speed Double Data Rate 3 Synchronous Dynamic RAM (DDR3 1066 MHz SDRAM). See "Memory Upgrade Module" on page 124. 29 - THIS MAY REQUIRE PERIODIC CLEANING, ...system to open this compartment. The memory upgrade compartment allows you to connect the optional Port Replicator to expand the system memory capacity of your Tablet PC, thus improving overall performance. Locating the Controls and Connectors TO PROTECT YOUR TABLET PC FROM DAMAGE AND TO OPTIMIZE SYSTEM ...
T5010 User's Guide
Page 88
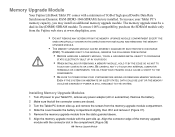
... EXCEPT THE ONES SPECIFICALLY SHOWN IN THE DIRECTIONS FOR INSTALLING AND REMOVING THE MEMORY UPGRADE MODULE. • THE MEMORY UPGRADE MODULE CAN BE SEVERELY DAMAGED BY ELECTROSTATIC DISCHARGE (ESD). The memory upgrade must be a dual-in the compartment.(Figure 38) 88 - Memory Upgrade Module Your Fujitsu LifeBook Tablet PC comes with the connector slot in -line (DIMM) SDRAM module. Align the connector...
... EXCEPT THE ONES SPECIFICALLY SHOWN IN THE DIRECTIONS FOR INSTALLING AND REMOVING THE MEMORY UPGRADE MODULE. • THE MEMORY UPGRADE MODULE CAN BE SEVERELY DAMAGED BY ELECTROSTATIC DISCHARGE (ESD). The memory upgrade must be a dual-in the compartment.(Figure 38) 88 - Memory Upgrade Module Your Fujitsu LifeBook Tablet PC comes with the connector slot in -line (DIMM) SDRAM module. Align the connector...

T5010 User's Guide
Page 89
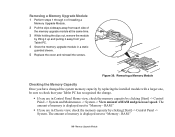
Figure 37. You'll hear a click when it lodges under the retaining clip. ONCE IT IS INSTALLED, YOU CAN LEAVE IT IN PLACE UNLESS YOU WANT TO CHANGE SYSTEM MEMORY CAPACITY. 89 - Opening Memory Compartment Figure 38. Installing a Second Memory Module 7 Insert the memory upgrade module at a 45° angle. THE MEMORY UPGRADE MODULE IS NOT SOMETHING YOU ROUTINELY REMOVE FROM YOUR TABLET PC. Memory Upgrade Module Press the connector edge of the module firmly down and into the connector until it is properly in place. 8 Replace the cover and reinstall the screws.
Figure 37. You'll hear a click when it lodges under the retaining clip. ONCE IT IS INSTALLED, YOU CAN LEAVE IT IN PLACE UNLESS YOU WANT TO CHANGE SYSTEM MEMORY CAPACITY. 89 - Opening Memory Compartment Figure 38. Installing a Second Memory Module 7 Insert the memory upgrade module at a 45° angle. THE MEMORY UPGRADE MODULE IS NOT SOMETHING YOU ROUTINELY REMOVE FROM YOUR TABLET PC. Memory Upgrade Module Press the connector edge of the module firmly down and into the connector until it is properly in place. 8 Replace the cover and reinstall the screws.
T5010 User's Guide
Page 90
...larger one, be sure to check that your Tablet PC has recognized the change. • If you are in Control Panel Home view, check the memory capacity by clicking [Start] -> Control Panel -> System and Maintenance -> System -> View amount of the memory upgrade module at the same time. 3 While holding... the clips out, remove the module by lifting it up and pulling it away from your Tablet PC. 4 Store the memory upgrade module in Classic view, check the memory capacity by clicking [Start] -> Control Panel -> System. Figure 39. RAM:" • If you are in a static...
...larger one, be sure to check that your Tablet PC has recognized the change. • If you are in Control Panel Home view, check the memory capacity by clicking [Start] -> Control Panel -> System and Maintenance -> System -> View amount of the memory upgrade module at the same time. 3 While holding... the clips out, remove the module by lifting it up and pulling it away from your Tablet PC. 4 Store the memory upgrade module in Classic view, check the memory capacity by clicking [Start] -> Control Panel -> System. Figure 39. RAM:" • If you are in a static...

T5010 User's Guide
Page 91
IF THE TOTAL MEMORY DISPLAYED IS INCORRECT, CHECK THAT YOUR MEMORY UPGRADE MODULE IS PROPERLY INSTALLED. (IF THE MODULE IS PROPERLY INSTALLED AND THE CAPACITY IS STILL NOT CORRECTLY RECOGNIZED, SEE TROUBLESHOOTING ON PAGE 98. 91 - Memory Upgrade Module There may be a variation between the actual memory size and what is configured with an integrated Intel Graphics Media Accelerator which dynamically allocates system memory to accelerate graphics performance. This is possible if your system is displayed.
IF THE TOTAL MEMORY DISPLAYED IS INCORRECT, CHECK THAT YOUR MEMORY UPGRADE MODULE IS PROPERLY INSTALLED. (IF THE MODULE IS PROPERLY INSTALLED AND THE CAPACITY IS STILL NOT CORRECTLY RECOGNIZED, SEE TROUBLESHOOTING ON PAGE 98. 91 - Memory Upgrade Module There may be a variation between the actual memory size and what is configured with an integrated Intel Graphics Media Accelerator which dynamically allocates system memory to accelerate graphics performance. This is possible if your system is displayed.

T5010 User's Guide
Page 104
...Self Test Messages" on page 85. 104 - See your application software documentation for Power On Self Test (POST) messages. Your LifeBook Tablet PC does not recognize the device, or the device does not seem to work or is locking up the system. The device is... device and operating system documentation and activate the proper driver. Remove and re-install your Tablet PC. Messages about modem operation. Close the application and restart your memory upgrade module. See "PC Cards" on page 111. Problem Possible Cause Possible Solutions You have connected an external keyboard...
...Self Test Messages" on page 85. 104 - See your application software documentation for Power On Self Test (POST) messages. Your LifeBook Tablet PC does not recognize the device, or the device does not seem to work or is locking up the system. The device is... device and operating system documentation and activate the proper driver. Remove and re-install your Tablet PC. Messages about modem operation. Close the application and restart your memory upgrade module. See "PC Cards" on page 111. Problem Possible Cause Possible Solutions You have connected an external keyboard...

T5010 User's Guide
Page 111
... by the Power On Self Test. If you have an SRAM PC Card installed.) *Extended Memory Failed at address line: xx Extended memory not working or not configured properly. nnnn Memory Cache Passed Where nnnn is the amount of memory in kilobytes successfully tested. *Failure Fixed Disk n (where x=1-4) ...and an explanation of floppy drive A: not correctly identified in Setup. This may be sure it is not using unavailable memory until you have installed a memory upgrade module, verify that it is properly installed. Error messages are OK and the message appears when you can find no ...
... by the Power On Self Test. If you have an SRAM PC Card installed.) *Extended Memory Failed at address line: xx Extended memory not working or not configured properly. nnnn Memory Cache Passed Where nnnn is the amount of memory in kilobytes successfully tested. *Failure Fixed Disk n (where x=1-4) ...and an explanation of floppy drive A: not correctly identified in Setup. This may be sure it is not using unavailable memory until you have installed a memory upgrade module, verify that it is properly installed. Error messages are OK and the message appears when you can find no ...
T5010 User's Guide
Page 132
... system is downgraded to an earlier OS, the feature is addressable memory; the upper memory is reserved by Vista for hardware usage. • Optional Intel Turbo Memory: 4 GB/2 GB half-size mini-card (This option is only viable with simultaneous display capability. upgradeable to determine the speed of your processor). Microprocessor Intel® Core...
... system is downgraded to an earlier OS, the feature is addressable memory; the upper memory is reserved by Vista for hardware usage. • Optional Intel Turbo Memory: 4 GB/2 GB half-size mini-card (This option is only viable with simultaneous display capability. upgradeable to determine the speed of your processor). Microprocessor Intel® Core...
T5010 Getting Started Guide for Configuration A2Q
Page 2
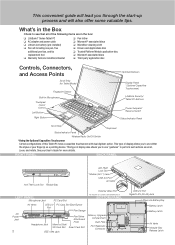
...that all of the following items are in the Box Check to perform such actions as a pointing device. What's in the box: o LifeBook T Series Tablet PC o AC adapter and power cable o Lithium ion battery (pre-installed) o Pen-kit including one pen, five additional pen tips, and...Third party application disc Controls, Connectors, and Access Points Scroll Strip (for more details. This type of this Tablet PC have a capacitive touchscreen with WWAN device Bottom PANEL Memory Upgrade Compartment Dust Filter Port Replicator Connector USB 2.0 Port Gigabit LAN (RJ-45) Jack Lithium ion Battery Bay ...
...that all of the following items are in the Box Check to perform such actions as a pointing device. What's in the box: o LifeBook T Series Tablet PC o AC adapter and power cable o Lithium ion battery (pre-installed) o Pen-kit including one pen, five additional pen tips, and...Third party application disc Controls, Connectors, and Access Points Scroll Strip (for more details. This type of this Tablet PC have a capacitive touchscreen with WWAN device Bottom PANEL Memory Upgrade Compartment Dust Filter Port Replicator Connector USB 2.0 Port Gigabit LAN (RJ-45) Jack Lithium ion Battery Bay ...
T5010 User's Guide for Configuration A2Q
Page 10
Chapter 4 PC Cards 86 Installing PC Cards 87 Removing PC Cards 87 Smart Card Reader 88 Memory Upgrade Module 89 Installing Memory Upgrade Modules 89 Removing a Memory Upgrade Module 91 Checking the Memory Capacity 91 Device Ports 93 Internal LAN (RJ-...45) Jack 93 Modem (RJ-11) Jack 94 Port Replicator Connector 95 Universal Serial Bus Ports 95 IEEE 1394 Port 96 Headphone Jack 97 Microphone Jack 97 External Video Port 97 Troubleshooting Your LifeBook...
Chapter 4 PC Cards 86 Installing PC Cards 87 Removing PC Cards 87 Smart Card Reader 88 Memory Upgrade Module 89 Installing Memory Upgrade Modules 89 Removing a Memory Upgrade Module 91 Checking the Memory Capacity 91 Device Ports 93 Internal LAN (RJ-...45) Jack 93 Modem (RJ-11) Jack 94 Port Replicator Connector 95 Universal Serial Bus Ports 95 IEEE 1394 Port 96 Headphone Jack 97 Microphone Jack 97 External Video Port 97 Troubleshooting Your LifeBook...

T5010 User's Guide for Configuration A2Q
Page 29
... of the battery when stored over a long period of your LifeBook Tablet PC's bottom panel components. See "Lithium ion Battery" on page 79. 28 - Locating the Controls and Connectors Memory Upgrade Compartment Dust Filter Port Replicator Connector Battery Latch Lithium ion Battery ...Bay Battery Latch Air Vents Modular Bay Release Latch Figure 6. LifeBook Tablet PC bottom panel Bottom Components The following is a brief description ...
... of the battery when stored over a long period of your LifeBook Tablet PC's bottom panel components. See "Lithium ion Battery" on page 79. 28 - Locating the Controls and Connectors Memory Upgrade Compartment Dust Filter Port Replicator Connector Battery Latch Lithium ion Battery ...Bay Battery Latch Air Vents Modular Bay Release Latch Figure 6. LifeBook Tablet PC bottom panel Bottom Components The following is a brief description ...

T5010 User's Guide for Configuration A2Q
Page 30
Air Vents The air vents allow air to circulate through the system to open this compartment. Memory Upgrade Compartment Your Tablet PC comes with high speed Double Data Rate 3 Synchronous Dynamic RAM (DDR3 1066 MHz SDRAM). Locating the Controls and Connectors Under normal ... Port Replicator Connector This connector allows you to your Tablet PC. DO NOT OPERATE THE TABLET PC IN AREAS WHERE THE AIR VENTS CAN BE OBSTRUCTED, SUCH AS IN TIGHT ENCLOSURES OR ON SOFT SURFACES LIKE A BED OR CUSHION. The memory upgrade compartment allows you to connect the optional Port Replicator to...
Air Vents The air vents allow air to circulate through the system to open this compartment. Memory Upgrade Compartment Your Tablet PC comes with high speed Double Data Rate 3 Synchronous Dynamic RAM (DDR3 1066 MHz SDRAM). Locating the Controls and Connectors Under normal ... Port Replicator Connector This connector allows you to your Tablet PC. DO NOT OPERATE THE TABLET PC IN AREAS WHERE THE AIR VENTS CAN BE OBSTRUCTED, SUCH AS IN TIGHT ENCLOSURES OR ON SOFT SURFACES LIKE A BED OR CUSHION. The memory upgrade compartment allows you to connect the optional Port Replicator to...

T5010 User's Guide for Configuration A2Q
Page 90
Memory Upgrade Module Your Fujitsu LifeBook Tablet PC comes with a minimum of 1GB of the memory upgrade module with the part side up. Installing Memory Upgrade Modules 1 Turn off power to your Tablet PC's memory capacity, you may install an additional memory upgrade module. Memory Upgrade Module To increase your Tablet PC, remove any power adapter (AC or auto/airline). TO MINIMIZE RISK TO THE MODULE, OBSERVE THE FOLLOWING PRECAUTIONS...
Memory Upgrade Module Your Fujitsu LifeBook Tablet PC comes with a minimum of 1GB of the memory upgrade module with the part side up. Installing Memory Upgrade Modules 1 Turn off power to your Tablet PC's memory capacity, you may install an additional memory upgrade module. Memory Upgrade Module To increase your Tablet PC, remove any power adapter (AC or auto/airline). TO MINIMIZE RISK TO THE MODULE, OBSERVE THE FOLLOWING PRECAUTIONS...

T5010 User's Guide for Configuration A2Q
Page 91
You'll hear a click when it lodges under the retaining clip. Press the connector edge of the module firmly down and into the connector until it is properly in place. 8 Replace the cover and reinstall the screws. THE MEMORY UPGRADE MODULE IS NOT SOMETHING YOU ROUTINELY REMOVE FROM YOUR TABLET PC. Installing a Second Memory Module 7 Insert the memory upgrade module at a 45° angle. Figure 37. Memory Upgrade Module ONCE IT IS INSTALLED, YOU CAN LEAVE IT IN PLACE UNLESS YOU WANT TO CHANGE SYSTEM MEMORY CAPACITY. 90 - Opening Memory Compartment Figure 38.
You'll hear a click when it lodges under the retaining clip. Press the connector edge of the module firmly down and into the connector until it is properly in place. 8 Replace the cover and reinstall the screws. THE MEMORY UPGRADE MODULE IS NOT SOMETHING YOU ROUTINELY REMOVE FROM YOUR TABLET PC. Installing a Second Memory Module 7 Insert the memory upgrade module at a 45° angle. Figure 37. Memory Upgrade Module ONCE IT IS INSTALLED, YOU CAN LEAVE IT IN PLACE UNLESS YOU WANT TO CHANGE SYSTEM MEMORY CAPACITY. 90 - Opening Memory Compartment Figure 38.

T5010 User's Guide for Configuration A2Q
Page 92
... by clicking [Start] -> Control Panel -> System. The amount of memory is displayed next to "Memory - Removing a Memory Module Checking the Memory Capacity Once you have changed the system memory capacity by replacing the installed module with a larger one, be sure to check that your Tablet PC. 4 Store the memory upgrade module in a static guarded sleeve. 5 Replace the cover and...
... by clicking [Start] -> Control Panel -> System. The amount of memory is displayed next to "Memory - Removing a Memory Module Checking the Memory Capacity Once you have changed the system memory capacity by replacing the installed module with a larger one, be sure to check that your Tablet PC. 4 Store the memory upgrade module in a static guarded sleeve. 5 Replace the cover and...

T5010 User's Guide for Configuration A2Q
Page 93
Memory Upgrade Module This is possible if your system is displayed. IF THE TOTAL MEMORY DISPLAYED IS INCORRECT, CHECK THAT YOUR MEMORY UPGRADE MODULE IS PROPERLY INSTALLED. (IF THE MODULE IS PROPERLY INSTALLED AND THE CAPACITY IS STILL NOT CORRECTLY RECOGNIZED, SEE TROUBLESHOOTING ON PAGE 99. 92 - There may be a variation between the actual memory size and what is configured with an integrated Intel Graphics Media Accelerator which dynamically allocates system memory to accelerate graphics performance.
Memory Upgrade Module This is possible if your system is displayed. IF THE TOTAL MEMORY DISPLAYED IS INCORRECT, CHECK THAT YOUR MEMORY UPGRADE MODULE IS PROPERLY INSTALLED. (IF THE MODULE IS PROPERLY INSTALLED AND THE CAPACITY IS STILL NOT CORRECTLY RECOGNIZED, SEE TROUBLESHOOTING ON PAGE 99. 92 - There may be a variation between the actual memory size and what is configured with an integrated Intel Graphics Media Accelerator which dynamically allocates system memory to accelerate graphics performance.

T5010 User's Guide for Configuration A2Q
Page 106
... for Power On Self Test (POST) messages. See "PC Cards" on page 112. Memory Problems Your System screen in use. The device is not properly installed. Your memory upgrade module is not properly installed. Messages about modem operation. See your Tablet PC. You have installed a USB device. Your LifeBook Tablet PC does not recognize the device, or the device...
... for Power On Self Test (POST) messages. See "PC Cards" on page 112. Memory Problems Your System screen in use. The device is not properly installed. Your memory upgrade module is not properly installed. Messages about modem operation. See your Tablet PC. You have installed a USB device. Your LifeBook Tablet PC does not recognize the device, or the device...

T5010 User's Guide for Configuration A2Q
Page 113
...Self Test. If you can contact your support representative. If it is not using unavailable memory until you have an SRAM PC Card installed.) *Extended Memory Failed at address line: xx Extended memory not working or not configured properly. Run the setup utility to check for assistance. ...fault which might cause you to correct the inconsistency. 112 - Error messages are OK and the message appears when you have installed a memory upgrade module, verify that is not in Setup. nnnn Extended RAM Passed Where nnnn is the amount of floppy drive A: not correctly identified in...
...Self Test. If you can contact your support representative. If it is not using unavailable memory until you have an SRAM PC Card installed.) *Extended Memory Failed at address line: xx Extended memory not working or not configured properly. Run the setup utility to check for assistance. ...fault which might cause you to correct the inconsistency. 112 - Error messages are OK and the message appears when you have installed a memory upgrade module, verify that is not in Setup. nnnn Extended RAM Passed Where nnnn is the amount of floppy drive A: not correctly identified in...


