
Battery Charger User's Guide
Page 1
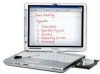
BATTERY CHARGER COMPONENTS Battery Connector 1 Battery Connector 2 Power Indicator LED AC Adapter Connector Charge Indicator LEDs Figure 1. Battery Charger Components Power Indicator LED The Power Indicator LED is being supplied from the AC adapter. 1 Fujitsu Computer Systems Corporation Battery Charger User's Guide This user's guide contains information on when power is on your battery charger. We strongly recommend that you read this guide before using the battery charger even if you are already familiar with computers.
BATTERY CHARGER COMPONENTS Battery Connector 1 Battery Connector 2 Power Indicator LED AC Adapter Connector Charge Indicator LEDs Figure 1. Battery Charger Components Power Indicator LED The Power Indicator LED is being supplied from the AC adapter. 1 Fujitsu Computer Systems Corporation Battery Charger User's Guide This user's guide contains information on when power is on your battery charger. We strongly recommend that you read this guide before using the battery charger even if you are already familiar with computers.
Battery Charger User's Guide
Page 2
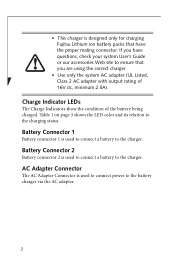
Charge Indicator LEDs The Charge Indicators show the condition of 16V dc, minimum 2.5A). Battery Connector 1 Battery connector 1 is designed only for charging Fujitsu Lithium ion battery packs that you are using the correct charger. • Use only the system AC adapter (UL Listed, Class 2 AC adapter with output ...
Charge Indicator LEDs The Charge Indicators show the condition of 16V dc, minimum 2.5A). Battery Connector 1 Battery connector 1 is designed only for charging Fujitsu Lithium ion battery packs that you are using the correct charger. • Use only the system AC adapter (UL Listed, Class 2 AC adapter with output ...

Battery Charger User's Guide
Page 3
The two Charge Indicator LEDs show the charging status of the battery connected to a plugged-in AC adapter. If this happens, immediately disconnect the AC adapter and remove the battery from the charger. • If the battery charger detects a failure in its charging circuit, the Charging Indicator LED will turn a steady red. If this happens, immediately remove the battery from the charger. 3 Charge Indicator Flashes orange Steady orange Steady green Steady red Flashing red No light Charging Condition Standing by for charging Charging Charging is wrong with the battery, ...
The two Charge Indicator LEDs show the charging status of the battery connected to a plugged-in AC adapter. If this happens, immediately disconnect the AC adapter and remove the battery from the charger. • If the battery charger detects a failure in its charging circuit, the Charging Indicator LED will turn a steady red. If this happens, immediately remove the battery from the charger. 3 Charge Indicator Flashes orange Steady orange Steady green Steady red Flashing red No light Charging Condition Standing by for charging Charging Charging is wrong with the battery, ...

Battery Charger User's Guide
Page 4
Plug the AC adapter into an AC outlet. (Figure 2) 3. The Power Indicator LED will light up and the Charging Indicator LED(s) will turn green. This is extremely high or low, the battery charger will take longer to charge. • When the ambient temperature is low, it will standby for charging until the battery returns to normal temperature. Battery Capacity Charging Time Less than 2500 mAh 5 hours 2500 mAh to 4100 mAh 8 hours Over 4100 mAh 12 hours • When a battery has been left unused for a long time, it will take longer to charge a battery. • If the ...
Plug the AC adapter into an AC outlet. (Figure 2) 3. The Power Indicator LED will light up and the Charging Indicator LED(s) will turn green. This is extremely high or low, the battery charger will take longer to charge. • When the ambient temperature is low, it will standby for charging until the battery returns to normal temperature. Battery Capacity Charging Time Less than 2500 mAh 5 hours 2500 mAh to 4100 mAh 8 hours Over 4100 mAh 12 hours • When a battery has been left unused for a long time, it will take longer to charge a battery. • If the ...

Battery Charger User's Guide
Page 5
The battery that was connected first is being charged. 6. • The charger can have two batteries connected at the same time, but it charges only one at a time. The Charging Indicator LED(s) will turn orange when the battery(s) is charged first. The Charging Indicator LED(s) will turn green when charging is completely charged. • Charging time varies depending on the environmental conditions (such as temperature) or deterioration of the battery(s). 5. Connecting the AC Adapter 5 Figure 2. The second battery is held in a wait status until the first battery is ...
The battery that was connected first is being charged. 6. • The charger can have two batteries connected at the same time, but it charges only one at a time. The Charging Indicator LED(s) will turn orange when the battery(s) is charged first. The Charging Indicator LED(s) will turn green when charging is completely charged. • Charging time varies depending on the environmental conditions (such as temperature) or deterioration of the battery(s). 5. Connecting the AC Adapter 5 Figure 2. The second battery is held in a wait status until the first battery is ...
Battery Charger User's Guide
Page 6
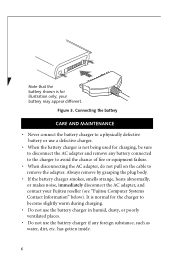
...; When the battery charger is normal for illustration only; It is not being used for charging, be sure to remove the adapter. Figure 3. your Fujitsu reseller (see "Fujitsu Computer Systems Contact Information" below). Always remove by grasping the plug body. • If the battery charger smokes, smells strange, heats abnormally, or makes...
...; When the battery charger is normal for illustration only; It is not being used for charging, be sure to remove the adapter. Figure 3. your Fujitsu reseller (see "Fujitsu Computer Systems Contact Information" below). Always remove by grasping the plug body. • If the battery charger smokes, smells strange, heats abnormally, or makes...
Battery Charger User's Guide
Page 7
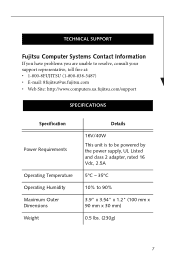
... are unable to resolve, consult your support representative, toll free at: • 1-800-8FUJITSU (1-800-838-5487) • E-mail: 8fujitsu@us.fujitsu.com • Web Site: http://www.computers.us.fujitsu.com/support SPECIFICATIONS Specification Power Requirements Operating Temperature Operating Humidity Maximum Outer Dimensions Weight Details 16V/40W This unit is to...
... are unable to resolve, consult your support representative, toll free at: • 1-800-8FUJITSU (1-800-838-5487) • E-mail: 8fujitsu@us.fujitsu.com • Web Site: http://www.computers.us.fujitsu.com/support SPECIFICATIONS Specification Power Requirements Operating Temperature Operating Humidity Maximum Outer Dimensions Weight Details 16V/40W This unit is to...

Battery Charger User's Guide
Page 8
... Declares that may cause undesired operation. Operations are subject to the following two conditions:(1) This device must not be allowed to FCC Part 15 Responsible Fujitsu Computer Systems Corporation Party Name: Address: 1250 E.
... Declares that may cause undesired operation. Operations are subject to the following two conditions:(1) This device must not be allowed to FCC Part 15 Responsible Fujitsu Computer Systems Corporation Party Name: Address: 1250 E.

Battery Charger User's Guide
Page 9
Shielded interconnect cables must be employed with this equipment to ensure compliance with the instructions, may cause harmful interference to radio or television reception, which can be operated at a maximum ambient temperature of 35° C (95° F). 9 CET appareil numérique de la class B respecte toutes les exigence du Réglement sur le matérial brouilleur du Canada. If this device. Notice to Users of Radios and Television This Class B digital apparatus meets all requirements of the Canadian Interference-Causing Equipment Regulations. This equipment generates...
Shielded interconnect cables must be employed with this equipment to ensure compliance with the instructions, may cause harmful interference to radio or television reception, which can be operated at a maximum ambient temperature of 35° C (95° F). 9 CET appareil numérique de la class B respecte toutes les exigence du Réglement sur le matérial brouilleur du Canada. If this device. Notice to Users of Radios and Television This Class B digital apparatus meets all requirements of the Canadian Interference-Causing Equipment Regulations. This equipment generates...

Battery Charger User's Guide
Page 12
...Web site at: www.shopfujitsu.com For technical support call:1-800-8FUJITSU (1-800-838-5487) or e-mail us at: 8fujitsu@us.fujitsu.com Fujitsu and the Fujitsu logo are the property of their respective owners. actual results may vary based on this product will expose you to lead, a... chemical known to the State of California to change without notice. © 2008 Fujitsu Computer Systems Corporation. B5FY-8881-01EN-00 12 Warning Handling the cord on a variety of Fujitsu Ltd. All other reproductive harm. Specifications are subject to cause birth defects or other trademarks ...
...Web site at: www.shopfujitsu.com For technical support call:1-800-8FUJITSU (1-800-838-5487) or e-mail us at: 8fujitsu@us.fujitsu.com Fujitsu and the Fujitsu logo are the property of their respective owners. actual results may vary based on this product will expose you to lead, a... chemical known to the State of California to change without notice. © 2008 Fujitsu Computer Systems Corporation. B5FY-8881-01EN-00 12 Warning Handling the cord on a variety of Fujitsu Ltd. All other reproductive harm. Specifications are subject to cause birth defects or other trademarks ...

T4215 BIOS Guide
Page 2
...[F1] key gives you to be invoked by pressing the [F12] key when the Fujitsu logo appears on the screen. Using the TrustedCore Menu When the Fujitsu logo appears on or restart your tablet. The TrustedCore Menu provides shortcuts to a menu from any of the fields will open the...through the other menu, press the [Esc] key. ■ Selecting a field causes a help screen. Pressing the Enter key again will appear. LifeBook T Series Tablet PC T Series BIOS BIOS SETUP UTILITY The BIOS Setup Utility is executed. 9. Your BIOS is not a submenu or auto selection will be asked to ...
...[F1] key gives you to be invoked by pressing the [F12] key when the Fujitsu logo appears on the screen. Using the TrustedCore Menu When the Fujitsu logo appears on or restart your tablet. The TrustedCore Menu provides shortcuts to a menu from any of the fields will open the...through the other menu, press the [Esc] key. ■ Selecting a field causes a help screen. Pressing the Enter key again will appear. LifeBook T Series Tablet PC T Series BIOS BIOS SETUP UTILITY The BIOS Setup Utility is executed. 9. Your BIOS is not a submenu or auto selection will be asked to ...

T4215 BIOS Guide
Page 3
... 2. The system will then display the Main Menu with the boot process and start the operating system anyway, press the [F1] key. ■ If your tablet emits a series of beeps that sounds like a code and the display is displayed on the screen, and you want to continue with current parameters values...
... 2. The system will then display the Main Menu with the boot process and start the operating system anyway, press the [F1] key. ■ If your tablet emits a series of beeps that sounds like a code and the display is displayed on the screen, and you want to continue with current parameters values...

T4215 BIOS Guide
Page 4
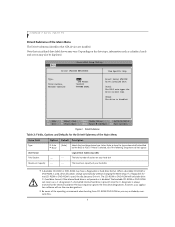
...your operating system without using the setup utility. Time is in a 24 hour for each. (HH:MM:SS). You may vary. LifeBook T Series Tablet PC MAIN MENU - SETTING STANDARD SYSTEM PARAMETERS The Main Menu allows you to set from your Windows Control panel or type time or date ...from the MS-DOS prompt. PhoenixBIOS Setup Utility Main Advanced Security Boot Info Exit System Time: System Date: Drive0 Drive1 Language: [02:34:56] [06/08/2006] [FUJITSU...
...your operating system without using the setup utility. Time is in a 24 hour for each. (HH:MM:SS). You may vary. LifeBook T Series Tablet PC MAIN MENU - SETTING STANDARD SYSTEM PARAMETERS The Main Menu allows you to set from your Windows Control panel or type time or date ...from the MS-DOS prompt. PhoenixBIOS Setup Utility Main Advanced Security Boot Info Exit System Time: System Date: Drive0 Drive1 Language: [02:34:56] [06/08/2006] [FUJITSU...

T4215 BIOS Guide
Page 5
Date is one. rately. Pressing the Enter key selects the Drive0 submenu allowing additional device configuration options for this ATA/IDE interface. Display the type of the date sepa- Language: ■ English (US) ■ Japanese (JP) [English (US)] The default setting differs between the segments with 2 digits each segment of device on this interface. Move between the US/European and the Japanese model. Drive0 Selects the Drive0 Serial ATA drive submenu The product number of the CD-ROM drive. Pressing the Enter key selects the Serial ATA Drive1 submenu ...
Date is one. rately. Pressing the Enter key selects the Drive0 submenu allowing additional device configuration options for this ATA/IDE interface. Display the type of the date sepa- Language: ■ English (US) ■ Japanese (JP) [English (US)] The default setting differs between the segments with 2 digits each segment of device on this interface. Move between the US/European and the Japanese model. Drive0 Selects the Drive0 Serial ATA drive submenu The product number of the CD-ROM drive. Pressing the Enter key selects the Serial ATA Drive1 submenu ...
T4215 BIOS Guide
Page 6
... of the operating environment when booting from CD-ROM/DVD-ROM or you may mistakenly overwrite files. 6 PhoenixBIOS Setup Utility Main Drive0 [FUJITSU MHV2040BH] Item Specific Help Type: Total Sectors: Maximum Capacity: [Auto] LBA Format 78140160 40008MB SATA1 Select Serial ATA/IDE drive installed...Type: LBA Format Total Sectors: Options Default Description ■ Auto ■ None [Auto] Selects the hard drive device type. LifeBook T Series Tablet PC Drive0 Submenu of your hard disk ■ A bootable CD-ROM or DVD-ROM may have the type automatically identified by the BIOS...
... of the operating environment when booting from CD-ROM/DVD-ROM or you may mistakenly overwrite files. 6 PhoenixBIOS Setup Utility Main Drive0 [FUJITSU MHV2040BH] Item Specific Help Type: Total Sectors: Maximum Capacity: [Auto] LBA Format 78140160 40008MB SATA1 Select Serial ATA/IDE drive installed...Type: LBA Format Total Sectors: Options Default Description ■ Auto ■ None [Auto] Selects the hard drive device type. LifeBook T Series Tablet PC Drive0 Submenu of your hard disk ■ A bootable CD-ROM or DVD-ROM may have the type automatically identified by the BIOS...
T4215 BIOS Guide
Page 7
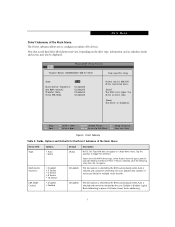
F1 Help ESC Exit Select Item Select Menu -/Space Change Values F9 Setup Defaults ▲ Enter Select Sub-Menu F10 Save and Exit Figure 3. Tap the spacebar to configure secondary ATA devices. The best option is selected by the BIOS automatically when Auto is selected and cannot be selected by the BIOS automatically when Auto is selected and cannot be displayed. Specifies the number of sectors per block for the Drive1 Submenu of the Main Menu Menu Field Type: Options • Auto • None Multi-Sector Transfers: LBA Mode Control: • Disabled • 2 Sectors ...
F1 Help ESC Exit Select Item Select Menu -/Space Change Values F9 Setup Defaults ▲ Enter Select Sub-Menu F10 Save and Exit Figure 3. Tap the spacebar to configure secondary ATA devices. The best option is selected by the BIOS automatically when Auto is selected and cannot be selected by the BIOS automatically when Auto is selected and cannot be displayed. Specifies the number of sectors per block for the Drive1 Submenu of the Main Menu Menu Field Type: Options • Auto • None Multi-Sector Transfers: LBA Mode Control: • Disabled • 2 Sectors ...
T4215 BIOS Guide
Page 8
...; Mode 4 • Mode 5 [Disabled] The best option is selected by the BIOS automatically when Auto is selected and cannot be selected by the user. LifeBook T Series Tablet PC Table 3: Fields, Options and Defaults for moving data to /from the drive. Selects the method for the Drive1 Submenu of the Main Menu Menu Field...
...; Mode 4 • Mode 5 [Disabled] The best option is selected by the BIOS automatically when Auto is selected and cannot be selected by the user. LifeBook T Series Tablet PC Table 3: Fields, Options and Defaults for moving data to /from the drive. Selects the method for the Drive1 Submenu of the Main Menu Menu Field...

T4215 BIOS Guide
Page 9
Main Menu ADVANCED MENU - SETTING DEVICE FEATURE CONTROLS The Advanced Menu allows you to: ■ Set the I/O addresses for the infrared ports. ■ Set the features of the field's function, and any changes. (See Navigating through the Setup Utility on page 2 for more information) The following tables show the names of the menu fields for the Advanced Menu and its submenus, all of the options for Navigating Through the Setup Utility to make any special information needed to help understand the field's use. Follow the instructions for each field, the default settings and a ...
Main Menu ADVANCED MENU - SETTING DEVICE FEATURE CONTROLS The Advanced Menu allows you to: ■ Set the I/O addresses for the infrared ports. ■ Set the features of the field's function, and any changes. (See Navigating through the Setup Utility on page 2 for more information) The following tables show the names of the menu fields for the Advanced Menu and its submenus, all of the options for Navigating Through the Setup Utility to make any special information needed to help understand the field's use. Follow the instructions for each field, the default settings and a ...

T4215 BIOS Guide
Page 10
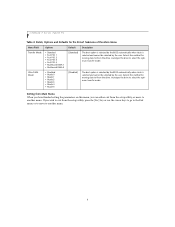
... event logging submenu. 10 Keyboard/Mouse Features When selected, opens the Keyboard/Mouse Features submenu, which allows the user to different displays or video projectors. LifeBook T Series Tablet PC Table 4: Fields, Options and Defaults for infrared ports. Miscellaneous Configurations Configures miscellaneous features, such as Wake Up On LAN and Power Button. Video Features...
... event logging submenu. 10 Keyboard/Mouse Features When selected, opens the Keyboard/Mouse Features submenu, which allows the user to different displays or video projectors. LifeBook T Series Tablet PC Table 4: Fields, Options and Defaults for infrared ports. Miscellaneous Configurations Configures miscellaneous features, such as Wake Up On LAN and Power Button. Video Features...

T4215 BIOS Guide
Page 11
.... See your hardware and software documentation as well as the setup utility to set the I/O addresses and interrupt levels for the infrared ports of your tablet will not function normally. IrDA Port Configuration Submenu 11 I/O addresses, DMA channels, and Interrupt levels can call 1-800-8Fujitsu for the I /O Address: Interrupt: DMA Channel...
.... See your hardware and software documentation as well as the setup utility to set the I/O addresses and interrupt levels for the infrared ports of your tablet will not function normally. IrDA Port Configuration Submenu 11 I/O addresses, DMA channels, and Interrupt levels can call 1-800-8Fujitsu for the I /O Address: Interrupt: DMA Channel...
