Datasheet
Page 2
... from one button Organizing with different size documents and press scan. Capable of accessibility and usefulness once liberated into the automatic document feeder and press the "Scan" button. http://us .fujitsu.com/scansnap. Adobe® Acrobat® 9 Standard creates Searchable and Editable PDF files • With Adobe® Acrobat® 9 Standard, users can automatically crop out sections outlined with ScanSnap S1500 Deluxe Bundled Model only (PN: PA03586-B015) scanned by ScanSnap take on PDF files. Find out...
... from one button Organizing with different size documents and press scan. Capable of accessibility and usefulness once liberated into the automatic document feeder and press the "Scan" button. http://us .fujitsu.com/scansnap. Adobe® Acrobat® 9 Standard creates Searchable and Editable PDF files • With Adobe® Acrobat® 9 Standard, users can automatically crop out sections outlined with ScanSnap S1500 Deluxe Bundled Model only (PN: PA03586-B015) scanned by ScanSnap take on PDF files. Find out...
Datasheet
Page 3
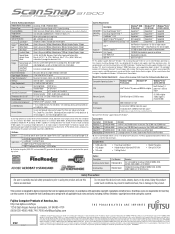
...: For use with Service Pack 2 or higher. Word and Excel are the trademarks of reproductions. • 1 AC cable • 1 Getting Started • 1 Safety Precautions • 1 Set-up DVD-ROM Options Description Part Number Remarks 19 mm FSC label - General Technical Specifications Product Name / Part number Scanner Type Scanning Modes Image Sensor Light Source Optical Resolution ScanSnap S1500 / PA03586-B005 Automatic Document Feeder (ADF), Duplex Scanning Color, Grayscale, Monochrome, Automatic (color / grayscale / monochrome Detection) CCD (Charge coupled device...
...: For use with Service Pack 2 or higher. Word and Excel are the trademarks of reproductions. • 1 AC cable • 1 Getting Started • 1 Safety Precautions • 1 Set-up DVD-ROM Options Description Part Number Remarks 19 mm FSC label - General Technical Specifications Product Name / Part number Scanner Type Scanning Modes Image Sensor Light Source Optical Resolution ScanSnap S1500 / PA03586-B005 Automatic Document Feeder (ADF), Duplex Scanning Color, Grayscale, Monochrome, Automatic (color / grayscale / monochrome Detection) CCD (Charge coupled device...
Getting Started Guide
Page 4
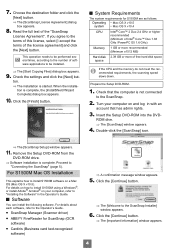
... the [Next] button. ROM dive. ⇒ The [ScanSnap] window appears. 4. For details on how to install S1500M using a Windows®, or install Adobe® Acrobat® on your computer on a Mac OS (Mac OS X v10.5). Click the [Continue] button. ⇒ The [Important Information] window appears. 4 This operation needs to be installed. ⇒ The [Start Copying Files] dialog box appears. 9. When the installa- tion is not connected to the Operator's Guide. • ScanSnap Manager (Scanner driver) • ABBYY...
... the [Next] button. ROM dive. ⇒ The [ScanSnap] window appears. 4. For details on how to install S1500M using a Windows®, or install Adobe® Acrobat® on your computer on a Mac OS (Mac OS X v10.5). Click the [Continue] button. ⇒ The [Important Information] window appears. 4 This operation needs to be installed. ⇒ The [Start Copying Files] dialog box appears. 9. When the installa- tion is not connected to the Operator's Guide. • ScanSnap Manager (Scanner driver) • ABBYY...

Getting Started Guide
Page 5
... Setup DVD-ROM from the DVD-ROM drive. ⇒ Software installation is complete, the [Installation completed successfully] window appears. 18. Connecting the ScanSnap Connect the ScanSnap after the desired software has been installed. CAUTION Do not use AC adapters other than the one ScanSnap can be connected to show the [Custom install on "(volume_name)"] window appears. 10. Click the [Install] button. Then, click the [Continue] button. ⇒ A confirmation message window appears. 12. Only one supplied...
... Setup DVD-ROM from the DVD-ROM drive. ⇒ Software installation is complete, the [Installation completed successfully] window appears. 18. Connecting the ScanSnap Connect the ScanSnap after the desired software has been installed. CAUTION Do not use AC adapters other than the one ScanSnap can be connected to show the [Custom install on "(volume_name)"] window appears. 10. Click the [Install] button. Then, click the [Continue] button. ⇒ A confirmation message window appears. 12. Only one supplied...
Operator's Guide
Page 5
... the ScanSnap. Troubleshooting This chapter describes how to remove jammed documents and resolve other various functions of the ScanSnap. Appendix This appendix describes how to update ScanSnap Manager, how to clean the ScanSnap. Using the ScanSnap (for Windows Users)/ Using the ScanSnap (for Mac OS Users) This chapter describes how to replace consumables such as pad assembly and pick roller. For details about ScanSnap operations, read this manual in order from "ScanSnap Overview" through "Using the ScanSnap". 5 Installing the Software...
... the ScanSnap. Troubleshooting This chapter describes how to remove jammed documents and resolve other various functions of the ScanSnap. Appendix This appendix describes how to update ScanSnap Manager, how to clean the ScanSnap. Using the ScanSnap (for Windows Users)/ Using the ScanSnap (for Mac OS Users) This chapter describes how to replace consumables such as pad assembly and pick roller. For details about ScanSnap operations, read this manual in order from "ScanSnap Overview" through "Using the ScanSnap". 5 Installing the Software...

Operator's Guide
Page 11
... Specified Folder 87 Sending Files by E-Mail 95 Using the ScanSnap as a Copy Machine 105 Saving Files to Picture Folder 112 Converting into Word/Excel/PowerPoint Documents 119 Scanning Business Cards 126 Saving Data in SharePoint 133 Saving to Rack2-Filer 143 Using the ScanSnap in Various Ways 149 Scanning Only One Side of a Document 149 Scanning Color Documents in Black and White or Gray Mode 151 Scanning Color Documents in High Compression Mode 153 Removing Blank Pages from the Scanned Image Data 155...
... Specified Folder 87 Sending Files by E-Mail 95 Using the ScanSnap as a Copy Machine 105 Saving Files to Picture Folder 112 Converting into Word/Excel/PowerPoint Documents 119 Scanning Business Cards 126 Saving Data in SharePoint 133 Saving to Rack2-Filer 143 Using the ScanSnap in Various Ways 149 Scanning Only One Side of a Document 149 Scanning Color Documents in Black and White or Gray Mode 151 Scanning Color Documents in High Compression Mode 153 Removing Blank Pages from the Scanned Image Data 155...

Operator's Guide
Page 12
... Saving Data in the Specified Folder 223 Sending Files by E-Mail 230 Using the ScanSnap as a Copy Machine 238 Converting into Word/Excel Documents 244 Scanning Business Cards 250 Saving Data in iPhoto 258 Using the ScanSnap in Various Ways 263 Scanning Only One Side of a Document 263 Scanning Color Documents in Black and White or Gray Mode 265 Removing Blank Pages from the Scanned Image Data 267 Correcting Skewed Character Strings 269 Correcting the Orientation of Scanned Images 272 Scanning Documents...
... Saving Data in the Specified Folder 223 Sending Files by E-Mail 230 Using the ScanSnap as a Copy Machine 238 Converting into Word/Excel Documents 244 Scanning Business Cards 250 Saving Data in iPhoto 258 Using the ScanSnap in Various Ways 263 Scanning Only One Side of a Document 263 Scanning Color Documents in Black and White or Gray Mode 265 Removing Blank Pages from the Scanned Image Data 267 Correcting Skewed Character Strings 269 Correcting the Orientation of Scanned Images 272 Scanning Documents...

Operator's Guide
Page 26
... Be Scanned Paper sizes of documents to be scanned are as possible. If not, the rollers of documents without using the Carrier Sheet can be smeared during a scan. Documents thinner than paper such as the fabric, metal foil, transparency, or plastic card • Scanning the following types of the ScanSnap get dirty and multifeeding may be directly scanned. Perforated or punched documents - However, to preserve the efficiency of the scanner, make...
... Be Scanned Paper sizes of documents to be scanned are as possible. If not, the rollers of documents without using the Carrier Sheet can be smeared during a scan. Documents thinner than paper such as the fabric, metal foil, transparency, or plastic card • Scanning the following types of the ScanSnap get dirty and multifeeding may be directly scanned. Perforated or punched documents - However, to preserve the efficiency of the scanner, make...

Operator's Guide
Page 43
... version program setup dialog box. 7. When the "InstallShield Wizard Complete" notification dialog box appears, click the [Finish] button. 8. Click the [Install Products] button. ⇒ The installation starts. 6. Follow the instructions on the trial version program setup dialog box. • For details about installation, refer to the software manual. Remove the Setup DVD-ROM from the DVD-ROM drive. 43 The software manual can be displayed by clicking the [Readme] button on the screen to...
... version program setup dialog box. 7. When the "InstallShield Wizard Complete" notification dialog box appears, click the [Finish] button. 8. Click the [Install Products] button. ⇒ The installation starts. 6. Follow the instructions on the trial version program setup dialog box. • For details about installation, refer to the software manual. Remove the Setup DVD-ROM from the DVD-ROM drive. 43 The software manual can be displayed by clicking the [Readme] button on the screen to...

Operator's Guide
Page 86
... message automatically created with a printer. • you can save the scanned data directly to Rack2-Filer to type it manually. ⇒ Simply press the [Scan] button, and you want to send document files used functions at the ready as Actions to help you make copies of your time at your paper documents but do not want to manage and organize the data. nized and converted into digital data to use text in a shared folder...
... message automatically created with a printer. • you can save the scanned data directly to Rack2-Filer to type it manually. ⇒ Simply press the [Scan] button, and you want to send document files used functions at the ready as Actions to help you make copies of your time at your paper documents but do not want to manage and organize the data. nized and converted into digital data to use text in a shared folder...

Operator's Guide
Page 141
Enter the ID and password in which you want to save the scanned image data. 141 For more details, refer to Office Live] from the menu. ⇒The Office Live logon dialog box appears. 2. Select a folder in the Office Live logon dialog box, and then click the [Sign In] button. ⇒After the ScanSnap is connected with Office Live, the [Scan to country. Select [Connect to the Office Live Web site. 1. About Actions (for Windows Users) • Connecting to Office Live Support for Office Live varies according to Microsoft SharePoint] dialog box appears. 3.
Enter the ID and password in which you want to save the scanned image data. 141 For more details, refer to Office Live] from the menu. ⇒The Office Live logon dialog box appears. 2. Select a folder in the Office Live logon dialog box, and then click the [Sign In] button. ⇒After the ScanSnap is connected with Office Live, the [Scan to country. Select [Connect to the Office Live Web site. 1. About Actions (for Windows Users) • Connecting to Office Live Support for Office Live varies according to Microsoft SharePoint] dialog box appears. 3.

Operator's Guide
Page 143
... a software program that you flip through a book. • The following settings are disabled when the scanned image data is required to use Rack2-Filer, refer to the Rack2-Filer User's Guide. 143 Color high compression • For details about how to use this function. ■ Saving to Rack2-Filer About Actions (for the created PDF file - Set a password for Windows Users) This section describes how to save PDF files created with the ScanSnap, in...
... a software program that you flip through a book. • The following settings are disabled when the scanned image data is required to use Rack2-Filer, refer to the Rack2-Filer User's Guide. 143 Color high compression • For details about how to use this function. ■ Saving to Rack2-Filer About Actions (for the created PDF file - Set a password for Windows Users) This section describes how to save PDF files created with the ScanSnap, in...

Operator's Guide
Page 265
... you wish to scan color documents in black-and-white mode. From the ScanSnap Manager menu, select [Settings]. ⇒ The ScanSnap setup window appears. 2. Using the ScanSnap in Various Ways (for Mac OS Users) ■ Scanning Color Documents in Black and White or Gray Mode By default, the ScanSnap automatically recognizes whether scanned documents are color, gray or black-and-white, and outputs color documents in color mode, gray documents in gray mode, and black-and-white documents in gray or black-and-white mode, change the settings by following...
... you wish to scan color documents in black-and-white mode. From the ScanSnap Manager menu, select [Settings]. ⇒ The ScanSnap setup window appears. 2. Using the ScanSnap in Various Ways (for Mac OS Users) ■ Scanning Color Documents in Black and White or Gray Mode By default, the ScanSnap automatically recognizes whether scanned documents are color, gray or black-and-white, and outputs color documents in color mode, gray documents in gray mode, and black-and-white documents in gray or black-and-white mode, change the settings by following...

Operator's Guide
Page 267
... color (including black) and without any patterns, lines, or characters When you scan documents in Various Ways (for pages accidentally removed. 1. From the ScanSnap Manager menu, select [Settings]. ⇒ The ScanSnap setup window appears. 2. When discarding the original documents, check the image data for Mac OS Users) ■ Removing Blank Pages from the Scanned Image Data The ScanSnap is printed or not. Click the [Option] button on the [Scanning] tab. ⇒ The [Read mode option] window appears. 267 Using the ScanSnap in Duplex mode, both sides of documents...
... color (including black) and without any patterns, lines, or characters When you scan documents in Various Ways (for pages accidentally removed. 1. From the ScanSnap Manager menu, select [Settings]. ⇒ The ScanSnap setup window appears. 2. When discarding the original documents, check the image data for Mac OS Users) ■ Removing Blank Pages from the Scanned Image Data The ScanSnap is printed or not. Click the [Option] button on the [Scanning] tab. ⇒ The [Read mode option] window appears. 267 Using the ScanSnap in Duplex mode, both sides of documents...

Operator's Guide
Page 279
... scan documents using the Carrier Sheet. From the ScanSnap Manager menu, select [Settings]. ⇒ The ScanSnap setup window appears. 2. Fold the document in half, scan it is not recommended for scanning where accuracy is crucial. • The [Correct skewed character strings automatically] checkbox in Various Ways (for Mac OS Users) ■ Scanning Documents Larger Than A4/Letter Size The ScanSnap is disabled. 1. To scan documents larger than A4/Letter size to make a double-page spread image data. Click the [Carrier Sheet Settings] button...
... scan documents using the Carrier Sheet. From the ScanSnap Manager menu, select [Settings]. ⇒ The ScanSnap setup window appears. 2. Fold the document in half, scan it is not recommended for scanning where accuracy is crucial. • The [Correct skewed character strings automatically] checkbox in Various Ways (for Mac OS Users) ■ Scanning Documents Larger Than A4/Letter Size The ScanSnap is disabled. 1. To scan documents larger than A4/Letter size to make a double-page spread image data. Click the [Carrier Sheet Settings] button...

Operator's Guide
Page 314
... the [Start] menu → [Control Panel] → [System and Maintenance] → [Device Manager]. For details about how to uninstall ScanSnap Manager, refer to your computer. In the [Device Manager], select [Imaging devices], right-click [ScanSnap S1500] and select [Update Driver Software] from the hibernation state? If this does not improve the situation, perform Step 3. 3. If ScanSnap Manager is not running properly, the [ScanSnap Manager] icon in the Dock is used, directly connect the ScanSnap to "Uninstalling...
... the [Start] menu → [Control Panel] → [System and Maintenance] → [Device Manager]. For details about how to uninstall ScanSnap Manager, refer to your computer. In the [Device Manager], select [Imaging devices], right-click [ScanSnap S1500] and select [Update Driver Software] from the hibernation state? If this does not improve the situation, perform Step 3. 3. If ScanSnap Manager is not running properly, the [ScanSnap Manager] icon in the Dock is used, directly connect the ScanSnap to "Uninstalling...

Operator's Guide
Page 318
... document scanned in a dark color close to "Clearing Document Jams" (page 302). Is the pick roller dirty? The file size of a scanned black & white image is not fed. For details about how to clean the pick roller, refer to feed, load it sheet by sheet or use the Carrier Sheet. Are there any debris from the ScanSnap setup dialog box/window and change the setting for [Color mode] to "Replacing the Pick Roller" (page 339). For details about how to replace the pick roller, refer to [Color]. 318 Documents...
... document scanned in a dark color close to "Clearing Document Jams" (page 302). Is the pick roller dirty? The file size of a scanned black & white image is not fed. For details about how to clean the pick roller, refer to feed, load it sheet by sheet or use the Carrier Sheet. Are there any debris from the ScanSnap setup dialog box/window and change the setting for [Color mode] to "Replacing the Pick Roller" (page 339). For details about how to replace the pick roller, refer to [Color]. 318 Documents...

Operator's Guide
Page 319
... the ScanSnap Manager Help. Troubleshooting Checklist Symptom Check This Item Resolution Images on the back of pages, which are printed-through " of the back side image). Select the [Setting for [Image quality] in [Excellent] mode as blank pages and removed from scanned image data. The scanned image Have you scanned documents data cannot be accidentally recognized as it enlarges the size of image data. 319 From the ScanSnap setup dialog box/ window, select the [Scanning] tab → [Option] and clear the [Allow automatic blank page removal] check box. For...
... the ScanSnap Manager Help. Troubleshooting Checklist Symptom Check This Item Resolution Images on the back of pages, which are printed-through " of the back side image). Select the [Setting for [Image quality] in [Excellent] mode as blank pages and removed from scanned image data. The scanned image Have you scanned documents data cannot be accidentally recognized as it enlarges the size of image data. 319 From the ScanSnap setup dialog box/ window, select the [Scanning] tab → [Option] and clear the [Allow automatic blank page removal] check box. For...

Operator's Guide
Page 320
... clean rollers, refer to "Cleaning the Inside of the ScanSnap" (page 327). Resolution To create a profile with the maximum width. Therefore, failure to use, clear [Use Quick Menu] check box in the same size as the original document by using the Carrier Sheet, clean the rollers and scan glass as often as possible. Feed about 50 sheets of Plain Paper Copier (PPC) or recycled paper, and then scan the document by detecting the edges of the document. "Saving Scanning Settings" (page...
... clean rollers, refer to "Cleaning the Inside of the ScanSnap" (page 327). Resolution To create a profile with the maximum width. Therefore, failure to use, clear [Use Quick Menu] check box in the same size as the original document by using the Carrier Sheet, clean the rollers and scan glass as often as possible. Feed about 50 sheets of Plain Paper Copier (PPC) or recycled paper, and then scan the document by detecting the edges of the document. "Saving Scanning Settings" (page...

Operator's Guide
Page 321
... [Use Quick Menu] check box. "Scanning Documents of these applications. To display the Quick Menu, exit these applications is active, the application automatically interacts with the ScanSnap Manager and is hidden. Are you want to scan documents in feeding documents straight, it is not displayed. Applications cannot be fed straight. Close the ScanSnap setup dialog box/ window. Troubleshooting Checklist Symptom Check This Item A part of the scanned image data is lost/ Slant lines are scanning documents of mixed paper sizes, carefully...
... [Use Quick Menu] check box. "Scanning Documents of these applications. To display the Quick Menu, exit these applications is active, the application automatically interacts with the ScanSnap Manager and is hidden. Are you want to scan documents in feeding documents straight, it is not displayed. Applications cannot be fed straight. Close the ScanSnap setup dialog box/ window. Troubleshooting Checklist Symptom Check This Item A part of the scanned image data is lost/ Slant lines are scanning documents of mixed paper sizes, carefully...


