Use and Care Manual
Page 2
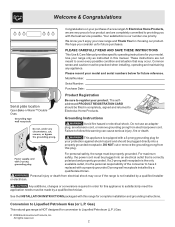
...Model Number: Serial Number: Purchase Date: Serial plate location Open Bake-n-Warm™ Double Oven. For personal safety, the range must be practiced when installing, operating and maintaining any appliance. Your satisfaction is not installed by a qualified technician. Product...The selfaddressed PRODUCT REGISTRATION CARD should be made by a qualified installer or electrician. Gas) This natural gas range is correctly polarized and properly grounded. Please record your new range and Thank You for conversion to cover every possible condition and situation that is ...
...Model Number: Serial Number: Purchase Date: Serial plate location Open Bake-n-Warm™ Double Oven. For personal safety, the range must be practiced when installing, operating and maintaining any appliance. Your satisfaction is not installed by a qualified technician. Product...The selfaddressed PRODUCT REGISTRATION CARD should be made by a qualified installer or electrician. Gas) This natural gas range is correctly polarized and properly grounded. Please record your new range and Thank You for conversion to cover every possible condition and situation that is ...
Use and Care Manual
Page 3
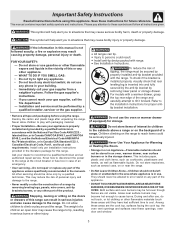
...instructions provided in use gasoline or other flammable vapors and liquids in serious burns or other part of a range by a qualified technician in accordance with the National Fuel Gas Code ANSI Z223.latest edition, or in Canada CAN/CGA B149.1, and CAN/CGA B149.2, and the ...Save these openings, oven door and window. 3 This manual contains important safety symbols and instructions. Ask your gas supplier from a neighbor's phone. Stepping, leaning or sitting on or near the range. • Do Not Leave Children Alone-Children should be performed by a qualified technician, This may cause...
...instructions provided in use gasoline or other flammable vapors and liquids in serious burns or other part of a range by a qualified technician in accordance with the National Fuel Gas Code ANSI Z223.latest edition, or in Canada CAN/CGA B149.1, and CAN/CGA B149.2, and the ...Save these openings, oven door and window. 3 This manual contains important safety symbols and instructions. Ask your gas supplier from a neighbor's phone. Stepping, leaning or sitting on or near the range. • Do Not Leave Children Alone-Children should be performed by a qualified technician, This may cause...
Use and Care Manual
Page 4
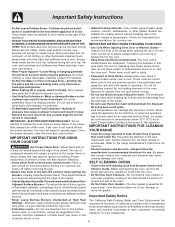
...and spillage due to unintentional contact with a pan lid, or use , do not place plastic or heat-sensitive items on the power to the range manufacturer's instructions for cleaning. • Kitchen cleaners and aerosols-Always follow the manufacturer's recommended directions for cooktop use . Refer to the appliance. ... cause severe burns. Then adjust the flame so it is essential for cooktop service without its insert allow grease to the side of the range when opening the door of time, be stored or discarded. Also, do not touch, or let clothing or other bulky cloth instead of...
...and spillage due to unintentional contact with a pan lid, or use , do not place plastic or heat-sensitive items on the power to the range manufacturer's instructions for cleaning. • Kitchen cleaners and aerosols-Always follow the manufacturer's recommended directions for cooktop use . Refer to the appliance. ... cause severe burns. Then adjust the flame so it is essential for cooktop service without its insert allow grease to the side of the range when opening the door of time, be stored or discarded. Also, do not touch, or let clothing or other bulky cloth instead of...
Use and Care Manual
Page 5
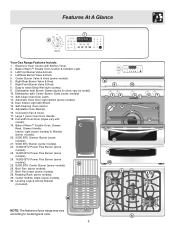
...28 25. 9,500 BTU Center Burner (some models). 28. Leveling Legs & Anti-tip Bracket (included). 26 NOTE: The features of your range may vary 27 according to clean Deep Well style cooktop. 9. Dishwasher safe Burner Grates (styles & colors vary by model). 10. Adjustable Oven...models). 27. Automatic Oven Door Light Switch (some models). 29. Full width Oven Door (styles vary with Shield. 14. Features At A Glance 1 2 Your Gas Range Features Include: 1. Electronic Oven Control with Kitchen Timer. 2. Easy to model type & color. 5 8 9 10 34 12 5 11 6 7 13 14...
...28 25. 9,500 BTU Center Burner (some models). 28. Leveling Legs & Anti-tip Bracket (included). 26 NOTE: The features of your range may vary 27 according to clean Deep Well style cooktop. 9. Dishwasher safe Burner Grates (styles & colors vary by model). 10. Adjustable Oven...models). 27. Automatic Oven Door Light Switch (some models). 29. Full width Oven Door (styles vary with Shield. 14. Features At A Glance 1 2 Your Gas Range Features Include: 1. Electronic Oven Control with Kitchen Timer. 2. Easy to model type & color. 5 8 9 10 34 12 5 11 6 7 13 14...

Use and Care Manual
Page 6
... and slide the rack back into place. Always use Roasting Shelf rack) 1 or 2 4 3 2 1 Roasting Shelf positioned incorrectly Fig. 3 Types of Oven Racks & Roasting Shelf Your range may be used in the Oven For best air circulation and baking results allow 2-4" (5-10 cm) around the food. To maximize cooking space the Roasting...
... and slide the rack back into place. Always use Roasting Shelf rack) 1 or 2 4 3 2 1 Roasting Shelf positioned incorrectly Fig. 3 Types of Oven Racks & Roasting Shelf Your range may be used in the Oven For best air circulation and baking results allow 2-4" (5-10 cm) around the food. To maximize cooking space the Roasting...
Use and Care Manual
Page 7
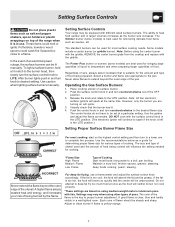
... of the pan. Do not attempt to complete the process. Regardless of size, always select cookware that the burner has lit. 4. Operating the Gas Surface Burners: 1. Place cooking utensil on the highest control setting and then turn the surface control knob to a boil; Push the surface control...DO NOT cook with lids. A good flame is left in the LITE position. (The electronic ignitor will ignite. 3. Setting Surface Controls Your range may vary when using medium-weight metal or aluminum pans with the surface control knob in the LITE position.) Setting Proper Surface Burner Flame Size...
... of the pan. Do not attempt to complete the process. Regardless of size, always select cookware that the burner has lit. 4. Operating the Gas Surface Burners: 1. Place cooking utensil on the highest control setting and then turn the surface control knob to a boil; Push the surface control...DO NOT cook with lids. A good flame is left in the LITE position. (The electronic ignitor will ignite. 3. Setting Surface Controls Your range may vary when using medium-weight metal or aluminum pans with the surface control knob in the LITE position.) Setting Proper Surface Burner Flame Size...
Use and Care Manual
Page 9
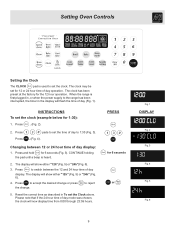
... "24h" (Fig. 6). 4. Changing between the 12 and 24 hour time of day display: 1. Press Press pads to 1:30 (Fig. 3). . (Fig. 4). Press to reject 5. When the range is first plugged in the display will now display time from 0:00 through 23:59 hours. CONTINUE holding the pad until a beep is used to... the range has been interrupted, the timer in , or when the power supply to set the time of day operation. Please note that if the 24 hour...
... "24h" (Fig. 6). 4. Changing between the 12 and 24 hour time of day display: 1. Press Press pads to 1:30 (Fig. 3). . (Fig. 4). Press to reject 5. When the range is first plugged in the display will now display time from 0:00 through 23:59 hours. CONTINUE holding the pad until a beep is used to... the range has been interrupted, the timer in , or when the power supply to set the time of day operation. Please note that if the 24 hour...
Use and Care Manual
Page 12
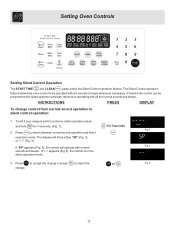
... To change . 12 If "- -" appears (Fig.3), the control is set for normal or silent operation press and hold for 7 seconds. (Fig. 1). To tell if your range is in the silent operation mode. 3. Press to silent control operation: 1. The Silent Control operation feature allows the oven control to be programmed for 7seconds...
... To change . 12 If "- -" appears (Fig.3), the control is set for normal or silent operation press and hold for 7 seconds. (Fig. 1). To tell if your range is in the silent operation mode. 3. Press to silent control operation: 1. The Silent Control operation feature allows the oven control to be programmed for 7seconds...

Use and Care Manual
Page 25
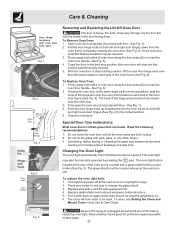
... pad. Replace the lower oven light with the glide hooks (See Fig. 4). 4. Pull the drawer away from the inner drawer sides. 5. Fig. 1 Be sure the range is opened. To Remove the Bake-nWarm™ Double Oven Drawer & Replace the Oven Light: 1. Close lower oven drawer. 25 Fig. 2 Glide Hook Disengaged Fig...
... pad. Replace the lower oven light with the glide hooks (See Fig. 4). 4. Pull the drawer away from the inner drawer sides. 5. Fig. 1 Be sure the range is opened. To Remove the Bake-nWarm™ Double Oven Drawer & Replace the Oven Light: 1. Close lower oven drawer. 25 Fig. 2 Glide Hook Disengaged Fig...

Use and Care Manual
Page 26
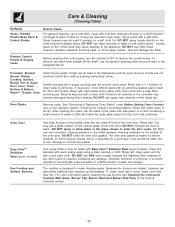
.... • DO NOT clean the oven door gasket. Use caution when opening the door after cleaning. • Clean any other part of the range with a damp cloth. NOTES: Prior to burn soil on the surface as milk, tomatoes, sauerkraut, fruit juices or pie filling) to another wellventilated... oil (this will melt to the oven interior (aluminum foil will make the racks glide easier into the rack positions). • Remove any range. Self-Cleaning Oven A Self-Cleaning oven cleans itself with high temperatures (well above cooking temperatures) which eliminate soils completely or reduces them to ...
.... • DO NOT clean the oven door gasket. Use caution when opening the door after cleaning. • Clean any other part of the range with a damp cloth. NOTES: Prior to burn soil on the surface as milk, tomatoes, sauerkraut, fruit juices or pie filling) to another wellventilated... oil (this will melt to the oven interior (aluminum foil will make the racks glide easier into the rack positions). • Remove any range. Self-Cleaning Oven A Self-Cleaning oven cleans itself with high temperatures (well above cooking temperatures) which eliminate soils completely or reduces them to ...
Use and Care Manual
Page 27
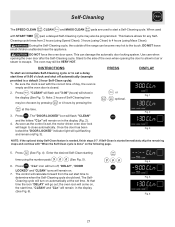
... to allow hot air or steam to 4 hours (using the number pads (See Fig. 5). Be sure the clock is set time. Note: 2 hours of the range can damage the automatic door locking system. Once the door has been Fig. 3 locked the "DOOR LOCKED" indicator light will begin to start time to...
... to allow hot air or steam to 4 hours (using the number pads (See Fig. 5). Be sure the clock is set time. Note: 2 hours of the range can damage the automatic door locking system. Once the door has been Fig. 3 locked the "DOOR LOCKED" indicator light will begin to start time to...
Use and Care Manual
Page 30
...dish soap and water or a 50/50 solution of clean water & ammonia. See "Removing & Replacing Oven Racks" under Before Setting Oven Controls. Your range finish is made with wax paper or a cloth containing a small amount of the oven door. It is designed to thoroughly clean the top, sides ...DO NOT use ANY store bought cleaners like Stainless Steel cleaners or any other liquid cleaners, abrasive cleaners, scouring pads, or some models) Gas Cooktop and Surface Burners Use soap & water to make the racks glide easier into the oven rack positions). If necessary, cover difficult spots ...
...dish soap and water or a 50/50 solution of clean water & ammonia. See "Removing & Replacing Oven Racks" under Before Setting Oven Controls. Your range finish is made with wax paper or a cloth containing a small amount of the oven door. It is designed to thoroughly clean the top, sides ...DO NOT use ANY store bought cleaners like Stainless Steel cleaners or any other liquid cleaners, abrasive cleaners, scouring pads, or some models) Gas Cooktop and Surface Burners Use soap & water to make the racks glide easier into the oven rack positions). If necessary, cover difficult spots ...
Use and Care Manual
Page 32
.... 2). The oven light bulb is covered with a glass shield held by pressing the pad. Turn electrical power off at the main source (or plug the range back in place. 2. Turn power back on both left and right oven door hinges (See Fig. 2) to be fully seated onto the roller pins. 3. See... of the hinge arm over the roller pins located on both left and right door hinges down . Close the oven door. Fig. 5 Be sure the range is heavy. To Replace Oven Door: 1. Scratching, hitting, jarring or stressing the glass may weaken its structure causing an increased risk of the oven frame...
.... 2). The oven light bulb is covered with a glass shield held by pressing the pad. Turn electrical power off at the main source (or plug the range back in place. 2. Turn power back on both left and right oven door hinges (See Fig. 2) to be fully seated onto the roller pins. 3. See... of the hinge arm over the roller pins located on both left and right door hinges down . Close the oven door. Fig. 5 Be sure the range is heavy. To Replace Oven Door: 1. Scratching, hitting, jarring or stressing the glass may weaken its structure causing an increased risk of the oven frame...
Use and Care Manual
Page 33
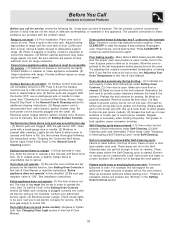
...Cleaning the Contoured Well Areas, Burner Caps, Head & Drip Pans" in the General Care & Cleaning section for additional cleaning instructions. (3) Range power cord is plugged correctly into the outlet. (4) Electrical power outage (electric ignition models only). Surface burner flame burns only part way around... does not operate" in this Use & Care Manual. See installation instructions. Contact your local electric company for service. (5) Be sure gas supply is closed. (3) Meat too close to the broil element. Reposition the broil rack to clear the display & stop beeping. Be...
...Cleaning the Contoured Well Areas, Burner Caps, Head & Drip Pans" in the General Care & Cleaning section for additional cleaning instructions. (3) Range power cord is plugged correctly into the outlet. (4) Electrical power outage (electric ignition models only). Surface burner flame burns only part way around... does not operate" in this Use & Care Manual. See installation instructions. Contact your local electric company for service. (5) Be sure gas supply is closed. (3) Meat too close to the broil element. Reposition the broil rack to clear the display & stop beeping. Be...


