Use and Care Manual
Page 4
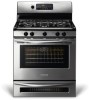
...the oven vent. These items could ignite. • Cold temperatures can damage the electronic control. Do not let potholders contact the hot heating elements in desired location while oven is...or other reproductive harm, and requires businesses to warn customers of potential exposure to the range manufacturer's instructions for cleaning. • Kitchen cleaners and aerosols-Always follow the manufacturer's...aluminum foil to become hot enough to the appliance. Once the power resumes, reset the clock and oven function. IMPORTANT INSTRUCTIONS FOR USING YOUR OVEN • Use Care When Opening...
...the oven vent. These items could ignite. • Cold temperatures can damage the electronic control. Do not let potholders contact the hot heating elements in desired location while oven is...or other reproductive harm, and requires businesses to warn customers of potential exposure to the range manufacturer's instructions for cleaning. • Kitchen cleaners and aerosols-Always follow the manufacturer's...aluminum foil to become hot enough to the appliance. Once the power resumes, reset the clock and oven function. IMPORTANT INSTRUCTIONS FOR USING YOUR OVEN • Use Care When Opening...
Use and Care Manual
Page 8
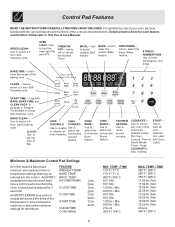
...later in this Use & Care Manual. BAKE-Use to select the select the Convection Convection Bake Roast feature. LOCK CONV CONV CONV CONTROLS CONVERT- Convection Convert Use to Use to enter the normal Bake feature. Use to select a 3 hour SelfCleaning cycle. Use to ...59 Hr./ Min. 4 hours 550°F / 288°C 8 Use to stop cooking. CLOCK - SPEED CLEAN- MAXX CLEAN- Press CLEAR/OFF to select variable Broil feature. Minimum & Maximum Control Pad Settings All of the baking time. CLEAR/OFF- Use to set the time of the temperature...
...later in this Use & Care Manual. BAKE-Use to select the select the Convection Convection Bake Roast feature. LOCK CONV CONV CONV CONTROLS CONVERT- Convection Convert Use to Use to enter the normal Bake feature. Use to select a 3 hour SelfCleaning cycle. Use to ...59 Hr./ Min. 4 hours 550°F / 288°C 8 Use to stop cooking. CLOCK - SPEED CLEAN- MAXX CLEAN- Press CLEAR/OFF to select variable Broil feature. Minimum & Maximum Control Pad Settings All of the baking time. CLEAR/OFF- Use to set the time of the temperature...
Use and Care Manual
Page 9
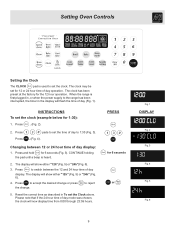
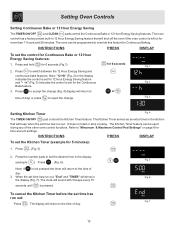
... 6). 4. to accept the desired change or press the change. Press . (Fig. 2). 2. Press to the range has been interrupted, the timer in To set the clock (example below for 6 seconds (Fig. 3). When the range is first plugged in, or when the power supply to switch between 12 or 24 hour time...the correct time as described in the display will flash the time of day mode was chosen, the clock will show either "12h"(Fig. 5) or "24h"(Fig. 6). 3. Setting Oven Controls Setting the Clock The CLOCK pad is heard. 2. The display will now display time from 0:00 through 23:59 hours.
... 6). 4. to accept the desired change or press the change. Press . (Fig. 2). 2. Press to the range has been interrupted, the timer in To set the clock (example below for 6 seconds (Fig. 3). When the range is first plugged in, or when the power supply to switch between 12 or 24 hour time...the correct time as described in the display will flash the time of day mode was chosen, the clock will show either "12h"(Fig. 5) or "24h"(Fig. 6). 3. Setting Oven Controls Setting the Clock The CLOCK pad is heard. 2. The display will now display time from 0:00 through 23:59 hours.
Use and Care Manual
Page 10
... or stop cooking. The Kitchen Timer feature can be used during any of day. Press the number pads to set time has run out. The clock will beep when the set the desired time in Fig. 6 the display (Fig. 7). Note: "12 Hh" (Fig. 2) in the kitchen that will ...show in the display (example ). Refer to the time of the other oven control functions. Fig. 7 10 INSTRUCTIONS PRESS DISPLAY To set the Kitchen Timer (example for more than 11 hours and 59 minutes. The Kitchen Timer serves as...
... or stop cooking. The Kitchen Timer feature can be used during any of day. Press the number pads to set time has run out. The clock will beep when the set the desired time in Fig. 6 the display (Fig. 7). Note: "12 Hh" (Fig. 2) in the kitchen that will ...show in the display (example ). Refer to the time of the other oven control functions. Fig. 7 10 INSTRUCTIONS PRESS DISPLAY To set the Kitchen Timer (example for more than 11 hours and 59 minutes. The Kitchen Timer serves as...
Use and Care Manual
Page 11
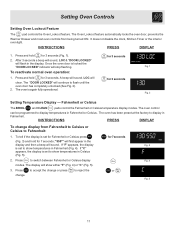
...to display temperatures in Fahrenheit. INSTRUCTIONS PRESS DISPLAY To change . INSTRUCTIONS PRESS DISPLAY 1. Fig. 2 Setting Temperature Display - The oven control can be programmed to display in Fahrenheit or Celsius. Press to accept the change or press to show temperatures in Celsius (Fig. ...feature automatically locks the oven door, prevents the Warmer Drawer and most oven controls from Fahrenheit to Celsius or Celsius to show either "F" (Fig. 4) or "C" (Fig. 5). 3. It does not disable the clock, Kitchen Timer or the interior oven light. A beep will flash in ...
...to display temperatures in Fahrenheit. INSTRUCTIONS PRESS DISPLAY To change . INSTRUCTIONS PRESS DISPLAY 1. Fig. 2 Setting Temperature Display - The oven control can be programmed to display in Fahrenheit or Celsius. Press to accept the change or press to show temperatures in Celsius (Fig. ...feature automatically locks the oven door, prevents the Warmer Drawer and most oven controls from Fahrenheit to Celsius or Celsius to show either "F" (Fig. 4) or "C" (Fig. 5). 3. It does not disable the clock, Kitchen Timer or the interior oven light. A beep will flash in ...
Use and Care Manual
Page 15
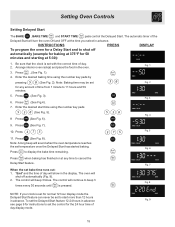
... the Delayed Start feature can never be set for any time to shut off automatically (Fig. 9). 2. Press 10. Fig. 7 Fig. 8 NOTE: If your clock is pressed. The automatic timer of day display mode. 15 Arrange interior oven rack(s) and place the food in the display. The oven will beep...12 hours in advance Fig. 9 see page 9 for instructions to 11 hours and 59 minutes. 5. Press (See Fig. 7). . Fig. 5 11. When the set the control for 50 minutes and starting at 375°F for the 24 hour time of the Delayed Start will continue to beep 3 times every 30 seconds...
... the Delayed Start feature can never be set for any time to shut off automatically (Fig. 9). 2. Press 10. Fig. 7 Fig. 8 NOTE: If your clock is pressed. The automatic timer of day display mode. 15 Arrange interior oven rack(s) and place the food in the display. The oven will beep...12 hours in advance Fig. 9 see page 9 for instructions to 11 hours and 59 minutes. 5. Press (See Fig. 7). . Fig. 5 11. When the set the control for 50 minutes and starting at 375°F for the 24 hour time of the Delayed Start will continue to beep 3 times every 30 seconds...
Use and Care Manual
Page 21
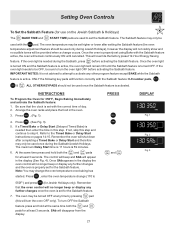
... Delay Start time is set for the Sabbath feature. Remember that the clock is properly set for the Sabbath feature. 7. PRESS and DISPLAY Fig. 1 Fig. 2 Fig. 3 21 This will appear in the display the oven control will no audible tones will remain continuously ON until the Sabbath feature is...and hold at the same time both the and pads for at least 3 seconds. Press , enter the oven temperature change occurs. Setting Oven Controls To Set the Sabbath Feature (for use on pages 14-15. The oven temperature may change the oven temperature once baking has started. Refer...
... Delay Start time is set for the Sabbath feature. Remember that the clock is properly set for the Sabbath feature. 7. PRESS and DISPLAY Fig. 1 Fig. 2 Fig. 3 21 This will appear in the display the oven control will no audible tones will remain continuously ON until the Sabbath feature is...and hold at the same time both the and pads for at least 3 seconds. Press , enter the oven temperature change occurs. Setting Oven Controls To Set the Sabbath Feature (for use on pages 14-15. The oven temperature may change the oven temperature once baking has started. Refer...
Use and Care Manual
Page 27
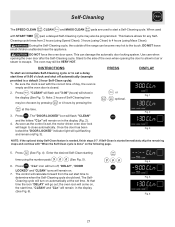
... the set start time to close automatically. The oven may be choosen by pressing or 4 hours by pressing the PRESS or , optional. Be sure the clock is set , the motor driven oven door lock will show in the display (See Fig. 1). Note: 2 hours of Self-Cleaning time may still be ... go out; At that time the icon "DELAY" will flash; During the Self-Cleaning cycle, the outside of the range can damage the automatic door locking system. Fig. 2 3. As soon as the control is set with START TIME pad, a delayed Self-Cleaning cycle may also be VERY HOT. "DELAY", "DOOR LOCKED" ...
... the set start time to close automatically. The oven may be choosen by pressing or 4 hours by pressing the PRESS or , optional. Be sure the clock is set , the motor driven oven door lock will show in the display (See Fig. 1). Note: 2 hours of Self-Cleaning time may still be ... go out; At that time the icon "DELAY" will flash; During the Self-Cleaning cycle, the outside of the range can damage the automatic door locking system. Fig. 2 3. As soon as the control is set with START TIME pad, a delayed Self-Cleaning cycle may also be VERY HOT. "DELAY", "DOOR LOCKED" ...

Use and Care Manual
Page 28
... 24 hour time of day,"Hot, DOOR LOCKED" and "CLEAN" icon will remain in the display (See Fig. 7). 2. Once power is active. 2. To set the control for instructions to finish. 3. The time of day display mode. 28 Stopping or Interrupting a Self-Cleaning cycle: If it becomes necessary to stop or interrupt... the Delay Self-Clean cycle can then be started but not finished and a power failure occurs, the appliance may not have thoroughly cleaned. If your clock is done: 1. Press . 2.
... 24 hour time of day,"Hot, DOOR LOCKED" and "CLEAN" icon will remain in the display (See Fig. 7). 2. Once power is active. 2. To set the control for instructions to finish. 3. The time of day display mode. 28 Stopping or Interrupting a Self-Cleaning cycle: If it becomes necessary to stop or interrupt... the Delay Self-Clean cycle can then be started but not finished and a power failure occurs, the appliance may not have thoroughly cleaned. If your clock is done: 1. Press . 2.
Use and Care Manual
Page 33
...service - (1) Cabinets not square or are built in too tightly. With the gas burner OFF, clean ports with a stiff nylon brush and water or a nylon scrubber. See "To Set the Clock" in the Setting Oven Controls section. 33 Call your authorized service agent. (4) Electrical power outage. If fault ...the burner to operate a few minutes until the oven rack is level. (2) Be sure floor is level, strong & stable enough to adequately support range. (3) If floor is sagging or sloping, contact a carpenter to drip into outlet. (3) Service wiring is not set temperature before placing food in...
...service - (1) Cabinets not square or are built in too tightly. With the gas burner OFF, clean ports with a stiff nylon brush and water or a nylon scrubber. See "To Set the Clock" in the Setting Oven Controls section. 33 Call your authorized service agent. (4) Electrical power outage. If fault ...the burner to operate a few minutes until the oven rack is level. (2) Be sure floor is level, strong & stable enough to adequately support range. (3) If floor is sagging or sloping, contact a carpenter to drip into outlet. (3) Service wiring is not set temperature before placing food in...


