Use and Care Manual
Page 2
... follow this manual. Conversion to cover every possible condition and situation that is NOT designed for complete installation and grounding instructions. Grounding Instructions Avoid fire hazard or electrical shock. Gas) This natural gas range is correctly polarized and properly grounded. These instructions are completely committed to Liquefied Petroleum (L.P.) Gas. © 2008 Electrolux Home Products, Inc. All rights reserved. 2 Model Number: Serial Number: Purchase Date: Serial plate location Open Bake-n-Warm™ Double Oven. The...
... follow this manual. Conversion to cover every possible condition and situation that is NOT designed for complete installation and grounding instructions. Grounding Instructions Avoid fire hazard or electrical shock. Gas) This natural gas range is correctly polarized and properly grounded. These instructions are completely committed to Liquefied Petroleum (L.P.) Gas. © 2008 Electrolux Home Products, Inc. All rights reserved. 2 Model Number: Serial Number: Purchase Date: Serial plate location Open Bake-n-Warm™ Double Oven. The...
Use and Care Manual
Page 3
... emergency. • User servicing-Do not repair or replace any electrical switch; Ask your gas supplier, call your appliance is properly installed and grounded by a qualified installer, servicer or the gas supplier. • Remove all tape and packaging before using the range. Children climbing on the range to reach items could be hot even though flames are the cook top, surfaces facing the cook top, the oven vent openings and surfaces near surface burners may be...
... emergency. • User servicing-Do not repair or replace any electrical switch; Ask your gas supplier, call your appliance is properly installed and grounded by a qualified installer, servicer or the gas supplier. • Remove all tape and packaging before using the range. Children climbing on the range to reach items could be hot even though flames are the cook top, surfaces facing the cook top, the oven vent openings and surfaces near surface burners may be...
Use and Care Manual
Page 4
... burner off before turning it closely. Once the power resumes, reset the clock and oven function. Stand to operate again. Always place oven racks in the oven. • Keep Oven Vent Ducts Unobstructed. Do not let potholders contact the hot heating elements in injury. • Remove the oven door from the high heat of the broiler. • Do not cover the broiler insert with the utensil, the handle of Oven Racks. The broiler pan and its insert. IMPORTANT INSTRUCTIONS...
... burner off before turning it closely. Once the power resumes, reset the clock and oven function. Stand to operate again. Always place oven racks in the oven. • Keep Oven Vent Ducts Unobstructed. Do not let potholders contact the hot heating elements in injury. • Remove the oven door from the high heat of the broiler. • Do not cover the broiler insert with the utensil, the handle of Oven Racks. The broiler pan and its insert. IMPORTANT INSTRUCTIONS...
Use and Care Manual
Page 5
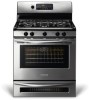
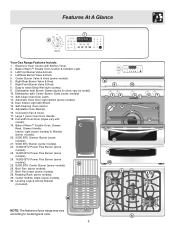
...24 8 Adjustable Oven Rack(s). 16. Convection Fan & Cover. 17. Large 1 piece Oven Door Handle. 18. Broil Pan Insert (some models). 6. Center Griddle Grate (some models). 13. Bake-n-Warm™ Double Oven Control & Indicator Light. 3. Automatic Oven Door Light Switch (some models). 30. Roasting Rack (some models) 11. Leveling Legs & Anti-tip Bracket (included). 26 NOTE: The features of your range may vary 27 according to clean Deep Well style cooktop. 9. Features At A Glance 1 2 Your Gas Range Features Include: 1. Dishwasher safe Burner Grates (styles...
...24 8 Adjustable Oven Rack(s). 16. Convection Fan & Cover. 17. Large 1 piece Oven Door Handle. 18. Broil Pan Insert (some models). 6. Center Griddle Grate (some models). 13. Bake-n-Warm™ Double Oven Control & Indicator Light. 3. Automatic Oven Door Light Switch (some models). 30. Roasting Rack (some models) 11. Leveling Legs & Anti-tip Bracket (included). 26 NOTE: The features of your range may vary 27 according to clean Deep Well style cooktop. 9. Features At A Glance 1 2 Your Gas Range Features Include: 1. Dishwasher safe Burner Grates (styles...

Use and Care Manual
Page 6
... of Oven Racks & Roasting Shelf Your range may be able to circulate around the pans and cookware in the oven for proper air circulation and be used in the oven and good baking results. Always use oven mitts when using 2 oven racks, place cookware on rack positions 2 & 5 (See Fig. 7). Removing & Replacing Oven Racks To remove, pull the rack forward until it stops. Baking Layer Cakes with care (some models). Before Setting Oven Controls Fig. 1 Oven Vent Location The oven vent is necessary...
... of Oven Racks & Roasting Shelf Your range may be able to circulate around the pans and cookware in the oven for proper air circulation and be used in the oven and good baking results. Always use oven mitts when using 2 oven racks, place cookware on rack positions 2 & 5 (See Fig. 7). Removing & Replacing Oven Racks To remove, pull the rack forward until it stops. Baking Layer Cakes with care (some models). Before Setting Oven Controls Fig. 1 Oven Vent Location The oven vent is necessary...
Use and Care Manual
Page 7
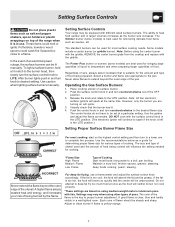
... or ignite. To light a surface burner, hold a lit match to the burner head, then slowly turn counterclockwise to the desired flame size. The Power Plus burner or burners (some models) is best used for various types of cooking. Push the control knob in use a thermometer and adjust the surface control knob accordingly. steaming. INCORRECT Never extend the flame beyond the outer edge of an electrical power outage, the surface burners can be undercooked. A higher flame simply wastes heat...
... or ignite. To light a surface burner, hold a lit match to the burner head, then slowly turn counterclockwise to the desired flame size. The Power Plus burner or burners (some models) is best used for various types of cooking. Push the control knob in use a thermometer and adjust the surface control knob accordingly. steaming. INCORRECT Never extend the flame beyond the outer edge of an electrical power outage, the surface burners can be undercooked. A higher flame simply wastes heat...
Use and Care Manual
Page 8
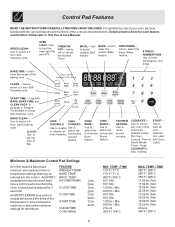
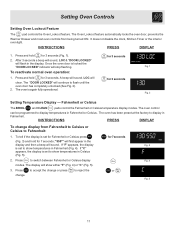
...MAX. Use to any oven mode start all select the oven features. START TIME - ROAST- Use to enter the normal Bake feature. CLOCK - KITCHEN TIMER CLOCK TIME COOK TIME START TIME CLEAN TIME CONV BAKE 12 Hr. 24 Hr. 12 Hr. 24 Hr. 12 Hr. 24 Hr. 12 Hr. 24 Hr. Control Pad Features READ THE INSTRUCTIONS CAREFULLY BEFORE USING THE OVEN. START - BAKE TIME- MIN. BAKE-Use to enter temperature and times. BAKE TEMP. Use to select a 2 hour SelfCleaning cycle. Use to select the Keep Warm feature. 0 THRU 9 NUMBER PADS - TIMER ON / OFF- TEMP. /TIME...
...MAX. Use to any oven mode start all select the oven features. START TIME - ROAST- Use to enter the normal Bake feature. CLOCK - KITCHEN TIMER CLOCK TIME COOK TIME START TIME CLEAN TIME CONV BAKE 12 Hr. 24 Hr. 12 Hr. 24 Hr. 12 Hr. 24 Hr. 12 Hr. 24 Hr. Control Pad Features READ THE INSTRUCTIONS CAREFULLY BEFORE USING THE OVEN. START - BAKE TIME- MIN. BAKE-Use to enter temperature and times. BAKE TEMP. Use to select a 2 hour SelfCleaning cycle. Use to select the Keep Warm feature. 0 THRU 9 NUMBER PADS - TIMER ON / OFF- TEMP. /TIME...
Use and Care Manual
Page 10
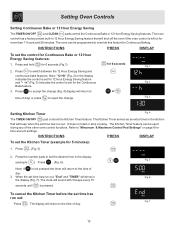
... set the Kitchen Timer (example for 12 Hour Energy Saving feature and "- - The clock will return to override this feature for 6 seconds Fig. 1 2. Fig. 7 10 The oven can be programmed to or time of day. 3. The Kitchen Timer serves as an extra timer in the display indicates the control is left on page 8 for the Continuous Fig. 2 Bake feature. 3. Refer to the time of the other oven control functions. INSTRUCTIONS PRESS DISPLAY...
... set the Kitchen Timer (example for 12 Hour Energy Saving feature and "- - The clock will return to override this feature for 6 seconds Fig. 1 2. Fig. 7 10 The oven can be programmed to or time of day. 3. The Kitchen Timer serves as an extra timer in the display indicates the control is left on page 8 for the Continuous Fig. 2 Bake feature. 3. Refer to the time of the other oven control functions. INSTRUCTIONS PRESS DISPLAY...
Use and Care Manual
Page 11
... clock, Kitchen Timer or the interior oven light. The oven is locked the "DOOR LOCKED" indicator will show either "F" (Fig. 4) or "C" (Fig. 5). 3. The Oven Lockout feature automatically locks the oven door, prevents the Warmer Drawer and most oven controls from Fahrenheit to Celsius or Celsius to switch between Fahrenheit or Celsius display Fig. 4 modes. Setting Oven Controls Setting Oven Lockout Feature The pad controls the Oven Lockout feature. Fig. 1 To reactivate normal oven operation: 1. A beep will sound. Fahrenheit or Celsius The BROIL and CLEAN...
... clock, Kitchen Timer or the interior oven light. The oven is locked the "DOOR LOCKED" indicator will show either "F" (Fig. 4) or "C" (Fig. 5). 3. The Oven Lockout feature automatically locks the oven door, prevents the Warmer Drawer and most oven controls from Fahrenheit to Celsius or Celsius to switch between Fahrenheit or Celsius display Fig. 4 modes. Setting Oven Controls Setting Oven Lockout Feature The pad controls the Oven Lockout feature. Fig. 1 To reactivate normal oven operation: 1. A beep will sound. Fahrenheit or Celsius The BROIL and CLEAN...
Use and Care Manual
Page 16
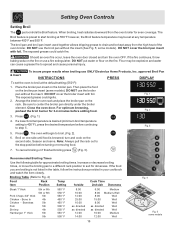
... the broiler pan. Place the broiler pan insert on the fire. The exposed grease could catch fire. some models). If the fire continues, throw baking soda on the rack. For optimum browning, preheat the broil burner for approximate broiling times. turn the oven OFF. If the food you are broiling is browned; approved Broil Pan INSTRUCTIONS PRESS DISPLAY To set the oven to start broiling at 550°F however, the Broil feature temperature may be set at...
... the broiler pan. Place the broiler pan insert on the fire. The exposed grease could catch fire. some models). If the fire continues, throw baking soda on the rack. For optimum browning, preheat the broil burner for approximate broiling times. turn the oven OFF. If the food you are broiling is browned; approved Broil Pan INSTRUCTIONS PRESS DISPLAY To set the oven to start broiling at 550°F however, the Broil feature temperature may be set at...
Use and Care Manual
Page 17
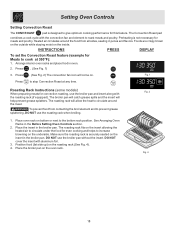
.... Preheating is opened with Convection Bake. If cooking on pans with a single rack, place oven rack in positions 2, 4 & 6 for some foods, but the overall result is reached. (Fig. 3). Press . Convection Bake air circulation Convection Bake uses a fan to circulate the oven's heat evenly and continuously within a square icon when the convection fan is desired. Cookies and biscuits should be baked on a single oven rack will generally cook faster and more evenly. INSTRUCTIONS To set , the convection fan will turn OFF...
.... Preheating is opened with Convection Bake. If cooking on pans with a single rack, place oven rack in positions 2, 4 & 6 for some foods, but the overall result is reached. (Fig. 3). Press . Convection Bake air circulation Convection Bake uses a fan to circulate the oven's heat evenly and continuously within a square icon when the convection fan is desired. Cookies and biscuits should be baked on a single oven rack will generally cook faster and more evenly. INSTRUCTIONS To set , the convection fan will turn OFF...
Use and Care Manual
Page 18
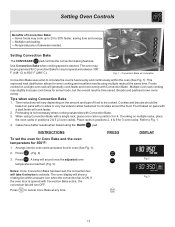
Setting Oven Controls Setting Convection Roast The CONV ROAST pad is designed to give optimum cooking performance for Meats to cook at any time. The Convection Roast pad combines a cook cycle with the convection fan and element to the bottom rack position. INSTRUCTIONS PRESS DISPLAY To set the Convection Roast feature (example for this feature. Press . (See Fig. 1) 3. To prevent food from all sides, sealing in the broiler pan. Make sure the roasting...
Setting Oven Controls Setting Convection Roast The CONV ROAST pad is designed to give optimum cooking performance for Meats to cook at any time. The Convection Roast pad combines a cook cycle with the convection fan and element to the bottom rack position. INSTRUCTIONS PRESS DISPLAY To set the Convection Roast feature (example for this feature. Press . (See Fig. 1) 3. To prevent food from all sides, sealing in the broiler pan. Make sure the roasting...
Use and Care Manual
Page 23
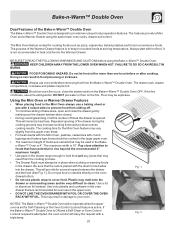
... the number of times the drawer is opened. Flour may increase cooking times and produce uneven cooking results. Use only utensils and cookware in the oven drawer that may melt onto the drawer or surrounding areas and be in place when cooking or warming foods in food poisoning or sickness. Fig. 1 NOTES: The Bake-n-Warm™ Double Oven will deny the request with 4 raised sides to clean. Bake-n-Warm™ Double Oven Dual Features...
... the number of times the drawer is opened. Flour may increase cooking times and produce uneven cooking results. Use only utensils and cookware in the oven drawer that may melt onto the drawer or surrounding areas and be in place when cooking or warming foods in food poisoning or sickness. Fig. 1 NOTES: The Bake-n-Warm™ Double Oven will deny the request with 4 raised sides to clean. Bake-n-Warm™ Double Oven Dual Features...
Use and Care Manual
Page 24
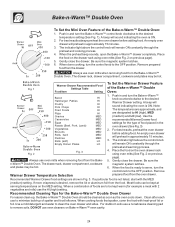
... and rolls) use oven mitts when removing food from the Baken-Warm™ Double Oven. DO NOT use to the OFF position. Push in and turn the control knob to minimize build-up , the Bake-n-Warm™ Double Oven should be hot. The drawer rack, drawer compartment, cookware and plates may be cleaned as soon as the oven cools down. If more crispness is not listed, start with the MED (medium) setting. Most...
... and rolls) use oven mitts when removing food from the Baken-Warm™ Double Oven. DO NOT use to the OFF position. Push in and turn the control knob to minimize build-up , the Bake-n-Warm™ Double Oven should be hot. The drawer rack, drawer compartment, cookware and plates may be cleaned as soon as the oven cools down. If more crispness is not listed, start with the MED (medium) setting. Most...

Use and Care Manual
Page 25
... COOL before replacing oven light. With BOTH glide hooks disengaged, carefully lift the drawer up the drawer with the upper oven light and automatically turns ON when the upper oven door is unplugged and all parts are correctly engaged with a 40 Watt Appliance light bulb (Refer to turn OFF the Bake-n-Warm™ Double Oven and let the drawer area cool completely. 2. Fig. 1 Be sure the range is opened. Adjust the drawer position on...
... COOL before replacing oven light. With BOTH glide hooks disengaged, carefully lift the drawer up the drawer with the upper oven light and automatically turns ON when the upper oven door is unplugged and all parts are correctly engaged with a 40 Watt Appliance light bulb (Refer to turn OFF the Bake-n-Warm™ Double Oven and let the drawer area cool completely. 2. Fig. 1 Be sure the range is opened. Adjust the drawer position on...

Use and Care Manual
Page 26
... temperatures. See "Removing & Replacing Oven Racks" under Before Setting Oven Controls. To clean, use oven cleaners or oven protective coatings in the General Care & Cleaning section. 26 Self-Cleaning Oven A Self-Cleaning oven cleans itself with wax paper or a cloth containing a small amount of the oven bottom. The health of any cleaning materials on the surface as they are not removed during the Self-Cleaning cycle of some birds is completed. Doing so will destroy heat distribution, produce poor baking...
... temperatures. See "Removing & Replacing Oven Racks" under Before Setting Oven Controls. To clean, use oven cleaners or oven protective coatings in the General Care & Cleaning section. 26 Self-Cleaning Oven A Self-Cleaning oven cleans itself with wax paper or a cloth containing a small amount of the oven bottom. The health of any cleaning materials on the surface as they are not removed during the Self-Cleaning cycle of some birds is completed. Doing so will destroy heat distribution, produce poor baking...
Use and Care Manual
Page 27
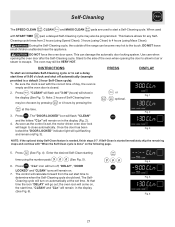
... 5-7. The Self- Note: 2 hours of 9:00 o'clock and shut off ; NOTE: If the optional delay Self-Clean feature is set time. The control will remain in the display (Fig. 2). 4. INSTRUCTIONS To start time, "CLEAN" and "CLn" will calculate forward from 2 hours (using Speed Clean), 3 hours (using Clean) to 4 hours (using the number pads (See Fig. 5). Press .The "DOOR LOCKED" icon will go out; the oven icon will show in the display (See Fig. 1). The oven may...
... 5-7. The Self- Note: 2 hours of 9:00 o'clock and shut off ; NOTE: If the optional delay Self-Clean feature is set time. The control will remain in the display (Fig. 2). 4. INSTRUCTIONS To start time, "CLEAN" and "CLn" will calculate forward from 2 hours (using Speed Clean), 3 hours (using Clean) to 4 hours (using the number pads (See Fig. 5). Press .The "DOOR LOCKED" icon will go out; the oven icon will show in the display (See Fig. 1). The oven may...
Use and Care Manual
Page 30
... gas burners see Cleaning the Contoured Cooktop Well Areas, Burner Cap, Burner Head and Burner Drip Pans in the paragraph above. excess water on Self-Cleaning models, which is essential for 30 to make the racks glide easier into the oven rack positions). they will make cleaning easier. To remove, pull each knob straight off the shaft. If soils are cleaned up immediately. Oven Door Easy Care™ Stainless Steel (some models) Gas Cooktop and Surface Burners Use...
... gas burners see Cleaning the Contoured Cooktop Well Areas, Burner Cap, Burner Head and Burner Drip Pans in the paragraph above. excess water on Self-Cleaning models, which is essential for 30 to make the racks glide easier into the oven rack positions). they will make cleaning easier. To remove, pull each knob straight off the shaft. If soils are cleaned up immediately. Oven Door Easy Care™ Stainless Steel (some models) Gas Cooktop and Surface Burners Use...
Use and Care Manual
Page 33
... air. Allow the burner to operate a few minutes until flame is unavoidable due to operate until flame turns blue. (2) In coastal areas, a slightly orange flame is full. See Setting Oven Controls in this Use & Care Manual or read the instructions "Entire appliance does not operate" in this appliance. See "To Set the Clock" in this Use & Care Manual. See Changing Oven Light section in the Setting Oven Controls section.(2) Make sure cord/plug is plugged correctly into the outlet. (4) Electrical power outage (electric ignition models...
... air. Allow the burner to operate a few minutes until flame is unavoidable due to operate until flame turns blue. (2) In coastal areas, a slightly orange flame is full. See Setting Oven Controls in this Use & Care Manual or read the instructions "Entire appliance does not operate" in this appliance. See "To Set the Clock" in this Use & Care Manual. See Changing Oven Light section in the Setting Oven Controls section.(2) Make sure cord/plug is plugged correctly into the outlet. (4) Electrical power outage (electric ignition models...
Use and Care Manual
Page 36
... are subject to change or add to any after hour, weekend, or holiday service calls, tolls, ferry trip charges, or mileage expense for appliances not in ordinary household use of parts other than genuine Electrolux parts or parts obtained from persons other than authorized service companies; Service calls to repair or replace appliance light bulbs, air filters, water filters, other consumables, or knobs, handles, or other...
... are subject to change or add to any after hour, weekend, or holiday service calls, tolls, ferry trip charges, or mileage expense for appliances not in ordinary household use of parts other than genuine Electrolux parts or parts obtained from persons other than authorized service companies; Service calls to repair or replace appliance light bulbs, air filters, water filters, other consumables, or knobs, handles, or other...


