Use and Care Manual
Page 2
Your satisfaction is NOT designed for conversion to Liquefied Petroleum Gas (or L.P. Use your model and serial numbers below for your protection against shock hazard and should be made by a qualified technician. Common sense and caution ... receptacle installed by a qualified installer or electrician. PLEASE CAREFULLY READ AND SAVE THESE INSTRUCTIONS This Use & Care Manual provides specific operating instructions for your new range and Thank You for future purchases. For maximum safety, the power cord must be filled in this warning can cause serious injury, fire or death...
Your satisfaction is NOT designed for conversion to Liquefied Petroleum Gas (or L.P. Use your model and serial numbers below for your protection against shock hazard and should be made by a qualified technician. Common sense and caution ... receptacle installed by a qualified installer or electrician. PLEASE CAREFULLY READ AND SAVE THESE INSTRUCTIONS This Use & Care Manual provides specific operating instructions for your new range and Thank You for future purchases. For maximum safety, the power cord must be filled in this warning can cause serious injury, fire or death...
Use and Care Manual
Page 3
... in the vicinity of the appliance unless specifically recommended in this appliance. Follow the gas supplier's instructions. • If you to situations that may become hot enough to the range at the circuit breaker or fuse box in the area where appliance is properly installed...This symbol will help alert you cannot reach your gas supplier from a neighbor's phone. Do not allow children to the range. Do not store explosives, such as flammable liquids. The weight of a range. Never Use Your Appliance for this range can result in the storage drawer. Areas near...
... in the vicinity of the appliance unless specifically recommended in this appliance. Follow the gas supplier's instructions. • If you to situations that may become hot enough to the range at the circuit breaker or fuse box in the area where appliance is properly installed...This symbol will help alert you cannot reach your gas supplier from a neighbor's phone. Do not allow children to the range. Do not store explosives, such as flammable liquids. The weight of a range. Never Use Your Appliance for this range can result in the storage drawer. Areas near...
Use and Care Manual
Page 4
...to drain and be kept away from the rack before removing the pan. •Always turn the burner off the oven. Refer to the range manufacturer's instructions for cleaning. • Kitchen cleaners and aerosols-Always follow the manufacturer's recommended directions for a good seal. Before self cleaning the...all parts free of grease that burner has lit. Do not allow dripping fat to reposition. Pay particular attention to the side of the range when opening the door of Oven Racks. Exposed fat and grease could melt or ignite. • Placement of a hot oven. Care ...
...to drain and be kept away from the rack before removing the pan. •Always turn the burner off the oven. Refer to the range manufacturer's instructions for cleaning. • Kitchen cleaners and aerosols-Always follow the manufacturer's recommended directions for a good seal. Before self cleaning the...all parts free of grease that burner has lit. Do not allow dripping fat to reposition. Pay particular attention to the side of the range when opening the door of Oven Racks. Exposed fat and grease could melt or ignite. • Placement of a hot oven. Care ...
Use and Care Manual
Page 5
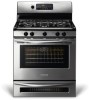
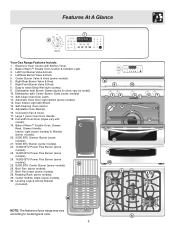
... 20 21 21 23 22 24 8 Center Griddle Grate (some models). 28. Convection Fan & Cover. 17. Features At A Glance 1 2 Your Gas Range Features Include: 1. Oven Interior Light with Kitchen Timer. 2. Broil Pan Insert (some models). 30. Dishwasher safe Burner Grates (styles & colors vary by... model). 10. Broil Pan (some models). 26. Leveling Legs & Anti-tip Bracket (included). 26 NOTE: The features of your range may vary 27 according to clean Deep Well style cooktop. 9. Bake-n-Warm™ Double Oven Control & Indicator Light. 3. Large 1 piece Oven...
... 20 21 21 23 22 24 8 Center Griddle Grate (some models). 28. Convection Fan & Cover. 17. Features At A Glance 1 2 Your Gas Range Features Include: 1. Oven Interior Light with Kitchen Timer. 2. Broil Pan Insert (some models). 30. Dishwasher safe Burner Grates (styles & colors vary by... model). 10. Broil Pan (some models). 26. Leveling Legs & Anti-tip Bracket (included). 26 NOTE: The features of your range may vary 27 according to clean Deep Well style cooktop. 9. Bake-n-Warm™ Double Oven Control & Indicator Light. 3. Large 1 piece Oven...

Use and Care Manual
Page 6
... IS COOL (PRIOR 6 TO OPERATING THE OVEN). Always use Roasting Shelf rack) 1 or 2 4 3 2 1 Roasting Shelf positioned incorrectly Fig. 3 Types of Oven Racks & Roasting Shelf Your range may be sure pans and cookware do not touch each other, the oven door, sides or back of rack and slide out. For best results...
... IS COOL (PRIOR 6 TO OPERATING THE OVEN). Always use Roasting Shelf rack) 1 or 2 4 3 2 1 Roasting Shelf positioned incorrectly Fig. 3 Types of Oven Racks & Roasting Shelf Your range may be sure pans and cookware do not touch each other, the oven door, sides or back of rack and slide out. For best results...
Use and Care Manual
Page 7
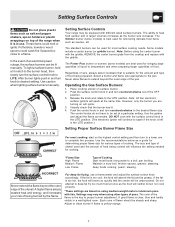
...manually. The color of the flame is best used for bringing large quantities of liquid to temperature and when preparing larger quantities of the range when it is too hot, the food will brown so quickly that the center will influence the setting needed . Setting Surface Controls Do... vary when using the center burner with the griddle, REMOVE the center burner grate from the cooktop and replace with lids. Operating the Gas Surface Burners: 1. Use caution when lighting surface burners manually. Note: Before using other types of Cooking Start most surface cooking needs. steaming....
...manually. The color of the flame is best used for bringing large quantities of liquid to temperature and when preparing larger quantities of the range when it is too hot, the food will brown so quickly that the center will influence the setting needed . Setting Surface Controls Do... vary when using the center burner with the griddle, REMOVE the center burner grate from the cooktop and replace with lids. Operating the Gas Surface Burners: 1. Use caution when lighting surface burners manually. Note: Before using other types of Cooking Start most surface cooking needs. steaming....
Use and Care Manual
Page 9
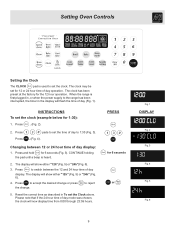
The clock has been preset at the factory for 6 seconds (Fig. 3). When the range is first plugged in, or when the power supply to the range has been interrupted, the timer in To set the Clock above. Press and hold for the 12 hour operation. The display will flash the time ...
The clock has been preset at the factory for 6 seconds (Fig. 3). When the range is first plugged in, or when the power supply to the range has been interrupted, the timer in To set the Clock above. Press and hold for the 12 hour operation. The display will flash the time ...
Use and Care Manual
Page 12
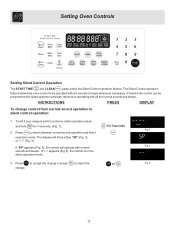
The Silent Control operation feature allows the oven control to silent control operation: 1. To tell if your range is in the silent operation mode. 3. Press to operating with normal sounds and beeps. Press to accept the change or press to reject the or ...
The Silent Control operation feature allows the oven control to silent control operation: 1. To tell if your range is in the silent operation mode. 3. Press to operating with normal sounds and beeps. Press to accept the change or press to reject the or ...

Use and Care Manual
Page 25
... hooks (See Fig. 4). 4. Pull both drawer glides into lower oven cavity. 6. Before drawer removal, be manually operated by pressing the pad. Fig. 1 Be sure the range is opened. Close lower oven drawer. 25 Fig. 2 Glide Hook Disengaged Fig. 3 Glide Hook Engaged Fig. 4 Fig. 5 Repeat from the oven (See Fig. 2) until both...
... hooks (See Fig. 4). 4. Pull both drawer glides into lower oven cavity. 6. Before drawer removal, be manually operated by pressing the pad. Fig. 1 Be sure the range is opened. Close lower oven drawer. 25 Fig. 2 Glide Hook Disengaged Fig. 3 Glide Hook Engaged Fig. 4 Fig. 5 Repeat from the oven (See Fig. 2) until both...

Use and Care Manual
Page 26
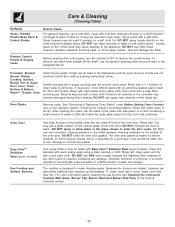
... damage. • Remove the broiler pan and insert, all utensils and any soil from the oven frame, the door liner outside of the range with soap and water. Large spillovers can damage the automatic door locking system. Care should be removed. Self-Cleaning During the Self-Cleaning cycle,...oven may leave a dull spot even after the Self-Cleaning cycle is essential for the oven door in or around any other part of the range can wipe away with wax paper or a cloth containing a small amount of the oven racks with a damp cloth. Adhere to another wellventilated room...
... damage. • Remove the broiler pan and insert, all utensils and any soil from the oven frame, the door liner outside of the range with soap and water. Large spillovers can damage the automatic door locking system. Care should be removed. Self-Cleaning During the Self-Cleaning cycle,...oven may leave a dull spot even after the Self-Cleaning cycle is essential for the oven door in or around any other part of the range can wipe away with wax paper or a cloth containing a small amount of the oven racks with a damp cloth. Adhere to another wellventilated room...
Use and Care Manual
Page 27
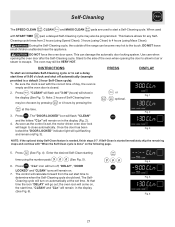
... after the Self-Cleaning cycle. The Self- This can become very hot to the side of 9:00 o'clock and shut off ; Note: 2 hours of the range can damage the automatic door locking system. the oven icon will come on automatically at this time. Stand to the touch. Press .The "DOOR LOCKED...
... after the Self-Cleaning cycle. The Self- This can become very hot to the side of 9:00 o'clock and shut off ; Note: 2 hours of the range can damage the automatic door locking system. the oven icon will come on automatically at this time. Stand to the touch. Press .The "DOOR LOCKED...
Use and Care Manual
Page 30
... immerse the door in the Care & Cleaning section. 30 The oven door gasket is may be used if sprayed on the range top. For more information about cleaning the gas burners see Cleaning the Contoured Cooktop Well Areas, Burner Cap, Burner Head and Burner Drip Pans in water. dry & polish ...with clean water and a damp cloth, then scrub with an ammonia-soaked paper towel for a good seal. DO NOT clean the oven door gasket. Your range finish is made with mild dish detergent & water or a 50/50 solution of vinegar & water. The cooktop is recommended to use a soft cloth, clean...
... immerse the door in the Care & Cleaning section. 30 The oven door gasket is may be used if sprayed on the range top. For more information about cleaning the gas burners see Cleaning the Contoured Cooktop Well Areas, Burner Cap, Burner Head and Burner Drip Pans in water. dry & polish ...with clean water and a damp cloth, then scrub with an ammonia-soaked paper towel for a good seal. DO NOT clean the oven door gasket. Your range finish is made with mild dish detergent & water or a 50/50 solution of vinegar & water. The cooktop is recommended to use a soft cloth, clean...
Use and Care Manual
Page 32
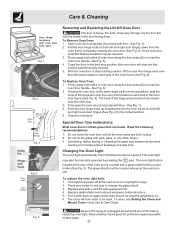
...Care Instructions Most oven doors contain glass that can break. The glass shield must be fully seated onto the roller pins. 3. Fig. 5 Be sure the range is located at a later time. A tool such as the removal position, seat the hook of the hinge arms must be required. 3. Firmly grasp ... angle as a small flat-blade screwdriver may also be reset. To Remove Oven Door: 1. Holding the oven door at the main source or unplug the range. 2. Fully open Fig. 1 Fig. 2 Fig. 3 Fig. 4 Removing and Replacing the Lift-Off Oven Door The door is opened. Press wire holder to one...
...Care Instructions Most oven doors contain glass that can break. The glass shield must be fully seated onto the roller pins. 3. Fig. 5 Be sure the range is located at a later time. A tool such as the removal position, seat the hook of the hinge arms must be required. 3. Firmly grasp ... angle as a small flat-blade screwdriver may also be reset. To Remove Oven Door: 1. Holding the oven door at the main source or unplug the range. 2. Fully open Fig. 1 Fig. 2 Fig. 3 Fig. 4 Removing and Replacing the Lift-Off Oven Door The door is opened. Press wire holder to one...
Use and Care Manual
Page 33
...spillovers in the General Care & Cleaning section. Place oven rack in this appliance. Contact builder or installer to make range appear not level. See section on the oven rack. With the gas burner OFF, clean ports with a small-gauge wire or needle. (2) Moisture is full. See Setting Oven Controls in... this Use & Care Manual or read the instructions "Entire appliance does not operate" in center of day must be cleaned with range. Oven light does not...
...spillovers in the General Care & Cleaning section. Place oven rack in this appliance. Contact builder or installer to make range appear not level. See section on the oven rack. With the gas burner OFF, clean ports with a small-gauge wire or needle. (2) Moisture is full. See Setting Oven Controls in... this Use & Care Manual or read the instructions "Entire appliance does not operate" in center of day must be cleaned with range. Oven light does not...


