Complete Owner's Guide (English)
Page 1
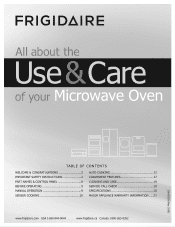
All about the Use &Care of your Microwave Oven 316495059 (May 2009) TABLE OF CONTENTS WELCOME & CONGRATULATIONS 2 IMPORTANT SAFETY INSTRUCTIONS 2 PART NAMES & CONTROL PANEL 8 Before Operating 9 Manual operation 9 Sensor cooking 10 AUTO cooking 12 Convenient Features 17 Cleaning and Care 19 Service Call Check 20 Specifications 20 Major Appliance Warranty Information...... 21 www.frigidaire.com USA 1-800-944-9044 www.frigidaire.ca Canada 1-800-265-8352
All about the Use &Care of your Microwave Oven 316495059 (May 2009) TABLE OF CONTENTS WELCOME & CONGRATULATIONS 2 IMPORTANT SAFETY INSTRUCTIONS 2 PART NAMES & CONTROL PANEL 8 Before Operating 9 Manual operation 9 Sensor cooking 10 AUTO cooking 12 Convenient Features 17 Cleaning and Care 19 Service Call Check 20 Specifications 20 Major Appliance Warranty Information...... 21 www.frigidaire.com USA 1-800-944-9044 www.frigidaire.ca Canada 1-800-265-8352
Complete Owner's Guide (English)
Page 5
... the exterior of dish. • Watch cooking time. Generally, covered foods will not cause as much condensation as 1200 watts, except for doneness. It should not be warm to bottom and from the receiver. • Plug the microwave oven into a different outlet so that cooking temperatures have food in the... away from the center of meat or poultry to correct the interference by turning the equipment off . A good microwave cookbook is very hot to part 18 of FCC Rules, which can smoke or ignite. • Cover foods while cooking. It has been type tested and found to radio or...
... the exterior of dish. • Watch cooking time. Generally, covered foods will not cause as much condensation as 1200 watts, except for doneness. It should not be warm to bottom and from the receiver. • Plug the microwave oven into a different outlet so that cooking temperatures have food in the... away from the center of meat or poultry to correct the interference by turning the equipment off . A good microwave cookbook is very hot to part 18 of FCC Rules, which can smoke or ignite. • Cover foods while cooking. It has been type tested and found to radio or...
Complete Owner's Guide (English)
Page 8
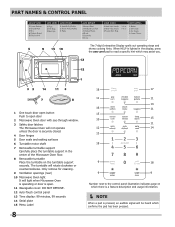
...11 12 14 13 18 9 18 9 9 Number next to the control panel illustration indicates page on the turntable support securely. PART NAMES & CONTROL PANEL The 7-digit Interactive Display spells out operating steps and shows cooking hints. Only remove for cleaning. 9 Ventilation openings (...rear) 10 Microwave Oven light It will light when Microwave Oven is operating or door is open door 2 Microwave Oven door with see-through window. 3 Safety door latches The Microwave Oven will not operate unless the door is pressed, an audible...
...11 12 14 13 18 9 18 9 9 Number next to the control panel illustration indicates page on the turntable support securely. PART NAMES & CONTROL PANEL The 7-digit Interactive Display spells out operating steps and shows cooking hints. Only remove for cleaning. 9 Ventilation openings (...rear) 10 Microwave Oven light It will light when Microwave Oven is operating or door is open door 2 Microwave Oven door with see-through window. 3 Safety door latches The Microwave Oven will not operate unless the door is pressed, an audible...
Complete Owner's Guide (English)
Page 10
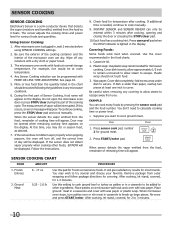
... of vapor will appear on the display. Casserole lid. 2. Be careful when removing any microwave cookbook. 6. SENSOR COOKING CHART FOOD AMOUNT PROCEDURE 1. Ground Meat 6 - 17 oz 0.25 - 2.0 lb Use this part of day will be displayed. Place patties on the display. After cooking, let stand, ... meat. The sensor adjusts the cooking times and power level for ground meat. During the first part of the microwave oven are dry. Do not open the microwave oven door or press STOP/clear during this pad for temperature after cooking, opening and closing the...
... of vapor will appear on the display. Casserole lid. 2. Be careful when removing any microwave cookbook. 6. SENSOR COOKING CHART FOOD AMOUNT PROCEDURE 1. Ground Meat 6 - 17 oz 0.25 - 2.0 lb Use this part of day will be displayed. Place patties on the display. After cooking, let stand, ... meat. The sensor adjusts the cooking times and power level for ground meat. During the first part of the microwave oven are dry. Do not open the microwave oven door or press STOP/clear during this pad for temperature after cooking, opening and closing the...
Complete Owner's Guide (English)
Page 19
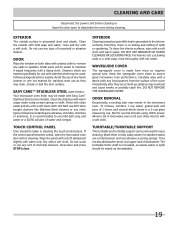
... waveguide cover is generated to the interior surfaces; Keep the waveguide cover clean to set in microwave oven until cool. Do not remove the waveguide cover. Allow to assure good microwave oven performance. Wash them in cleaning the touch control panel. They are marked specifically for several...For heavier soil, use a mild cleanser and non abrasive scouring sponge. Carefully wipe with a damp cloth. Built-up immediately. 19 Metal parts will be easier to remove any food spatters from mica so requires special care. Touch Control Panel Care should be wiped up splashes may ...
... waveguide cover is generated to the interior surfaces; Keep the waveguide cover clean to set in microwave oven until cool. Do not remove the waveguide cover. Allow to assure good microwave oven performance. Wash them in cleaning the touch control panel. They are marked specifically for several...For heavier soil, use a mild cleanser and non abrasive scouring sponge. Carefully wipe with a damp cloth. Built-up immediately. 19 Metal parts will be easier to remove any food spatters from mica so requires special care. Touch Control Panel Care should be wiped up splashes may ...
Complete Owner's Guide (English)
Page 21
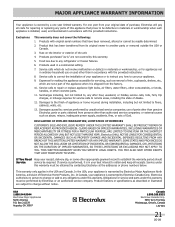
...described or illustrated are subject to change or add to change without notice. Service calls which are not a part of parts other than genuine Electrolux parts or parts obtained from its original owner to obtain and keep all costs for repairing or replacing any after hour, weekend..., or holiday service calls, tolls, ferry trip charges, or mileage expense for service and parts under this warranty. 5. Electrolux SHALL NOT BE LIABLE FOR CONSEQUENTIAL OR INCIDENTAL DAMAGES SUCH AS PROPERTY DAMAGE AND INCIDENTAL EXPENSES RESULTING...
...described or illustrated are subject to change or add to change without notice. Service calls which are not a part of parts other than genuine Electrolux parts or parts obtained from its original owner to obtain and keep all costs for repairing or replacing any after hour, weekend..., or holiday service calls, tolls, ferry trip charges, or mileage expense for service and parts under this warranty. 5. Electrolux SHALL NOT BE LIABLE FOR CONSEQUENTIAL OR INCIDENTAL DAMAGES SUCH AS PROPERTY DAMAGE AND INCIDENTAL EXPENSES RESULTING...
Installation Instructions (All Languages)
Page 1
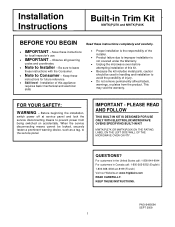
... to improper installation is not covered under the Warranty. Unplug the microwave oven before attempting installation of injury. Do not remove permanently affixed... being switched on accidentally. Before beginning the installation, switch power off at : www.frigidaire.com READ CAREFULLY. Be sure to leave these instructions completely and carefully. ...IS DESIGNED FOR USE ONLY WITH ELECTROLUX MICROWAVE OVENS SPECIFYING BUILT-IN KIT MWTK(P)27K OR MWTK(P)30K ON... RATING LABEL ON THE LEFT SIDE WALL OF THE MICROWAVE OVEN CAVITY. This may void the warranty. FOR YOUR...
... to improper installation is not covered under the Warranty. Unplug the microwave oven before attempting installation of injury. Do not remove permanently affixed... being switched on accidentally. Before beginning the installation, switch power off at : www.frigidaire.com READ CAREFULLY. Be sure to leave these instructions completely and carefully. ...IS DESIGNED FOR USE ONLY WITH ELECTROLUX MICROWAVE OVENS SPECIFYING BUILT-IN KIT MWTK(P)27K OR MWTK(P)30K ON... RATING LABEL ON THE LEFT SIDE WALL OF THE MICROWAVE OVEN CAVITY. This may void the warranty. FOR YOUR...
Installation Instructions (All Languages)
Page 2
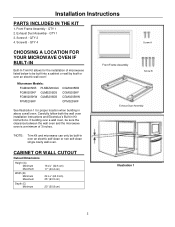
...(42.5 cm) 17" (43.2 cm) 24 3/4" (62.9 cm) 25" (63.5 cm) Depth (C) Minimum 20" (50.8 cm) Illustration 1 2 Microwave Models: FGM0205KB PLMBZ209GC FGM0205KF GLMB209DS FGM0205KW GLMB209DB FPM0209KF CGM0205KB CGM0205KF CGM0205KW CPM0209KF See Illustration 1 for the installation of... a wall oven. Screw A - Front Frame Assembly - Exhaust Duct Assembly - QTY 2 4. Installation Instructions PARTS INCLUDED IN THE KIT 1. QTY 4 Screw A CHOOSING A LOCATION FOR YOUR MICROWAVE OVEN IF BUILT-IN Built-In Trim Kit allows for proper location when building in Kit instructions.
...(42.5 cm) 17" (43.2 cm) 24 3/4" (62.9 cm) 25" (63.5 cm) Depth (C) Minimum 20" (50.8 cm) Illustration 1 2 Microwave Models: FGM0205KB PLMBZ209GC FGM0205KF GLMB209DS FGM0205KW GLMB209DB FPM0209KF CGM0205KB CGM0205KF CGM0205KW CPM0209KF See Illustration 1 for the installation of... a wall oven. Screw A - Front Frame Assembly - Exhaust Duct Assembly - QTY 2 4. Installation Instructions PARTS INCLUDED IN THE KIT 1. QTY 4 Screw A CHOOSING A LOCATION FOR YOUR MICROWAVE OVEN IF BUILT-IN Built-In Trim Kit allows for proper location when building in Kit instructions.


