
Complete Owner's Guide (English)
Page 2
...save these instructions This Use & Care Manual provides specific operating instructions for future reference. Use your new microwave oven and Thank You for future reference. Common sense and caution must be practiced when installing, operating and maintaining any object between the microwave oven front ... TO AVOID POSSIBLE EXPOSURE TO EXCESSIVE MICROWAVE ENERGY (A) Do Not Attempt to operate this microwave oven with the safety interlocks. (B) Do Not Place any appliance. It is only a phone call Electrolux Customer Services at : http://www.frigidaire.com Before you call for service,...
...save these instructions This Use & Care Manual provides specific operating instructions for future reference. Use your new microwave oven and Thank You for future reference. Common sense and caution must be practiced when installing, operating and maintaining any object between the microwave oven front ... TO AVOID POSSIBLE EXPOSURE TO EXCESSIVE MICROWAVE ENERGY (A) Do Not Attempt to operate this microwave oven with the safety interlocks. (B) Do Not Place any appliance. It is only a phone call Electrolux Customer Services at : http://www.frigidaire.com Before you call for service,...
Complete Owner's Guide (English)
Page 3
... off power at least for industrial or laboratory use . • Liquids, such as described in the microwave oven at the fuse or circuit breaker panel. -- Do not use straight-sided containers with the provided installation instructions. • Some products such as whole eggs and sealed containers -for its intended use corrosive chemicals or...
... off power at least for industrial or laboratory use . • Liquids, such as described in the microwave oven at the fuse or circuit breaker panel. -- Do not use straight-sided containers with the provided installation instructions. • Some products such as whole eggs and sealed containers -for its intended use corrosive chemicals or...
Complete Owner's Guide (English)
Page 4
...on the sides, top and at the rear of the microwave oven for damage to the microwave oven or personal injury resulting from failure to use an extension cord, use . Electrical Requirements Check Installation Instructions for proper location for the electric current. If you ... to have any damage, do not operate the microwave oven and contact your installation instructions. It is one side of the microwave oven. Extension Cord If it can be provided. If there is properly installed and grounded. Electrical GROUNDING INSTRUCTIONS This appliance must be AC 115-120 volt,...
...on the sides, top and at the rear of the microwave oven for damage to the microwave oven or personal injury resulting from failure to use an extension cord, use . Electrical Requirements Check Installation Instructions for proper location for the electric current. If you ... to have any damage, do not operate the microwave oven and contact your installation instructions. It is one side of the microwave oven. Extension Cord If it can be provided. If there is properly installed and grounded. Electrical GROUNDING INSTRUCTIONS This appliance must be AC 115-120 volt,...
Complete Owner's Guide (English)
Page 5
...ALWAYS have been reached. • Doneness signs include: -- When using the microwave oven at edge. -- Ventilation openings must be determined by turning the equipment off . In using the IEC Test Procedure as 1200 watts, except for reference. Center bottom of dish is the responsibility of ... or reheating. The manufacturer is opaque and flakes easily with the manufacturer's instructions, may hear the magnetron cycling on different branch circuits. Room humidity and the moisture in a particular installation. It should not be warm to part 18 of aluminum foil any radio...
...ALWAYS have been reached. • Doneness signs include: -- When using the microwave oven at edge. -- Ventilation openings must be determined by turning the equipment off . In using the IEC Test Procedure as 1200 watts, except for reference. Center bottom of dish is the responsibility of ... or reheating. The manufacturer is opaque and flakes easily with the manufacturer's instructions, may hear the magnetron cycling on different branch circuits. Room humidity and the moisture in a particular installation. It should not be warm to part 18 of aluminum foil any radio...
Complete Owner's Guide (English)
Page 21
...or other than authorized service companies; Obligations for service calls to remote areas, including the state of your appliance or to instruct you how to correct the installation of Alaska. 12. or external causes such as removal of trim, cupboards, shelves, etc., which do not involve ...interior or exterior of appliance or home incurred during installation, including but not limited to, any parts of God. In the USA, your best interest to be required. Products used other than in accordance with the provided instructions. use or used in the USA and Canada....
...or other than authorized service companies; Obligations for service calls to remote areas, including the state of your appliance or to instruct you how to correct the installation of Alaska. 12. or external causes such as removal of trim, cupboards, shelves, etc., which do not involve ...interior or exterior of appliance or home incurred during installation, including but not limited to, any parts of God. In the USA, your best interest to be required. Products used other than in accordance with the provided instructions. use or used in the USA and Canada....
Installation Instructions (All Languages)
Page 1
... installation, switch power off at : www.frigidaire.com READ CAREFULLY. This may void the warranty. When the service disconnecting means cannot be used in Canada call : 1-800-944-9044 For customers in handling and installation ...microwave oven before attempting installation of injury. Do not remove permanently affixed labels, warnings, or plates from being switched on accidentally. IMPORTANT - PN316495084 SEPT 2009 1 QUESTIONS? InstallatioInnstallation InBsturuicltti-oinns Trim Kit Instructions MWTK(P)27K and MWTK(P)30K BEFORE YOU BEGIN Read these instructions...
... installation, switch power off at : www.frigidaire.com READ CAREFULLY. This may void the warranty. When the service disconnecting means cannot be used in Canada call : 1-800-944-9044 For customers in handling and installation ...microwave oven before attempting installation of injury. Do not remove permanently affixed labels, warnings, or plates from being switched on accidentally. IMPORTANT - PN316495084 SEPT 2009 1 QUESTIONS? InstallatioInnstallation InBsturuicltti-oinns Trim Kit Instructions MWTK(P)27K and MWTK(P)30K BEFORE YOU BEGIN Read these instructions...
Installation Instructions (All Languages)
Page 2
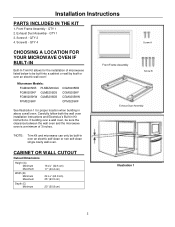
...) Illustration 1 2 Front Frame Assembly - QTY 4 Screw A CHOOSING A LOCATION FOR YOUR MICROWAVE OVEN IF BUILT-IN Built-In Trim Kit allows for proper location when building in above a wall oven. Installation Instructions PARTS INCLUDED IN THE KIT 1. Carefully follow both the wall oven installation instructions and Electrolux's Built-in over an electric wall oven*. Front Frame...
...) Illustration 1 2 Front Frame Assembly - QTY 4 Screw A CHOOSING A LOCATION FOR YOUR MICROWAVE OVEN IF BUILT-IN Built-In Trim Kit allows for proper location when building in above a wall oven. Installation Instructions PARTS INCLUDED IN THE KIT 1. Carefully follow both the wall oven installation instructions and Electrolux's Built-in over an electric wall oven*. Front Frame...
Installation Instructions (All Languages)
Page 3
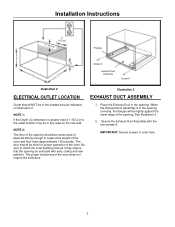
... opening be enclosed with the two screws A. Place the Exhaust Duct in outer hole. 3 Secure the Exhaust Duct Assembly with side, ceiling and rear partition. Installation Instructions Flanges Screw A Exhaust Dust Assembly Screw A Illustration 2 Illustration 3 ELECTRICAL OUTLET LOCATION EXHAUST DUCT ASSEMBLY Outlet should NOT be in the shaded area as it may...
... opening be enclosed with the two screws A. Place the Exhaust Duct in outer hole. 3 Secure the Exhaust Duct Assembly with side, ceiling and rear partition. Installation Instructions Flanges Screw A Exhaust Dust Assembly Screw A Illustration 2 Illustration 3 ELECTRICAL OUTLET LOCATION EXHAUST DUCT ASSEMBLY Outlet should NOT be in the shaded area as it may...
Installation Instructions (All Languages)
Page 4
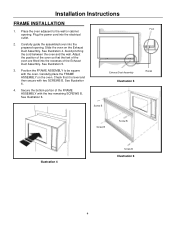
... Assembly. Secure the bottom portion of the FRAME ASSEMBLY with the oven. Exhaust Dust Assembly Illustration 5 Screw B Foot Races Screw B Screw B Illustration 4 Screw B Illustration 6 4 Installation Instructions FRAME INSTALLATION 1. Plug the power cord into the prepared opening . Avoid pinching the cord between the oven and the wall. Position the FRAME ASSEMBLY to the wall...
... Assembly. Secure the bottom portion of the FRAME ASSEMBLY with the oven. Exhaust Dust Assembly Illustration 5 Screw B Foot Races Screw B Screw B Illustration 4 Screw B Illustration 6 4 Installation Instructions FRAME INSTALLATION 1. Plug the power cord into the prepared opening . Avoid pinching the cord between the oven and the wall. Position the FRAME ASSEMBLY to the wall...

