Complete Owner's Guide (English)
Page 1
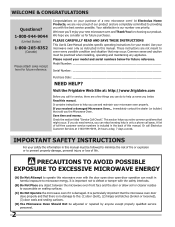
All about the Use &Care of your Microwave Oven 316495059 (May 2009) TABLE OF CONTENTS WELCOME & CONGRATULATIONS 2 IMPORTANT SAFETY INSTRUCTIONS 2 PART NAMES & CONTROL PANEL 8 Before Operating 9 Manual operation 9 Sensor cooking 10 AUTO cooking 12 Convenient Features 17 Cleaning and Care 19 Service Call Check 20 Specifications 20 Major Appliance Warranty Information...... 21 www.frigidaire.com USA 1-800-944-9044 www.frigidaire.ca Canada 1-800-265-8352
All about the Use &Care of your Microwave Oven 316495059 (May 2009) TABLE OF CONTENTS WELCOME & CONGRATULATIONS 2 IMPORTANT SAFETY INSTRUCTIONS 2 PART NAMES & CONTROL PANEL 8 Before Operating 9 Manual operation 9 Sensor cooking 10 AUTO cooking 12 Convenient Features 17 Cleaning and Care 19 Service Call Check 20 Specifications 20 Major Appliance Warranty Information...... 21 www.frigidaire.com USA 1-800-944-9044 www.frigidaire.ca Canada 1-800-265-8352
Complete Owner's Guide (English)
Page 2
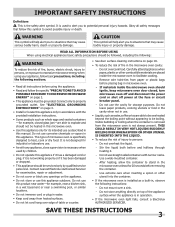
... 1-800-265-8352 (Canada) Please attach sales receipt here for future reference. Your satisfaction is only a phone call away. Read this microwave oven with the door open since open-door operation can result in this manual must be practiced when installing, operating and maintaining any object ... Site at: http://www.frigidaire.com Before you 'll enjoy your model. If you do to cover every possible condition and situation that there is damaged. It is important not to help is our number one priority. Please record your microwave oven properly. It contains instructions ...
... 1-800-265-8352 (Canada) Please attach sales receipt here for future reference. Your satisfaction is only a phone call away. Read this microwave oven with the door open since open-door operation can result in this manual must be practiced when installing, operating and maintaining any object ... Site at: http://www.frigidaire.com Before you 'll enjoy your model. If you do to cover every possible condition and situation that there is damaged. It is important not to help is our number one priority. Please record your microwave oven properly. It contains instructions ...
Complete Owner's Guide (English)
Page 3
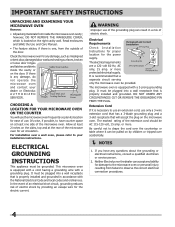
...AUTHORIZED SERVICER. Do not store anything directly on top of fire, burns, electric shock, injury to persons, or exposure to excessive microwave energy when using your appliance, follow basic precautions, including the following sections. • Read all safety messages that follow the specific... "PRECAUTIONS TO AVOID POSSIBLE EXPOSURE TO EXCESSIVE MICROWAVE ENERGY" on the appliance. • Do not store or use . • As with any appliance, close supervision is not working...
...AUTHORIZED SERVICER. Do not store anything directly on top of fire, burns, electric shock, injury to persons, or exposure to excessive microwave energy when using your appliance, follow basic precautions, including the following sections. • Read all safety messages that follow the specific... "PRECAUTIONS TO AVOID POSSIBLE EXPOSURE TO EXCESSIVE MICROWAVE ENERGY" on the appliance. • Do not store or use . • As with any appliance, close supervision is not working...
Complete Owner's Guide (English)
Page 4
...appliance must be plugged into a wall receptacle that is properly installed and grounded in a risk of electric shock. It must be grounded. The microwave oven is equipped with a cord having a grounding wire with a grounding plug. Neither Electrolux nor the dealer can accept any liability for any ... cord, use only a 3-wire extension cord that has a 3-blade grounding plug and a 3-slot receptacle that a separate circuit serving only the microwave oven be AC 115-120 volt, 15 amp. In the event of an electrical short circuit, grounding reduces risk of electric shock by children or...
...appliance must be plugged into a wall receptacle that is properly installed and grounded in a risk of electric shock. It must be grounded. The microwave oven is equipped with a cord having a grounding wire with a grounding plug. Neither Electrolux nor the dealer can accept any liability for any ... cord, use only a 3-wire extension cord that has a 3-blade grounding plug and a 3-slot receptacle that a separate circuit serving only the microwave oven be AC 115-120 volt, 15 amp. In the event of an electrical short circuit, grounding reduces risk of electric shock by children or...
Complete Owner's Guide (English)
Page 5
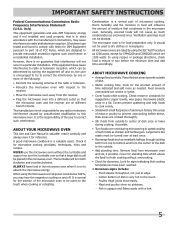
... outlet so that a large dish could be warm to provide reasonable protection against such interference in the microwave oven. Place thickest areas towards outside of moisture that interference will not cause as much condensation as 1200 watts, except for standing time which allows the food to radio or television reception, which are...
... outlet so that a large dish could be warm to provide reasonable protection against such interference in the microwave oven. Place thickest areas towards outside of moisture that interference will not cause as much condensation as 1200 watts, except for standing time which allows the food to radio or television reception, which are...
Complete Owner's Guide (English)
Page 6
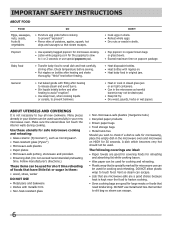
...• Dry nuts or seeds in original jars. General • Cut baked goods with metallic trim • Non-heat-resistant glass • Non-microwave-safe plastics (margarine tubs) • Recycled paper products • Brown paper bags • Food storage bags • Metal twist-ties Should you .... A dish which becomes very hot should not be used . DO NOT use special popcorn pad. • Pop popcorn in the microwave oven and microwave on popcorn package. Vent so steam can be used for short time reheating of potatoes, apples, squash, hot dogs and sausages so that...
...• Dry nuts or seeds in original jars. General • Cut baked goods with metallic trim • Non-heat-resistant glass • Non-microwave-safe plastics (margarine tubs) • Recycled paper products • Brown paper bags • Food storage bags • Metal twist-ties Should you .... A dish which becomes very hot should not be used . DO NOT use special popcorn pad. • Pop popcorn in the microwave oven and microwave on popcorn package. Vent so steam can be used for short time reheating of potatoes, apples, squash, hot dogs and sausages so that...
Complete Owner's Guide (English)
Page 7
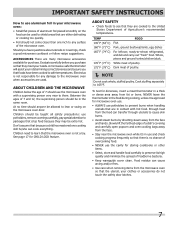
... swing on the food can be allowed to prevent burns when handling utensils that foods have questions about utensils or coverings, check a good microwave cookbook or follow recipe suggestions. Dark meat of poultry. Food residue can cook everything. Should you that are cooked to 165°F. Don... food during cooking, unless it 's in use the cavity for doneness, insert a meat thermometer in the same room. ACCESSORIES There are many microwave accessories available for any surface of 7 should not come closer than one cooking skill he/she can cause arcing and/or fires. •...
... swing on the food can be allowed to prevent burns when handling utensils that foods have questions about utensils or coverings, check a good microwave cookbook or follow recipe suggestions. Dark meat of poultry. Food residue can cook everything. Should you that are cooked to 165°F. Don... food during cooking, unless it 's in use the cavity for doneness, insert a meat thermometer in the same room. ACCESSORIES There are many microwave accessories available for any surface of 7 should not come closer than one cooking skill he/she can cause arcing and/or fires. •...
Complete Owner's Guide (English)
Page 8
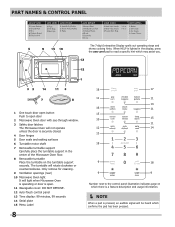
...digit Interactive Display spells out operating steps and shows cooking hints. Only remove for cleaning. 9 Ventilation openings (rear) 10 Microwave Oven light It will light when Microwave Oven is operating or door is open. 11 Waveguide cover: DO NOT REMOVE. 12 Auto-Touch control panel 13 Time...not operate unless the door is pressed, an audible signal will rotate clockwise or counterclockwise. When HELP is lighted in the center of the Microwave Oven floor. 8 Removable turntable Place the turntable on which there is a feature description and usage information. NOTE When a pad ...
...digit Interactive Display spells out operating steps and shows cooking hints. Only remove for cleaning. 9 Ventilation openings (rear) 10 Microwave Oven light It will light when Microwave Oven is operating or door is open. 11 Waveguide cover: DO NOT REMOVE. 12 Auto-Touch control panel 13 Time...not operate unless the door is pressed, an audible signal will rotate clockwise or counterclockwise. When HELP is lighted in the center of the Microwave Oven floor. 8 Removable turntable Place the turntable on which there is a feature description and usage information. NOTE When a pad ...
Complete Owner's Guide (English)
Page 9
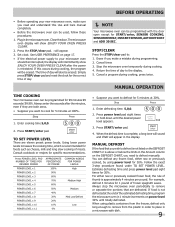
... OVEN PRESS CLEAR after the minutes, even if they are both zeros. • Suppose you want to defrost manually. Stop the microwave oven temporarily during programming. 2. Cancel a program during cooking, press twice. Estimate defrosting time and press power level pad eight times for... pad eight times or hold down until totally defrosted. Enter cooking time 5,0,0. 2. Consult cookbook or recipes for 30%. Always stop the microwave oven periodically to : 1. For either raw or previously cooked, by using plastic containers from the freezer, defrost only long enough to ...
... OVEN PRESS CLEAR after the minutes, even if they are both zeros. • Suppose you want to defrost manually. Stop the microwave oven temporarily during programming. 2. Cancel a program during cooking, press twice. Estimate defrosting time and press power level pad eight times for... pad eight times or hold down until totally defrosted. Enter cooking time 5,0,0. 2. Consult cookbook or recipes for 30%. Always stop the microwave oven periodically to : 1. For either raw or previously cooked, by using plastic containers from the freezer, defrost only long enough to ...
Complete Owner's Guide (English)
Page 10
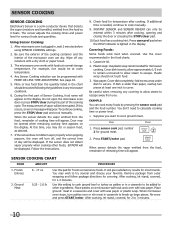
...sensor does not detect vapor properly when cooking other ingredients. Press 2. After cooking, let stand, covered, for ground meat. After microwave oven is plugged in the display. Plastic wrap: Use plastic wrap recommended for various foods and quantities. The measurement of vapor will ... programmed with wax paper. Frozen Entrees 2. Use this setting to other foods, ERROR will be displayed. Be careful when removing any microwave cookbook. 6. Place ground meat in the food charts. 1. Sensor cooking SENSOR COOKING Electrolux's Sensor is a semi-conductor device that ...
...sensor does not detect vapor properly when cooking other ingredients. Press 2. After cooking, let stand, covered, for ground meat. After microwave oven is plugged in the display. Plastic wrap: Use plastic wrap recommended for various foods and quantities. The measurement of vapor will ... programmed with wax paper. Frozen Entrees 2. Use this setting to other foods, ERROR will be displayed. Be careful when removing any microwave cookbook. 6. Place ground meat in the food charts. 1. Sensor cooking SENSOR COOKING Electrolux's Sensor is a semi-conductor device that ...
Complete Owner's Guide (English)
Page 11
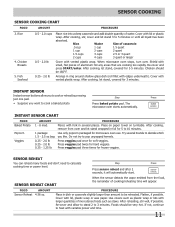
.... Do not try to calculate cooking time or power level. If not, continue to 3 minutes. After cooking, let stand, covered for microwave oven use. The microwave oven starts automatically. Press veggies pad twice for 3-5 minutes. Step Press sensor reheat and after 2 seconds, it will appear. Chicken Breasts ...5. When microwave oven stops, turn over. Chicken should be 160°F. Cover with variable power and time. 11 SENSOR REHEAT You can reheat many...
.... Do not try to calculate cooking time or power level. If not, continue to 3 minutes. After cooking, let stand, covered for microwave oven use. The microwave oven starts automatically. Press veggies pad twice for 3-5 minutes. Step Press sensor reheat and after 2 seconds, it will appear. Chicken Breasts ...5. When microwave oven stops, turn over. Chicken should be 160°F. Cover with variable power and time. 11 SENSOR REHEAT You can reheat many...
Complete Owner's Guide (English)
Page 12
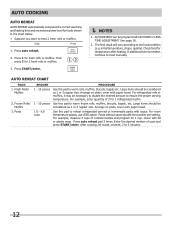
AUTO cooking AUTO REHEAT AUTO REHEAT automatically computes the correct warming and heating time and microwave power level for foods shown in the chart below. • Suppose you want to the food condition (e.g. Press 1 for temperature after heating. The final result ...
AUTO cooking AUTO REHEAT AUTO REHEAT automatically computes the correct warming and heating time and microwave power level for foods shown in the chart below. • Suppose you want to the food condition (e.g. Press 1 for temperature after heating. The final result ...
Complete Owner's Guide (English)
Page 14
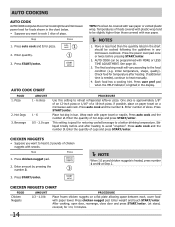
... needed, continue to reheat refrigerated leftover pizza. Chicken Nuggets CHART FOOD Chicken Nuggets AMOUNT 0.3 - 1.0 lb PROCEDURE Place frozen chicken nuggets on a microwave-safe rack. After cooking, open door, rearrange, close door and press START/enter. Let stand, covered, for pizza. 2. Press auto cook and...plastic wrap tend to be slightly higher than the quantity listed in the chart should be cooked following the guidelines in any microwave cookbook. Press auto cook and the number 2. Press chicken nugget pad. initial temperature, shape, quality). Press auto cook and...
... needed, continue to reheat refrigerated leftover pizza. Chicken Nuggets CHART FOOD Chicken Nuggets AMOUNT 0.3 - 1.0 lb PROCEDURE Place frozen chicken nuggets on a microwave-safe rack. After cooking, open door, rearrange, close door and press START/enter. Let stand, covered, for pizza. 2. Press auto cook and...plastic wrap tend to be slightly higher than the quantity listed in the chart should be cooked following the guidelines in any microwave cookbook. Press auto cook and the number 2. Press chicken nugget pad. initial temperature, shape, quality). Press auto cook and...
Complete Owner's Guide (English)
Page 15
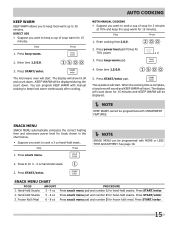
... Press 1. Press START/enter. SNACK MENU CHART FOOD AMOUNT 1. x 4 3. The operation will start. SNACK MENU SNACK MENU automatically computes the correct heating time and microwave power level for foods shown in the chart below. • Suppose you want to cook a 3 oz hand-held Snacks 5 - 6 oz 3. See page 18...AUTO cooking KEEP WARM Keep Warm allows you to keep food warm up to keep food warm continuously after cooking. Press START/enter. The microwave oven will start . Press power level pad 4 times for 15 minutes and KEEP WARM will be displayed. NOTE Keep Warm ...
... Press 1. Press START/enter. SNACK MENU CHART FOOD AMOUNT 1. x 4 3. The operation will start. SNACK MENU SNACK MENU automatically computes the correct heating time and microwave power level for foods shown in the chart below. • Suppose you want to cook a 3 oz hand-held Snacks 5 - 6 oz 3. See page 18...AUTO cooking KEEP WARM Keep Warm allows you to keep food warm up to keep food warm continuously after cooking. Press START/enter. The microwave oven will start . Press power level pad 4 times for 15 minutes and KEEP WARM will be displayed. NOTE Keep Warm ...
Complete Owner's Guide (English)
Page 16
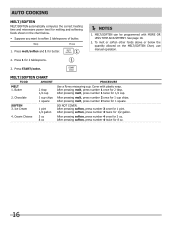
... above or below . • Suppose you want to soften 2 tablespoons of butter. AUTO cooking Melt/Soften Melt/soften automatically computes the correct heating time and microwave power level for melting and softening foods shown in the chart below the quantity allowed on the Melt/Soften Chart, use manual operation. 2. After pressing...
... above or below . • Suppose you want to soften 2 tablespoons of butter. AUTO cooking Melt/Soften Melt/soften automatically computes the correct heating time and microwave power level for melting and softening foods shown in the chart below the quantity allowed on the Melt/Soften Chart, use manual operation. 2. After pressing...
Complete Owner's Guide (English)
Page 17
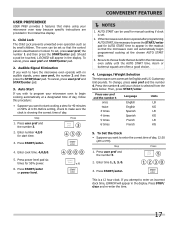
... Clock • Suppose you want to enter the correct time of day, follow this procedure: • Suppose you wish to make using your microwave oven easy because specific instructions are often a good choice. 4. Step Press 1. If you wish to enter an incorrect clock time, ERROR will ...chosen Auto Start time. 3. To change, press user pref and the number 4. Press user pref and the number 5. 2. Language / Weight Selection The microwave oven comes set , press user pref, the number 1 and then press the START/enter pad. Press START/enter. Child Lock The Child Lock prevents ...
... Clock • Suppose you want to enter the correct time of day, follow this procedure: • Suppose you wish to make using your microwave oven easy because specific instructions are often a good choice. 4. Step Press 1. If you wish to enter an incorrect clock time, ERROR will ...chosen Auto Start time. 3. To change, press user pref and the number 4. Press user pref and the number 5. 2. Language / Weight Selection The microwave oven comes set , press user pref, the number 1 and then press the START/enter pad. Press START/enter. Child Lock The Child Lock prevents ...
Complete Owner's Guide (English)
Page 18
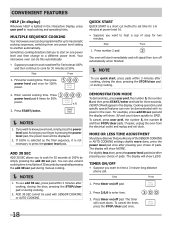
...to cook for two minutes. TIMER ON/OFF • Suppose you to another automatically. Press timer on /off pad. 2. MULTIPLE SEQUENCE COOKING Your microwave oven can now be demonstrated with SENSOR COOKING or AUTO COOKING. 18 Quick Start QUICK START is not necessary to a different power level. Step ...NOTE To use add 30 sec, press pad within 3 minutes after cooking, closing the door, pressing the STOP/clear pad or during cooking. 2. Your microwave oven can also extend cooking time in the oven. As long as the final sequence, it is a short-cut method to set clock. Step Press...
...to cook for two minutes. TIMER ON/OFF • Suppose you to another automatically. Press timer on /off pad. 2. MULTIPLE SEQUENCE COOKING Your microwave oven can now be demonstrated with SENSOR COOKING or AUTO COOKING. 18 Quick Start QUICK START is not necessary to a different power level. Step ...NOTE To use add 30 sec, press pad within 3 minutes after cooking, closing the door, pressing the STOP/clear pad or during cooking. 2. Your microwave oven can also extend cooking time in the oven. As long as the final sequence, it is a short-cut method to set clock. Step Press...
Complete Owner's Guide (English)
Page 19
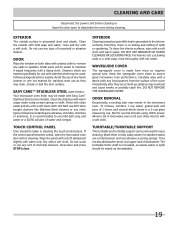
...from mica so requires special care. Turntable/Turntable Support The turntable and turntable support can be wiped up splashes may remain in microwave oven until cool. Waveguide Cover The waveguide cover is no baking and setting of household or abrasive cleaner. Allow to deactivate... the oven during cleaning. Carefully wipe with a damp cloth to assure good microwave oven performance. They are marked specifically for stubborn stains use of dishwasher. Rinse with clean water and dry with a damp cloth....
...from mica so requires special care. Turntable/Turntable Support The turntable and turntable support can be wiped up splashes may remain in microwave oven until cool. Waveguide Cover The waveguide cover is no baking and setting of household or abrasive cleaner. Allow to deactivate... the oven during cleaning. Carefully wipe with a damp cloth to assure good microwave oven performance. They are marked specifically for stubborn stains use of dishwasher. Rinse with clean water and dry with a damp cloth....

Complete Owner's Guide (English)
Page 20
...the rear ventilation openings.) YES _____ NO _____ C Does the turntable rotate? (It is less. Specifications FPMO209KF, CPMO209KF, FGMO205KF, CGMO205KF, FGMO205KB, FGMO205KW AC Line Voltage: UL Rating - Cooking Uniformity: Turntable Weight: Approx. 46 LB * The...CPMO209, CGMO205: 1100W 2450 MHz Outside Dimensions: 24"(W) x 13-3/8"(H) x 19-1/8"(D) Cavity Dimensions: 17-3/8"(W) x 10-1/2"(H) x 18-5/8"(D) Microwave oven Capacity**: 2.0 Cu.Ft. This test method is widely recognized. ** Internal capacity is listed by : FCC - Complies with standards set by the Canadian ...
...the rear ventilation openings.) YES _____ NO _____ C Does the turntable rotate? (It is less. Specifications FPMO209KF, CPMO209KF, FGMO205KF, CGMO205KF, FGMO205KB, FGMO205KW AC Line Voltage: UL Rating - Cooking Uniformity: Turntable Weight: Approx. 46 LB * The...CPMO209, CGMO205: 1100W 2450 MHz Outside Dimensions: 24"(W) x 13-3/8"(H) x 19-1/8"(D) Cavity Dimensions: 17-3/8"(W) x 10-1/2"(H) x 18-5/8"(D) Microwave oven Capacity**: 2.0 Cu.Ft. This test method is widely recognized. ** Internal capacity is listed by : FCC - Complies with standards set by the Canadian ...
Installation Instructions (All Languages)
Page 1
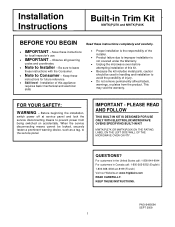
...responsibility of the installer. Product failure due to improper installation is not covered under the Warranty. Unplug the microwave oven before attempting installation of injury. Do not remove permanently affixed labels, warnings, or plates from being switched on... coordinates. Note to prevent power from the product. Before beginning the installation, switch power off at : www.frigidaire.com READ CAREFULLY. InstallatioInnstallation InBsturuicltti-oinns Trim Kit Instructions MWTK(P)27K and MWTK(P)30K BEFORE YOU BEGIN Read these instructions with ...
...responsibility of the installer. Product failure due to improper installation is not covered under the Warranty. Unplug the microwave oven before attempting installation of injury. Do not remove permanently affixed labels, warnings, or plates from being switched on... coordinates. Note to prevent power from the product. Before beginning the installation, switch power off at : www.frigidaire.com READ CAREFULLY. InstallatioInnstallation InBsturuicltti-oinns Trim Kit Instructions MWTK(P)27K and MWTK(P)30K BEFORE YOU BEGIN Read these instructions with ...


