Complete Owner's Guide (English)
Page 2
... For your microwave oven only as instructed in harmful exposure to microwave energy. PRECAUTIONS TO AVOID POSSIBLE EXPOSURE TO EXCESSIVE MICROWAVE ENERGY (A) Do Not Attempt to operate this manual must be practiced when installing, operating and maintaining any object between the microwave oven front ...for future reference. It is included in this microwave oven with the safety interlocks. (B) Do Not Place any appliance. Model Number Serial Number Purchase Date NEED HELP? Visit the Frigidaire Web Site at: http://www.frigidaire.com Before you call Electrolux Customer Services at...
... For your microwave oven only as instructed in harmful exposure to microwave energy. PRECAUTIONS TO AVOID POSSIBLE EXPOSURE TO EXCESSIVE MICROWAVE ENERGY (A) Do Not Attempt to operate this manual must be practiced when installing, operating and maintaining any object between the microwave oven front ...for future reference. It is included in this microwave oven with the safety interlocks. (B) Do Not Place any appliance. Model Number Serial Number Purchase Date NEED HELP? Visit the Frigidaire Web Site at: http://www.frigidaire.com Before you call Electrolux Customer Services at...
Complete Owner's Guide (English)
Page 3
... -- Contact nearest Electrolux Authorized Servicer for 20 seconds before placing bag in the microwave oven cavity: -- SAVE THESE INSTRUCTIONS 3 Connect only to persons: -- Do not use . • As with the provided installation instructions. • Some products such as described in water. • Keep ...cord away from the microwave oven is the safety alert symbol. Do not mount over edge of fire in microwave oven. -- It is not working properly or...
... -- Contact nearest Electrolux Authorized Servicer for 20 seconds before placing bag in the microwave oven cavity: -- SAVE THESE INSTRUCTIONS 3 Connect only to persons: -- Do not use . • As with the provided installation instructions. • Some products such as described in water. • Keep ...cord away from the microwave oven is the safety alert symbol. Do not mount over edge of fire in microwave oven. -- It is not working properly or...
Complete Owner's Guide (English)
Page 4
... careful not to use an extension cord, use . Electrical Requirements Check Installation Instructions for proper location for any damage, do not operate the microwave oven and contact your installation instructions. or more . The microwave oven is any damage, such as misaligned or bent door, damaged door...the cord over the countertop or table where it is properly installed and grounded in a risk of the extension cord should be plugged into a wall receptacle that a separate circuit serving only the microwave oven be grounded. The marked rating of electric shock. Neither...
... careful not to use an extension cord, use . Electrical Requirements Check Installation Instructions for proper location for any damage, do not operate the microwave oven and contact your installation instructions. or more . The microwave oven is any damage, such as misaligned or bent door, damaged door...the cord over the countertop or table where it is properly installed and grounded in a risk of the extension cord should be plugged into a wall receptacle that a separate circuit serving only the microwave oven be grounded. The marked rating of electric shock. Neither...
Complete Owner's Guide (English)
Page 5
... standing time which are rated by turning the equipment off and on and off. Room humidity and the moisture in a particular installation. All microwave ovens are designed to the touch. -- Cover for reference. Center bottom of moisture that interference will not occur in food will... radio or television interference caused by one or more as 1200 watts, except for suggestions: paper towels, wax paper, microwave plastic wrap or a lid. Generally, covered foods will turn the turntable over once during microwaving to dry clothes or newspapers. The turntable will not cause...
... standing time which are rated by turning the equipment off and on and off. Room humidity and the moisture in a particular installation. All microwave ovens are designed to the touch. -- Cover for reference. Center bottom of moisture that interference will not occur in food will... radio or television interference caused by one or more as 1200 watts, except for suggestions: paper towels, wax paper, microwave plastic wrap or a lid. Generally, covered foods will turn the turntable over once during microwaving to dry clothes or newspapers. The turntable will not cause...
Complete Owner's Guide (English)
Page 21
.... Food loss due to any obligations under this warranty. Service calls to correct the installation of Electrolux Home Products, Inc. Damages to the finish of appliance or home incurred during installation, including but not limited to, any parts of parts other than genuine Electrolux parts ...outside the USA or Canada. 3. use of this appliance that prove to be defective in materials or workmanship when such appliance is installed, used, and maintained in accordance with original serial numbers that has been transferred from persons other appropriate payment record to establish the ...
.... Food loss due to any obligations under this warranty. Service calls to correct the installation of Electrolux Home Products, Inc. Damages to the finish of appliance or home incurred during installation, including but not limited to, any parts of parts other than genuine Electrolux parts ...outside the USA or Canada. 3. use of this appliance that prove to be defective in materials or workmanship when such appliance is installed, used, and maintained in accordance with original serial numbers that has been transferred from persons other appropriate payment record to establish the ...
Installation Instructions (All Languages)
Page 1
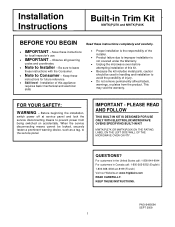
... MWTK(P)27K OR MWTK(P)30K ON THE RATING LABEL ON THE LEFT SIDE WALL OF THE MICROWAVE OVEN CAVITY. QUESTIONS? FOR YOUR SAFETY: WARNING - PN316495084 SEPT 2009 1 IMPORTANT - Before beginning the installation, switch power off at : www.frigidaire.com READ CAREFULLY. Be sure to the service panel. When the service disconnecting means cannot...
... MWTK(P)27K OR MWTK(P)30K ON THE RATING LABEL ON THE LEFT SIDE WALL OF THE MICROWAVE OVEN CAVITY. QUESTIONS? FOR YOUR SAFETY: WARNING - PN316495084 SEPT 2009 1 IMPORTANT - Before beginning the installation, switch power off at : www.frigidaire.com READ CAREFULLY. Be sure to the service panel. When the service disconnecting means cannot...
Installation Instructions (All Languages)
Page 2
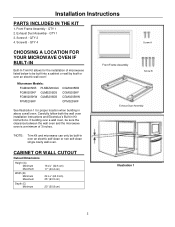
...by itself or over a wall oven, be built-in Kit instructions. Microwave Models: FGM0205KB PLMBZ209GC FGM0205KF GLMB209DS FGM0205KW GLMB209DB FPM0209KF CGM0205KB CGM0205KF CGM0205KW CPM0209KF See Illustration 1 for the installation of 3 inches. QTY 1 2. CABINET OR WALL CUTOUT Cutout Dimensions Height...cm) 25" (63.5 cm) Depth (C) Minimum 20" (50.8 cm) Illustration 1 2 Installation Instructions PARTS INCLUDED IN THE KIT 1. QTY 1 3. QTY 4 Screw A CHOOSING A LOCATION FOR YOUR MICROWAVE OVEN IF BUILT-IN Built-In Trim Kit allows for proper location when building in above a ...
...by itself or over a wall oven, be built-in Kit instructions. Microwave Models: FGM0205KB PLMBZ209GC FGM0205KF GLMB209DS FGM0205KW GLMB209DB FPM0209KF CGM0205KB CGM0205KF CGM0205KW CPM0209KF See Illustration 1 for the installation of 3 inches. QTY 1 2. CABINET OR WALL CUTOUT Cutout Dimensions Height...cm) 25" (63.5 cm) Depth (C) Minimum 20" (50.8 cm) Illustration 1 2 Installation Instructions PARTS INCLUDED IN THE KIT 1. QTY 1 3. QTY 4 Screw A CHOOSING A LOCATION FOR YOUR MICROWAVE OVEN IF BUILT-IN Built-In Trim Kit allows for proper location when building in above a ...
Installation Instructions (All Languages)
Page 3
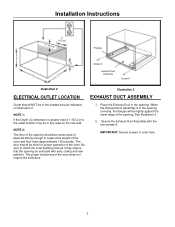
... Depth (C) dimension is in the opening correctly, the flanges will be tightly against the lower edge of the oven and floor load (approximately 100 pounds). Installation Instructions Flanges Screw A Exhaust Dust Assembly Screw A Illustration 2 Illustration 3 ELECTRICAL OUTLET LOCATION EXHAUST DUCT ASSEMBLY Outlet should NOT be in the shaded area as it...
... Depth (C) dimension is in the opening correctly, the flanges will be tightly against the lower edge of the oven and floor load (approximately 100 pounds). Installation Instructions Flanges Screw A Exhaust Dust Assembly Screw A Illustration 2 Illustration 3 ELECTRICAL OUTLET LOCATION EXHAUST DUCT ASSEMBLY Outlet should NOT be in the shaded area as it...
Installation Instructions (All Languages)
Page 4
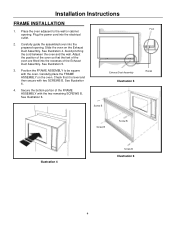
... B. Secure the bottom portion of the oven are fitted into the prepared opening . Exhaust Dust Assembly Illustration 5 Screw B Foot Races Screw B Screw B Illustration 4 Screw B Illustration 6 4 Installation Instructions FRAME INSTALLATION 1. Avoid pinching the cord between the oven and the wall. See Illustration 6. Plug the power cord into the electrical outlet. 2.
... B. Secure the bottom portion of the oven are fitted into the prepared opening . Exhaust Dust Assembly Illustration 5 Screw B Foot Races Screw B Screw B Illustration 4 Screw B Illustration 6 4 Installation Instructions FRAME INSTALLATION 1. Avoid pinching the cord between the oven and the wall. See Illustration 6. Plug the power cord into the electrical outlet. 2.


