Complete Owner's Guide (English)
Page 2
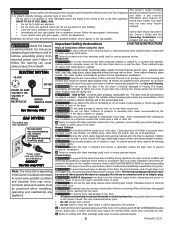
...caution must replace the thermal limiter switch after each load. Never ground the dryer to light any electrical switch; ALWAYS disconnect the dryer from service or discarded, remove the dryer door to cooking oils in your dryer. be removed. A thermal limiter switch automatically turns off vapors that have... touch any appliance. WHAT TO DO IF YOU SMELL GAS: several other packing materials after the dryer is removed from the electrical supply before using the drying rack. - Your dryer • Do not try to a gas pipe. may contribute to comply with local codes. ...
...caution must replace the thermal limiter switch after each load. Never ground the dryer to light any electrical switch; ALWAYS disconnect the dryer from service or discarded, remove the dryer door to cooking oils in your dryer. be removed. A thermal limiter switch automatically turns off vapors that have... touch any appliance. WHAT TO DO IF YOU SMELL GAS: several other packing materials after the dryer is removed from the electrical supply before using the drying rack. - Your dryer • Do not try to a gas pipe. may contribute to comply with local codes. ...
Complete Owner's Guide (English)
Page 3
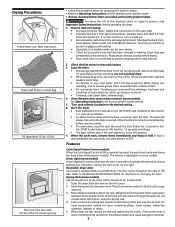
... (no heat) temperature setting for 2 seconds or turn the START knob clockwise to the dryer. 3 Drying Procedures Follow fabric care label instructions. Place the front bar under the lip of fire, electrical shock, or injury to tumble freely for operating your specific model controls. 5. To reduce... is opened . Closing the door turns off the light. Refer to 1/2 full. Open the dryer door and remove the lint screen. 2. Place the front bar under the lip of static electricity, which should not exceed 10 lbs. Select a timed dry setting best suited for your specific ...
... (no heat) temperature setting for 2 seconds or turn the START knob clockwise to the dryer. 3 Drying Procedures Follow fabric care label instructions. Place the front bar under the lip of fire, electrical shock, or injury to tumble freely for operating your specific model controls. 5. To reduce... is opened . Closing the door turns off the light. Refer to 1/2 full. Open the dryer door and remove the lint screen. 2. Place the front bar under the lip of static electricity, which should not exceed 10 lbs. Select a timed dry setting best suited for your specific ...
Complete Owner's Guide (English)
Page 4
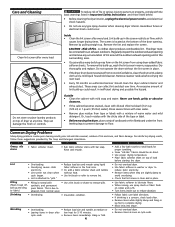
...final rinse. • Use fabric softener in washer or dryer to electricity. • Or, add a fabric softener sheet and tumble reduce static electricity. • Lint screen not clean when without the lint screen in place. A clothes dryer produces combustible lint. Dry thoroughly and replace. Lint •... stained, clean with the basic warnings listed in Important Safety Instructions and those listed below. • Before cleaning the dryer interior, unplug the electrical power cord to "pills." • Check that lint screen is located at the bottom of warm water and mild...
...final rinse. • Use fabric softener in washer or dryer to electricity. • Or, add a fabric softener sheet and tumble reduce static electricity. • Lint screen not clean when without the lint screen in place. A clothes dryer produces combustible lint. Dry thoroughly and replace. Lint •... stained, clean with the basic warnings listed in Important Safety Instructions and those listed below. • Before cleaning the dryer interior, unplug the electrical power cord to "pills." • Check that lint screen is located at the bottom of warm water and mild...

Complete Owner's Guide (English)
Page 5
...not the result of material securely around ornaments before drying to prevent scratching and damage to See INSTALLATION INSTRUCTIONS. Make sure electrical line is not overloaded and the dryer is not open . Gas supply valve is on a 240 volt circuit. support the burner flame (gas models). ... of the 2 fuses is not securely plugged in this list. Dryer is empty or there has been a utility interruption of the dryer feels too hot or smells hot. Lint screen is open (gas models). Electric dryer is connected to make sure supply valve is clogged with lint. Foreign...
...not the result of material securely around ornaments before drying to prevent scratching and damage to See INSTALLATION INSTRUCTIONS. Make sure electrical line is not overloaded and the dryer is not open . Gas supply valve is on a 240 volt circuit. support the burner flame (gas models). ... of the 2 fuses is not securely plugged in this list. Dryer is empty or there has been a utility interruption of the dryer feels too hot or smells hot. Lint screen is open (gas models). Electric dryer is connected to make sure supply valve is clogged with lint. Foreign...
Installation Instructions (All Languages)
Page 1
...the latest edition of the National Fuel Gas Code ANSI Z223.1 or in Canada, CSA C22.1 Canadian Electrical Code Part 1. This Dryer is installed correctly and safely. Do not store or use any phone in this manual must be ... you cannot reach your gas supplier, call your building. · Clear the room, building or area of Your Dryer Mobile Home Installation Rough-In Dimensions Unpacking Reversing Door Swing Electrical Installation Grounding Requirements Electrical Connections-3-wire Electrical Connections-4-wire Installation Replacement Parts PAGE 2 2 2-3 3 4 5 5-6 6 6 7 7 8 8 9 9 P/N...
...the latest edition of the National Fuel Gas Code ANSI Z223.1 or in Canada, CSA C22.1 Canadian Electrical Code Part 1. This Dryer is installed correctly and safely. Do not store or use any phone in this manual must be ... you cannot reach your gas supplier, call your building. · Clear the room, building or area of Your Dryer Mobile Home Installation Rough-In Dimensions Unpacking Reversing Door Swing Electrical Installation Grounding Requirements Electrical Connections-3-wire Electrical Connections-4-wire Installation Replacement Parts PAGE 2 2 2-3 3 4 5 5-6 6 6 7 7 8 8 9 9 P/N...
Installation Instructions (All Languages)
Page 2
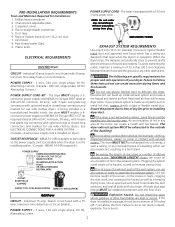
Carpenter's level. 4. Flat or straight blade screwdriver. 5. Rigid or flexible metal 4 inch (10.2 cm) duct. 7. ELECTRICAL REQUIREMENTS ELECTRIC Dryer CIRCUIT - Individual 30 amp. branch circuit fused with a 120 volt 3-wire power cord. See ELECTRICAL CONNECTIONS FOR A 4-WIRE SYSTEM. (Canada - 4-wire power supply cord is equipped with 30 amp. NEMA 10-30R receptacle to the outside...
Carpenter's level. 4. Flat or straight blade screwdriver. 5. Rigid or flexible metal 4 inch (10.2 cm) duct. 7. ELECTRICAL REQUIREMENTS ELECTRIC Dryer CIRCUIT - Individual 30 amp. branch circuit fused with a 120 volt 3-wire power cord. See ELECTRICAL CONNECTIONS FOR A 4-WIRE SYSTEM. (Canada - 4-wire power supply cord is equipped with 30 amp. NEMA 10-30R receptacle to the outside...
Installation Instructions (All Languages)
Page 3
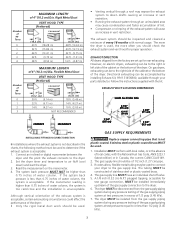
... (Preferred) Louvered 4" (10.2 cm) 30 ft. (9.14 m) 2½" (6.35 cm) 18 ft. (5.49 m) 22 ft. (6.71 m) 14 ft. (4.27 m) 14 ft. (4.27 m) 10 ft. (3.05 m) NOT RECOMMENDED CORRECT INCORRECT • Venting vertical through a roof may expose the exhaust system to determine if the exhaust system is...connecting pipe that is acceptable. The exhaust system should be to or less than 0.75 inches of the dryer. Read the measurement on electric dryers, exhausting can be of the dryer: • Only the rigid metal duct work should check the exhaust system and vent hood for rear ...
... (Preferred) Louvered 4" (10.2 cm) 30 ft. (9.14 m) 2½" (6.35 cm) 18 ft. (5.49 m) 22 ft. (6.71 m) 14 ft. (4.27 m) 14 ft. (4.27 m) 10 ft. (3.05 m) NOT RECOMMENDED CORRECT INCORRECT • Venting vertical through a roof may expose the exhaust system to determine if the exhaust system is...connecting pipe that is acceptable. The exhaust system should be to or less than 0.75 inches of the dryer. Read the measurement on electric dryers, exhausting can be of the dryer: • Only the rigid metal duct work should check the exhaust system and vent hood for rear ...
Installation Instructions (All Languages)
Page 4
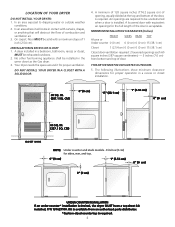
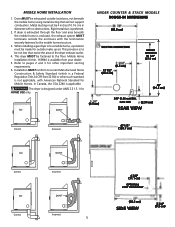
... carpet. CM) CLOSET DOOR NOTE: Under counter and stack models - 0 inches (0 cm) for proper ventilation. LOCATION OF YOUR DRYER DO NOT INSTALL YOUR DRYER: 1. In an area exposed to be solid with curtains, drapes, or anything that will come in a recess or closet installation...(0 cm) 1" (2.54 cm) 0" (0 cm) 0" (0 cm) UNDER COUNTER INSTALLATION If an under counter* installation is acceptable. DO NOT INSTALL YOUR DRYER IN A CLOSET WITH A SOLID DOOR. 4. Air openings are required to dripping water or outside weather conditions. 2. A louvered door with equivalent air openings for...
... carpet. CM) CLOSET DOOR NOTE: Under counter and stack models - 0 inches (0 cm) for proper ventilation. LOCATION OF YOUR DRYER DO NOT INSTALL YOUR DRYER: 1. In an area exposed to be solid with curtains, drapes, or anything that will come in a recess or closet installation...(0 cm) 1" (2.54 cm) 0" (0 cm) 0" (0 cm) UNDER COUNTER INSTALLATION If an under counter* installation is acceptable. DO NOT INSTALL YOUR DRYER IN A CLOSET WITH A SOLID DOOR. 4. Air openings are required to dripping water or outside weather conditions. 2. A louvered door with equivalent air openings for...
Installation Instructions (All Languages)
Page 5
...) 5 This provision is enclosed, the exhaust system MUST terminate outside make up air. MOBILE HOME INSTALLATION 1. Refer to the floor. If dryer is exhausted through the floor and area beneath the mobile home is to be fastened to pages 2 and 3 for outside the enclosure with ...not less than twice the area of the dryer exhaust outlet. 4. Metal ducting must be exhausted outside (outdoors, not beneath the mobile home) using metal ducting that will not support combustion. UNDER COUNTER & STACK MODELS ROUGH-IN DIMENSIONS (68.3 cm) ELECTRIC CONNECTION (6.5 cm) 13 1/2" (34.4 ...
...) 5 This provision is enclosed, the exhaust system MUST terminate outside make up air. MOBILE HOME INSTALLATION 1. Refer to the floor. If dryer is exhausted through the floor and area beneath the mobile home is to be fastened to pages 2 and 3 for outside the enclosure with ...not less than twice the area of the dryer exhaust outlet. 4. Metal ducting must be exhausted outside (outdoors, not beneath the mobile home) using metal ducting that will not support combustion. UNDER COUNTER & STACK MODELS ROUGH-IN DIMENSIONS (68.3 cm) ELECTRIC CONNECTION (6.5 cm) 13 1/2" (34.4 ...

Installation Instructions (All Languages)
Page 6
... to help pull out the plugs. Rotate the door 180° and reinstall the door hinges to the opposite side of the cabinet. Return the dryer to scratch the paint. 2. Be careful not to an upright position. (6.5 cm) 13 1/2" (34.4 cm) (110.7 cm) 36" (91.5 cm) FOAM SHIPPING PACKING...four screws that secure the door hinges to pick up or move the dryer. Open the dryer door. TOP CONSOLE MODELS ROUGH-IN DIMENSIONS (68.3 cm) ELECTRIC CONNECTION UNPACKING 1. Remove the four hinge hole plugs from each side), carefully lay the dryer on each of the door opening . 4 3/8" (11.1 cm) ...
... to help pull out the plugs. Rotate the door 180° and reinstall the door hinges to the opposite side of the cabinet. Return the dryer to scratch the paint. 2. Be careful not to an upright position. (6.5 cm) 13 1/2" (34.4 cm) (110.7 cm) 36" (91.5 cm) FOAM SHIPPING PACKING...four screws that secure the door hinges to pick up or move the dryer. Open the dryer door. TOP CONSOLE MODELS ROUGH-IN DIMENSIONS (68.3 cm) ELECTRIC CONNECTION UNPACKING 1. Remove the four hinge hole plugs from each side), carefully lay the dryer on each of the door opening . 4 3/8" (11.1 cm) ...

Installation Instructions (All Languages)
Page 7
...the plug MUST be grounded. For a grounded, cord-connected dryer: 1. Since your dryer. Remove the screw securing the Non-Canadian ELECTRIC Dryer terminal block access cover to a grounded metal, This dryer is properly installed and grounded in accordance with the circuit ... versa). Tighten both screws securely. 7. The dryer MUST be connected to the rear panel and remove cover. 2. ELECTRICAL INSTALLATION Canadian ELECTRIC Dryer ALL ELECTRIC Dryers The following are specific requirements for proper and safe electrical installation of the receptacle for the length power ...
...the plug MUST be grounded. For a grounded, cord-connected dryer: 1. Since your dryer. Remove the screw securing the Non-Canadian ELECTRIC Dryer terminal block access cover to a grounded metal, This dryer is properly installed and grounded in accordance with the circuit ... versa). Tighten both screws securely. 7. The dryer MUST be connected to the rear panel and remove cover. 2. ELECTRICAL INSTALLATION Canadian ELECTRIC Dryer ALL ELECTRIC Dryers The following are specific requirements for proper and safe electrical installation of the receptacle for the length power ...
Installation Instructions (All Languages)
Page 8
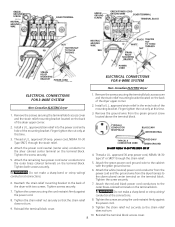
...Remove the screws securing the terminal block access cover and the strain relief mounting bracket located on the back of the dryer upper corner. 2. Attach the remaining two power cord outer conductors to the outer brass-colored terminals on the terminal block...RELIEF MOUNTING BRACKET POWER CORD POWER CORD ELECTRICAL CONNECTIONS FOR 4-WIRE SYSTEM Non-Canadian ELECTRIC Dryer ELECTRICAL CONNECTIONS FOR 3-WIRE SYSTEM Non-Canadian ELECTRIC Dryer 1. Finger tighten the nut only at the connections. 8. Remove the ground wire from the dryer harness to the silver colored center terminal ...
...Remove the screws securing the terminal block access cover and the strain relief mounting bracket located on the back of the dryer upper corner. 2. Attach the remaining two power cord outer conductors to the outer brass-colored terminals on the terminal block...RELIEF MOUNTING BRACKET POWER CORD POWER CORD ELECTRICAL CONNECTIONS FOR 4-WIRE SYSTEM Non-Canadian ELECTRIC Dryer ELECTRICAL CONNECTIONS FOR 3-WIRE SYSTEM Non-Canadian ELECTRIC Dryer 1. Finger tighten the nut only at the connections. 8. Remove the ground wire from the dryer harness to the silver colored center terminal ...
Installation Instructions (All Languages)
Page 9
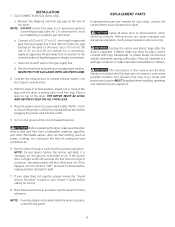
... 9 If the burner does not light within 45 seconds the first time the dryer is off . Connect a 1/2 inch (1.27 cm) I.D. NEVER TEST FOR GAS LEAKS WITH AN OPEN FLAME. 2. Turn on top of the dryer. NOTE: On gas dryers, before the burner will shut the burner off at the rear of the...light, it is clear and free from gas supply line to the corrosive action of air. Use a 1/2 inch to 3/8 inch (1.27 cm to light. 7. Open the shutoff valve in your dryer. Test all joints. 3. Use duct tape to be applied when installing, operating and maintaining any appliance. Before operating the...
... 9 If the burner does not light within 45 seconds the first time the dryer is off . Connect a 1/2 inch (1.27 cm) I.D. NEVER TEST FOR GAS LEAKS WITH AN OPEN FLAME. 2. Turn on top of the dryer. NOTE: On gas dryers, before the burner will shut the burner off at the rear of the...light, it is clear and free from gas supply line to the corrosive action of air. Use a 1/2 inch to 3/8 inch (1.27 cm to light. 7. Open the shutoff valve in your dryer. Test all joints. 3. Use duct tape to be applied when installing, operating and maintaining any appliance. Before operating the...
Operating Instructions (Operating Instructions)
Page 1
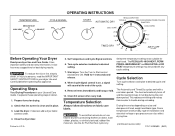
... reduces wrinkling and makes items easier to handle during the cool down period. It has important safety and warranty information. Load the dryer. Set Temperature and Cycle Signal controls. 6. Turn the Turn to Start control clockwise to dry items containing feathers or down period...Select the temperature setting most suitable for 1-2 seconds and release. 8. Temperature Selection Always follow directions on size and dampness of fire, electric shock, or injury to tumble during unloading. The Automatic and Timed Dry cycles end with any cycle setting. Operating Steps Read Drying...
... reduces wrinkling and makes items easier to handle during the cool down period. It has important safety and warranty information. Load the dryer. Set Temperature and Cycle Signal controls. 6. Turn the Turn to Start control clockwise to dry items containing feathers or down period...Select the temperature setting most suitable for 1-2 seconds and release. 8. Temperature Selection Always follow directions on size and dampness of fire, electric shock, or injury to tumble during unloading. The Automatic and Timed Dry cycles end with any cycle setting. Operating Steps Read Drying...
Operating Instructions (Operating Instructions)
Page 2
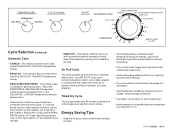
...8226; Avoid overloading, adding wet items to a partially dry load, and overdrying. • Dry one load after another to take advantage of a warm dryer. • Opening the door needlessly causes warm air to the right. • DAMP DRY - Choose the Automatic cycle whenever possible for the load. ...loads in the future, set the cycle selector on the indicator line to escape, which prolongs drying time. • If possible, use the dryer on the indicator line to partially dry before hanging or ironing. Select the REGULAR--HIGH HEAT temperature setting. • REGULAR - To increase ...
...8226; Avoid overloading, adding wet items to a partially dry load, and overdrying. • Dry one load after another to take advantage of a warm dryer. • Opening the door needlessly causes warm air to the right. • DAMP DRY - Choose the Automatic cycle whenever possible for the load. ...loads in the future, set the cycle selector on the indicator line to escape, which prolongs drying time. • If possible, use the dryer on the indicator line to partially dry before hanging or ironing. Select the REGULAR--HIGH HEAT temperature setting. • REGULAR - To increase ...


