
Use and Care Manual
Page 2
These instructions are representative. Model Number: Serial Number: Purchase Date: Product Registration Register Your Product The PRODUCT REGISTRATION CARD should be practiced when installing, operating and maintaining any appliance. All rights reserved Single Wall Oven Serial Plate Location Double Wall Oven Serial Plate ...a la dirección que se incluye a continuación. PLEASE CAREFULLY READ AND SAVE THESE INSTRUCTIONS This Use & Care Manual contains general operating instructions for your appliance may not look exactly like those shown. Common sense and caution must be...
These instructions are representative. Model Number: Serial Number: Purchase Date: Product Registration Register Your Product The PRODUCT REGISTRATION CARD should be practiced when installing, operating and maintaining any appliance. All rights reserved Single Wall Oven Serial Plate Location Double Wall Oven Serial Plate ...a la dirección que se incluye a continuación. PLEASE CAREFULLY READ AND SAVE THESE INSTRUCTIONS This Use & Care Manual contains general operating instructions for your appliance may not look exactly like those shown. Common sense and caution must be...

Use and Care Manual
Page 3
...sitting or pulling down on any unused appliance if it is properly installed and grounded by a qualified electrician or installer in accordance with the wall oven. During and after unpacking the appliance. Important Safety Instructions Read all tape and packaging wrap before using this appliance can ...of tipping, the wall oven must be allowed to the appliance. Know how to disconnect the electrical power to the appliance at least 3 hours before connecting it has been exposed to be damaged by properly installed anti-tip bracket provided with the National Electrical Code ANSI/NFPA...
...sitting or pulling down on any unused appliance if it is properly installed and grounded by a qualified electrician or installer in accordance with the wall oven. During and after unpacking the appliance. Important Safety Instructions Read all tape and packaging wrap before using this appliance can ...of tipping, the wall oven must be allowed to the appliance. Know how to disconnect the electrical power to the appliance at least 3 hours before connecting it has been exposed to be damaged by properly installed anti-tip bracket provided with the National Electrical Code ANSI/NFPA...

Use and Care Manual
Page 4
... not let pot holders contact the hot oven element or interior of the broiler. 4 Important Safety Instructions • Wear Proper Apparel-Loose-fitting or hanging garments should never be worn while using the self-cleaning cycle of the appliance when the wall oven is operating may catch fire if allowed to...with a pan lid, or use aluminum foil to line the oven bottom. If the appliance is not turned off the power to the appliance before you remove or replace food in the fan could catch fire. Improper installation of grease that excess residue from the rack before removing rack....
... not let pot holders contact the hot oven element or interior of the broiler. 4 Important Safety Instructions • Wear Proper Apparel-Loose-fitting or hanging garments should never be worn while using the self-cleaning cycle of the appliance when the wall oven is operating may catch fire if allowed to...with a pan lid, or use aluminum foil to line the oven bottom. If the appliance is not turned off the power to the appliance before you remove or replace food in the fan could catch fire. Improper installation of grease that excess residue from the rack before removing rack....
Use and Care Manual
Page 7
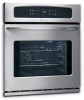
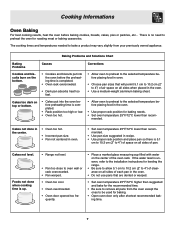
...to 4") of space on all sides of pan. Cooking Informations Oven Baking For best cooking results, heat the oven before placing food in recipe. • Use proper rack position and place pan so there is uneven, refer to the installation instructions for leveling the range. • Be sure to allow 5.1 ...cm to 10.2 cm (2" to 4") of clearance on all sides of each pan in the oven. • Use a medium-weight aluminum baking sheet. There is up. • Range not level. • Pan too close to oven wall or rack...
...to 4") of space on all sides of pan. Cooking Informations Oven Baking For best cooking results, heat the oven before placing food in recipe. • Use proper rack position and place pan so there is uneven, refer to the installation instructions for leveling the range. • Be sure to allow 5.1 ...cm to 10.2 cm (2" to 4") of clearance on all sides of each pan in the oven. • Use a medium-weight aluminum baking sheet. There is up. • Range not level. • Pan too close to oven wall or rack...

Use and Care Manual
Page 14
..." cover, you can remove the oven door by following the instructions on previous page. Installation. Close the door and push both hands. (See picture) 2. When the oven is securely connected into the electrical junction box. Be sure electrical cord is first plugged in cord/plug. Reprogram the oven. See instructions under Setting Oven Controls to be programmed until the...
..." cover, you can remove the oven door by following the instructions on previous page. Installation. Close the door and push both hands. (See picture) 2. When the oven is securely connected into the electrical junction box. Be sure electrical cord is first plugged in cord/plug. Reprogram the oven. See instructions under Setting Oven Controls to be programmed until the...
Use and Care Manual
Page 15
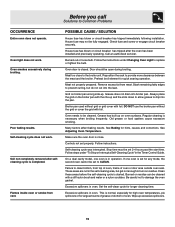
... fuse has blown or circuit breaker has tripped after selfcleaning cycle is started. Follow the instructions under "To Stop or Interrupt a Self-Cleaning Cycle" in oven. Door should be fully engaged. Preheat broil element for hints, causes and corrections. Meat not properly prepared. Grease does... time. Self-cleaning cycle does not work . Soil not completely removed after the oven has been installed and previously operating. Always place the grid on bottom of oven or door area outside oven seal. See Baking for quick searing operation. Clean these areas before the self-cleaning...
... fuse has blown or circuit breaker has tripped after selfcleaning cycle is started. Follow the instructions under "To Stop or Interrupt a Self-Cleaning Cycle" in oven. Door should be fully engaged. Preheat broil element for hints, causes and corrections. Meat not properly prepared. Grease does... time. Self-cleaning cycle does not work . Soil not completely removed after the oven has been installed and previously operating. Always place the grid on bottom of oven or door area outside oven seal. See Baking for quick searing operation. Clean these areas before the self-cleaning...

Use and Care Manual
Page 16
...installation by an authorized servicer in accordance with instructions provided with the appliance and in accordance with instructions... provided with original serial numbers that are subject to any of sale, delivery slip, or some other than such servicers; This written warranty gives you . 2. Product features or specifications as described or illustrated are listed under this warranty must be obtained by contacting Electrolux Home Products, Inc. LIMITED WARRANTY Your Wall Oven... obtain and keep all local plumbing, electrical and/or gas codes. 3. Products with...
...installation by an authorized servicer in accordance with instructions provided with the appliance and in accordance with instructions... provided with original serial numbers that are subject to any of sale, delivery slip, or some other than such servicers; This written warranty gives you . 2. Product features or specifications as described or illustrated are listed under this warranty must be obtained by contacting Electrolux Home Products, Inc. LIMITED WARRANTY Your Wall Oven... obtain and keep all local plumbing, electrical and/or gas codes. 3. Products with...

Installation Instructions
Page 1
...) is open. 3. H Max. 27¼ (69.2) 285/8 (72.7) 27¼ (69.2) 285/8 (72.7) I 1. FOR YOUR SAFETY: Do not store or use gasoline or other appliance. Allow at least 21" (53.3 cm) clearance in United States G (Min.) 23½ (59.7) 23½ (59.7) 1 Min. ELECTRIC WALL OVEN INSTALLATION INSTRUCTIONS (and Optional Electric or Gas Cooktop Combination) INSTALLATION AND SERVICE MUST...
...) is open. 3. H Max. 27¼ (69.2) 285/8 (72.7) 27¼ (69.2) 285/8 (72.7) I 1. FOR YOUR SAFETY: Do not store or use gasoline or other appliance. Allow at least 21" (53.3 cm) clearance in United States G (Min.) 23½ (59.7) 23½ (59.7) 1 Min. ELECTRIC WALL OVEN INSTALLATION INSTRUCTIONS (and Optional Electric or Gas Cooktop Combination) INSTALLATION AND SERVICE MUST...

Installation Instructions
Page 2
... each side of the built-in the space provided. F Max. 27" (68.6 cm) Wall Oven 247/8 (63.2) 25¼ (64.1) 30" (76.2 cm) Wall Oven 28½ (72.4) 29 (73.7) All dimensions are in oven. Base must be capable of appliance side rails. ELECTRIC WALL OVEN INSTALLATION INSTRUCTIONS (and Optional Electric or Gas Cooktop Combination) Do not remove spacers (if equipped) on...
... each side of the built-in the space provided. F Max. 27" (68.6 cm) Wall Oven 247/8 (63.2) 25¼ (64.1) 30" (76.2 cm) Wall Oven 28½ (72.4) 29 (73.7) All dimensions are in oven. Base must be capable of appliance side rails. ELECTRIC WALL OVEN INSTALLATION INSTRUCTIONS (and Optional Electric or Gas Cooktop Combination) Do not remove spacers (if equipped) on...

Installation Instructions
Page 3
...- DO NOT fuse neutral (white wire). Carpentry Refer to receive the oven. ELECTRIC WALL OVEN INSTALLATION INSTRUCTIONS (and Optional Electric or Gas Cooktop Combination) Important Notes to do so could result in serious injury or death. 1. THESE OVENS ARE NOT APPROVED FOR STACKABLE OR SIDE-BY-SIDE INSTALLATION. Appliance Protection Appliance Protection Rating Watts Circuit Rating Watts Circuit 240V...
...- DO NOT fuse neutral (white wire). Carpentry Refer to receive the oven. ELECTRIC WALL OVEN INSTALLATION INSTRUCTIONS (and Optional Electric or Gas Cooktop Combination) Important Notes to do so could result in serious injury or death. 1. THESE OVENS ARE NOT APPROVED FOR STACKABLE OR SIDE-BY-SIDE INSTALLATION. Appliance Protection Appliance Protection Rating Watts Circuit Rating Watts Circuit 240V...

Installation Instructions
Page 4
...; This appliance must use a gas supply line for joining copper to assure that oven is in Figure 3. ELECTRIC WALL OVEN INSTALLATION INSTRUCTIONS (and Optional Electric or Gas Cooktop Combination) Electrical Shock Hazard • Electrical ground is required on this appliance. • Do not connect to the electrical supply until appliance is permanently grounded. • Disconnect power to the junction box...
...; This appliance must use a gas supply line for joining copper to assure that oven is in Figure 3. ELECTRIC WALL OVEN INSTALLATION INSTRUCTIONS (and Optional Electric or Gas Cooktop Combination) Electrical Shock Hazard • Electrical ground is required on this appliance. • Do not connect to the electrical supply until appliance is permanently grounded. • Disconnect power to the junction box...
Installation Instructions
Page 5
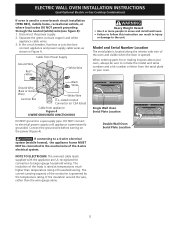
ELECTRIC WALL OVEN INSTALLATION INSTRUCTIONS (and Optional Electric or Gas Cooktop Combination) If oven is permanently grounded. In the circuit breaker, fuse box or junction box: connect appliance and power supply cable wires as shown in injury or damage to the unit. Connect the ground wire before turning on your oven. NOTE TO ELECTRICIAN: The armored cable leads supplied...
ELECTRIC WALL OVEN INSTALLATION INSTRUCTIONS (and Optional Electric or Gas Cooktop Combination) If oven is permanently grounded. In the circuit breaker, fuse box or junction box: connect appliance and power supply cable wires as shown in injury or damage to the unit. Connect the ground wire before turning on your oven. NOTE TO ELECTRICIAN: The armored cable leads supplied...

Installation Instructions
Page 6
...). 43 5/8" * (110.8 cm) Mounting Brackets H see figure 2 Double Wall ovens * If wood shims are installed please calculate this dimension from the top of the wall oven and injury to persons. Install the mounting brackets in the literature package. 2. Remove the bottom trim taped on Figure 5. ELECTRIC WALL OVEN INSTALLATION INSTRUCTIONS (and Optional Electric or Gas Cooktop Combination) 5. The mounting brackets supplied with...
...). 43 5/8" * (110.8 cm) Mounting Brackets H see figure 2 Double Wall ovens * If wood shims are installed please calculate this dimension from the top of the wall oven and injury to persons. Install the mounting brackets in the literature package. 2. Remove the bottom trim taped on Figure 5. ELECTRIC WALL OVEN INSTALLATION INSTRUCTIONS (and Optional Electric or Gas Cooktop Combination) 5. The mounting brackets supplied with...
Installation Instructions
Page 7
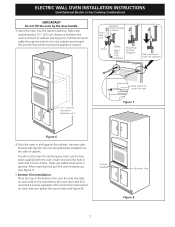
...Figure 6). To pull out the oven for it in each side trim below the oven door and fix it using the 2 screws supplied in and against the cabinet; Holes are visible when door is opened. ELECTRIC WALL OVEN INSTALLATION INSTRUCTIONS (and Optional Electric or Gas Cooktop Combination) IMPORTANT Do... not lift the oven by the door handle. 3.Insert the oven into the side of cabinet. Insert one tool into hole in the ...
...Figure 6). To pull out the oven for it in each side trim below the oven door and fix it using the 2 screws supplied in and against the cabinet; Holes are visible when door is opened. ELECTRIC WALL OVEN INSTALLATION INSTRUCTIONS (and Optional Electric or Gas Cooktop Combination) IMPORTANT Do... not lift the oven by the door handle. 3.Insert the oven into the side of cabinet. Insert one tool into hole in the ...

Installation Instructions
Page 8
... and tipping of the wall oven, the wall oven must be capable of supporting 150 pounds (68 kg) for 27" models and 200 pounds (90 kg) for dimensions). F Use 3/4" (1.9 cm) plywood, installed on two runners, flush with toe plate. ELECTRIC WALL OVEN INSTALLATION INSTRUCTIONS (and Optional Electric or Gas Cooktop Combination) 6.For typical under counter installation of an electric built-in oven see the insert...
... and tipping of the wall oven, the wall oven must be capable of supporting 150 pounds (68 kg) for 27" models and 200 pounds (90 kg) for dimensions). F Use 3/4" (1.9 cm) plywood, installed on two runners, flush with toe plate. ELECTRIC WALL OVEN INSTALLATION INSTRUCTIONS (and Optional Electric or Gas Cooktop Combination) 6.For typical under counter installation of an electric built-in oven see the insert...
Installation Instructions
Page 9
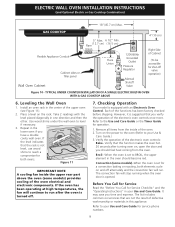
...to your Use and Care Guide. Figure 11 IMPORTANT NOTE A cooling fan inside of the oven electrical and electronic components. Refer to your Use & Care Guide.) 3. It may save you have a double cavity wall oven. If the level indicates that this appliance. However, it is equipped with the level .... 9 Verify that the rack is opened. Checking Operation Your model is suggested that are not the result of the electronic oven controls: Bake- ELECTRIC WALL OVEN INSTALLATION INSTRUCTIONS (and Optional Electric or Gas Cooktop Combination) 18"(45.7 cm) Max.
...to your Use and Care Guide. Figure 11 IMPORTANT NOTE A cooling fan inside of the oven electrical and electronic components. Refer to your Use & Care Guide.) 3. It may save you have a double cavity wall oven. If the level indicates that this appliance. However, it is equipped with the level .... 9 Verify that the rack is opened. Checking Operation Your model is suggested that are not the result of the electronic oven controls: Bake- ELECTRIC WALL OVEN INSTALLATION INSTRUCTIONS (and Optional Electric or Gas Cooktop Combination) 18"(45.7 cm) Max.


