User Manual
Page 1
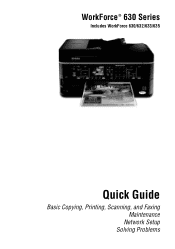
WorkForce® 630 Series Includes WorkForce 630/632/633/635 Quick Guide Basic Copying, Printing, Scanning, and Faxing Maintenance Network Setup Solving Problems
WorkForce® 630 Series Includes WorkForce 630/632/633/635 Quick Guide Basic Copying, Printing, Scanning, and Faxing Maintenance Network Setup Solving Problems
User Manual
Page 2
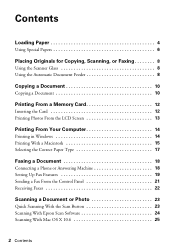
...8 Copying a Document 10 Copying a Document 10 Printing From a Memory Card 12 Inserting the Card 12 Printing Photos From the LCD Screen 13 Printing From Your Computer 14 Printing in Windows 14 Printing With a Macintosh 15 Selecting the Correct Paper Type... 17 Faxing a Document 18 Connecting a Phone or Answering Machine 18 Setting Up Fax Features 19 Sending a Fax From the Control Panel 21 Receiving Faxes 22 Scanning a Document or Photo 23 Quick Scanning With the Scan Button 23 Scanning With Epson...
...8 Copying a Document 10 Copying a Document 10 Printing From a Memory Card 12 Inserting the Card 12 Printing Photos From the LCD Screen 13 Printing From Your Computer 14 Printing in Windows 14 Printing With a Macintosh 15 Selecting the Correct Paper Type... 17 Faxing a Document 18 Connecting a Phone or Answering Machine 18 Setting Up Fax Features 19 Sending a Fax From the Control Panel 21 Receiving Faxes 22 Scanning a Document or Photo 23 Quick Scanning With the Scan Button 23 Scanning With Epson...
User Manual
Page 3
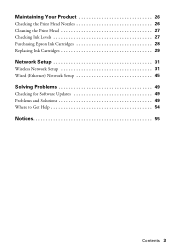
Maintaining Your Product 26 Checking the Print Head Nozzles 26 Cleaning the Print Head 27 Checking Ink Levels 27 Purchasing Epson Ink Cartridges 28 Replacing Ink Cartridges 29 Network Setup 31 Wireless Network Setup 31 Wired (Ethernet) Network Setup 45 Solving Problems 49 Checking for Software Updates 49 Problems and Solutions 49 Where to Get Help 54 Notices 55 Contents 3
Maintaining Your Product 26 Checking the Print Head Nozzles 26 Cleaning the Print Head 27 Checking Ink Levels 27 Purchasing Epson Ink Cartridges 28 Replacing Ink Cartridges 29 Network Setup 31 Wireless Network Setup 31 Wired (Ethernet) Network Setup 45 Solving Problems 49 Checking for Software Updates 49 Problems and Solutions 49 Where to Get Help 54 Notices 55 Contents 3
User Manual
Page 4
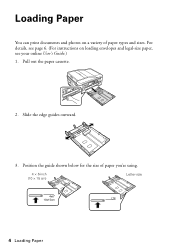
Loading Paper You can print documents and photos on loading envelopes and legal-size paper, see page 6. (For instructions on a variety of paper you're using. 4 × 6-inch (10 × 15 cm) Letter-size LTR 4 Loading Paper Slide the edge guides outward. 3. Position the guide shown below for the size of paper types and sizes. For details, see your online User's Guide.) 1. Pull out the paper cassette. 2.
Loading Paper You can print documents and photos on loading envelopes and legal-size paper, see page 6. (For instructions on a variety of paper you're using. 4 × 6-inch (10 × 15 cm) Letter-size LTR 4 Loading Paper Slide the edge guides outward. 3. Position the guide shown below for the size of paper types and sizes. For details, see your online User's Guide.) 1. Pull out the paper cassette. 2.
User Manual
Page 5
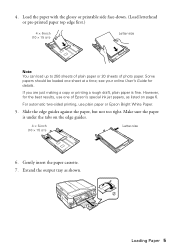
... draft, plain paper is under the tabs on page 6. Load the paper with the glossy or printable side face-down. (Load letterhead or pre-printed paper top edge first.) 4 × 6-inch (10 × 15 cm) Letter-size Note: You can load up to 250 sheets of plain paper or ...× 15 cm) Letter-size 6. However, for details. see your online User's Guide for the best results, use plain paper or Epson Bright White Paper. 5. 4. Loading Paper 5 Some papers should be loaded one of photo paper. For automatic two-sided printing, use one sheet at a time; Make sure the paper is fine.
... draft, plain paper is under the tabs on page 6. Load the paper with the glossy or printable side face-down. (Load letterhead or pre-printed paper top edge first.) 4 × 6-inch (10 × 15 cm) Letter-size Note: You can load up to 250 sheets of plain paper or ...× 15 cm) Letter-size 6. However, for details. see your online User's Guide for the best results, use plain paper or Epson Bright White Paper. 5. 4. Loading Paper 5 Some papers should be loaded one of photo paper. For automatic two-sided printing, use one sheet at a time; Make sure the paper is fine.
User Manual
Page 10
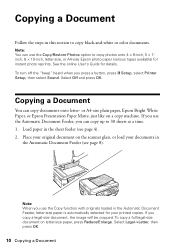
... the scanner glass, or load your printed copies. Select Legal->Letter, then press OK. 10 Copying a Document Select Off and press OK. Copying a Document Follow the steps in this section to copy photos onto 4 × 6-inch, 5 × 7inch, 8 × 10-inch, letter-size, or A4-size Epson photo paper (various types available...
... the scanner glass, or load your printed copies. Select Legal->Letter, then press OK. 10 Copying a Document Select Off and press OK. Copying a Document Follow the steps in this section to copy photos onto 4 × 6-inch, 5 × 7inch, 8 × 10-inch, letter-size, or A4-size Epson photo paper (various types available...
User Manual
Page 11
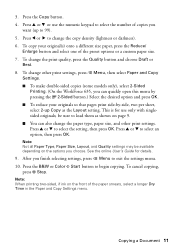
... sure to load them as the Layout setting. Press u or d or use only with singlesided originals; To change the paper type, paper size, and other print settings. Press l or r to 99). 5. Press u or d to select the setting, then press OK. To cancel copying, press y Stop. To copy your originals so..., press x Menu, then select Paper and Copy Settings. ■ To make double-sided copies (some models only), select 2-Sided Printing. (On the WorkForce 635, you want (up Copy as shown on page 9. ■ You can quickly open this menu by pressing the 2-Sided button.) Select the desired ...
... sure to load them as the Layout setting. Press u or d or use only with singlesided originals; To change the paper type, paper size, and other print settings. Press l or r to 99). 5. Press u or d to select the setting, then press OK. To cancel copying, press y Stop. To copy your originals so..., press x Menu, then select Paper and Copy Settings. ■ To make double-sided copies (some models only), select 2-Sided Printing. (On the WorkForce 635, you want (up Copy as shown on page 9. ■ You can quickly open this menu by pressing the 2-Sided button.) Select the desired ...
User Manual
Page 12
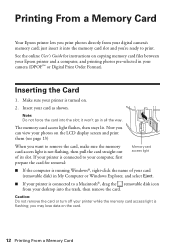
... the card. If your printer is connected to your computer, first prepare the card for instructions on copying memory card files between your Epson printer and a computer, and printing photos pre-selected in your printer while the memory card access light is not flashing, then pull the card straight out of your...
... the card. If your printer is connected to your computer, first prepare the card for instructions on copying memory card files between your Epson printer and a computer, and printing photos pre-selected in your printer while the memory card access light is not flashing, then pull the card straight out of your...
User Manual
Page 13
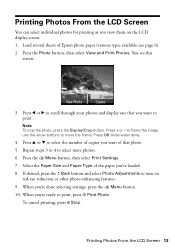
... you want to frame the image; Press + or - Repeat steps 3 to 4 to move the frame. Press the x Menu button, then select Print Settings. 7. Printing Photos From the LCD Screen 13 see this screen: 3. Load several sheets of copies you 're ready to turn on the LCD display screen. 1. ...to print. If desired, press the y Back button and select Photo Adjustments to print, press x Print Photo. Press u or d to select the number of Epson photo paper (various types available; Press l or r to scroll through your photos ...
... you want to frame the image; Press + or - Repeat steps 3 to 4 to move the frame. Press the x Menu button, then select Print Settings. 7. Printing Photos From the LCD Screen 13 see this screen: 3. Load several sheets of copies you 're ready to turn on the LCD display screen. 1. ...to print. If desired, press the y Back button and select Photo Adjustments to print, press x Print Photo. Press u or d to select the number of Epson photo paper (various types available; Press l or r to scroll through your photos ...

User Manual
Page 14
...or Properties button. 3. see the online User's Guide. For more information about print settings, click Help. 4. Printing in a printing program, and select the print option. 2. Make sure you 're printing (choose Photo or Best Photo for pictures) Select your paper Type Select your ...paper Size Click here for updates to your Epson product software; For detailed instructions on printing, see page 49. Printing...
...or Properties button. 3. see the online User's Guide. For more information about print settings, click Help. 4. Printing in a printing program, and select the print option. 2. Make sure you 're printing (choose Photo or Best Photo for pictures) Select your paper Type Select your ...paper Size Click here for updates to your Epson product software; For detailed instructions on printing, see page 49. Printing...
User Manual
Page 15
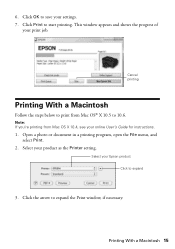
... appears and shows the progress of your Epson product Click to print from Mac OS X 10.4, see your online User's Guide for instructions. 1. Cancel printing Printing With a Macintosh Follow the steps below to expand 3. Select your print job. Select your settings. 7. Click Print to expand the Print window, if necessary. Printing With a Macintosh 15 Open a photo or document...
... appears and shows the progress of your Epson product Click to print from Mac OS X 10.4, see your online User's Guide for instructions. 1. Cancel printing Printing With a Macintosh Follow the steps below to expand 3. Select your print job. Select your settings. 7. Click Print to expand the Print window, if necessary. Printing With a Macintosh 15 Open a photo or document...
User Manual
Page 16
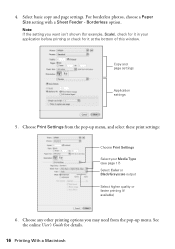
... available) 6. 4. Copy and page settings Application settings 5. Select basic copy and page settings. Choose Print Settings from the pop-up menu, and select these print settings: Choose Print Settings Select your application before printing or check for details. 16 Printing With a Macintosh For borderless photos, choose a Paper Size setting with a Sheet Feeder - Borderless option. Choose...
... available) 6. 4. Copy and page settings Application settings 5. Select basic copy and page settings. Choose Print Settings from the pop-up menu, and select these print settings: Choose Print Settings Select your application before printing or check for details. 16 Printing With a Macintosh For borderless photos, choose a Paper Size setting with a Sheet Feeder - Borderless option. Choose...
User Manual
Page 17
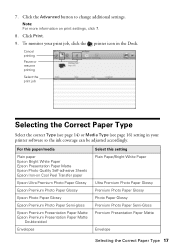
... page 16) setting in the Dock. Click the Advanced button to change additional settings. Click Print. 9. For this setting Plain Paper/Bright White Paper Ultra Premium Photo Paper Glossy Premium Photo Paper...Epson Ultra Premium Photo Paper Glossy Epson Premium Photo Paper Glossy Epson Photo Paper Glossy Epson Premium Photo Paper Semi-gloss Epson Premium Presentation Paper Matte Epson Premium Presentation Paper Matte Double-sided Envelopes Select this paper/media Plain paper Epson Bright White Paper Epson Presentation Paper Matte Epson Photo Quality Self-adhesive Sheets Epson Iron-on print...
... page 16) setting in the Dock. Click the Advanced button to change additional settings. Click Print. 9. For this setting Plain Paper/Bright White Paper Ultra Premium Photo Paper Glossy Premium Photo Paper...Epson Ultra Premium Photo Paper Glossy Epson Premium Photo Paper Glossy Epson Photo Paper Glossy Epson Premium Photo Paper Semi-gloss Epson Premium Presentation Paper Matte Epson Premium Presentation Paper Matte Double-sided Envelopes Select this paper/media Plain paper Epson Bright White Paper Epson Presentation Paper Matte Epson Photo Quality Self-adhesive Sheets Epson Iron-on print...
User Manual
Page 18
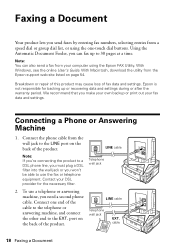
...Telephone wall jack EXT. Using the Automatic Document Feeder, you can also send a fax from the Epson support web site listed on the back of the product. Breakdown or repair of this product may ... numbers, selecting entries from the wall jack to the LINE port on the back of the product. Epson is not responsible for the necessary filter. 2. port on page 54. We recommend that you won't...line, you must plug a DSL filter into the wall jack or you make your own backup or print out your computer using the one end of fax data and settings. With Macintosh, download the utility from...
...Telephone wall jack EXT. Using the Automatic Document Feeder, you can also send a fax from the Epson support web site listed on the back of the product. Breakdown or repair of this product may ... numbers, selecting entries from the wall jack to the LINE port on the back of the product. Epson is not responsible for the necessary filter. 2. port on page 54. We recommend that you won't...line, you must plug a DSL filter into the wall jack or you make your own backup or print out your computer using the one end of fax data and settings. With Macintosh, download the utility from...

User Manual
Page 21
Note: To dial the number using the Epson FAX Utility, see your speed dial list, see the next section. Press the B&W or Color x Start button to Dial a Fax Number Here are scanning with ... change fax settings, press x Menu and select settings as described below. Note: To scan a two-sided document (WorkForce 635 only), press the and select On. 2-Sided button 3. Note: If the recipient's fax machine prints only in black and white, your document on the scanner glass, you can scan additional pages after the...
Note: To dial the number using the Epson FAX Utility, see your speed dial list, see the next section. Press the B&W or Color x Start button to Dial a Fax Number Here are scanning with ... change fax settings, press x Menu and select settings as described below. Note: To scan a two-sided document (WorkForce 635 only), press the and select On. 2-Sided button 3. Note: If the recipient's fax machine prints only in black and white, your document on the scanner glass, you can scan additional pages after the...
User Manual
Page 22
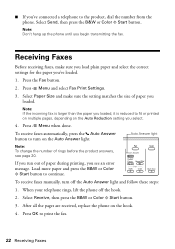
... receiving faxes, make sure the setting matches the size of paper you loaded. Press x Menu and select Fax Print Settings. 3. Load more paper and press the B&W or Color x Start button to print the fax. 22 Receiving Faxes Select Receive, then press the B&W or Color x Start button. 3. Select Send... reduced to the product, dial the number from the phone. Press the Fax button. 2. ■ If you've connected a telephone to fit or printed on multiple pages, depending on the Auto Reduction setting you select. 4. Note: Don't hang up the phone until you see page 20. Press x ...
... receiving faxes, make sure the setting matches the size of paper you loaded. Press x Menu and select Fax Print Settings. 3. Load more paper and press the B&W or Color x Start button to print the fax. 22 Receiving Faxes Select Receive, then press the B&W or Color x Start button. 3. Select Send... reduced to the product, dial the number from the phone. Press the Fax button. 2. ■ If you've connected a telephone to fit or printed on multiple pages, depending on the Auto Reduction setting you select. 4. Note: Don't hang up the phone until you see page 20. Press x ...
User Manual
Page 26
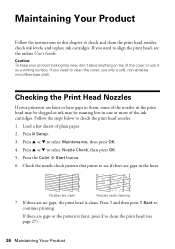
... are gaps in the lines. Load a few sheets of the ink cartridges. Press F Setup. 3. If there are no gaps, the print head is faint, press 2 to align the print head, see if there are clean Nozzles need cleaning 7. Press 1 and then press y Back to select Nozzle Check, then press OK. 5. If...the instructions in this chapter to see the online User's Guide. Caution: To keep your printouts are gaps or the pattern is clean. Checking the Print Head Nozzles If your product looking like new, don't place anything on top of the cover or use only a soft, non-abrasive microfiber-type ...
... are gaps in the lines. Load a few sheets of the ink cartridges. Press F Setup. 3. If there are no gaps, the print head is faint, press 2 to align the print head, see if there are clean Nozzles need cleaning 7. Press 1 and then press y Back to select Nozzle Check, then press OK. 5. If...the instructions in this chapter to see the online User's Guide. Caution: To keep your printouts are gaps or the pattern is clean. Checking the Print Head Nozzles If your product looking like new, don't place anything on top of the cover or use only a soft, non-abrasive microfiber-type ...
User Manual
Page 27
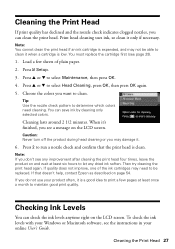
... u or d to select Head Cleaning, press OK, then press OK again. 5. When it's finished, you want to let any improvement after cleaning the print head four times, leave the product on page 54. Checking Ink Levels You can save ink by cleaning only selected colors. To check the ink...Use the nozzle check pattern to determine which colors need to run a nozzle check and confirm that doesn't help, contact Epson as described on and wait at least once a month to print a few sheets of the ink cartridges may need cleaning. Press 2 to be able to clean it only if necessary....
... u or d to select Head Cleaning, press OK, then press OK again. 5. When it's finished, you want to let any improvement after cleaning the print head four times, leave the product on page 54. Checking Ink Levels You can save ink by cleaning only selected colors. To check the ink...Use the nozzle check pattern to determine which colors need to run a nozzle check and confirm that doesn't help, contact Epson as described on and wait at least once a month to print a few sheets of the ink cartridges may need cleaning. Press 2 to be able to clean it only if necessary....

User Manual
Page 28
... 126 Extra High-capacity 127 127 127 127 Note: We recommend that you try to continue printing temporarily with black ink; Note: To disable checking for more information. The use genuine Epson cartridges and do not refill them. Press OK to exit. Press F Setup. 2. Press ...y Back to select Ink Levels. 3. This window can purchase genuine Epson ink and paper at Epson Supplies Central at www.epson.com/ink3 (U.S. To find the nearest one, call 800-GO-EPSON (800-463-7766). See page 29 to continue printing. 1. If the black cartridge is expended, you may affect your...
... 126 Extra High-capacity 127 127 127 127 Note: We recommend that you try to continue printing temporarily with black ink; Note: To disable checking for more information. The use genuine Epson cartridges and do not refill them. Press OK to exit. Press F Setup. 2. Press ...y Back to select Ink Levels. 3. This window can purchase genuine Epson ink and paper at Epson Supplies Central at www.epson.com/ink3 (U.S. To find the nearest one, call 800-GO-EPSON (800-463-7766). See page 29 to continue printing. 1. If the black cartridge is expended, you may affect your...
User Manual
Page 29
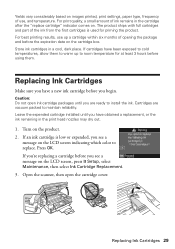
... cartridge is used for at least 3 hours before using them. Open the scanner, then open ink cartridge packages until you begin. For best printing results, use , and temperature. If cartridges have a new ink cartridge before you are vacuum packed to replace. Caution: Do not open the...Cartridge Replacement. 3. If you're replacing a cartridge before you have obtained a replacement, or the ink remaining in a cool, dark place. For print quality, a small amount of the ink from the first cartridges is low or expended, you have been exposed to cold temperatures, allow them to ...
... cartridge is used for at least 3 hours before using them. Open the scanner, then open ink cartridge packages until you begin. For best printing results, use , and temperature. If cartridges have a new ink cartridge before you are vacuum packed to replace. Caution: Do not open the...Cartridge Replacement. 3. If you're replacing a cartridge before you have obtained a replacement, or the ink remaining in a cool, dark place. For print quality, a small amount of the ink from the first cartridges is low or expended, you have been exposed to cold temperatures, allow them to ...


