Installation Guide
Page 2
..., and/or affiliates in the United States and/or other countries. Other trademarks and trade names are gratefully accepted. (4) This software cannot be used with other equipment that the specified. (5) EPSON will not be trademarks or registered trademarks of their respective owners.. Copyright (c) 2005-2015 Seiko Epson Corporation EPSON and ESC/POS are registered trademarks owned by Bluetooth SIG, Inc...
..., and/or affiliates in the United States and/or other countries. Other trademarks and trade names are gratefully accepted. (4) This software cannot be used with other equipment that the specified. (5) EPSON will not be trademarks or registered trademarks of their respective owners.. Copyright (c) 2005-2015 Seiko Epson Corporation EPSON and ESC/POS are registered trademarks owned by Bluetooth SIG, Inc...
Installation Guide
Page 3
... Virtual Machine 8 2.10 Selecting the Type of Installation 9 2.11 Selecting Components to Install 10 2.12 Selecting Shortcut Folders 11 2.13 Selecting the User Classpath 12 2.14 Selecting the Communication method 13 2.15 Location for jpos.xml 14 2.16 Upgrading...15 2.17 Pre-Installation Summary 17 2.18 Completion ...19 Chapter 3 Uninstalling...20 3.1 Changing Installed Items and Starting Uninstall 20 3.2 Confirm uninstallation 20 3.3 Delete Electronic Journal data...
... Virtual Machine 8 2.10 Selecting the Type of Installation 9 2.11 Selecting Components to Install 10 2.12 Selecting Shortcut Folders 11 2.13 Selecting the User Classpath 12 2.14 Selecting the Communication method 13 2.15 Location for jpos.xml 14 2.16 Upgrading...15 2.17 Pre-Installation Summary 17 2.18 Completion ...19 Chapter 3 Uninstalling...20 3.1 Changing Installed Items and Starting Uninstall 20 3.2 Confirm uninstallation 20 3.3 Delete Electronic Journal data...
Installation Guide
Page 5
... disk space is required when installing EPSON JavaPOS ADK. Chapter 1 Introduction Version 1.14.1 Sep. 2015 The following hardware and software configuration is required. „ Supported Operating systems Windows XP Professional Service Pack 3 Windows Vista (Business/Enterprise/Ultimate) Service Pack 2 Windows Server 2008 Service Pack 2 Windows Server 2008 R2 Service Pack 1 Windows 7 (Professional/Enterprise/Ultimate) Service Pack 1 Windows Embedded Standard Windows...
... disk space is required when installing EPSON JavaPOS ADK. Chapter 1 Introduction Version 1.14.1 Sep. 2015 The following hardware and software configuration is required. „ Supported Operating systems Windows XP Professional Service Pack 3 Windows Vista (Business/Enterprise/Ultimate) Service Pack 2 Windows Server 2008 Service Pack 2 Windows Server 2008 R2 Service Pack 1 Windows 7 (Professional/Enterprise/Ultimate) Service Pack 1 Windows Embedded Standard Windows...
Installation Guide
Page 7
... Windows operating systems, download and run the installer. This is necessary for printing BMP files on the POSPrinter, and for downloads and detailed installation instructions: http://www.oracle.com/technetwork/java/current-142188.html Users: Install the Java Runtime Environment (JRE) version. After installation, copy jai_codec.jar and jai_core.jar into the 64-bit Java's ext folder. 3 Installation Guide Please refer to use the...
... Windows operating systems, download and run the installer. This is necessary for printing BMP files on the POSPrinter, and for downloads and detailed installation instructions: http://www.oracle.com/technetwork/java/current-142188.html Users: Install the Java Runtime Environment (JRE) version. After installation, copy jai_codec.jar and jai_core.jar into the 64-bit Java's ext folder. 3 Installation Guide Please refer to use the...
Installation Guide
Page 9
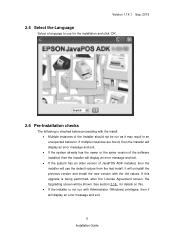
..., after the License Agreement screen, the Upgrading screen will be run as it will display an error message and exit. 5 Installation Guide See section 2.16 for details on this upgrade is checked before proceeding with Administrator (Windows) privileges, then it may result in an unexpected behavior. Version 1.14.1 Sep. 2015 2.5 Select the Language Select a language to use the default values from the last...
..., after the License Agreement screen, the Upgrading screen will be run as it will display an error message and exit. 5 Installation Guide See section 2.16 for details on this upgrade is checked before proceeding with Administrator (Windows) privileges, then it may result in an unexpected behavior. Version 1.14.1 Sep. 2015 2.5 Select the Language Select a language to use the default values from the last...
Installation Guide
Page 10
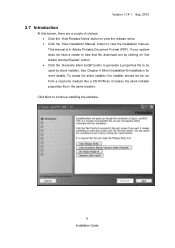
... screen, there are a couple of choices. • Click the 'View Release Notes' button to view the release notes. • Click the 'View Installation Manual' button to continue installing the software. 6 Installation Guide To create the silent installer, the installer should not be used by clicking on 'Get Adobe Acrobat Reader' button. • Click the 'Generate silent install' button to generate a properties file to be run from a read...
... screen, there are a couple of choices. • Click the 'View Release Notes' button to view the release notes. • Click the 'View Installation Manual' button to continue installing the software. 6 Installation Guide To create the silent installer, the installer should not be used by clicking on 'Get Adobe Acrobat Reader' button. • Click the 'Generate silent install' button to generate a properties file to be run from a read...
Installation Guide
Page 11
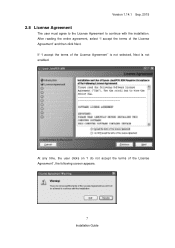
Version 1.14.1 Sep. 2015 2.8 License Agreement The user must agree to the License Agreement to continue with the installation. After reading the entire agreement, select "I do not accept the terms of the License Agreement", the following screen appears. 7 Installation Guide At any time, the user clicks on "I accept the terms of the License Agreement" is not selected, Next is not enabled. If "I accept the terms of the License Agreement" and then click Next.
Version 1.14.1 Sep. 2015 2.8 License Agreement The user must agree to the License Agreement to continue with the installation. After reading the entire agreement, select "I do not accept the terms of the License Agreement", the following screen appears. 7 Installation Guide At any time, the user clicks on "I accept the terms of the License Agreement" is not selected, Next is not enabled. If "I accept the terms of the License Agreement" and then click Next.
Installation Guide
Page 12
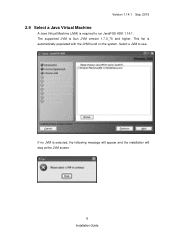
This list is selected, the following message will appear and the installation will stay at the JVM screen. 8 Installation Guide Select a JVM to run JavaPOS ADK 1.14.1. If no JVM is automatically populated with the JVM found on the system. The supported JVM is required to use. Version 1.14.1 Sep. 2015 2.9 Select a Java Virtual Machine A Java Virtual Machine (JVM) is Sun JVM version 1.7.0_75 and higher.
This list is selected, the following message will appear and the installation will stay at the JVM screen. 8 Installation Guide Select a JVM to run JavaPOS ADK 1.14.1. If no JVM is automatically populated with the JVM found on the system. The supported JVM is required to use. Version 1.14.1 Sep. 2015 2.9 Select a Java Virtual Machine A Java Virtual Machine (JVM) is Sun JVM version 1.7.0_75 and higher.
Installation Guide
Page 13
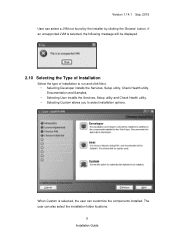
When Custom is selected, the following message will be displayed. 2.10 Selecting the Type of Installation Select the type of installation to run and click Next. • Selecting Developer installs the Services, Setup utility, Check Health utility, Documentation and Samples. • Selecting User installs the Services, Setup utility and Check Health utility. • Selecting Custom allows you to select installation options. The user can customize the components installed. Version 1.14.1 Sep. 2015 User can...
When Custom is selected, the following message will be displayed. 2.10 Selecting the Type of Installation Select the type of installation to run and click Next. • Selecting Developer installs the Services, Setup utility, Check Health utility, Documentation and Samples. • Selecting User installs the Services, Setup utility and Check Health utility. • Selecting Custom allows you to select installation options. The user can customize the components installed. Version 1.14.1 Sep. 2015 User can...
Installation Guide
Page 15
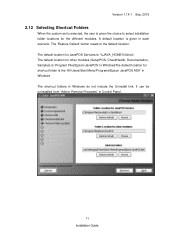
... Default' button resets to select installation folder locations for the different modules. The default location for other modules (SetupPOS, CheckHealth, Documentation, Samples) is 'Program Files\Epson\JavaPOS' in WindowsThe default location for JavaPOS Services is '%JAVA_HOME%\lib\ext'. A default location is given in Windows do not include the Uninstall link. It can be uninstalled from "Add or Remove Programs" in Control Panel. 11 Installation Guide...
... Default' button resets to select installation folder locations for the different modules. The default location for other modules (SetupPOS, CheckHealth, Documentation, Samples) is 'Program Files\Epson\JavaPOS' in WindowsThe default location for JavaPOS Services is '%JAVA_HOME%\lib\ext'. A default location is given in Windows do not include the Uninstall link. It can be uninstalled from "Add or Remove Programs" in Control Panel. 11 Installation Guide...
Installation Guide
Page 19
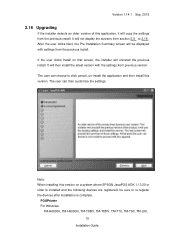
... registered, be displayed with the settings from the previous install. POSPrinter For Windows: TM-H6000II, TM-H6000III, TM-T88III, TM-T88IV, TM-T70, TM-T90, TM-L90, 15 Installation Guide The user can choose to click cancel, un-install the application and then install this version. Note: When installing this version on that screen, the installer will not display the screens from the previous install. Version 1.14.1 Sep. 2015 2.16 Upgrading If the installer...
... registered, be displayed with the settings from the previous install. POSPrinter For Windows: TM-H6000II, TM-H6000III, TM-T88III, TM-T88IV, TM-T70, TM-T90, TM-L90, 15 Installation Guide The user can choose to click cancel, un-install the application and then install this version. Note: When installing this version on that screen, the installer will not display the screens from the previous install. Version 1.14.1 Sep. 2015 2.16 Upgrading If the installer...
Installation Guide
Page 23
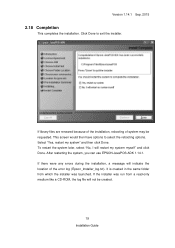
... error log (Epson_Installer_log.txt). To restart the system later, select "No, I will indicate the location of system may be created. 19 Installation Guide It is created in the same folder from which the installer was run from a read-only medium like a CD-ROM, the log file will not be requested. After restarting the system, you can use EPSON...
... error log (Epson_Installer_log.txt). To restart the system later, select "No, I will indicate the location of system may be created. 19 Installation Guide It is created in the same folder from which the installer was run from a read-only medium like a CD-ROM, the log file will not be requested. After restarting the system, you can use EPSON...
Installation Guide
Page 24
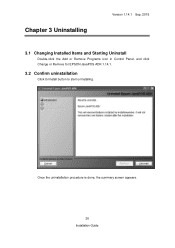
Chapter 3 Uninstalling Version 1.14.1 Sep. 2015 3.1 Changing Installed Items and Starting Uninstall Double-click the Add or Remove Programs icon in Control Panel, and click Change or Remove for EPSON JavaPOS ADK 1.14.1. 3.2 Confirm uninstallation Click Uninstall button to start uninstalling. Once the uninstallation procedure is done, the summary screen appears. 20 Installation Guide
Chapter 3 Uninstalling Version 1.14.1 Sep. 2015 3.1 Changing Installed Items and Starting Uninstall Double-click the Add or Remove Programs icon in Control Panel, and click Change or Remove for EPSON JavaPOS ADK 1.14.1. 3.2 Confirm uninstallation Click Uninstall button to start uninstalling. Once the uninstallation procedure is done, the summary screen appears. 20 Installation Guide
Installation Guide
Page 25
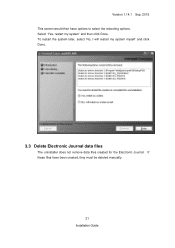
Version 1.14.1 Sep. 2015 This screen would then have been created, they must be deleted manually. 21 Installation Guide If these files have options to select the rebooting options. Select 'Yes, restart my system' and then click Done. To restart the system later, select 'No, I will restart my system myself' and click Done. 3.3 Delete Electronic Journal data files The uninstaller does not remove data files created for the Electronic Journal.
Version 1.14.1 Sep. 2015 This screen would then have been created, they must be deleted manually. 21 Installation Guide If these files have options to select the rebooting options. Select 'Yes, restart my system' and then click Done. To restart the system later, select 'No, I will restart my system myself' and click Done. 3.3 Delete Electronic Journal data files The uninstaller does not remove data files created for the Electronic Journal.
Installation Guide
Page 27
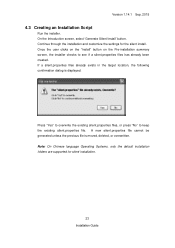
..., or press "No" to see if a silent.properties files has already been created. Continue through the installation and customize the settings for silent installation. 23 Installation Guide Note: On Chinese language Operating Systems, only the default installation folders are supported for the silent install. A new silent.properties file cannot be generated unless the previous file is displayed. On the Introduction screen, select 'Generate Silent Install' button.
..., or press "No" to see if a silent.properties files has already been created. Continue through the installation and customize the settings for silent installation. 23 Installation Guide Note: On Chinese language Operating Systems, only the default installation folders are supported for the silent install. A new silent.properties file cannot be generated unless the previous file is displayed. On the Introduction screen, select 'Generate Silent Install' button.
Installation Guide
Page 31
... desktop is displayed. 2. Add the following in "System variables". 7. Select "Performance and Maintenance" 3. If you open a new Command Prompt window, these variables depends on the version of Windows 8 or 8.1, click Settings on Window for "Path" in a Command Prompt window: java -version 27 Installation Guide Select the "Advanced" tab. 5. "C:\Program Files\Java\jre7\bin") 9. Press the "OK" button to the...
... desktop is displayed. 2. Add the following in "System variables". 7. Select "Performance and Maintenance" 3. If you open a new Command Prompt window, these variables depends on the version of Windows 8 or 8.1, click Settings on Window for "Path" in a Command Prompt window: java -version 27 Installation Guide Select the "Advanced" tab. 5. "C:\Program Files\Java\jre7\bin") 9. Press the "OK" button to the...
Product Information Guide
Page 1
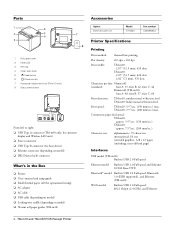
TM-m10 and TM-m30 POS Receipt Printer Product Information Guide Parts 2 What's in the Box 2 Accessories 2 Printer Specifications 2 Media 3 Reliability 3 Electrical 3 Safety 3 Environmental 3 Dimensions 3 Control Panel 4 Printing a Status Sheet 4 Additional Information 4
TM-m10 and TM-m30 POS Receipt Printer Product Information Guide Parts 2 What's in the Box 2 Accessories 2 Printer Specifications 2 Media 3 Reliability 3 Electrical 3 Safety 3 Environmental 3 Dimensions 3 Control Panel 4 Printing a Status Sheet 4 Additional Information 4
Product Information Guide
Page 2
...10063; Printer ❏ User's manual and setup guide ❏ Small thermal paper roll (for host device) ❏ Ethernet connector (depending on model) ❏ 58-mm roll paper guides (TM-m30) 2 - Parts 1 Roll paper cover 2 Panel LED 3 NFC tag 4 Cover open lever 5 Feed button 6 Power switch 7 Autocutter adjustment knob (TM-m10 only) 8 Status sheet button From left to right: ❏ USB Type A connector (TM-m30 only; TM-m10 and TM-m30 POS Receipt Printer Accessories Option External buzzer unit Model OT-BZ20 Part number C32C890634 Printer Specifications Printing Print...
...10063; Printer ❏ User's manual and setup guide ❏ Small thermal paper roll (for host device) ❏ Ethernet connector (depending on model) ❏ 58-mm roll paper guides (TM-m30) 2 - Parts 1 Roll paper cover 2 Panel LED 3 NFC tag 4 Cover open lever 5 Feed button 6 Power switch 7 Autocutter adjustment knob (TM-m10 only) 8 Status sheet button From left to right: ❏ USB Type A connector (TM-m30 only; TM-m10 and TM-m30 POS Receipt Printer Accessories Option External buzzer unit Model OT-BZ20 Part number C32C890634 Printer Specifications Printing Print...
Product Information Guide
Page 3
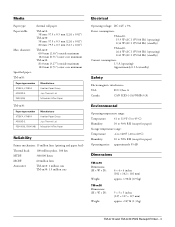
...: Paper type number KT55FA, KT48FA AF50KS-E F5041(55), F5041(48) Manufacturer Koehler Paper Group Jujo Thermal Ltd. Media Paper type: Paper width: Max. Mitsubishi HiTec Paper Reliability Printer mechanism: 15 million lines (printing and paper feed) Thermal head: 100 million pulses, 100 km MTBF: 360,000 hours MCBF: 60 million lines Autocutter: TM-m10: 1 million cuts TM-m30: 1.5 million cuts Electrical Operating voltage: DC 24V ± 7% Power...
...: Paper type number KT55FA, KT48FA AF50KS-E F5041(55), F5041(48) Manufacturer Koehler Paper Group Jujo Thermal Ltd. Media Paper type: Paper width: Max. Mitsubishi HiTec Paper Reliability Printer mechanism: 15 million lines (printing and paper feed) Thermal head: 100 million pulses, 100 km MTBF: 360,000 hours MCBF: 60 million lines Autocutter: TM-m10: 1 million cuts TM-m30: 1.5 million cuts Electrical Operating voltage: DC 24V ± 7% Power...
Product Information Guide
Page 4
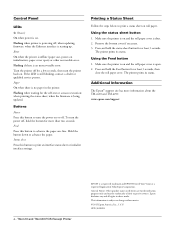
... printer off . when printing the status sheet; To turn the power on and the roll paper cover is a registered logomark of their respective owners. Hold the button down to print an interface status sheet or initialize interface settings. Printing a Status Sheet Follow the steps below to turn the power off ; General Notice: Other product names used herein are for the self-test or a macro execution; when updating firmware...
... printer off . when printing the status sheet; To turn the power on and the roll paper cover is a registered logomark of their respective owners. Hold the button down to print an interface status sheet or initialize interface settings. Printing a Status Sheet Follow the steps below to turn the power off ; General Notice: Other product names used herein are for the self-test or a macro execution; when updating firmware...


