
Preferred Warranty Booklet
Page 8
...cleaner wiper and cap unit surroundings b) Performing periodic nozzle checks and nozzle cleanings to maintain, improper packing or shipping, disasters such as documented in the Epson Stylus Pro GS6000 User's Guide. and Canada. EPSON® PreferredSM Limited Warranty Program for example, dealer or user-added boards...and replacing the Flushing Pad d) Checking and cleaning the secondary roller e) Properly discharging the Waste ink. 2) Any damage caused by using non-Epson inks or ink cartridges, or any ink delivery system other than an Epson Authorized Servicer. 6) Service when the printer is...
...cleaner wiper and cap unit surroundings b) Performing periodic nozzle checks and nozzle cleanings to maintain, improper packing or shipping, disasters such as documented in the Epson Stylus Pro GS6000 User's Guide. and Canada. EPSON® PreferredSM Limited Warranty Program for example, dealer or user-added boards...and replacing the Flushing Pad d) Checking and cleaning the secondary roller e) Properly discharging the Waste ink. 2) Any damage caused by using non-Epson inks or ink cartridges, or any ink delivery system other than an Epson Authorized Servicer. 6) Service when the printer is...

Product Brochure
Page 5
...High-Capacity Ink System Eight individual, rear-loaded, 950 ml ink cartridges Hot-swappable ink cartridge replacement for increased productivity - 3-minute buffer Individual ink-level sensors ... via front-end RIP software Intelligent Preventative Maintenance System Four-mode automatic cleaning system for maintaining optimum print quality Simple user-focused maintenance process for... solvent-based media type - Introducing Epson UltraChrome GS Ink Technology Industry-Defining 8-Color Solvent-Based Ink System Unique solvent-based chemistry developed by Epson Extremely wide color gamut using CMYK,...
...High-Capacity Ink System Eight individual, rear-loaded, 950 ml ink cartridges Hot-swappable ink cartridge replacement for increased productivity - 3-minute buffer Individual ink-level sensors ... via front-end RIP software Intelligent Preventative Maintenance System Four-mode automatic cleaning system for maintaining optimum print quality Simple user-focused maintenance process for... solvent-based media type - Introducing Epson UltraChrome GS Ink Technology Industry-Defining 8-Color Solvent-Based Ink System Unique solvent-based chemistry developed by Epson Extremely wide color gamut using CMYK,...
Product Brochure
Page 7
...or other product and brand names are service marks of Seiko Epson Corporation. Epson Stylus Pro GS6000 Print Engine Specifications Base Printing Technology Dual-Array MicroPiezo AMC Print Head with 350 ml cartridges. Includes full workflow software with layout, nesting, tiling, ... printer) Additional Cleaning Cartridges (set of eight) (for priming the printer. AMC is also supported by ColorBurst. All other air ventilation system. The printer ships with full ICC profiling software included. The Epson Stylus Pro GS6000 is a trademark and Epson Preferred and myepsonprinter...
...or other product and brand names are service marks of Seiko Epson Corporation. Epson Stylus Pro GS6000 Print Engine Specifications Base Printing Technology Dual-Array MicroPiezo AMC Print Head with 350 ml cartridges. Includes full workflow software with layout, nesting, tiling, ... printer) Additional Cleaning Cartridges (set of eight) (for priming the printer. AMC is also supported by ColorBurst. All other air ventilation system. The printer ships with full ICC profiling software included. The Epson Stylus Pro GS6000 is a trademark and Epson Preferred and myepsonprinter...

Quick Reference Guide
Page 12
... ink status (see below the ink icons correspond to check ink levels is getting low; see page 13 • Clean the cleaning wiper and print head casing (once a month or more often, as needed ); Periodically, you have a new cartridge Ink is low (example shows the yellow cartridge) Ink is expended (example shows the yellow...
... ink status (see below the ink icons correspond to check ink levels is getting low; see page 13 • Clean the cleaning wiper and print head casing (once a month or more often, as needed ); Periodically, you have a new cartridge Ink is low (example shows the yellow cartridge) Ink is expended (example shows the yellow...

Quick Reference Guide
Page 18
...detailed instructions on the individual procedures, see the instructions for wiping the waste ink tank spigot • A set of Additional Cleaning Cartridges from Epson; If you see page 13. see a COVER OPEN error, close the indicated cover. Carefully follow all the instructions as ...: • Removing the ink cartridges • Emptying the waste ink tank • Inserting the cleaning cartridges • Emptying the waste ink tank again • Removing the cleaning cartridges • Emptying the waste ink tank again • Installing ink cartridges and charging the ink system Caution...
...detailed instructions on the individual procedures, see the instructions for wiping the waste ink tank spigot • A set of Additional Cleaning Cartridges from Epson; If you see page 13. see a COVER OPEN error, close the indicated cover. Carefully follow all the instructions as ...: • Removing the ink cartridges • Emptying the waste ink tank • Inserting the cleaning cartridges • Emptying the waste ink tank again • Removing the cleaning cartridges • Emptying the waste ink tank again • Installing ink cartridges and charging the ink system Caution...

Quick Reference Guide
Page 19
...Check H ink High Heat Low Heat Error alert lamp Description On: printer is turned on Flashing: printer is processing or printing a print job, performing a cleaning operation, warming up, or shutting down Off: printer is turned off On: printer is paused or in menu mode On: no media is loaded, media...: media is jammed, almost out, loaded crooked, or there is another error condition On: an ink cartridge is expended, not installed, or not compatible with the printer Flashing: an ink cartridge is nearly expended See the next two tables for descriptions Flashing: an error has occurred Status of High...
...Check H ink High Heat Low Heat Error alert lamp Description On: printer is turned on Flashing: printer is processing or printing a print job, performing a cleaning operation, warming up, or shutting down Off: printer is turned off On: printer is paused or in menu mode On: no media is loaded, media...: media is jammed, almost out, loaded crooked, or there is another error condition On: an ink cartridge is expended, not installed, or not compatible with the printer Flashing: an ink cartridge is nearly expended See the next two tables for descriptions Flashing: an error has occurred Status of High...

Quick Reference Guide
Page 24
...) 377-6611, 6 AM to Get Help Epson provides technical support and information on the installation, configuration, and operation of professional printing products through Friday. Ordering Supplies | 23 Ordering Supplies Part Ink Cartridges Additional Printer Maintenance Kit (one-year supply) Additional Cleaning Cartridges (8 cartridges) Print Head Cleaning Kit (used for periodic cleaning) Additional Waste Ink Bottle Additional 64...
...) 377-6611, 6 AM to Get Help Epson provides technical support and information on the installation, configuration, and operation of professional printing products through Friday. Ordering Supplies | 23 Ordering Supplies Part Ink Cartridges Additional Printer Maintenance Kit (one-year supply) Additional Cleaning Cartridges (8 cartridges) Print Head Cleaning Kit (used for periodic cleaning) Additional Waste Ink Bottle Additional 64...

Quick Reference Guide
Page 27
Control Panel and LCD Display Power button and light Paper and ink Check lights Pause/resume or delete button and light Enter button Paper feed backward button Menu or cleaning button High Heat button and light Low Heat button and light LCD display Heater type button Paper feed forward button Error alert lamp (if flashing, an error has occurred) Printer status messages Ink status icons Ink cartridge slot numbers Selected custom media type number Pre, platen, and post heater temperatures Platen gap icon Heater type diagram
Control Panel and LCD Display Power button and light Paper and ink Check lights Pause/resume or delete button and light Enter button Paper feed backward button Menu or cleaning button High Heat button and light Low Heat button and light LCD display Heater type button Paper feed forward button Error alert lamp (if flashing, an error has occurred) Printer status messages Ink status icons Ink cartridge slot numbers Selected custom media type number Pre, platen, and post heater temperatures Platen gap icon Heater type diagram

Setup and User's Guide
Page 6
...70 Printing Status Information 71 Viewing Status Information 71 Checking the Print Head Nozzles 73 Cleaning the Print Head 74 Replacing Ink Cartridges 75 Disposing of Waste Ink 78 Cleaning the Cleaning Wiper, Capping Assemblies, and Print Head Casings 79 Replacing the Flushing Pad 84 Washing... the Ink System 86 4 Cleaning, Storing, and Transporting the Printer Cleaning the Printer 89 Storing the Printer...
...70 Printing Status Information 71 Viewing Status Information 71 Checking the Print Head Nozzles 73 Cleaning the Print Head 74 Replacing Ink Cartridges 75 Disposing of Waste Ink 78 Cleaning the Cleaning Wiper, Capping Assemblies, and Print Head Casings 79 Replacing the Flushing Pad 84 Washing... the Ink System 86 4 Cleaning, Storing, and Transporting the Printer Cleaning the Printer 89 Storing the Printer...

Setup and User's Guide
Page 9
... have a problem, and lists your printer, provides troubleshooting tips in case you use and printer maintenance-loading media, replacing ink cartridges, cleaning and maintaining the printer and ink system, and keeping track of your printer, loading media, adjusting print quality, replacing ink... the most out of media types. Notes contain important information about your equipment. Tips contain additional hints on how to clean and transport your printer specifications. 9 Introduction This Setup and Use Guide provides important information on setting up and using your printer. 9
... have a problem, and lists your printer, provides troubleshooting tips in case you use and printer maintenance-loading media, replacing ink cartridges, cleaning and maintaining the printer and ink system, and keeping track of your printer, loading media, adjusting print quality, replacing ink... the most out of media types. Notes contain important information about your equipment. Tips contain additional hints on how to clean and transport your printer specifications. 9 Introduction This Setup and Use Guide provides important information on setting up and using your printer. 9

Setup and User's Guide
Page 10
... page 75 for a complete list. see page 78 Additional Cleaning Cartridges (8 cartridges); You can order these supplies: Consumables and user-replaceable parts Part Ink Cartridges Additional Printer Maintenance Kit (one-year supply); Or you can purchase online at www.proimaging.epson. Options and Supplies Your Epson Stylus® Pro GS6000 offers these optional upgrades: Optional upgrades Option Additional One...
... page 75 for a complete list. see page 78 Additional Cleaning Cartridges (8 cartridges); You can order these supplies: Consumables and user-replaceable parts Part Ink Cartridges Additional Printer Maintenance Kit (one-year supply); Or you can purchase online at www.proimaging.epson. Options and Supplies Your Epson Stylus® Pro GS6000 offers these optional upgrades: Optional upgrades Option Additional One...

Setup and User's Guide
Page 33
...cartridge. Power button 33 Make sure you to turn on the LCD display. Press the P Power button to do so. 1. Setting Up the Printer | 33 Installing Ink Use the cleaning and ink cartridges that came with your printer for initial ink charging. 8 cleaning cartridges 8 ink cartridges... During initial installation, it is normal for a significant amount of cartridges as soon as possible.
...cartridge. Power button 33 Make sure you to turn on the LCD display. Press the P Power button to do so. 1. Setting Up the Printer | 33 Installing Ink Use the cleaning and ink cartridges that came with your printer for initial ink charging. 8 cleaning cartridges 8 ink cartridges... During initial installation, it is normal for a significant amount of cartridges as soon as possible.

Setup and User's Guide
Page 34
Do not leave the printer unattended. 3. The printer processes the cleaning cartridges for about eight minutes while CLEANING appears on the LCD display. 2. Cleaning cartridge Note: You need to install the cleaning cartridges, not the ink cartridges, at this point. 34 | Setting Up the Printer Caution: Be sure to...installation process. Follow the instructions on the LCD display. 34 Open both ink cartridge compartment covers on the LCD display to check the status of the printer, insert the cleaning cartridges as shown, and close the covers. 4. Follow the instructions on the ...
Do not leave the printer unattended. 3. The printer processes the cleaning cartridges for about eight minutes while CLEANING appears on the LCD display. 2. Cleaning cartridge Note: You need to install the cleaning cartridges, not the ink cartridges, at this point. 34 | Setting Up the Printer Caution: Be sure to...installation process. Follow the instructions on the LCD display. 34 Open both ink cartridge compartment covers on the LCD display to check the status of the printer, insert the cleaning cartridges as shown, and close the covers. 4. Follow the instructions on the ...

Setup and User's Guide
Page 35
... You can download it from Epson's support website at epson.com/support (U.S.) or epson.ca/support (Canada). When INSTALL INK CARTRIDGE appears on the LCD display, vigorously shake each ink cartridge in its package for about five seconds, then remove the cartridges from the printer is required. Consign disposal of the cleaning cartridges in your printer. Dispose of...
... You can download it from Epson's support website at epson.com/support (U.S.) or epson.ca/support (Canada). When INSTALL INK CARTRIDGE appears on the LCD display, vigorously shake each ink cartridge in its package for about five seconds, then remove the cartridges from the printer is required. Consign disposal of the cleaning cartridges in your printer. Dispose of...
Setup and User's Guide
Page 86
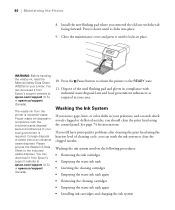
...Washing the Ink System If you should clean the print head using the heaviest level of cleaning cycle, you removed the old one with the tab facing forward. The waste ink from Epson's support website at epson.com/support (U.S.) or epson.ca/support (Canada). See page 74...procedures: • Removing the ink cartridges • Emptying the waste ink tank • Inserting the cleaning cartridges • Emptying the waste ink tank again • Removing the cleaning cartridges • Emptying the waste ink tank again • Installing ink cartridges and charging the ink system 86...
...Washing the Ink System If you should clean the print head using the heaviest level of cleaning cycle, you removed the old one with the tab facing forward. The waste ink from Epson's support website at epson.com/support (U.S.) or epson.ca/support (Canada). See page 74...procedures: • Removing the ink cartridges • Emptying the waste ink tank • Inserting the cleaning cartridges • Emptying the waste ink tank again • Removing the cleaning cartridges • Emptying the waste ink tank again • Installing ink cartridges and charging the ink system 86...

Setup and User's Guide
Page 87
... error, empty the waste ink tank. Turn on the LCD display to hold the drained waste ink (one bottle was included with plenty of Additional Cleaning Cartridges from Epson; Carefully follow all the instructions as they appear on the LCD display. Carefully follow all the instructions on the printer. 2. For detailed instructions see...
... error, empty the waste ink tank. Turn on the LCD display to hold the drained waste ink (one bottle was included with plenty of Additional Cleaning Cartridges from Epson; Carefully follow all the instructions as they appear on the LCD display. Carefully follow all the instructions on the printer. 2. For detailed instructions see...

Setup and User's Guide
Page 94
...you set of any open covers on the LCD display to re-initialize the printer. 1. Dispose of additional cleaning cartridges to the electrical outlet. Press the d button to remove the printer from your ink cartridges to avoid errors. Close any waste ink in these steps; Follow the steps on end, or turn ... the print head bracket and bolt, and connect the power and interface cables. Do not tilt the printer, stand it 's a good idea to run a cleaning cycle (page 74) and realign the print head (page 61) to ensure good print quality. 1 to 2 week preparation You will leak and you were not...
...you set of any open covers on the LCD display to re-initialize the printer. 1. Dispose of additional cleaning cartridges to the electrical outlet. Press the d button to remove the printer from your ink cartridges to avoid errors. Close any waste ink in these steps; Follow the steps on end, or turn ... the print head bracket and bolt, and connect the power and interface cables. Do not tilt the printer, stand it 's a good idea to run a cleaning cycle (page 74) and realign the print head (page 61) to ensure good print quality. 1 to 2 week preparation You will leak and you were not...

Setup and User's Guide
Page 95
...attach the printer to remove the printer from the printer, cover the end of any partially used ink and cleaning cartridges in the waste ink tank (see page 78). After draining the cleaning fluid, press the P Power button to drain and wash the ink system as they appear on the printer... instructions to turn on the LCD display. Then remove the waste ink tank from the stand. The first time you remove the cleaning cartridges and drain the cleaning fluid. Reinstall the bolt and bracket securing the print head that you set up Reel 9. When you removed during setup. Follow ...
...attach the printer to remove the printer from the printer, cover the end of any partially used ink and cleaning cartridges in the waste ink tank (see page 78). After draining the cleaning fluid, press the P Power button to drain and wash the ink system as they appear on the printer... instructions to turn on the LCD display. Then remove the waste ink tank from the stand. The first time you remove the cleaning cartridges and drain the cleaning fluid. Reinstall the bolt and bracket securing the print head that you set up Reel 9. When you removed during setup. Follow ...

Setup and User's Guide
Page 116
...see page 71 for details. see page 56 for details. CONTRAST ADJUSTMENT Adjusts the contrast of the ink in the cartridges. NETWORK STATUS SHEET Prints a sheet showing the network settings JOB INFORMATION Prints a sheet showing information about paper configurations you.... HEAD WASHING Starts the print head washing cycle using the cleaning cartridges; 116 | Printer Parts and Controls Summary Menu setting Description CLEANING (HEAVY) Starts the strongest print head cleaning cycle when a MEDIUM cleaning cycle does not unclog the print head fully (uses more ...
...see page 71 for details. see page 56 for details. CONTRAST ADJUSTMENT Adjusts the contrast of the ink in the cartridges. NETWORK STATUS SHEET Prints a sheet showing the network settings JOB INFORMATION Prints a sheet showing information about paper configurations you.... HEAD WASHING Starts the print head washing cycle using the cleaning cartridges; 116 | Printer Parts and Controls Summary Menu setting Description CLEANING (HEAVY) Starts the strongest print head cleaning cycle when a MEDIUM cleaning cycle does not unclog the print head fully (uses more ...

Setup and User's Guide
Page 125
...95 removing, 29 Buttons, control panel, 100, 110 to 111 C Cables power, 31 to 32 printer, 37 problems, 104 requirements, 11 Cartridges, see Ink cartridges, or Cleaning cartridges Check ink light, 70, 77, 100 Check paper light, 100, 108 Checking error messages, 100 to 103 ink status, 70 lights, 100 ...waste ink, 16, 78 to 79, 95 Documentation, how to use, 9 E Electrical specifications, 121 Energy consumption, 121 Environmental specifications, 121 Epson accessories, 10 help, 11 Preferred Limited Warranty Plan, 11 Epson NetConfig, 39 to 40 Error alert lamp, 110 to 111 Error messages, 100 to 103 125
...95 removing, 29 Buttons, control panel, 100, 110 to 111 C Cables power, 31 to 32 printer, 37 problems, 104 requirements, 11 Cartridges, see Ink cartridges, or Cleaning cartridges Check ink light, 70, 77, 100 Check paper light, 100, 108 Checking error messages, 100 to 103 ink status, 70 lights, 100 ...waste ink, 16, 78 to 79, 95 Documentation, how to use, 9 E Electrical specifications, 121 Energy consumption, 121 Environmental specifications, 121 Epson accessories, 10 help, 11 Preferred Limited Warranty Plan, 11 Epson NetConfig, 39 to 40 Error alert lamp, 110 to 111 Error messages, 100 to 103 125


