

Product Information Guide
Page 7
... small margins) 2-up Copies two originals onto one sheet 4-up Copies four originals onto one . (Follow the instructions on your copy settings, your copies may not be the exact same size as will fit (full-size; Glossy Prem. Epson Stylus Photo RX600 ❏ Zoom In/Out: Manually adjust the size of paper you've loaded in the...
... small margins) 2-up Copies two originals onto one sheet 4-up Copies four originals onto one . (Follow the instructions on your copy settings, your copies may not be the exact same size as will fit (full-size; Glossy Prem. Epson Stylus Photo RX600 ❏ Zoom In/Out: Manually adjust the size of paper you've loaded in the...
Product Information Guide
Page 10
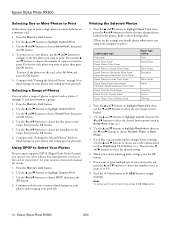
...to choose the last photo in the printer. Use the u and d buttons to choose one or a few photos, use the l and r buttons to navigate to the first photo you want to print, then use the l and r buttons to select the desired setting. 6. Epson Stylus Photo RX600 2/04 Use the... or x B&W button to highlight Custom Print. 3. Epson Stylus Photo RX600 Selecting One or More Photos to Print Follow these steps to print a single photo or selected photos on page 10 to finish laying out your photos and setting up your camera's instruction manual for details. 1. Use the u and d buttons ...
...to choose the last photo in the printer. Use the u and d buttons to choose one or a few photos, use the l and r buttons to navigate to the first photo you want to print, then use the l and r buttons to select the desired setting. 6. Epson Stylus Photo RX600 2/04 Use the... or x B&W button to highlight Custom Print. 3. Epson Stylus Photo RX600 Selecting One or More Photos to Print Follow these steps to print a single photo or selected photos on page 10 to finish laying out your photos and setting up your camera's instruction manual for details. 1. Use the u and d buttons ...
Product Information Guide
Page 12
... scans may not look right. Scanning From a Program You can also scan to a memory card or to the location you manually configure advanced image settings. Epson Scan provides three scanning modes for progressive levels of control over your scanned image: ❏ Full Auto Mode makes scanning quick ... for scanning reflective documents later. When you automatic image adjustments, previewing and cropping capability, and preset configurations for your computer, select EPSON Scan and click the Always use this box 6. Complete the scan using Epson Scan. Epson Stylus Photo RX600 2/04
... scans may not look right. Scanning From a Program You can also scan to a memory card or to the location you manually configure advanced image settings. Epson Scan provides three scanning modes for progressive levels of control over your scanned image: ❏ Full Auto Mode makes scanning quick ... for scanning reflective documents later. When you automatic image adjustments, previewing and cropping capability, and preset configurations for your computer, select EPSON Scan and click the Always use this box 6. Complete the scan using Epson Scan. Epson Stylus Photo RX600 2/04

User Manual
Page 15
Feeder guard Output tray 15 Open the output tray. 2. Loading Paper Follow the guidelines below ■ "Loading Envelopes" on page 17 ■ "Loading Special Papers" on page 19 Loading Single Sheets 1. Flip the feeder guard forward. For a list of Epson papers, see the inside back cover of this manual. ■ "Loading Single Sheets" below to load paper in your Stylus Photo RX600.
Feeder guard Output tray 15 Open the output tray. 2. Loading Paper Follow the guidelines below ■ "Loading Envelopes" on page 17 ■ "Loading Special Papers" on page 19 Loading Single Sheets 1. Flip the feeder guard forward. For a list of Epson papers, see the inside back cover of this manual. ■ "Loading Single Sheets" below to load paper in your Stylus Photo RX600.

User Manual
Page 24
... (always select for BorderFree copying ■ Zoom In/Out: Manually adjust the size of copies you want to change settings. ■ Copies: Choose the number of your copy. ■ Paper Type: Select the type of the arrow); Glossy Epson Premium Glossy Photo Paper Epson Photo Stickers 24 Copying Select a percentage to reduce or enlarge your...
... (always select for BorderFree copying ■ Zoom In/Out: Manually adjust the size of copies you want to change settings. ■ Copies: Choose the number of your copy. ■ Paper Type: Select the type of the arrow); Glossy Epson Premium Glossy Photo Paper Epson Photo Stickers 24 Copying Select a percentage to reduce or enlarge your...

User Manual
Page 33
... any changes you've made. 4. Note: Press the Cancel button if you need to cancel any of the following copy settings: ■ Source Type: Choose Photo & Text, Photo, or Text, based on the content of your original. ■ Reduce/Enlarge: Choose a preset based on the size of your original and your copy...
... any changes you've made. 4. Note: Press the Cancel button if you need to cancel any of the following copy settings: ■ Source Type: Choose Photo & Text, Photo, or Text, based on the content of your original. ■ Reduce/Enlarge: Choose a preset based on the size of your original and your copy...

User Manual
Page 62
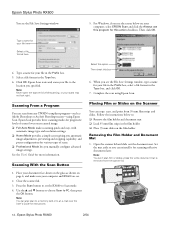
...program-such as shown. Placing Your Document or Photo 1. You can change the mode at the same time. 0.1 in 0.1 in Move the photo or document in the mode you used last, but you manually configure advanced image settings. Place your photo or document face down on the glass in... screen giving you automatic image adjustments, previewing and cropping capability, and preset configurations for various types of control over your old photos. Open the scanner lid. 2. Note: Epson Scan starts in about 1/10 inch from the edges, as Adobe® Photoshop® or ArcSoft PhotoImpression-using...
...program-such as shown. Placing Your Document or Photo 1. You can change the mode at the same time. 0.1 in 0.1 in Move the photo or document in the mode you used last, but you manually configure advanced image settings. Place your photo or document face down on the glass in... screen giving you automatic image adjustments, previewing and cropping capability, and preset configurations for various types of control over your old photos. Open the scanner lid. 2. Note: Epson Scan starts in about 1/10 inch from the edges, as Adobe® Photoshop® or ArcSoft PhotoImpression-using...

User Manual
Page 89
... your camera supports DPOF (Digital Print Order Format), you insert the card in your print job. Press the Memory Card button. 2. Printing All Your Photos You can use it to choose All Print. 4. Use the u and d buttons to choose DPOF. 4. Use the l and r buttons to...u and d buttons to finish laying out your photos and setting up your printer. Continue with "Printing Your Selected Photos" on page 90 to finish laying out your photos and setting up your camera's instruction manual for printing before you can print all the photos on page 90 to highlight Custom Print. 3. Continue...
... your camera supports DPOF (Digital Print Order Format), you insert the card in your print job. Press the Memory Card button. 2. Printing All Your Photos You can use it to choose All Print. 4. Use the u and d buttons to choose DPOF. 4. Use the l and r buttons to...u and d buttons to finish laying out your photos and setting up your printer. Continue with "Printing Your Selected Photos" on page 90 to finish laying out your photos and setting up your camera's instruction manual for printing before you can print all the photos on page 90 to highlight Custom Print. 3. Continue...

User Manual
Page 158
You can purchase ink cartridges, paper, manuals, and accessories from the Epson Store at (800) 873-7766, or visit www.epsonstore.com (U.S. In Canada, please call (800) 463-7766 for dealer referral. Other Software Technical Support Software Telephone Epson Smart Panel (510) 445-8616 ArcSoft PhotoImpression (510) 440-9901 8:30 AM-5:30 PM, Pacific...
You can purchase ink cartridges, paper, manuals, and accessories from the Epson Store at (800) 873-7766, or visit www.epsonstore.com (U.S. In Canada, please call (800) 463-7766 for dealer referral. Other Software Technical Support Software Telephone Epson Smart Panel (510) 445-8616 ArcSoft PhotoImpression (510) 440-9901 8:30 AM-5:30 PM, Pacific...


