User's Guide
Page 6
...'s Buttons 104 Installing a Security Cable ...104 Creating a User Pattern to Display 105 Adjusting the Menu Settings ...108 Using the Projector's Menus...108 Image Quality Settings - Settings Menu 114 Projector Setup Settings - Reset Menu 126 Maintaining and Transporting the Projector 128 Projector Maintenance ...128 Cleaning the Lens...128 Cleaning the Projector Case...129 Air Filter and Vent Maintenance 129 Cleaning the Air Filter and Vents 129 Replacing the Air Filter...130 Projector Lamp Maintenance...132 Replacing the Lamp ...133 Resetting the Lamp Timer...138 Replacing the Remote...
...'s Buttons 104 Installing a Security Cable ...104 Creating a User Pattern to Display 105 Adjusting the Menu Settings ...108 Using the Projector's Menus...108 Image Quality Settings - Settings Menu 114 Projector Setup Settings - Reset Menu 126 Maintaining and Transporting the Projector 128 Projector Maintenance ...128 Cleaning the Lens...128 Cleaning the Projector Case...129 Air Filter and Vent Maintenance 129 Cleaning the Air Filter and Vents 129 Replacing the Air Filter...130 Projector Lamp Maintenance...132 Replacing the Lamp ...133 Resetting the Lamp Timer...138 Replacing the Remote...

User's Guide
Page 10
... to Your Projector Related concepts Projector Parts Locations Product Box Contents Save all of ownership with long-life projector lamp and high-efficiency air filter • High optical zoom ratio for larger images in shorter projection distances • 2000:1 contrast ratio and Auto Iris control for crisply detailed images • Tall projector foot for increased positioning flexibility • Powerful 16 W speaker system with audio out port for connecting external speakers • Epson Instant Off...
... to Your Projector Related concepts Projector Parts Locations Product Box Contents Save all of ownership with long-life projector lamp and high-efficiency air filter • High optical zoom ratio for larger images in shorter projection distances • 2000:1 contrast ratio and Auto Iris control for crisply detailed images • Tall projector foot for increased positioning flexibility • Powerful 16 W speaker system with audio out port for connecting external speakers • Epson Instant Off...
User's Guide
Page 20
...1 Power button 2 Computer button (cycles through connected computer sources) 3 Video button (cycles through connected video sources) 4 Numeric buttons (enter numbers) 5 A/V Mute button (turns off picture and sound) 6 Freeze button (stops video action) 7 Auto button (automatically adjusts position, tracking, and sync settings) 8 Aspect button (selects the image aspect ratio) 9 Page Up/Down buttons (control presentation slides) 10 E-Zoom +/-buttons (zoom into and out of the image) 11 Menu button (accesses projector menu system) 12 Arrow buttons (move through connected USB sources) 22 LAN button...
...1 Power button 2 Computer button (cycles through connected computer sources) 3 Video button (cycles through connected video sources) 4 Numeric buttons (enter numbers) 5 A/V Mute button (turns off picture and sound) 6 Freeze button (stops video action) 7 Auto button (automatically adjusts position, tracking, and sync settings) 8 Aspect button (selects the image aspect ratio) 9 Page Up/Down buttons (control presentation slides) 10 E-Zoom +/-buttons (zoom into and out of the image) 11 Menu button (accesses projector menu system) 12 Arrow buttons (move through connected USB sources) 22 LAN button...

User's Guide
Page 25
... can connect the projector to a variety of computer, video, and audio sources to display presentations, movies, or other images, with or without sound. • Connect any type of computer that has a USB port, standard video output (monitor) port, or HDMI port. • For video projection, connect devices such as DVD players, gaming consoles, digital cameras, and camera phones with compatible video output ports. • If your presentation or video includes sound, you can connect audio input cables...
... can connect the projector to a variety of computer, video, and audio sources to display presentations, movies, or other images, with or without sound. • Connect any type of computer that has a USB port, standard video output (monitor) port, or HDMI port. • For video projection, connect devices such as DVD players, gaming consoles, digital cameras, and camera phones with compatible video output ports. • If your presentation or video includes sound, you can connect audio input cables...

User's Guide
Page 30
... or audio-out port. 2. Remote Control Connecting to a Computer for Sound If your computer documentation for Sound Parent topic: Projector Connections 30 Connect the audio cable to work with an external USB mouse. See your computer presentation includes sound and you did not connect it using the projector's USB TypeB or HDMI port, you are using. 1 Audio1 or Audio2 port Parent topic: Connecting to Computer Sources Connecting to Video Sources Follow the instructions in these sections to connect video devices to...
... or audio-out port. 2. Remote Control Connecting to a Computer for Sound If your computer documentation for Sound Parent topic: Projector Connections 30 Connect the audio cable to work with an external USB mouse. See your computer presentation includes sound and you did not connect it using the projector's USB TypeB or HDMI port, you are using. 1 Audio1 or Audio2 port Parent topic: Connecting to Computer Sources Connecting to Video Sources Follow the instructions in these sections to connect video devices to...
User's Guide
Page 42
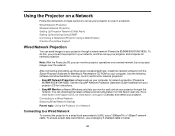
..., install the network software from your projector CD for instructions. • EasyMP Monitor software (Windows only) lets you connect the projector to your network, and then set up your projector through the network. Connecting to a Wired Network Selecting Wired Network Settings Parent topic: Using the Projector on a network. Wired Network Projection Wireless Network Projection Setting Up Projector Network E-Mail Alerts Setting Up Monitoring Using SNMP Controlling a Networked Projector Using a Web Browser Crestron RoomView Support Wired Network Projection You can send images...
..., install the network software from your projector CD for instructions. • EasyMP Monitor software (Windows only) lets you connect the projector to your network, and then set up your projector through the network. Connecting to a Wired Network Selecting Wired Network Settings Parent topic: Using the Projector on a network. Wired Network Projection Wireless Network Projection Setting Up Projector Network E-Mail Alerts Setting Up Monitoring Using SNMP Controlling a Networked Projector Using a Web Browser Crestron RoomView Support Wired Network Projection You can send images...
User's Guide
Page 46
... wireless network projection. You can download the latest software and documentation from your computer. See the EasyMP Network Projection Operation Guide installed from the Epson web site. Caution: Never remove the module while its indicator light is green or flashing, or while you monitor and control your projector. You may damage the module or lose data. 1. Turn off the projector and unplug the power cord. 46 Use the following software and documentation to www.epson.com/support...
... wireless network projection. You can download the latest software and documentation from your computer. See the EasyMP Network Projection Operation Guide installed from the Epson web site. Caution: Never remove the module while its indicator light is green or flashing, or while you monitor and control your projector. You may damage the module or lose data. 1. Turn off the projector and unplug the power cord. 46 Use the following software and documentation to www.epson.com/support...
User's Guide
Page 49
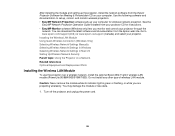
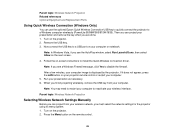
...When you finish projecting wirelessly, remove the USB key from your computer. 5. Parent topic: Wireless Network Projection Selecting Wireless Network Settings Manually Before you must select the network settings for the projector using its menu system. 1. If it does not appear, press the LAN button on -screen instructions to reactivate your presentation as necessary. 6. Parent topic: Wireless Network Projection Related references Optional Equipment and Replacement Parts Using Quick Wireless Connection (Windows Only) You can project your computer image is displayed by the...
...When you finish projecting wirelessly, remove the USB key from your computer. 5. Parent topic: Wireless Network Projection Selecting Wireless Network Settings Manually Before you must select the network settings for the projector using its menu system. 1. If it does not appear, press the LAN button on -screen instructions to reactivate your presentation as necessary. 6. Parent topic: Wireless Network Projection Related references Optional Equipment and Replacement Parts Using Quick Wireless Connection (Windows Only) You can project your computer image is displayed by the...

User's Guide
Page 53
... display the SSID on the network standby screen Selects whether to display the IP address on the network standby screen Parent topic: Selecting Wireless Network Settings Manually Selecting Wireless Network Settings in Mac OS Before connecting to the projector, select the correct wireless network on the Windows taskbar. 2. Setting IP Settings SSID Display IP Address Display Options DHCP (On or Off) IP Address Subnet Mask Gateway Address On Off On Off Description Selects DHCP if your network assigns addresses automatically, or turns...
... display the SSID on the network standby screen Selects whether to display the IP address on the network standby screen Parent topic: Selecting Wireless Network Settings Manually Selecting Wireless Network Settings in Mac OS Before connecting to the projector, select the correct wireless network on the Windows taskbar. 2. Setting IP Settings SSID Display IP Address Display Options DHCP (On or Off) IP Address Subnet Mask Gateway Address On Off On Off Description Selects DHCP if your network assigns addresses automatically, or turns...
User's Guide
Page 67
...: Using Basic Projector Features Related references Projector Setup Settings - 3. Note: With Direct Power On turned on, the projector turns on . Plug the power cord into the projector lens when the lamp is not yet turned on the projector or the remote control. The projector's power light turns orange. After about five seconds, the power light stops flashing and turns green. The projector displays a shutdown confirmation screen. 67 This can see a projected image right away, try the following: • Turn on the connected computer or video device...
...: Using Basic Projector Features Related references Projector Setup Settings - 3. Note: With Direct Power On turned on, the projector turns on . Plug the power cord into the projector lens when the lamp is not yet turned on the projector or the remote control. The projector's power light turns orange. After about five seconds, the power light stops flashing and turns green. The projector displays a shutdown confirmation screen. 67 This can see a projected image right away, try the following: • Turn on the connected computer or video device...
User's Guide
Page 132
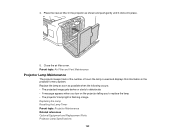
... the projector telling you to replace the lamp • The projector's lamp light is used and displays this information in the projector's menu system. Replace the lamp as soon as shown and push gently until it clicks into place. 5. Parent topic: Air Filter and Vent Maintenance Projector Lamp Maintenance The projector keeps track of the number of hours the lamp is flashing orange Replacing the Lamp Resetting the Lamp Timer Parent topic: Projector Maintenance Related references Optional Equipment and Replacement Parts Projector Lamp Specifications...
... the projector telling you to replace the lamp • The projector's lamp light is used and displays this information in the projector's menu system. Replace the lamp as soon as shown and push gently until it clicks into place. 5. Parent topic: Air Filter and Vent Maintenance Projector Lamp Maintenance The projector keeps track of the number of hours the lamp is flashing orange Replacing the Lamp Resetting the Lamp Timer Parent topic: Projector Maintenance Related references Optional Equipment and Replacement Parts Projector Lamp Specifications...
User's Guide
Page 144
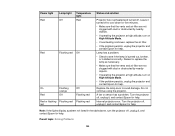
... contact Epson for help . Lamp has a problem. • Check to avoid damage. Note: If the lights display a pattern not listed in the table above, turn on High Altitude Mode. • If the problem persists, unplug the projector and contact Epson for help. Power light Red Lamp light Off Temperature light Red Red Flashing red Off On Flashing Off orange Red Off Flashing red Red or flashing Flashing red Flashing red red Status and solution Projector has overheated and turned off , unplug it, and contact Epson for help . Turn the projector off . Replace the lamp soon...
... contact Epson for help . Lamp has a problem. • Check to avoid damage. Note: If the lights display a pattern not listed in the table above, turn on High Altitude Mode. • If the problem persists, unplug the projector and contact Epson for help. Power light Red Lamp light Off Temperature light Red Red Flashing red Off On Flashing Off orange Red Off Flashing red Red or flashing Flashing red Flashing red red Status and solution Projector has overheated and turned off , unplug it, and contact Epson for help . Turn the projector off . Replace the lamp soon...

User's Guide
Page 147
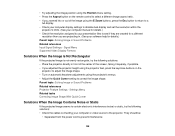
.... 1. Displaying From a PC Laptop Displaying From a Mac Laptop Parent topic: Solving Image or Sound Problems Displaying From a PC Laptop If you see the "No Signal" message when you display from full screen mode. • With Windows DirectX, turn the projector and the connected computer or video source off the Transfer layered window setting in the Dock or from the Applications folder. • With Windows Media Center, reduce the screen size from a PC laptop, you are projecting from a laptop computer...
.... 1. Displaying From a PC Laptop Displaying From a Mac Laptop Parent topic: Solving Image or Sound Problems Displaying From a PC Laptop If you see the "No Signal" message when you display from full screen mode. • With Windows DirectX, turn the projector and the connected computer or video source off the Transfer layered window setting in the Dock or from the Applications folder. • With Windows Media Center, reduce the screen size from a PC laptop, you are projecting from a laptop computer...
User's Guide
Page 149
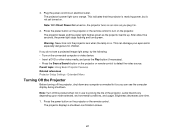
..., press the keystone buttons on the projector to adjust the image shape. • Turn on automatic keystone adjustments using the E-Zoom buttons, press the Esc button to return to a full display. • Check your computer display settings to disable dual display and set the resolution within the projector's limits. (See your computer manual for details.) Parent topic: Solving Image or Sound Problems Related references Input Signal Settings - Parent topic: Solving Image or Sound Problems Related references Projector Feature Settings - Signal Menu Supported Video Display Formats Solutions...
..., press the keystone buttons on the projector to adjust the image shape. • Turn on automatic keystone adjustments using the E-Zoom buttons, press the Esc button to return to a full display. • Check your computer display settings to disable dual display and set the resolution within the projector's limits. (See your computer manual for details.) Parent topic: Solving Image or Sound Problems Related references Input Signal Settings - Parent topic: Solving Image or Sound Problems Related references Projector Feature Settings - Signal Menu Supported Video Display Formats Solutions...
User's Guide
Page 151
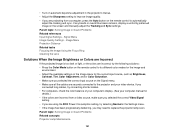
...'s display. (See your computer manual for the current input source, such as Brightness, Contrast, Tint, Color Adjustment, and/or Color Saturation. • Make sure you selected the correct input source on the Signal menu. • Make sure all the cables are securely connected to the projector and your video device. Parent topic: Solving Image or Sound Problems Related concepts Projector Lamp Maintenance 151 • Turn on automatic keystone adjustment in the projector's menus. • Adjust...
...'s display. (See your computer manual for the current input source, such as Brightness, Contrast, Tint, Color Adjustment, and/or Color Saturation. • Make sure you selected the correct input source on the Signal menu. • Make sure all the cables are securely connected to the projector and your video device. Parent topic: Solving Image or Sound Problems Related concepts Projector Lamp Maintenance 151 • Turn on automatic keystone adjustment in the projector's menus. • Adjust...

User's Guide
Page 154
... turned on and connected to the network correctly. (If an error shut down the code and contact Epson. • If you lose the remote control you cannot enter a password. Dim the lights or move the projector away from the sun or interfering equipment. • If available, turn off . • If you assigned an ID number to the remote control to operate multiple projectors, you may need to check or change...
... turned on and connected to the network correctly. (If an error shut down the code and contact Epson. • If you lose the remote control you cannot enter a password. Dim the lights or move the projector away from the sun or interfering equipment. • If available, turn off . • If you assigned an ID number to the remote control to operate multiple projectors, you may need to check or change...

User's Guide
Page 157
... Specifications Projector Lamp Specifications Remote Control Specifications Projector Dimension Specifications Projector Electrical Specifications Projector Environmental Specifications Projector Safety and Approvals Specifications Supported Video Display Formats General Projector Specifications Type of your projector. Technical Specifications These sections list the technical specifications of display Resolution Lens Color reproduction Poly-silicon TFT active matrix PowerLite 92/93/95/905/1835: 1024 x 768 pixels (XGA) PowerLite 96W/915W: 1280 x 800 pixels (WXGA) PowerLite 92/93/95/96W...
... Specifications Projector Lamp Specifications Remote Control Specifications Projector Dimension Specifications Projector Electrical Specifications Projector Environmental Specifications Projector Safety and Approvals Specifications Supported Video Display Formats General Projector Specifications Type of your projector. Technical Specifications These sections list the technical specifications of display Resolution Lens Color reproduction Poly-silicon TFT active matrix PowerLite 92/93/95/905/1835: 1024 x 768 pixels (XGA) PowerLite 96W/915W: 1280 x 800 pixels (WXGA) PowerLite 92/93/95/96W...

Quick Setup
Page 2
... air filter cover latch and open the air filter cover. 5 If your image looks like or , you don't see the troubleshooting tips on the projector to cool down the projector, press the power button twice, then unplug it. Focus ring 4 Turn the zoom ring to connect the projector wirelessly over an 802.11g, 802.11b, or 802.11n wireless network. Power button Power light Using the remote control Make sure the batteries are installed as shown (two AA batteries). Project wirelessly...
... air filter cover latch and open the air filter cover. 5 If your image looks like or , you don't see the troubleshooting tips on the projector to cool down the projector, press the power button twice, then unplug it. Focus ring 4 Turn the zoom ring to connect the projector wirelessly over an 802.11g, 802.11b, or 802.11n wireless network. Power button Power light Using the remote control Make sure the batteries are installed as shown (two AA batteries). Project wirelessly...
Quick Setup
Page 3
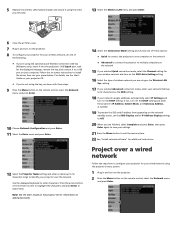
... Channel setting for the displayed message, remove the key, and connect it into the projector's USB TypeA port, wait for your wireless network and turn on the SSID Auto Setting setting. 16 Select the type of wireless network you are finished, select Complete and press Enter, then press Enter again to save your settings. 21 Press the Menu button to exit the menu system. 22 See "Install network software" for your wired network using the projector's menu...
... Channel setting for the displayed message, remove the key, and connect it into the projector's USB TypeA port, wait for your wireless network and turn on the SSID Auto Setting setting. 16 Select the type of wireless network you are finished, select Complete and press Enter, then press Enter again to save your settings. 21 Press the Menu button to exit the menu system. 22 See "Install network software" for your wired network using the projector's menu...

Quick Setup
Page 4
...: See the User's Guide on the projector CD for additional instructions. If not, turn on your computer desktop. Install network software Install the EasyMP® Network Projection software on the remote control to highlight the characters and press Enter to select them on the DHCP setting. Where to get help Manuals For more information about using your network software, see the EasyMP Network Projection Operation Guide on the Epson PrivateLine Support card included with a projector support specialist by...
...: See the User's Guide on the projector CD for additional instructions. If not, turn on your computer desktop. Install network software Install the EasyMP® Network Projection software on the remote control to highlight the characters and press Enter to select them on the DHCP setting. Where to get help Manuals For more information about using your network software, see the EasyMP Network Projection Operation Guide on the Epson PrivateLine Support card included with a projector support specialist by...


