Installation Guide
Page 3
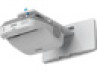
... wall mount or projector falls, it could cause personal injury or property damage. If you find any broken parts, stop using the included Epson wall mount. 3 Caution Do not install the wall mount in personal injury. The wall mount may break, resulting in a location where ...fire or electric shock. About This Installation Guide This guide describes how to mount the ultra-short-throw projectors BrightLink 575Wi/585Wi/575Wi+/585Wi+ and PowerLite 570/575W/580/585W to fall and cause personal injury or property damage. Inspect the wall mount on a concrete wall. When performing wiring,...
... wall mount or projector falls, it could cause personal injury or property damage. If you find any broken parts, stop using the included Epson wall mount. 3 Caution Do not install the wall mount in personal injury. The wall mount may break, resulting in a location where ...fire or electric shock. About This Installation Guide This guide describes how to mount the ultra-short-throw projectors BrightLink 575Wi/585Wi/575Wi+/585Wi+ and PowerLite 570/575W/580/585W to fall and cause personal injury or property damage. Inspect the wall mount on a concrete wall. When performing wiring,...
Installation Guide
Page 9
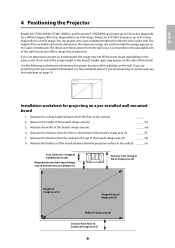
... image appears on a plain wall, use the worksheet below. English 4 Positioning the Projector BrightLink 575Wi/585Wi/575Wi+/585Wi+ and PowerLite 575W/585W can project up to project on a whiteboard, the image may appear on the sides of the board. PowerLite 570/580 can project onto a pre-installed whiteboard or directly onto a plain wall. You can...
... image appears on a plain wall, use the worksheet below. English 4 Positioning the Projector BrightLink 575Wi/585Wi/575Wi+/585Wi+ and PowerLite 575W/585W can project up to project on a whiteboard, the image may appear on the sides of the board. PowerLite 570/580 can project onto a pre-installed whiteboard or directly onto a plain wall. You can...
Installation Guide
Page 13
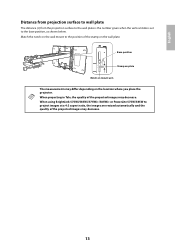
... plate is the number given when the vertical slide is set to the position of the stamp on the wall plate. When using BrightLink 575Wi/585Wi/575Wi+/585Wi+ or PowerLite 575W/585W to project images at a 4:3 aspect ratio, the images are resized automatically and the quality of the projected images may decrease. 13
... plate is the number given when the vertical slide is set to the position of the stamp on the wall plate. When using BrightLink 575Wi/585Wi/575Wi+/585Wi+ or PowerLite 575W/585W to project images at a 4:3 aspect ratio, the images are resized automatically and the quality of the projected images may decrease. 13
Installation Guide
Page 14
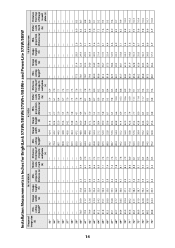
....3 6.4 6.4 8.5 95.2 60.8 45.6 8.8 8.8 9.6 88.1 66.2 37.3 6.9 6.9 10.8 ceiling height* Image width (w) 16:10 WXGA 4:3 XGA Image height (h) Min. Installation Measurements in Inches for BrightLink 575Wi/585Wi/575Wi+/585Wi+ and PowerLite 575W/585W 14 Diagonal image size (S) Min.
....3 6.4 6.4 8.5 95.2 60.8 45.6 8.8 8.8 9.6 88.1 66.2 37.3 6.9 6.9 10.8 ceiling height* Image width (w) 16:10 WXGA 4:3 XGA Image height (h) Min. Installation Measurements in Inches for BrightLink 575Wi/585Wi/575Wi+/585Wi+ and PowerLite 575W/585W 14 Diagonal image size (S) Min.
Installation Guide
Page 18
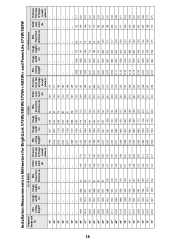
Installation Measurements in Millimeters for BrightLink 575Wi/585Wi/575Wi+/585Wi+ and PowerLite 575W/585W 18 Diagonal image size (S) Min. ceiling height* Image width (w) 4:3 XGA Image height (h) Min. ceiling height* Image width (w) 16:9 Widescreen Image height (h) Min. Projection distance (a) Slider ...
Installation Measurements in Millimeters for BrightLink 575Wi/585Wi/575Wi+/585Wi+ and PowerLite 575W/585W 18 Diagonal image size (S) Min. ceiling height* Image width (w) 4:3 XGA Image height (h) Min. ceiling height* Image width (w) 16:9 Widescreen Image height (h) Min. Projection distance (a) Slider ...

Installation Guide
Page 34
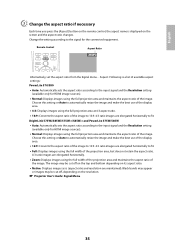
... sure the image is evenly rectangular, without distortion. • Make sure the projector is displayed. Press the [Help] button. When using the BrightLink 575Wi/585Wi/575Wi+/585Wi+ and PowerLite 570/575W/580/585W, follow the steps below to the projected image. Doing so may result in a reduction in relation to adjust the projected image.
... sure the image is evenly rectangular, without distortion. • Make sure the projector is displayed. Press the [Help] button. When using the BrightLink 575Wi/585Wi/575Wi+/585Wi+ and PowerLite 570/575W/580/585W, follow the steps below to the projected image. Doing so may result in a reduction in relation to adjust the projected image.
Installation Guide
Page 35
...the aspect ratio of the image to the input signal and the Resolution setting (available only for the connected equipment. BrightLink 575Wi/585Wi/575Wi+/585Wi+ and PowerLite 575W/585W • Auto: Automatically sets the aspect ratio according to 16:9. 4:3 ratio images are elongated horizontally. • Zoom: ..., the aspect name is displayed on its aspect ratio. • Native: Displays images as is a list of available aspect settings: PowerLite 570/580 • Auto: Automatically sets the aspect ratio according to the input signal and the Resolution setting (available only for HDMI ...
...the aspect ratio of the image to the input signal and the Resolution setting (available only for the connected equipment. BrightLink 575Wi/585Wi/575Wi+/585Wi+ and PowerLite 575W/585W • Auto: Automatically sets the aspect ratio according to 16:9. 4:3 ratio images are elongated horizontally. • Zoom: ..., the aspect name is displayed on its aspect ratio. • Native: Displays images as is a list of available aspect settings: PowerLite 570/580 • Auto: Automatically sets the aspect ratio according to the input signal and the Resolution setting (available only for HDMI ...

