Quick Guide
Page 1
Epson Stylus® NX400 Series Quick Guide Basic Copying, Printing, and Scanning Maintaining Your All-in-One Solving Problems
Epson Stylus® NX400 Series Quick Guide Basic Copying, Printing, and Scanning Maintaining Your All-in-One Solving Problems
Quick Guide
Page 2
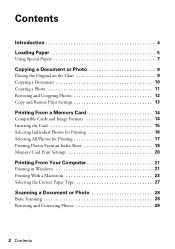
... Placing the Original on the Glass 9 Copying a Document 10 Copying a Photo 11 Restoring and Cropping Photos 12 Copy and Restore Print Settings 13 Printing From a Memory Card 14 Compatible Cards and Image Formats 14 Inserting the Card 15 Selecting Individual Photos for... Printing 16 Selecting All Photos for Printing 17 Printing Photos From an Index Sheet 18 Memory Card Print Settings 20 Printing From Your Computer 21 Printing in Windows 21 Printing With a Macintosh 23 Selecting the Correct Paper Type 27 ...
... Placing the Original on the Glass 9 Copying a Document 10 Copying a Photo 11 Restoring and Cropping Photos 12 Copy and Restore Print Settings 13 Printing From a Memory Card 14 Compatible Cards and Image Formats 14 Inserting the Card 15 Selecting Individual Photos for... Printing 16 Selecting All Photos for Printing 17 Printing Photos From an Index Sheet 18 Memory Card Print Settings 20 Printing From Your Computer 21 Printing in Windows 21 Printing With a Macintosh 23 Selecting the Correct Paper Type 27 ...
Quick Guide
Page 3
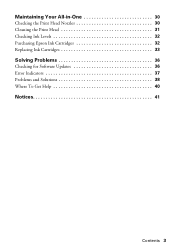
Maintaining Your All-in-One 30 Checking the Print Head Nozzles 30 Cleaning the Print Head 31 Checking Ink Levels 32 Purchasing Epson Ink Cartridges 32 Replacing Ink Cartridges 33 Solving Problems 36 Checking for Software Updates 36 Error Indicators 37 Problems and Solutions 38 Where To Get Help 40 Notices 41 Contents 3
Maintaining Your All-in-One 30 Checking the Print Head Nozzles 30 Cleaning the Print Head 31 Checking Ink Levels 32 Purchasing Epson Ink Cartridges 32 Replacing Ink Cartridges 33 Solving Problems 36 Checking for Software Updates 36 Error Indicators 37 Problems and Solutions 38 Where To Get Help 40 Notices 41 Contents 3
Quick Guide
Page 4
Introduction After you have set up your Epson Stylus® NX400 Series all-in-one as you connect it to your Windows® or Macintosh® computer. Caution: Cautions must be observed to avoid damage to ... a memory card or digital camera ■ Get the basic steps for better copying, scanning, and printing. 4 Introduction Tip: Tips contain hints for printing from your computer ■ Scan a document or photo and restore or correct the color ■ Perform routine maintenance ■ Solve simple problems This book tells you how to do a lot...
Introduction After you have set up your Epson Stylus® NX400 Series all-in-one as you connect it to your Windows® or Macintosh® computer. Caution: Cautions must be observed to avoid damage to ... a memory card or digital camera ■ Get the basic steps for better copying, scanning, and printing. 4 Introduction Tip: Tips contain hints for printing from your computer ■ Scan a document or photo and restore or correct the color ■ Perform routine maintenance ■ Solve simple problems This book tells you how to do a lot...
Quick Guide
Page 5
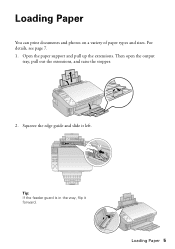
Squeeze the edge guide and slide it forward. Tip: If the feeder guard is in the way, flip it left. Open the paper support and pull up the extensions. Loading Paper 5 For details, see page 7. 1. Then open the output tray, pull out the extensions, and raise the stopper. 2. Loading Paper You can print documents and photos on a variety of paper types and sizes.
Squeeze the edge guide and slide it forward. Tip: If the feeder guard is in the way, flip it left. Open the paper support and pull up the extensions. Loading Paper 5 For details, see page 7. 1. Then open the output tray, pull out the extensions, and raise the stopper. 2. Loading Paper You can print documents and photos on a variety of paper types and sizes.
Quick Guide
Page 6
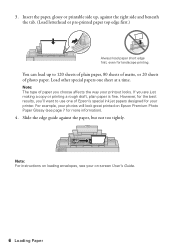
For example, your photos will look great printed on Epson Premium Photo Paper Glossy (see your on loading envelopes, see page... Note: For instructions on -screen User's Guide. 6 Loading Paper Note: The type of Epson's special ink jet papers designed for landscape printing. If you choose affects the way your printer. Insert the paper, glossy or printable side ... information). 4. Slide the edge guide against the right side and beneath the tab. (Load letterhead or pre-printed paper top edge first.) Always load paper short edge first, even for your printout looks. Load other special ...
For example, your photos will look great printed on Epson Premium Photo Paper Glossy (see your on loading envelopes, see page... Note: For instructions on -screen User's Guide. 6 Loading Paper Note: The type of Epson's special ink jet papers designed for landscape printing. If you choose affects the way your printer. Insert the paper, glossy or printable side ... information). 4. Slide the edge guide against the right side and beneath the tab. (Load letterhead or pre-printed paper top edge first.) Always load paper short edge first, even for your printout looks. Load other special ...
Quick Guide
Page 10
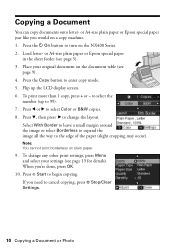
... settings (see page 13 for details). Note: You cannot print borderless on the NX400 Series. 2. Press the Copy button to the edge of the paper (slight cropping may occur). To print more than 1 copy, press + or - or A4-size plain paper or Epson special paper in the sheet feeder (see page 9). 4.... you 're done, press OK. 10. When you need to 99). 7. Load letter- Press x Start to select Color or B&W copies. 8. Copying a Document You can copy documents onto letter- or A4-size plain paper or Epson special paper just like you would on the document table (see page 5). 3.
... settings (see page 13 for details). Note: You cannot print borderless on the NX400 Series. 2. Press the Copy button to the edge of the paper (slight cropping may occur). To print more than 1 copy, press + or - or A4-size plain paper or Epson special paper in the sheet feeder (see page 9). 4.... you 're done, press OK. 10. When you need to 99). 7. Load letter- Press x Start to select Color or B&W copies. 8. Copying a Document You can copy documents onto letter- or A4-size plain paper or Epson special paper just like you would on the document table (see page 5). 3.
Quick Guide
Page 11
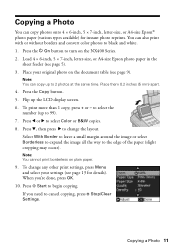
...photos at the same time. Copying a Photo 11 Place them 0.2 inches (5 mm) apart. 4. Note: You cannot print borderless on the NX400 Series. 2. You can also print with or without borders and convert color photos to 99). 7. to select the number (up to black and white. 1. Press x Start to the edge of... can copy up the LCD display screen. 6. Press the Copy button. 5. Load 4 × 6-inch, 5 × 7-inch, letter-size, or A4-size Epson photo paper in the sheet feeder (see page 9). If you 're done, press OK. 10. Press the P On button to turn on plain paper. 9. Copying...
...photos at the same time. Copying a Photo 11 Place them 0.2 inches (5 mm) apart. 4. Note: You cannot print borderless on the NX400 Series. 2. You can also print with or without borders and convert color photos to 99). 7. to select the number (up to black and white. 1. Press x Start to the edge of... can copy up the LCD display screen. 6. Press the Copy button. 5. Load 4 × 6-inch, 5 × 7-inch, letter-size, or A4-size Epson photo paper in the sheet feeder (see page 9). If you 're done, press OK. 10. Press the P On button to turn on plain paper. 9. Copying...
Quick Guide
Page 12
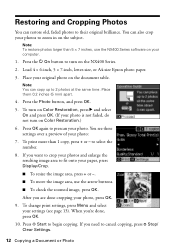
... press OK. (If your original photo on Color Restoration.) 6. Press OK again to prescan your settings (see these settings over a preview of your photos to cancel copying, press y Stop/ Clear Settings. 12 Copying a Document or Photo To change print settings, press Menu and select your photo. Note...faded, do not turn on the subject. After you need to zoom in on the NX400 Series. 2. If you are done cropping your computer. 1. Load 4 × 6-inch, 5 × 7-inch, letter-size, or A4-size Epson photo paper. 3. Note: You can copy up to their original brilliance. Press the...
... press OK. (If your original photo on Color Restoration.) 6. Press OK again to prescan your settings (see these settings over a preview of your photos to cancel copying, press y Stop/ Clear Settings. 12 Copying a Document or Photo To change print settings, press Menu and select your photo. Note...faded, do not turn on the subject. After you need to zoom in on the NX400 Series. 2. If you are done cropping your computer. 1. Load 4 × 6-inch, 5 × 7-inch, letter-size, or A4-size Epson photo paper. 3. Note: You can copy up to their original brilliance. Press the...
Quick Guide
Page 13
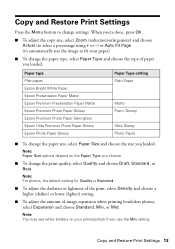
Paper type Plain paper Epson Bright White Paper Epson Presentation Paper Matte Epson Premium Presentation Paper Matte Epson Premium Photo Paper Glossy Epson Premium Photo Paper Semi-gloss Epson Ultra Premium Photo Paper Glossy Epson Photo Paper Glossy Paper Type setting Plain Paper Matte Prem. Note: You may see ...enlargement) and choose Actual (to select a percentage using + or -) or Auto Fit Page (to automatically size the image to change the print quality, select Quality and choose Draft, Standard, or Best. Note: Paper Size options depend on your paper). ■ To change the paper...
Paper type Plain paper Epson Bright White Paper Epson Presentation Paper Matte Epson Premium Presentation Paper Matte Epson Premium Photo Paper Glossy Epson Premium Photo Paper Semi-gloss Epson Ultra Premium Photo Paper Glossy Epson Photo Paper Glossy Paper Type setting Plain Paper Matte Prem. Note: You may see ...enlargement) and choose Actual (to select a percentage using + or -) or Auto Fit Page (to automatically size the image to change the print quality, select Quality and choose Draft, Standard, or Best. Note: Paper Size options depend on your paper). ■ To change the paper...
Quick Guide
Page 14
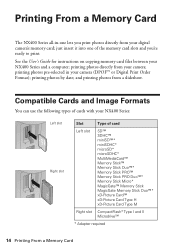
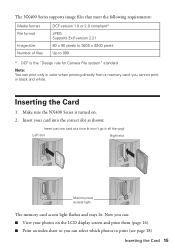
... Card Type M Right slot CompactFlash® Type I and II Microdrive™ * Adapter required 14 Printing From a Memory Card printing photos directly from a slideshow. Compatible Cards and Image Formats You can use the following types of cards with your NX400 Series: Left slot Right slot Slot Type of the memory card slots and you...
... Card Type M Right slot CompactFlash® Type I and II Microdrive™ * Adapter required 14 Printing From a Memory Card printing photos directly from a slideshow. Compatible Cards and Image Formats You can use the following types of cards with your NX400 Series: Left slot Right slot Slot Type of the memory card slots and you...
Quick Guide
Page 15
... is turned on. 2. Inserting the Card 1. Insert your photos on the LCD display screen and print them (page 16) ■ Print an index sheet so you can print only in color when printing directly from a memory card; Make sure the NX400 Series is the "Design rule for Camera File system" standard Note: You can : ■ View...
... is turned on. 2. Inserting the Card 1. Insert your photos on the LCD display screen and print them (page 16) ■ Print an index sheet so you can print only in color when printing directly from a memory card; Make sure the NX400 Series is the "Design rule for Camera File system" standard Note: You can : ■ View...
Quick Guide
Page 16
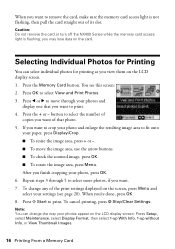
...Printing You can change any of the print settings displayed on the screen, press Menu and select your photos appear on the LCD display screen. Caution: Do not remove the card or turn off the NX400... Series while the memory card access light is not flashing, then pull the card straight out of that you want to print. 4. button to select the number..., select Display Format, then select 1-up With Info, 1-up without Info, or View Thumbnail Images. 16 Printing From a Memory Card When you want to remove the card, make sure the memory card access light is flashing...
...Printing You can change any of the print settings displayed on the screen, press Menu and select your photos appear on the LCD display screen. Caution: Do not remove the card or turn off the NX400... Series while the memory card access light is not flashing, then pull the card straight out of that you want to print. 4. button to select the number..., select Display Format, then select 1-up With Info, 1-up without Info, or View Thumbnail Images. 16 Printing From a Memory Card When you want to remove the card, make sure the memory card access light is flashing...
Quick Guide
Page 17
...photos on your memory card for Printing 17 To print more than 1 copy, press + or - To change any of the photos on 4 × 6-inch Epson photo paper (various types available), press x Start and go to step 5. To select multiple copies with different print settings, press OK and continue ...with step 3. 3. When you 're ready to cancel printing, press y Stop/Clear Settings. Press l or r ...
...photos on your memory card for Printing 17 To print more than 1 copy, press + or - To change any of the photos on 4 × 6-inch Epson photo paper (various types available), press x Start and go to step 5. To select multiple copies with different print settings, press OK and continue ...with step 3. 3. When you 're ready to cancel printing, press y Stop/Clear Settings. Press l or r ...
Quick Guide
Page 18
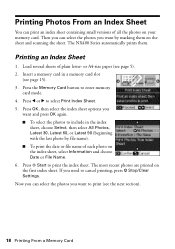
... name of each photo on the sheet and scanning the sheet. If you want to include in a memory card slot (see page 15). 3. The NX400 Series automatically prints them on the index sheet, select Information and choose Date or File Name. 6. Load several sheets of all the photos on the first index...
... name of each photo on the sheet and scanning the sheet. If you want to include in a memory card slot (see page 15). 3. The NX400 Series automatically prints them on the index sheet, select Information and choose Date or File Name. 6. Load several sheets of all the photos on the first index...

Quick Guide
Page 19
...against the right edge of the glass. Open the document cover. The numbers indicate how many copies you want to print. Then place the index sheet face-down on the glass, in the circles on the sheet. Correct: Incorrect: ...Borderless or With Border layout. ■ If you want to print right on the sheet, scan the sheet, and print the photos automatically. 1. Printing Photos From The Index Sheet Once you have printed an index sheet (see page 18), you can mark the... photos you want to print the date the photo was taken on each photo you want of all ...
...against the right edge of the glass. Open the document cover. The numbers indicate how many copies you want to print. Then place the index sheet face-down on the glass, in the circles on the sheet. Correct: Incorrect: ...Borderless or With Border layout. ■ If you want to print right on the sheet, scan the sheet, and print the photos automatically. 1. Printing Photos From The Index Sheet Once you have printed an index sheet (see page 18), you can mark the... photos you want to print the date the photo was taken on each photo you want of all ...
Quick Guide
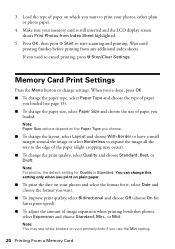
Page 20
...the size of the paper (slight cropping may see white borders on which you loaded (see page 13). ■ To change settings. Wait until printing finishes before printing from Index Sheet highlighted. 5. When you're done, press OK. ■ To change the paper type, select Paper Type and choose the ...). ■ To adjust the amount of paper on your photos, either plain or photo paper. 4. Load the type of image expansion when printing borderless photos, select Expansion and choose Standard, Min., or Mid. Note: Paper Size options depend on your photos and select the format for it...
...the size of the paper (slight cropping may see white borders on which you loaded (see page 13). ■ To change settings. Wait until printing finishes before printing from Index Sheet highlighted. 5. When you're done, press OK. ■ To change the paper type, select Paper Type and choose the ...). ■ To adjust the amount of paper on your photos, either plain or photo paper. 4. Load the type of image expansion when printing borderless photos, select Expansion and choose Standard, Min., or Mid. Note: Paper Size options depend on your photos and select the format for it...
Quick Guide
Page 21
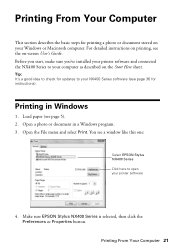
Open the File menu and select Print. Make sure EPSON Stylus NX400 Series is selected, then click the Preferences or Properties button. Printing From Your Computer This section describes the basic steps for updates to open your printer software 4. You see a window like this one: Select EPSON Stylus NX400 Series Click here to your NX400 Series software (see page 36...
Open the File menu and select Print. Make sure EPSON Stylus NX400 Series is selected, then click the Preferences or Properties button. Printing From Your Computer This section describes the basic steps for updates to open your printer software 4. You see a window like this one: Select EPSON Stylus NX400 Series Click here to your NX400 Series software (see page 36...
Quick Guide
Page 22
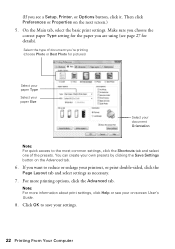
... clicking the Save Settings button on -screen User's Guide. 8. Click OK to save your printout, or print double-sided, click the Page Layout tab and select settings as necessary. 7. Make sure you choose the ...paper Type Select your paper Size Select your on the Advanced tab. 6. If you 're printing (choose Photo or Best Photo for the paper you are using (see a Setup, Printer, or Options button, click... it. Note: For more printing options, click the Advanced tab. Select the type of document you want to the most common settings...
... clicking the Save Settings button on -screen User's Guide. 8. Click OK to save your printout, or print double-sided, click the Page Layout tab and select settings as necessary. 7. Make sure you choose the ...paper Type Select your paper Size Select your on the Advanced tab. 6. If you 're printing (choose Photo or Best Photo for the paper you are using (see a Setup, Printer, or Options button, click... it. Note: For more printing options, click the Advanced tab. Select the type of document you want to the most common settings...
Quick Guide
Page 23
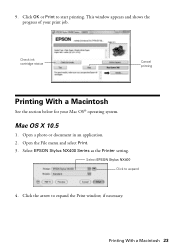
Open the File menu and select Print. 3. Mac OS X 10.5 1. Check ink cartridge status Cancel printing Printing With a Macintosh See the section below for your print job. Open a photo or document in an application. 2. Printing With a Macintosh 23 Select EPSON Stylus NX400 Series as the Printer setting. Select EPSON Stylus NX400 Click to expand the Print window, if necessary. Click the arrow to expand 4. 9. Click OK or Print to start printing. This window appears and shows the progress of your Mac OS® operating system.
Open the File menu and select Print. 3. Mac OS X 10.5 1. Check ink cartridge status Cancel printing Printing With a Macintosh See the section below for your print job. Open a photo or document in an application. 2. Printing With a Macintosh 23 Select EPSON Stylus NX400 Series as the Printer setting. Select EPSON Stylus NX400 Click to expand the Print window, if necessary. Click the arrow to expand 4. 9. Click OK or Print to start printing. This window appears and shows the progress of your Mac OS® operating system.


