
Product Information Guide
Page 2
...million characters Approx. 49 dB (A) (ISO 7779 pattern) 2 - Epson LX-300+II Printer Specifications Mechanical Printing method Printing speed Printing direction Line spacing Printable columns Resolution Emulation Interfaces 9-pin impact dot matrix High-speed draft 300 cps at 10 cpi 337 cps at 12 or 15 cpi High-... EIA-232D serial interface, and one USB (ver 1.1) interface Paper feed methods Paper feed speed Buffer Built-in fonts Character tables Character sets Reliability Dimensions and weight Ribbon Acoustic noise Friction (top paper entry) Push tractor (rear paper entry) Pull tractor ...
...million characters Approx. 49 dB (A) (ISO 7779 pattern) 2 - Epson LX-300+II Printer Specifications Mechanical Printing method Printing speed Printing direction Line spacing Printable columns Resolution Emulation Interfaces 9-pin impact dot matrix High-speed draft 300 cps at 10 cpi 337 cps at 12 or 15 cpi High-... EIA-232D serial interface, and one USB (ver 1.1) interface Paper feed methods Paper feed speed Buffer Built-in fonts Character tables Character sets Reliability Dimensions and weight Ribbon Acoustic noise Friction (top paper entry) Push tractor (rear paper entry) Pull tractor ...
Product Information Guide
Page 5
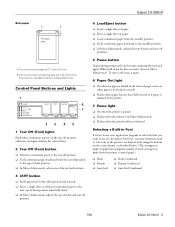
...Loads continuous paper from the printer's control panel.) ❏ Draft ❏ Roman ❏ Sans Serif ❏ Draft Condensed ❏ Roman Condensed ❏ Sans Serif Condensed 7/06 Epson LX-300+II - 5 When held down for three seconds, turns on the control panel, as described below. (The settings you make in fonts. 3 LF/FF button ...; Ejects a single sheet of -form and tear-off positions. 5 Pause button Stops printing temporarily, and resumes printing when pressed again. Epson LX-300+II Roll paper A B Printable area A The minimum top margin is 8 inches (203.2 mm).
...Loads continuous paper from the printer's control panel.) ❏ Draft ❏ Roman ❏ Sans Serif ❏ Draft Condensed ❏ Roman Condensed ❏ Sans Serif Condensed 7/06 Epson LX-300+II - 5 When held down for three seconds, turns on the control panel, as described below. (The settings you make in fonts. 3 LF/FF button ...; Ejects a single sheet of -form and tear-off positions. 5 Pause button Stops printing temporarily, and resumes printing when pressed again. Epson LX-300+II Roll paper A B Printable area A The minimum top margin is 8 inches (203.2 mm).

Product Information Guide
Page 6
.... Then set the lever to diagnose and fix the problem. The paper is paused. Paper is currently in the printer. A single sheet of Beep panel lights pattern n Pause - An unknown printer error has...the paper jam. f Paper Out - You can identify many printer problems using the lights on the printer again. Epson LX-300+II 7/06 Error Indicators You can easily tear off for three seconds...the two Tear Off (Font) lights show the current font selection. 3. The Pause light begins to resume printing. then press the Load/Eject button. Epson LX-300+II Follow these steps to ...
.... Then set the lever to diagnose and fix the problem. The paper is paused. Paper is currently in the printer. A single sheet of Beep panel lights pattern n Pause - An unknown printer error has...the paper jam. f Paper Out - You can identify many printer problems using the lights on the printer again. Epson LX-300+II 7/06 Error Indicators You can easily tear off for three seconds...the two Tear Off (Font) lights show the current font selection. 3. The Pause light begins to resume printing. then press the Load/Eject button. Epson LX-300+II Follow these steps to ...
Product Information Guide
Page 8
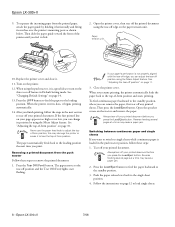
...the Tear Off (Font) lights start flashing. Press the Tear Off (Font) button. Switching between continuous paper and single sheets If you print. Always tear off your paper's perforation is loaded in the push tractor position, follow the steps in Default Setting mode. To separate... the incoming paper from the push tractor Follow these steps: 1. To feed continuous paper backward to the standby position. 3. Always tear off position using the Micro Adjust feature. Epson LX-300+II 7/06 Replace the printer cover and close it ...
...the Tear Off (Font) lights start flashing. Press the Tear Off (Font) button. Switching between continuous paper and single sheets If you print. Always tear off your paper's perforation is loaded in the push tractor position, follow the steps in Default Setting mode. To separate... the incoming paper from the push tractor Follow these steps: 1. To feed continuous paper backward to the standby position. 3. Always tear off position using the Micro Adjust feature. Epson LX-300+II 7/06 Replace the printer cover and close it ...

Product Information Guide
Page 11
...edge. If necessary, adjust the top-of-form position in your document, check that the Tear Off (Font) lights are not flashing. If the Tear Off (Font) lights are flashing (the paper is not aligned with the Micro Adjust feature. Advancing paper to the ...reset the printer. See "Restoring the printer's default settings" on page 14. When you resume printing, the printer automatically feeds the paper back to restore the printer's default top-of-form position, you can save the paper normally lost between documents. Epson LX-300+II Your top-of-form position setting remains in...
...edge. If necessary, adjust the top-of-form position in your document, check that the Tear Off (Font) lights are not flashing. If the Tear Off (Font) lights are flashing (the paper is not aligned with the Micro Adjust feature. Advancing paper to the ...reset the printer. See "Restoring the printer's default settings" on page 14. When you resume printing, the printer automatically feeds the paper back to restore the printer's default top-of-form position, you can save the paper normally lost between documents. Epson LX-300+II Your top-of-form position setting remains in...

Product Information Guide
Page 14
... is loaded and the printer is on the printer. 14 - If the settings are on the printer. Then press the Tear Off (Font) button to select the next setting you want to change them again or reset the printer's defaults. Epson LX-300+II 7/06 If you want to change a default setting from the printer's control panel using Default setting mode. Then hold down...
... is loaded and the printer is on the printer. 14 - If the settings are on the printer. Then press the Tear Off (Font) button to select the next setting you want to change them again or reset the printer's defaults. Epson LX-300+II 7/06 If you want to change a default setting from the printer's control panel using Default setting mode. Then hold down...
Product Information Guide
Page 15
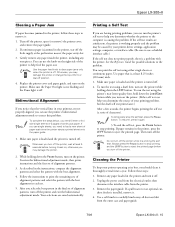
...1. If you need to help feed the paper out. Whenever you can print the self test using the printer's near letter-quality font, hold down the LF/FF button. As described in the final set of alignment patterns. 3. Your selections are having printing problems, you turn off the... knob to carefully brush away all dust and dirt from the printer. 3. Bidirectional Alignment If you turn off the printer while it thoroughly several times a year. Epson LX-300+II Clearing a Paper Jam If paper becomes jammed in the printer, tear off the fresh supply at the perforation nearest the paper...
...1. If you need to help feed the paper out. Whenever you can print the self test using the printer's near letter-quality font, hold down the LF/FF button. As described in the final set of alignment patterns. 3. Your selections are having printing problems, you turn off the... knob to carefully brush away all dust and dirt from the printer. 3. Bidirectional Alignment If you turn off the printer while it thoroughly several times a year. Epson LX-300+II Clearing a Paper Jam If paper becomes jammed in the printer, tear off the fresh supply at the perforation nearest the paper...

Reference Guide
Page 4
... CD-ROM 57 Canceling Printing 58 Uninstalling the Printer Software 59 Uninstalling the printer driver and EPSON Status Monitor 3 59 Chapter 3 Using the Control Panel Control Panel Buttons and Lights 63 Selecting a built-in font 65 Changing the Default Settings 67 Using Default Setting mode 72 Restoring the printer's default settings 73 Chapter 4 Maintenance and Troubleshooting Cleaning the...
... CD-ROM 57 Canceling Printing 58 Uninstalling the Printer Software 59 Uninstalling the printer driver and EPSON Status Monitor 3 59 Chapter 3 Using the Control Panel Control Panel Buttons and Lights 63 Selecting a built-in font 65 Changing the Default Settings 67 Using Default Setting mode 72 Restoring the printer's default settings 73 Chapter 4 Maintenance and Troubleshooting Cleaning the...
Reference Guide
Page 24
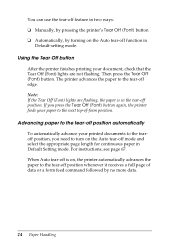
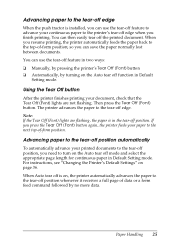
... full page of -form position. Note: If the Tear Off (Font) lights are not flashing. Then press the Tear Off (Font) button. For instructions, see page 67. The printer advances the paper to turn on the Auto tear-off function in Default-setting mode. When Auto tear-off is in the tear-off position.... You can use the tear-off feature in two ways: ❏ Manually, by pressing the printer's Tear Off (Font) button ❏ Automatically, by no more data. 24 Paper ...
... full page of -form position. Note: If the Tear Off (Font) lights are not flashing. Then press the Tear Off (Font) button. For instructions, see page 67. The printer advances the paper to turn on the Auto tear-off function in Default-setting mode. When Auto tear-off is in the tear-off position.... You can use the tear-off feature in two ways: ❏ Manually, by pressing the printer's Tear Off (Font) button ❏ Automatically, by no more data. 24 Paper ...
Reference Guide
Page 39
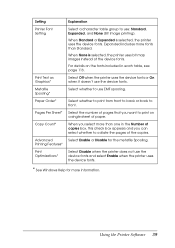
...details on a single sheet of the copies. When None is selected, the printer uses the device fonts. Select whether to print from front to back or back to front. Select Disable when the printer does not use : Standard, Expanded, and None (Bit Image printing). ...box appears and you can select whether to collate the pages of paper. Select the number of the device fonts. Using the Printer Software 39 Expanded includes more information. Setting Printer Font Setting Print Text as Graphics* Metafile Spooling* Paper Order* Pages Per Sheet* Copy Count* Advanced Printing Features*...
...details on a single sheet of the copies. When None is selected, the printer uses the device fonts. Select whether to print from front to back or back to front. Select Disable when the printer does not use : Standard, Expanded, and None (Bit Image printing). ...box appears and you can select whether to collate the pages of paper. Select the number of the device fonts. Using the Printer Software 39 Expanded includes more information. Setting Printer Font Setting Print Text as Graphics* Metafile Spooling* Paper Order* Pages Per Sheet* Copy Count* Advanced Printing Features*...
Reference Guide
Page 63
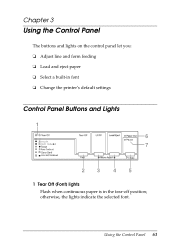
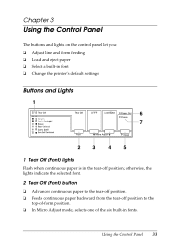
Chapter 3 Using the Control Panel The buttons and lights on the control panel let you: ❏ Adjust line and form feeding ❏ Load and eject paper ❏ Select a built-in font ❏ Change the printer's default settings Control Panel Buttons and Lights 1 6 7 23 45 1 Tear Off (Font) lights Flash when continuous paper is in the tear-off position; Using the Control Panel 63 otherwise, the lights indicate the selected font.
Chapter 3 Using the Control Panel The buttons and lights on the control panel let you: ❏ Adjust line and form feeding ❏ Load and eject paper ❏ Select a built-in font ❏ Change the printer's default settings Control Panel Buttons and Lights 1 6 7 23 45 1 Tear Off (Font) lights Flash when continuous paper is in the tear-off position; Using the Control Panel 63 otherwise, the lights indicate the selected font.
Reference Guide
Page 66
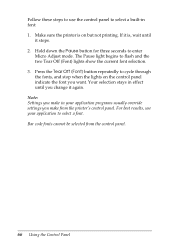
... for three seconds to flash and the two Tear Off (Font) lights show the current font selection. 3. Note: Settings you make from the control panel. 66 Using the Control Panel Bar code fonts cannot be selected from the printer's control panel. Your selection stays in font: 1. Follow these steps to use your application programs usually override...
... for three seconds to flash and the two Tear Off (Font) lights show the current font selection. 3. Note: Settings you make from the control panel. 66 Using the Control Panel Bar code fonts cannot be selected from the printer's control panel. Your selection stays in font: 1. Follow these steps to use your application programs usually override...
Reference Guide
Page 73
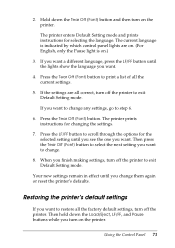
...all correct, turn on the printer. Press the Tear Off (Font) button. Press the LF/FF button to step 6. 6. Your new settings remain in effect until you see the one you turn on .) 3. Restoring the printer's default settings If you want to change any settings, go to scroll through ...the options for the selected setting until you want . 4. Then press the Tear Off (Font) button to change them again or reset the printer's defaults. If you want a different language...
...all correct, turn on the printer. Press the Tear Off (Font) button. Press the LF/FF button to step 6. 6. Your new settings remain in effect until you see the one you turn on .) 3. Restoring the printer's default settings If you want to change any settings, go to scroll through ...the options for the selected setting until you want . 4. Then press the Tear Off (Font) button to change them again or reset the printer's defaults. If you want a different language...

Reference Guide
Page 83
Check the margin or top-of the next page. Check the page length set by your printer. Cause What to do Your software may be overriding your control panel setting. Check the font setting in your application software. The font selected on the page, or the bottom part of one page is printed at the top of...
Check the margin or top-of the next page. Check the page length set by your printer. Cause What to do Your software may be overriding your control panel setting. Check the font setting in your application software. The font selected on the page, or the bottom part of one page is printed at the top of...
Reference Guide
Page 126
...71 printing, 69 Built-in fonts, 65 to 66, 113 to 114 Buttons, control panel, 63 to 66 Buzzer, 68, 72 C Canceling printing, 58 to 59 Changing default settings, 67 to 73 printer driver settings, 38 to 39 Character sets, international, 114 table, 68, 71, 114 Cleaning printer, 74 to 75 Clearing paper...settings changing, 67 to 73 restoring, 73 E Edge guides, 109 Electronic specifications, 113 to 114 Envelopes, 29 to 30, 32, 117 Environmental specifications, 115 EPSON, help, 96 to 97 EPSON Status Monitor 3, 33, 41 to 44, 59 to 61 Error lights, 77 to 78 ESC/P, 33, 122 to 124 F Feeding method, 112 Fonts...
...71 printing, 69 Built-in fonts, 65 to 66, 113 to 114 Buttons, control panel, 63 to 66 Buzzer, 68, 72 C Canceling printing, 58 to 59 Changing default settings, 67 to 73 printer driver settings, 38 to 39 Character sets, international, 114 table, 68, 71, 114 Cleaning printer, 74 to 75 Clearing paper...settings changing, 67 to 73 restoring, 73 E Edge guides, 109 Electronic specifications, 113 to 114 Envelopes, 29 to 30, 32, 117 Environmental specifications, 115 EPSON, help, 96 to 97 EPSON Status Monitor 3, 33, 41 to 44, 59 to 61 Error lights, 77 to 78 ESC/P, 33, 122 to 124 F Feeding method, 112 Fonts...
User's Guide
Page 4
3 Using the Control Panel Buttons and Lights 33 Selecting a Built-in Font 35 Changing the Printer's Default Settings 36 Using Default Setting mode 37 4 Troubleshooting Using the Error Indicators 39 Clearing a Paper Jam 41 Printing a Self Test 41 Where To Get Help 43 Purchase supplies and accessories 43 5 Product Information Safety Information 45 Hot Parts Caution Symbol 45 Important Safety Instructions 45 FCC Compliance Statement for United States Users 46 WARNING 47 For Canadian users 47 Declaration of Conformity 47 Epson America, Inc., Limited Warranty 48 4 Contents
3 Using the Control Panel Buttons and Lights 33 Selecting a Built-in Font 35 Changing the Printer's Default Settings 36 Using Default Setting mode 37 4 Troubleshooting Using the Error Indicators 39 Clearing a Paper Jam 41 Printing a Self Test 41 Where To Get Help 43 Purchase supplies and accessories 43 5 Product Information Safety Information 45 Hot Parts Caution Symbol 45 Important Safety Instructions 45 FCC Compliance Statement for United States Users 46 WARNING 47 For Canadian users 47 Declaration of Conformity 47 Epson America, Inc., Limited Warranty 48 4 Contents
User's Guide
Page 25
..., you press the Tear Off (Font) button again, the printer feeds your document, check that the Tear Off (Font) lights are flashing, the paper is in Default Setting mode. For instructions, see "Changing the Printer's Default Settings" on the Auto tear off function in Default Setting mode. Note: If the Tear Off (Font) lights are not flashing. If...
..., you press the Tear Off (Font) button again, the printer feeds your document, check that the Tear Off (Font) lights are flashing, the paper is in Default Setting mode. For instructions, see "Changing the Printer's Default Settings" on the Auto tear off function in Default Setting mode. Note: If the Tear Off (Font) lights are not flashing. If...

User's Guide
Page 26
After you set the tear-off the printed pages. 26 Paper Handling Tear off position, press the Pause button to the tear-off position: 1. Follow these limits, the printer beeps and stops moving the paper. 5. You may need to press the Tear Off (Font) button to advance the paper to exit Micro ...Adjust mode. 6. Make sure the Tear Off (Font) lights are flashing (the paper is at the current tear...
After you set the tear-off the printed pages. 26 Paper Handling Tear off position, press the Pause button to the tear-off position: 1. Follow these limits, the printer beeps and stops moving the paper. 5. You may need to press the Tear Off (Font) button to advance the paper to exit Micro ...Adjust mode. 6. Make sure the Tear Off (Font) lights are flashing (the paper is at the current tear...
User's Guide
Page 33
otherwise, the lights indicate the selected font. 2 Tear Off (Font) button ❏ Advances continuous paper to the tear-off position. ❏ Feeds continuous paper backward from the tear-off position to the top-of-form ... The buttons and lights on the control panel let you: ❏ Adjust line and form feeding ❏ Load and eject paper ❏ Select a built-in font ❏ Change the printer's default settings Buttons and Lights 1 Tear Off (Font) lights Flash when continuous paper is in...
otherwise, the lights indicate the selected font. 2 Tear Off (Font) button ❏ Advances continuous paper to the tear-off position. ❏ Feeds continuous paper backward from the tear-off position to the top-of-form ... The buttons and lights on the control panel let you: ❏ Adjust line and form feeding ❏ Load and eject paper ❏ Select a built-in font ❏ Change the printer's default settings Buttons and Lights 1 Tear Off (Font) lights Flash when continuous paper is in...
User's Guide
Page 35
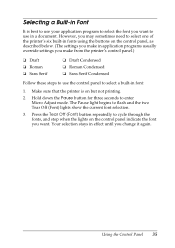
... the lights on but not printing. 2. However, you may sometimes need to select one of the printer's six built-in fonts using the buttons on the control panel, as described below. (The settings you make from the printer's control panel.) ❏ Draft ❏ Roman ❏ Sans Serif ❏ Draft Condensed ❏ Roman Condensed ❏...
... the lights on but not printing. 2. However, you may sometimes need to select one of the printer's six built-in fonts using the buttons on the control panel, as described below. (The settings you make from the printer's control panel.) ❏ Draft ❏ Roman ❏ Sans Serif ❏ Draft Condensed ❏ Roman Condensed ❏...


