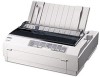

Technical Brief (Impact Printers)
Page 1
... - both in purchase price and low cost of printer: Low cost - only impact printers can handle multi-part forms and multiple paper paths that the printer are the property of printing. These printers have finer printhead pins which determines the type of printing and the number of multi-part forms that can all EPSON impact printers: Functionality M Printing technology M Control code/emulation M Paper handling M SmartPark™ settings Versatility M Flexible interfacing M Built-in...
... - both in purchase price and low cost of printer: Low cost - only impact printers can handle multi-part forms and multiple paper paths that the printer are the property of printing. These printers have finer printhead pins which determines the type of printing and the number of multi-part forms that can all EPSON impact printers: Functionality M Printing technology M Control code/emulation M Paper handling M SmartPark™ settings Versatility M Flexible interfacing M Built-in...
Technical Brief (Impact Printers)
Page 4
... Windows 98 drivers guarantees ease of use right out of -form position. When the paper is torn off, or when another document is printed, paper is a registered trademark of Seiko Epson Corporation. 1/00 Other trademarks are the property of built-in fonts Each EPSON impact printer includes a variety of their respective owners. Barcode fonts are available on the control panel. EPSON impact printers offers these types...
... Windows 98 drivers guarantees ease of use right out of -form position. When the paper is torn off, or when another document is printed, paper is a registered trademark of Seiko Epson Corporation. 1/00 Other trademarks are the property of built-in fonts Each EPSON impact printer includes a variety of their respective owners. Barcode fonts are available on the control panel. EPSON impact printers offers these types...

Technical Brief (Impact Printers)
Page 5
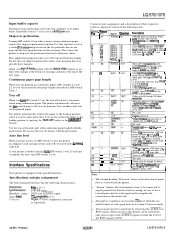
... Help: Select printer Font. Manual Front : 17 inch Manual Front : 8.5mm Print Direction : Bi-d Skip over hold : OFF Interface mode : Auto I/F interval : 10s Input Buffer : ON Auto Tear off : OFF Auto Line Feed : OFF Control Code : ESC/P 0 slash : OFF Buzzer : ON Roll Paper : OFF F1 : Execute F10: Previous F2 : Quit CR : Select item F3 : Default F4 : Change Port Printer Status Monitor Utility The Printer Status Monitor provides Windows 95/98 users with automatic error messaging for direct printer...
... Help: Select printer Font. Manual Front : 17 inch Manual Front : 8.5mm Print Direction : Bi-d Skip over hold : OFF Interface mode : Auto I/F interval : 10s Input Buffer : ON Auto Tear off : OFF Auto Line Feed : OFF Control Code : ESC/P 0 slash : OFF Buzzer : ON Roll Paper : OFF F1 : Execute F10: Previous F2 : Quit CR : Select item F3 : Default F4 : Change Port Printer Status Monitor Utility The Printer Status Monitor provides Windows 95/98 users with automatic error messaging for direct printer...
Product Information Guide
Page 3
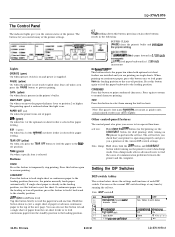
... printer. lf continuous paper is selected for draft printing) while turning on single sheets. DATA (yellow) On when data is reduced when this button down the LF/FF button (for LQ printing) or the LOAD/EJECT button (for paper feeding. You can see the current DIP-switch settings at any time by running the self test. LQ-570/1070 The Control Panel The indicator lights give you the current status of the next page. The printing...
... printer. lf continuous paper is selected for draft printing) while turning on single sheets. DATA (yellow) On when data is reduced when this button down the LF/FF button (for LQ printing) or the LOAD/EJECT button (for paper feeding. You can see the current DIP-switch settings at any time by running the self test. LQ-570/1070 The Control Panel The indicator lights give you the current status of the next page. The printing...
Product Information Guide
Page 5
... the printer. Keep DIP switch 1-7 off the printed paper. Most application programs take care of the 1st to read data. Continuous paper page length When you select from the logic ground. : Not used. The printer automatically advances the last printed page to complete the connection on Interface Specifications Your printer is double spacing, turn on continuous paper, DIP switches 2-l and 2-2 let you are using continuous paper. Do not use a twisted-pair cable for...
... the printer. Keep DIP switch 1-7 off the printed paper. Most application programs take care of the 1st to read data. Continuous paper page length When you select from the logic ground. : Not used. The printer automatically advances the last printed page to complete the connection on Interface Specifications Your printer is double spacing, turn on continuous paper, DIP switches 2-l and 2-2 let you are using continuous paper. Do not use a twisted-pair cable for...
Product Information Guide
Page 7
... printer selection menu. Related Documentation TM-LQ57APS LQ-570/1070 and ActionPrinter 5000/55OU Service Manual EL-LQ57AP5 LQ-570/1070 and AP5000/5500 Parts List 4000552COl-00 LQ-570/1070 User'sGuide Installation/Support Tips Most application programs let you specify the type of printer you can take full advantage of the printer's features. ESC A ESC K ESC L ESC Y ESC2 DEL Beeper Backspace Select printer Deselect printer Cancel data...
... printer selection menu. Related Documentation TM-LQ57APS LQ-570/1070 and ActionPrinter 5000/55OU Service Manual EL-LQ57AP5 LQ-570/1070 and AP5000/5500 Parts List 4000552COl-00 LQ-570/1070 User'sGuide Installation/Support Tips Most application programs let you specify the type of printer you can take full advantage of the printer's features. ESC A ESC K ESC L ESC Y ESC2 DEL Beeper Backspace Select printer Deselect printer Cancel data...

User Manual
Page 4
... differences in your file, notice the last number printed on the next page, or that is your file correctly but then prints too low on the first page. See Chapter 1 for paper that it normally asks you what printer you print your application program as opposed to continuous paper. For a standard 8½ x 11-inch page, try adjusting the form length setting. When you install an application...
... differences in your file, notice the last number printed on the next page, or that is your file correctly but then prints too low on the first page. See Chapter 1 for paper that it normally asks you what printer you print your application program as opposed to continuous paper. For a standard 8½ x 11-inch page, try adjusting the form length setting. When you install an application...
User Manual
Page 8
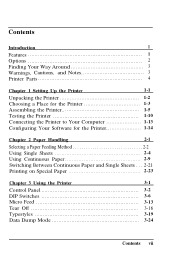
...Setting Up the Printer 1-1 Unpacking the Printer 1-2 Choosing a Place for the Printer 1-3 Assembling the Printer 1-5 Testing the Printer 1-10 Connecting the Printer to Your Computer 1-13 Configuring Your Software for the Printer 1-14 Chapter 2 Paper Handling 2-1 Selecting a Paper Feeding Method 2-2 Using Single Sheets 2-4 Using Continuous Paper 2-9 Switching Between Continuous Paper and Single Sheets . . . 2-21 Printing on Special Paper 2-23 Chapter 3 Using the Printer 3-1 Control Panel 3-2 DIP Switches 3-6 Micro Feed 3-13 Tear Off 3-16 Typestyles 3-19 Data Dump Mode...
...Setting Up the Printer 1-1 Unpacking the Printer 1-2 Choosing a Place for the Printer 1-3 Assembling the Printer 1-5 Testing the Printer 1-10 Connecting the Printer to Your Computer 1-13 Configuring Your Software for the Printer 1-14 Chapter 2 Paper Handling 2-1 Selecting a Paper Feeding Method 2-2 Using Single Sheets 2-4 Using Continuous Paper 2-9 Switching Between Continuous Paper and Single Sheets . . . 2-21 Printing on Special Paper 2-23 Chapter 3 Using the Printer 3-1 Control Panel 3-2 DIP Switches 3-6 Micro Feed 3-13 Tear Off 3-16 Typestyles 3-19 Data Dump Mode...

User Manual
Page 9
Chapter 4 Using Printer Options 4-1 Cut-Sheet Feeders 4-2 Pull Tractor 4-12 Interface Cards 4-14 Chapter 5 Maintenance and Transportation 5-1 Cleaning the Printer 5-2 Replacing the Ribbon Cartridge 5-3 Transporting the Printer 5-4 Chapter 6 Troubleshooting 6-1 Problems and Solutions 6-2 Power Supply 6-3 Printing 6-4 Paper Handling 6-8 Options 6-10 Chapter 7 Technical Specifications 7-1 Printer Specifications 7-2 Interface Specifications 7-10 Option Specifications 7-14 Initialization 7-16 Chapter 8 Command Summary 8-1 Using the Command Summary 8-2 Commands ...
Chapter 4 Using Printer Options 4-1 Cut-Sheet Feeders 4-2 Pull Tractor 4-12 Interface Cards 4-14 Chapter 5 Maintenance and Transportation 5-1 Cleaning the Printer 5-2 Replacing the Ribbon Cartridge 5-3 Transporting the Printer 5-4 Chapter 6 Troubleshooting 6-1 Problems and Solutions 6-2 Power Supply 6-3 Printing 6-4 Paper Handling 6-8 Options 6-10 Chapter 7 Technical Specifications 7-1 Printer Specifications 7-2 Interface Specifications 7-10 Option Specifications 7-14 Initialization 7-16 Chapter 8 Command Summary 8-1 Using the Command Summary 8-2 Commands ...
User Manual
Page 33
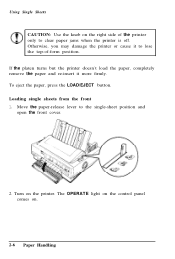
... paper-release lever to clear paper jams when the printer is off. Using Single Sheets CAUTION: Use the knob on the right side of -form position. If the platen turns but the printer doesn't load the paper, completely remove the paper and re-insert it to lose the top-of the printer only to the single-sheet position and open the front cover. 2. The OPERATE light on the control panel comes on the printer...
... paper-release lever to clear paper jams when the printer is off. Using Single Sheets CAUTION: Use the knob on the right side of -form position. If the platen turns but the printer doesn't load the paper, completely remove the paper and re-insert it to lose the top-of the printer only to the single-sheet position and open the front cover. 2. The OPERATE light on the control panel comes on the printer...
User Manual
Page 35
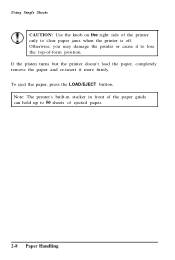
Note: The printer's built-in stacker in front of the paper guide can hold up to clear paper jams when the printer is off. Using Single Sheets CAUTION: Use the knob on the right side of the printer only to 50 sheets of ejected paper. 2-8 Paper Handling Otherwise, you may damage the printer or cause it more firmly. If the platen turns but the printer doesn't load the paper, completely remove the paper and re-insert it to lose the top-of-form position. To eject the paper, press the LOAD/EJECT button.
Note: The printer's built-in stacker in front of the paper guide can hold up to clear paper jams when the printer is off. Using Single Sheets CAUTION: Use the knob on the right side of the printer only to 50 sheets of ejected paper. 2-8 Paper Handling Otherwise, you may damage the printer or cause it more firmly. If the platen turns but the printer doesn't load the paper, completely remove the paper and re-insert it to lose the top-of-form position. To eject the paper, press the LOAD/EJECT button.
User Manual
Page 38
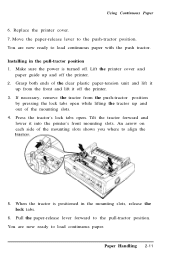
... side of the clear plastic paper-tension unit and lift it up and off . Move the paper-release lever to load continuous paper with the push tractor. If necessary, remove the tractor from the front and lift it into the printer's front mounting slots. Lift the printer cover and paper guide up from the push-tractor position by pressing the lock tabs open . Replace the printer cover...
... side of the clear plastic paper-tension unit and lift it up and off . Move the paper-release lever to load continuous paper with the push tractor. If necessary, remove the tractor from the front and lift it into the printer's front mounting slots. Lift the printer cover and paper guide up from the push-tractor position by pressing the lock tabs open . Replace the printer cover...

User Manual
Page 49
... the paper guide. 4. The printer automatically advances the continuous paper to eject it receives data. 2-22 Paper Handling Switching Between Continuous Paper and Single Sheets 5. You can now load single sheets as described in Using Single Sheets in the push tractor, follow the steps below. 1. Lift the paper guide until it stops in the paper path, press the LOAD/EJECT button to the loading position when it . 2. Slightly lift the paper guide...
... the paper guide. 4. The printer automatically advances the continuous paper to eject it receives data. 2-22 Paper Handling Switching Between Continuous Paper and Single Sheets 5. You can now load single sheets as described in Using Single Sheets in the push tractor, follow the steps below. 1. Lift the paper guide until it stops in the paper path, press the LOAD/EJECT button to the loading position when it . 2. Slightly lift the paper guide...

User Manual
Page 88
... printer cover. Note: When you are in the printer, press the TEAR OFF button to advance the continuous paper to the push tractor but is still attached to the tear-off position. 2. Press the LOAD/EJECT button. The paper is no longer in the single-sheet position. Tear off their backing and jam the printer. Switching to the cut-sheet feeder 1. This helps the printer feed the printed pages...
... printer cover. Note: When you are in the printer, press the TEAR OFF button to advance the continuous paper to the push tractor but is still attached to the tear-off position. 2. Press the LOAD/EJECT button. The paper is no longer in the single-sheet position. Tear off their backing and jam the printer. Switching to the cut-sheet feeder 1. This helps the printer feed the printed pages...

User Manual
Page 90
... place. Slide both edge guides to the pull-tractor position. 7. Slightly lift the paper guide and then lower it until it to the pull tractor as described in the paper between the push and pull tractors. 9. Pull Tractor 6. Attach the continuous paper to remove any slack in Chapter 2. 8. This helps the printer feed the printed pages properly and prevents paper jams. Using Printer Options 4-13
... place. Slide both edge guides to the pull-tractor position. 7. Slightly lift the paper guide and then lower it until it to the pull tractor as described in the paper between the push and pull tractors. 9. Pull Tractor 6. Attach the continuous paper to remove any slack in Chapter 2. 8. This helps the printer feed the printed pages properly and prevents paper jams. Using Printer Options 4-13

User Manual
Page 99
... page 6-9. See page 6-11. 6-2 Troubleshooting See page 6-5. l Continuous paper does not feed properly. Problems and Solutions This chapter describes problems you have a printer problem, find it in printed characters or graphics. See page 6-6. See page 6-10. Paper handling l Single sheets do not feed properly. If you may encounter while operating your printer and provides their likely solutions. Power supply l Power is faint or uneven. See page 6-5. Options l When using the cut-sheet feeder, the paper...
... page 6-9. See page 6-11. 6-2 Troubleshooting See page 6-5. l Continuous paper does not feed properly. Problems and Solutions This chapter describes problems you have a printer problem, find it in printed characters or graphics. See page 6-6. See page 6-10. Paper handling l Single sheets do not feed properly. If you may encounter while operating your printer and provides their likely solutions. Power supply l Power is faint or uneven. See page 6-5. Options l When using the cut-sheet feeder, the paper...
User Manual
Page 101
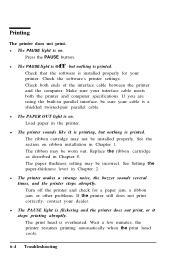
..., be installed properly. l The PAPER OUT light is printed. The ribbon cartridge may not be sure your printer. See the section on ribbon installation in the printer. See Setting the paper-thickness lever in Chapter 5. l The PAUSE light is overheated. Check the software's printer settings. Turn off but nothing is on . Replace the ribbon cartridge as described in Chapter 2. Printing The printer does not print. the printer resumes printing automatically when the print head cools. 6-4 Troubleshooting
..., be installed properly. l The PAPER OUT light is printed. The ribbon cartridge may not be sure your printer. See the section on ribbon installation in the printer. See Setting the paper-thickness lever in Chapter 5. l The PAUSE light is overheated. Check the software's printer settings. Turn off but nothing is on . Replace the ribbon cartridge as described in Chapter 2. Printing The printer does not print. the printer resumes printing automatically when the print head cools. 6-4 Troubleshooting
User Manual
Page 104
... LF/FF button before clearing the buffer. If the self test does not work, contact your paper. Printing l Regular gaps occur in the computer, the software, or the cable. l Vertical printed lines do not align. l Printing starts too low on for unidirectional printing. Use your application program's menu. Troubleshooting 6-7 Always advance the paper to reduce the page length or lines per page setting. Set DIP switch 1-8 off . l Skip-over -perforation may be set DIP switch 1-8 off...
... LF/FF button before clearing the buffer. If the self test does not work, contact your paper. Printing l Regular gaps occur in the computer, the software, or the cable. l Vertical printed lines do not align. l Printing starts too low on for unidirectional printing. Use your application program's menu. Troubleshooting 6-7 Always advance the paper to reduce the page length or lines per page setting. Set DIP switch 1-8 off . l Skip-over -perforation may be set DIP switch 1-8 off...
User Manual
Page 106
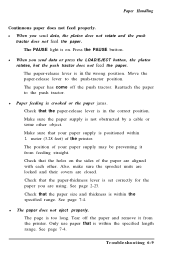
... paper. Make sure the paper supply is too long. l The paper does not eject properly. See page 7-4. Make sure that the paper-thickness lever is set correctly for the paper you send data or press the LOAD/EJECT button, the platen rotates, but the push tractor does not feed the paper. Check that the holes on . Press the PAUSE button. Paper Handling Continuous paper does not feed properly. Check that the paper size...
... paper. Make sure the paper supply is too long. l The paper does not eject properly. See page 7-4. Make sure that the paper-thickness lever is set correctly for the paper you send data or press the LOAD/EJECT button, the platen rotates, but the push tractor does not feed the paper. Check that the holes on . Press the PAUSE button. Paper Handling Continuous paper does not feed properly. Check that the paper size...
User Manual
Page 108
... interface card or cable with this chapter.) l Paper feeding is the proper size and quality. l The printer does not print or the printout is crooked. Make sure that your software. Make sure the sprocket units on . Use only new, clean sheets of the sprocket units to two pages. When using the optional pull tractor, the paper does not feed properly. (Check the section on continuous paper troubleshooting in your paper is crooked or the paper jams...
... interface card or cable with this chapter.) l Paper feeding is the proper size and quality. l The printer does not print or the printout is crooked. Make sure that your software. Make sure the sprocket units on . Use only new, clean sheets of the sprocket units to two pages. When using the optional pull tractor, the paper does not feed properly. (Check the section on continuous paper troubleshooting in your paper is crooked or the paper jams...


