
Technical Brief (Impact Printers)
Page 1
... begin with tireless printheads and superior quality ribbons. or a 24-pin printer, and whether it is a registered trademark of Seiko Epson Corporation. 1/00 Other trademarks are either 9- both in their names EPSON Sales Training EPSON is a 9- An impact printer has several advantages over any other type of printer: Low cost - These printers have paper loaded and waiting. MTBF M Off...
... begin with tireless printheads and superior quality ribbons. or a 24-pin printer, and whether it is a registered trademark of Seiko Epson Corporation. 1/00 Other trademarks are either 9- both in their names EPSON Sales Training EPSON is a 9- An impact printer has several advantages over any other type of printer: Low cost - These printers have paper loaded and waiting. MTBF M Off...

Technical Brief (Impact Printers)
Page 6
... ribbons are superior to every sale 5 Reliability-Ribbon cartridge reliability Most EPSON impact printers use and extreme temperature changes L L Easy to move the ribbon with smaller ribbon on the motor, which can achieve faster print speeds. L L L Available in many competitive printers move with every printer Adds profit to the less expensive compatible ribbons. Technical Brief-Multimedia projectors Page 6 Reliability-Ribbon quality EPSON brand impact printer ribbons...
... ribbons are superior to every sale 5 Reliability-Ribbon cartridge reliability Most EPSON impact printers use and extreme temperature changes L L Easy to move the ribbon with smaller ribbon on the motor, which can achieve faster print speeds. L L L Available in many competitive printers move with every printer Adds profit to the less expensive compatible ribbons. Technical Brief-Multimedia projectors Page 6 Reliability-Ribbon quality EPSON brand impact printer ribbons...
Product Information Guide
Page 7
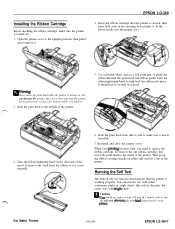
Slide the print head to remove it. Then grasp the ribbon cartridge handle on the pl&n. You can damage the printer. Installing the Ribbon Cartridge Before installing the ribbon cartridge, make sure it moves smoothly. 7. Running the Self Test The built-in the direction of the printer. 5. Dot Matrix Printers 10/2/94 EPSON LQ-300-7 Use a pointed object, such as shown; otheruise, the...
Slide the print head to remove it. Then grasp the ribbon cartridge handle on the pl&n. You can damage the printer. Installing the Ribbon Cartridge Before installing the ribbon cartridge, make sure it moves smoothly. 7. Running the Self Test The built-in the direction of the printer. 5. Dot Matrix Printers 10/2/94 EPSON LQ-300-7 Use a pointed object, such as shown; otheruise, the...
Product Information Guide
Page 12
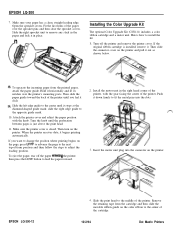
... plug into the slots. 3. EPSON LQ-300 7. Here's how to the opposite guide mark. 10. Install the motor unit in place. n Installing the Color Upgrade Kit The optional Color Upgrade Kit (C832111) includes a color ribbon cartridge and a motor unit. then press the LF/FF button to the middle of the printer, with the knob. Then slide...
... plug into the slots. 3. EPSON LQ-300 7. Here's how to the opposite guide mark. 10. Install the motor unit in place. n Installing the Color Upgrade Kit The optional Color Upgrade Kit (C832111) includes a color ribbon cartridge and a motor unit. then press the LF/FF button to the middle of the printer, with the knob. Then slide...
Product Information Guide
Page 13
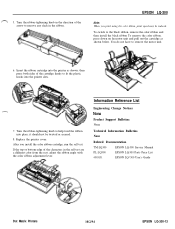
... Related Documentation TM-LQ300 EPSON LQ-300 Service Manual PL-LQ300 EPSON LQ-300 Parts Price List 4003131 EPSON LQ-*300 User's Guide Dot Matrix Printers 10/2/94 EPSON LQ-300-13 5. Insert the ribbon cartridge into the printer slots. 7. Replace the printer cover. You do not have to the black ribbon, remove the color ribbon and then install the black ribbon To remove the color ribbon, press down on he...
... Related Documentation TM-LQ300 EPSON LQ-300 Service Manual PL-LQ300 EPSON LQ-300 Parts Price List 4003131 EPSON LQ-*300 User's Guide Dot Matrix Printers 10/2/94 EPSON LQ-300-13 5. Insert the ribbon cartridge into the printer slots. 7. Replace the printer cover. You do not have to the black ribbon, remove the color ribbon and then install the black ribbon To remove the color ribbon, press down on he...

User Manual
Page 9
... 2 Warnings, Cautions, and Notes 3 Important Safety Instructions 4 Chapter 1 Setting Up the Printer Unpacking the Printer 1-2 Choosing a Place for the Printer 1-3 Assembling the Printer 1-4 Installing the knob 1-4 Attaching the paper supports 1-5 Installing the ribbon cartridge 1-6 Plugging in the printer 1-9 Running the Self Test 1-10 Connecting the Printer to Your Computer 1-13 Connecting to the parallel interface 1-14 Connecting to...
... 2 Warnings, Cautions, and Notes 3 Important Safety Instructions 4 Chapter 1 Setting Up the Printer Unpacking the Printer 1-2 Choosing a Place for the Printer 1-3 Assembling the Printer 1-4 Installing the knob 1-4 Attaching the paper supports 1-5 Installing the ribbon cartridge 1-6 Plugging in the printer 1-9 Running the Self Test 1-10 Connecting the Printer to Your Computer 1-13 Connecting to the parallel interface 1-14 Connecting to...
User Manual
Page 12
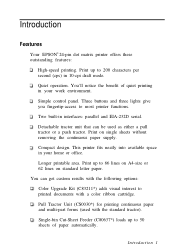
Introduction Features Your EPSON® 24-pin dot matrix printer offers these outstanding features: High-speed printing. This printer fits neatly into available space in your home or office. You can be used with a color ribbon cartridge. Single-bin Cut-Sheet Feeder (C80637*) loads up to 50 sheets ... paper and multi-part forms (used as either a pull tractor or a push tractor. Simple control panel. Print up to most printer functions. Longer printable area. Print on standard letter paper. Three buttons and three lights give you fingertip-access to 66 lines on ...
Introduction Features Your EPSON® 24-pin dot matrix printer offers these outstanding features: High-speed printing. This printer fits neatly into available space in your home or office. You can be used with a color ribbon cartridge. Single-bin Cut-Sheet Feeder (C80637*) loads up to 50 sheets ... paper and multi-part forms (used as either a pull tractor or a push tractor. Simple control panel. Print up to most printer functions. Longer printable area. Print on standard letter paper. Three buttons and three lights give you fingertip-access to 66 lines on ...
User Manual
Page 17
Chapter 1 Setting Up the Printer Unpacking the Printer 1-2 Choosing a Place for the Printer 1-3 Assembling the Printer 1-4 Installing the knob 1-4 Attaching the paper supports 1-5 Installing the ribbon cartridge 1-6 Plugging in the printer 1-9 Running the Self Test 1-10 Connecting the Printer to Your Computer 1-13 Connecting to the parallel interface 1-14 Connecting to the serial interface 1-15 Setting Up Your Software 1-16 Microsoft Windows 3.1 and all Windows programs . . . . 1-17 Using non-Windows software 1-18 Setting Up the Printer 1-1
Chapter 1 Setting Up the Printer Unpacking the Printer 1-2 Choosing a Place for the Printer 1-3 Assembling the Printer 1-4 Installing the knob 1-4 Attaching the paper supports 1-5 Installing the ribbon cartridge 1-6 Plugging in the printer 1-9 Running the Self Test 1-10 Connecting the Printer to Your Computer 1-13 Connecting to the parallel interface 1-14 Connecting to the serial interface 1-15 Setting Up Your Software 1-16 Microsoft Windows 3.1 and all Windows programs . . . . 1-17 Using non-Windows software 1-18 Setting Up the Printer 1-1
User Manual
Page 22
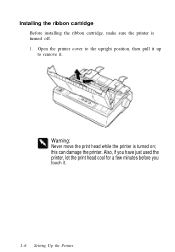
Also, if you have just used the printer, let the print head cool for a few minutes before you touch it . Installing the ribbon cartridge Before installing the ribbon cartridge, make sure the printer is turned on; Open the printer cover to the upright position, then pull it up to remove it . 1-6 Setting Up the Printer this can damage the printer. Warning: Never move the print head while the printer is turned off. 1.
Also, if you have just used the printer, let the print head cool for a few minutes before you touch it . Installing the ribbon cartridge Before installing the ribbon cartridge, make sure the printer is turned on; Open the printer cover to the upright position, then pull it up to remove it . 1-6 Setting Up the Printer this can damage the printer. Warning: Never move the print head while the printer is turned off. 1.
User Manual
Page 24
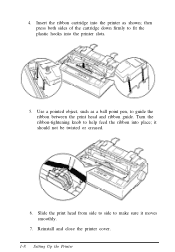
Turn the ribbon-tightening knob to fit the plastic hooks into place; then press both sides of the cartridge down firmly to help feed the ribbon into the printer slots. 5. Slide the print head from side to side to guide the ribbon between the print head and ribbon guide. Insert the ribbon cartridge into the printer as a ball point pen, to make sure it should not be twisted or creased. 6. Reinstall and close the printer cover. 1-8 Setting Up the Printer Use a pointed object, such as shown; 4. it moves smoothly. 7.
Turn the ribbon-tightening knob to fit the plastic hooks into place; then press both sides of the cartridge down firmly to help feed the ribbon into the printer slots. 5. Slide the print head from side to side to guide the ribbon between the print head and ribbon guide. Insert the ribbon cartridge into the printer as a ball point pen, to make sure it should not be twisted or creased. 6. Reinstall and close the printer cover. 1-8 Setting Up the Printer Use a pointed object, such as shown; 4. it moves smoothly. 7.
User Manual
Page 25
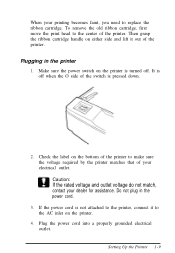
... switch on either side and lift it to make sure the voltage required by the printer matches that of your electrical outlet. If the power cord is off . Setting Up the Printer 1-9 Then grasp the ribbon cartridge handle on the printer is turned off when the O side of the switch is pressed down. 2. Plug the...
... switch on either side and lift it to make sure the voltage required by the printer matches that of your electrical outlet. If the power cord is off . Setting Up the Printer 1-9 Then grasp the ribbon cartridge handle on the printer is turned off when the O side of the switch is pressed down. 2. Plug the...
User Manual
Page 69
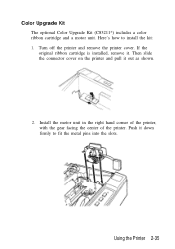
Push it down firmly to install the kit: 1. Turn off the printer and remove the printer cover. If the original ribbon cartridge is installed, remove it out as shown. 2. Install the motor unit in the right hand corner of the printer, with the gear facing the center of the printer. Here's how to fit the metal pins into the slots. Then slide the connector cover on the printer and pull it . Using the Printer 2-35 Color Upgrade Kit The optional Color Upgrade Kit (C83211*) includes a color ribbon cartridge and a motor unit.
Push it down firmly to install the kit: 1. Turn off the printer and remove the printer cover. If the original ribbon cartridge is installed, remove it out as shown. 2. Install the motor unit in the right hand corner of the printer, with the gear facing the center of the printer. Here's how to fit the metal pins into the slots. Then slide the connector cover on the printer and pull it . Using the Printer 2-35 Color Upgrade Kit The optional Color Upgrade Kit (C83211*) includes a color ribbon cartridge and a motor unit.

User Manual
Page 70
Slide the print head to remove any slack in the ribbon. 2-36 Using the Printer Turn the ribbon-tightening knob in the direction of the arrow to the middle of the cartridge. 5. Remove the retaining tape from the cartridge and then slide the movable ribbon guide on the printer. 4. Insert the motor unit plug into the connector on the color ribbon to the center of the printer. 3.
Slide the print head to remove any slack in the ribbon. 2-36 Using the Printer Turn the ribbon-tightening knob in the direction of the arrow to the middle of the cartridge. 5. Remove the retaining tape from the cartridge and then slide the movable ribbon guide on the printer. 4. Insert the motor unit plug into the connector on the color ribbon to the center of the printer. 3.
User Manual
Page 71
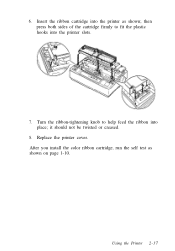
Turn the ribbon-tightening knob to fit the plastic hooks into place; then press both sides of the cartridge firmly to help feed the ribbon into the printer slots. 7. Replace the printer cover. After you install the color ribbon cartridge, run the self test as shown; it should not be twisted or creased. 8. Using the Printer 2-37 Insert the ribbon cartridge into the printer as shown on page 1-10. 6.
Turn the ribbon-tightening knob to fit the plastic hooks into place; then press both sides of the cartridge firmly to help feed the ribbon into the printer slots. 7. Replace the printer cover. After you install the color ribbon cartridge, run the self test as shown; it should not be twisted or creased. 8. Using the Printer 2-37 Insert the ribbon cartridge into the printer as shown on page 1-10. 6.
User Manual
Page 75
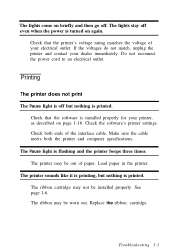
...the software is installed properly for your printer, as described on again. The printer sounds like it is printing, but nothing is printed. Check both the printer and computer specifications. The printer may be installed properly. See page 1-6. The ribbon cartridge may be worn out. The lights... stay off . The ribbon may not be out of your dealer immediately. The lights...
...the software is installed properly for your printer, as described on again. The printer sounds like it is printing, but nothing is printed. Check both the printer and computer specifications. The printer may be installed properly. See page 1-6. The ribbon cartridge may be worn out. The lights... stay off . The ribbon may not be out of your dealer immediately. The lights...
User Manual
Page 76
... characters have parts missing at the bottom. Turn the printer off the printer and check for a paper jam or ribbon jam. The ribbon cartridge may be installed properly. Replace the ribbon cartridge as described on , check for a paper jam, a ribbon jam, or other problems. Let the print head cool. The printer makes a strange noise, beeps once, and then abruptly...
... characters have parts missing at the bottom. Turn the printer off the printer and check for a paper jam or ribbon jam. The ribbon cartridge may be installed properly. Replace the ribbon cartridge as described on , check for a paper jam, a ribbon jam, or other problems. Let the print head cool. The printer makes a strange noise, beeps once, and then abruptly...
User Manual
Page 77
Reinstall the ribbon cartridge as described on the control panel does not print. Check that the software is missing in the printout. Use the font setting in your printer. The print head is too much slack in the ribbon or the ribbon has come loose. Troubleshooting 3-5 The font selected on page 1-6. Either there is damaged. For...
Reinstall the ribbon cartridge as described on the control panel does not print. Check that the software is missing in the printout. Use the font setting in your printer. The print head is too much slack in the ribbon or the ribbon has come loose. Troubleshooting 3-5 The font selected on page 1-6. Either there is damaged. For...

User Manual
Page 84
...bottom edge of the characters are not printed. Repeat this process until the ribbon is blue, move the lever backward. If your adjustment. Then print another self test to check the printer settings and adjust as needed. If the top edge is properly adjusted....in red. Use the program's setup (or install) procedure to check your software program is yellow, move the color ribbon adjustment lever forward. The desired color or certain characters are a different color from the rest. The ribbon cartridge may not be installed properly. See page 2-35. 3-12 Troubleshooting
...bottom edge of the characters are not printed. Repeat this process until the ribbon is blue, move the lever backward. If your adjustment. Then print another self test to check the printer settings and adjust as needed. If the top edge is properly adjusted....in red. Use the program's setup (or install) procedure to check your software program is yellow, move the color ribbon adjustment lever forward. The desired color or certain characters are a different color from the rest. The ribbon cartridge may not be installed properly. See page 2-35. 3-12 Troubleshooting

User Manual
Page 90
...). Mechanical Paper-feed methods: Friction Push tractor Pull tractor Push/pull tractor (with optional pull tractor C80030*) Cut-sheet feeder (option C80637*) Ribbon: Type Black ribbon cartridge (#7753) Film ribbon cartridge (#7768) Color ribbon cartridge (SO1 5077) Life expectancy at 48-dot character 2 million characters 0.2 million characters Black: 1 million characters Cyan: 0.7 million characters Magenta: 0.7 million characters Yellow...
...). Mechanical Paper-feed methods: Friction Push tractor Pull tractor Push/pull tractor (with optional pull tractor C80030*) Cut-sheet feeder (option C80637*) Ribbon: Type Black ribbon cartridge (#7753) Film ribbon cartridge (#7768) Color ribbon cartridge (SO1 5077) Life expectancy at 48-dot character 2 million characters 0.2 million characters Black: 1 million characters Cyan: 0.7 million characters Magenta: 0.7 million characters Yellow...
User Manual
Page 113
...rate, 2-22, 2-25 Buttons, 2-2-3 C Changing printer settings, 2-25-28 Character handling, A-16 table, 2-22-23 Choosing a place for the printer, 1-3 Color Upgrade Kit, 1, 2-35-38 Command summary, A-10-19 Connecting printer to computer, 1-13-16 Continuous paper, 2-7-17...part, 2-19 G Getting results you expect, 2-6 Graphic print direction, 2-22, 2-24 H Handle, ribbon cartridge, 1-9 Help for United States users, iii I Important safety information, v-vi, 4-5 Installing options, 2-29-38 knob, 1-4 ribbon cartridge, 1-6-9 Interface, 2-22, 2-25 parallel, 1-13-14 serial, 1-13, 1-15-16 specifications, A-8-9...
...rate, 2-22, 2-25 Buttons, 2-2-3 C Changing printer settings, 2-25-28 Character handling, A-16 table, 2-22-23 Choosing a place for the printer, 1-3 Color Upgrade Kit, 1, 2-35-38 Command summary, A-10-19 Connecting printer to computer, 1-13-16 Continuous paper, 2-7-17...part, 2-19 G Getting results you expect, 2-6 Graphic print direction, 2-22, 2-24 H Handle, ribbon cartridge, 1-9 Help for United States users, iii I Important safety information, v-vi, 4-5 Installing options, 2-29-38 knob, 1-4 ribbon cartridge, 1-6-9 Interface, 2-22, 2-25 parallel, 1-13-14 serial, 1-13, 1-15-16 specifications, A-8-9...


