
Technical Brief (Impact Printers)
Page 5
Start UP Utility Ver. 1.22 Copyright (C) SEIKO EPSON CORP. 1992 Printer: FX-2180 Mode: ESC/P Port: LPT1 Font : Roman Pitch : 10CPI Print Quality : LQ Character Table : PC 437 Continuous Rear : 11 inch Continuous Rear : 8.5mm Continuous Front : 7 inch Continuous Front : 8.5mm ... Rear : 14 inch Manual Rear : 8.5mm Help: Select printer Font. Simplifies setup when installing multiple printers-just make the necessary changes in the software utility, and download the settings to the Printer Status Monitor. Utility EPSON Remote! L Windows 3.51 and NT 4.0 users can add an...
Start UP Utility Ver. 1.22 Copyright (C) SEIKO EPSON CORP. 1992 Printer: FX-2180 Mode: ESC/P Port: LPT1 Font : Roman Pitch : 10CPI Print Quality : LQ Character Table : PC 437 Continuous Rear : 11 inch Continuous Rear : 8.5mm Continuous Front : 7 inch Continuous Front : 8.5mm ... Rear : 14 inch Manual Rear : 8.5mm Help: Select printer Font. Simplifies setup when installing multiple printers-just make the necessary changes in the software utility, and download the settings to the Printer Status Monitor. Utility EPSON Remote! L Windows 3.51 and NT 4.0 users can add an...
Product Information Guide
Page 7
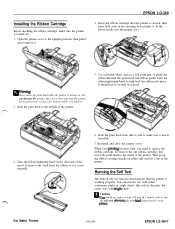
... working properly. Re-install and close the printer cover. otheruise, the print heud prints directly on either continuous paper or single sheets; To remove the old ribbon cartridge, first move the print head to the center of the arrow to fit the plastic hooks into place; Dot Matrix Printers 10/2/94 EPSON LQ-300-7 Turn the...
... working properly. Re-install and close the printer cover. otheruise, the print heud prints directly on either continuous paper or single sheets; To remove the old ribbon cartridge, first move the print head to the center of the arrow to fit the plastic hooks into place; Dot Matrix Printers 10/2/94 EPSON LQ-300-7 Turn the...
Product Information Guide
Page 8
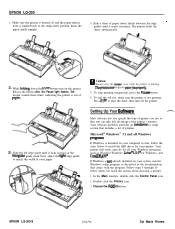
... 4 through 10 below to the single-sheet position. Your printer will work correctly for Windows, and CorelDRAW? EPSON LQ-300-8 10/2/94 Dot Matrix Printers To stop printing temporarily, press the Taupe button 6. To end the self test, make sure the printer is pushed back to install the right driver for your Windows programs, such as described...
... 4 through 10 below to the single-sheet position. Your printer will work correctly for Windows, and CorelDRAW? EPSON LQ-300-8 10/2/94 Dot Matrix Printers To stop printing temporarily, press the Taupe button 6. To end the self test, make sure the printer is pushed back to install the right driver for your Windows programs, such as described...
Product Information Guide
Page 9
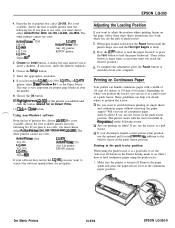
... update. Choose the Install button. Dot Matrix Printers 10/2/94 EPSON LQ-300-9 From the list of printers box, choose LQ-300. Choose the OK button. Remove the paper guide and place the paper-release lever in your computer. Make sure the printer is turned off continuous paper sheet-by-sheet? EPSON LQ-300 ,f---Y 4. ActionPrinter~ 3260 LQ-150 w-860 LQ-2550 LQ-570+ Stylus &IO...
... update. Choose the Install button. Dot Matrix Printers 10/2/94 EPSON LQ-300-9 From the list of printers box, choose LQ-300. Choose the OK button. Remove the paper guide and place the paper-release lever in your computer. Make sure the printer is turned off continuous paper sheet-by-sheet? EPSON LQ-300 ,f---Y 4. ActionPrinter~ 3260 LQ-150 w-860 LQ-2550 LQ-570+ Stylus &IO...
Product Information Guide
Page 11
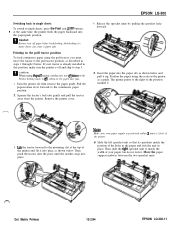
...your paper supply is off and skip to step 5. Then slide the ri&t sprocket unit to match the width of your tractor is already installed in the pull tractor position To load continuous paper using the pull tractor, you must move the tractor to the pull tractor position; ca... the paper may jam. 1. Squeeze the tractor's lock tabs gently and pull the tractor away from the printer. Release the sprocket units by pulling the sprocket locks forward. 5. Dot Matrix Printers 10/2/94 EPSON LQ-300-11 back-feeding too many sheets can cause a paper jam. then remove the paper guide. Insert the ...
...your paper supply is off and skip to step 5. Then slide the ri&t sprocket unit to match the width of your tractor is already installed in the pull tractor position To load continuous paper using the pull tractor, you must move the tractor to the pull tractor position; ca... the paper may jam. 1. Squeeze the tractor's lock tabs gently and pull the tractor away from the printer. Release the sprocket units by pulling the sprocket locks forward. 5. Dot Matrix Printers 10/2/94 EPSON LQ-300-11 back-feeding too many sheets can cause a paper jam. then remove the paper guide. Insert the ...
Product Information Guide
Page 12
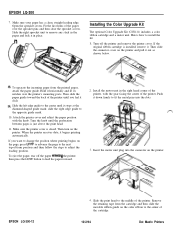
...Color Upgrade Kit The optional Color Upgrade Kit (C832111) includes a color ribbon cartridge and a motor unit. Make sure the printer cover is installed, remove it. then press the LF/FF button to the center until the perforation between pages is just above the print ... Then slide the paper guide toward the back of the cartridge. 10/2/94 Dot Matrix Printers If the original ribbon cartridge is closed. Open the sprocket covers. EPSON LQ-300 7. EPSON LQ-300-12 4. Fit the first holes of the printer. Make sure your paper has a clean, straight leading edge. Then turn on the...
...Color Upgrade Kit The optional Color Upgrade Kit (C832111) includes a color ribbon cartridge and a motor unit. Make sure the printer cover is installed, remove it. then press the LF/FF button to the center until the perforation between pages is just above the print ... Then slide the paper guide toward the back of the cartridge. 10/2/94 Dot Matrix Printers If the original ribbon cartridge is closed. Open the sprocket covers. EPSON LQ-300 7. EPSON LQ-300-12 4. Fit the first holes of the printer. Make sure your paper has a clean, straight leading edge. Then turn on the...
Product Information Guide
Page 13
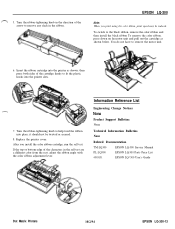
... You do not have to help feed the ribbon into the printer slots. 7. then press both sides of the arrow to fit the plastic hooks into place; 5. EPSON LQ-300 Note: When you install the color ribbon cartridge, run the self test. Turn the ribbon... Notices NCWS Product Support Bulletins None Technical Information Bulletins None Related Documentation TM-LQ300 EPSON LQ-300 Service Manual PL-LQ300 EPSON LQ-300 Parts Price List 4003131 EPSON LQ-*300 User's Guide Dot Matrix Printers 10/2/94 EPSON LQ-300-13 Turn the ribbon-tightening knob to remove the motor unit. 6.
... You do not have to help feed the ribbon into the printer slots. 7. then press both sides of the arrow to fit the plastic hooks into place; 5. EPSON LQ-300 Note: When you install the color ribbon cartridge, run the self test. Turn the ribbon... Notices NCWS Product Support Bulletins None Technical Information Bulletins None Related Documentation TM-LQ300 EPSON LQ-300 Service Manual PL-LQ300 EPSON LQ-300 Parts Price List 4003131 EPSON LQ-*300 User's Guide Dot Matrix Printers 10/2/94 EPSON LQ-300-13 Turn the ribbon-tightening knob to remove the motor unit. 6.

User Manual
Page 4
If this equipment does cause interference to radio and television reception, which can radiate radio frequency energy and, if not installed and used in a particular installation. FCC Compliance Statement For United States Users This equipment has been tested and found to comply with the limits for a...connected to correct the interference by turning the equipment off and on a circuit different from digital apparatus as set out in a residential installation. It is encouraged to try to unused interfaces. For Canadian Users This digital apparatus does not exceed the Class B limits for ...
If this equipment does cause interference to radio and television reception, which can radiate radio frequency energy and, if not installed and used in a particular installation. FCC Compliance Statement For United States Users This equipment has been tested and found to comply with the limits for a...connected to correct the interference by turning the equipment off and on a circuit different from digital apparatus as set out in a residential installation. It is encouraged to try to unused interfaces. For Canadian Users This digital apparatus does not exceed the Class B limits for ...
User Manual
Page 5
... publication To take advantage of this offer, call (614) 529-1611 or your nearest Authorized EPSON Reseller or Service Center Technical assistance with the installation, configuration, and operation of EPSON products Sales of the ESC/P® Reference Manual Epson technical information library fax service Product literature withtechnical specifications on CompuServe. In other countries, call...
... publication To take advantage of this offer, call (614) 529-1611 or your nearest Authorized EPSON Reseller or Service Center Technical assistance with the installation, configuration, and operation of EPSON products Sales of the ESC/P® Reference Manual Epson technical information library fax service Product literature withtechnical specifications on CompuServe. In other countries, call...

User Manual
Page 9
... 2 Warnings, Cautions, and Notes 3 Important Safety Instructions 4 Chapter 1 Setting Up the Printer Unpacking the Printer 1-2 Choosing a Place for the Printer 1-3 Assembling the Printer 1-4 Installing the knob 1-4 Attaching the paper supports 1-5 Installing the ribbon cartridge 1-6 Plugging in the printer 1-9 Running the Self Test 1-10 Connecting the Printer to Your Computer 1-13 Connecting to the parallel interface 1-14 Connecting to...
... 2 Warnings, Cautions, and Notes 3 Important Safety Instructions 4 Chapter 1 Setting Up the Printer Unpacking the Printer 1-2 Choosing a Place for the Printer 1-3 Assembling the Printer 1-4 Installing the knob 1-4 Attaching the paper supports 1-5 Installing the ribbon cartridge 1-6 Plugging in the printer 1-9 Running the Self Test 1-10 Connecting the Printer to Your Computer 1-13 Connecting to the parallel interface 1-14 Connecting to...
User Manual
Page 10
... on Special Paper 2-17 Adjusting the paper-thickness lever 2-17 Multi-part forms 2-19 Labels 2-20 Envelopes 2-21 Using the Printer Setting Mode 2-22 Printer setting descriptions 2-23 Changing the printer settings 2-25 Installing and Using Options 2-29 Single-bin Cut-Sheet Feeder 2-29 Pull Tractor Unit 2-33 Color Upgrade Kit 2-35 Chapter 3 Troubleshooting...
... on Special Paper 2-17 Adjusting the paper-thickness lever 2-17 Multi-part forms 2-19 Labels 2-20 Envelopes 2-21 Using the Printer Setting Mode 2-22 Printer setting descriptions 2-23 Changing the printer settings 2-25 Installing and Using Options 2-29 Single-bin Cut-Sheet Feeder 2-29 Pull Tractor Unit 2-33 Color Upgrade Kit 2-35 Chapter 3 Troubleshooting...
User Manual
Page 11
With the color upgrade installed, the printer does not operate properly 3-11 Appendix Printer Specifications Printing Paper Mechanical Electrical Environmental Safety approvals Interface Specifications Parallel interface Serial interface Command Summary Sending printer commands Using the command summary General operation Paper feeding Page format Print position motion Font selection Font enhancement Spacing Character handling Bit image...
With the color upgrade installed, the printer does not operate properly 3-11 Appendix Printer Specifications Printing Paper Mechanical Electrical Environmental Safety approvals Interface Specifications Parallel interface Serial interface Command Summary Sending printer commands Using the command summary General operation Paper feeding Page format Print position motion Font selection Font enhancement Spacing Character handling Bit image...
User Manual
Page 13
... Energy Star emblem does not represent EPA endorsement of any product or service. Chapter 1 describes how to install options. Be sure to your printer. Chapter 3 offers simple tips on how to get the printing results you expect or the printer does not work properly, turn here for setting up , test, and connect the...
... Energy Star emblem does not represent EPA endorsement of any product or service. Chapter 1 describes how to install options. Be sure to your printer. Chapter 3 offers simple tips on how to get the printing results you expect or the printer does not work properly, turn here for setting up , test, and connect the...

User Manual
Page 15
... a third (grounding) pin, which fits only into the outlet, have an electrician replace your printer. Follow all of the grounding-type plug. This is provided. Never place the printer near water or spill any slots or openings in installation unless proper ventilation is a safety feature. Do not use a damp cloth for the ventilation...
... a third (grounding) pin, which fits only into the outlet, have an electrician replace your printer. Follow all of the grounding-type plug. This is provided. Never place the printer near water or spill any slots or openings in installation unless proper ventilation is a safety feature. Do not use a damp cloth for the ventilation...
User Manual
Page 17
Chapter 1 Setting Up the Printer Unpacking the Printer 1-2 Choosing a Place for the Printer 1-3 Assembling the Printer 1-4 Installing the knob 1-4 Attaching the paper supports 1-5 Installing the ribbon cartridge 1-6 Plugging in the printer 1-9 Running the Self Test 1-10 Connecting the Printer to Your Computer 1-13 Connecting to the parallel interface 1-14 Connecting to the serial interface 1-15 Setting Up Your Software 1-16 Microsoft Windows 3.1 and all Windows programs . . . . 1-17 Using non-Windows software 1-18 Setting Up the Printer 1-1
Chapter 1 Setting Up the Printer Unpacking the Printer 1-2 Choosing a Place for the Printer 1-3 Assembling the Printer 1-4 Installing the knob 1-4 Attaching the paper supports 1-5 Installing the ribbon cartridge 1-6 Plugging in the printer 1-9 Running the Self Test 1-10 Connecting the Printer to Your Computer 1-13 Connecting to the parallel interface 1-14 Connecting to the serial interface 1-15 Setting Up Your Software 1-16 Microsoft Windows 3.1 and all Windows programs . . . . 1-17 Using non-Windows software 1-18 Setting Up the Printer 1-1
User Manual
Page 20
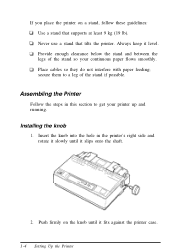
... these guidelines: Use a stand that tilts the printer. Assembling the Printer Follow the steps in the printer's right side and rotate it slowly until it fits against the printer case. 1-4 Setting Up the Printer Always keep it level. If you place the printer on the knob until it slips onto the shaft.... 2. Never use a stand that supports at least 9 kg (19 lb). Provide enough clearance below the stand and between the legs of the stand if possible. Installing...
... these guidelines: Use a stand that tilts the printer. Assembling the Printer Follow the steps in the printer's right side and rotate it slowly until it fits against the printer case. 1-4 Setting Up the Printer Always keep it level. If you place the printer on the knob until it slips onto the shaft.... 2. Never use a stand that supports at least 9 kg (19 lb). Provide enough clearance below the stand and between the legs of the stand if possible. Installing...
User Manual
Page 22
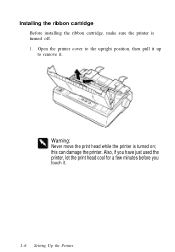
Warning: Never move the print head while the printer is turned off. 1. this can damage the printer. Also, if you have just used the printer, let the print head cool for a few minutes before you touch it . Open the printer cover to the upright position, then pull it up to remove it . 1-6 Setting Up the Printer Installing the ribbon cartridge Before installing the ribbon cartridge, make sure the printer is turned on;
Warning: Never move the print head while the printer is turned off. 1. this can damage the printer. Also, if you have just used the printer, let the print head cool for a few minutes before you touch it . Open the printer cover to the upright position, then pull it up to remove it . 1-6 Setting Up the Printer Installing the ribbon cartridge Before installing the ribbon cartridge, make sure the printer is turned on;
User Manual
Page 23
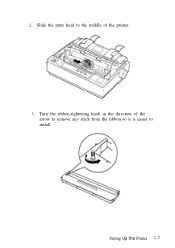
2. Setting Up the Printer 1-7 Slide the print head to install. Turn the ribbon-tightening knob in the direction of the arrow to remove any slack from the ribbon so it is easier to the middle of the printer. 3.
2. Setting Up the Printer 1-7 Slide the print head to install. Turn the ribbon-tightening knob in the direction of the arrow to remove any slack from the ribbon so it is easier to the middle of the printer. 3.
User Manual
Page 32
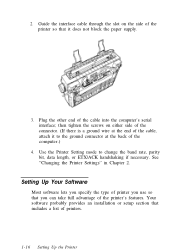
... to change the baud rate, parity bit, data length, or ETX/ACK handshaking if necessary. Plug the other end of printers. 1-16 Setting Up the Printer See "Changing the Printer Settings" in Chapter 2. then tighten the screws on the side of the cable, attach it does not block the paper... cable through the slot on either side of the connector. (If there is a ground wire at the back of the printer's features. Your software probably provides an installation or setup section that you can take full advantage of the computer.) 4. Setting Up Your Software Most software lets you specify...
... to change the baud rate, parity bit, data length, or ETX/ACK handshaking if necessary. Plug the other end of printers. 1-16 Setting Up the Printer See "Changing the Printer Settings" in Chapter 2. then tighten the screws on the side of the cable, attach it does not block the paper... cable through the slot on either side of the connector. (If there is a ground wire at the back of the printer's features. Your software probably provides an installation or setup section that you can take full advantage of the computer.) 4. Setting Up Your Software Most software lets you specify...
User Manual
Page 33
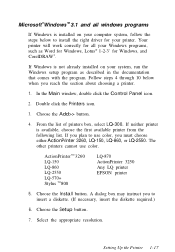
... list of printers box, select LQ-300. The other printers cannot use color, you reach the section about choosing a printer. 1. If you plan to use color. Follow steps 4 through 10 below to insert a diskette. (If necessary, insert the diskette required.) 6. ActionPrinterTM 3260 LQ-150 LQ-860 LQ-2550 LQ-570+ Stylus TM 800 LQ-870 ActionPrinter 3250 Any LQ printer EPSON printer 5. Select the...
... list of printers box, select LQ-300. The other printers cannot use color, you reach the section about choosing a printer. 1. If you plan to use color. Follow steps 4 through 10 below to insert a diskette. (If necessary, insert the diskette required.) 6. ActionPrinterTM 3260 LQ-150 LQ-860 LQ-2550 LQ-570+ Stylus TM 800 LQ-870 ActionPrinter 3250 Any LQ printer EPSON printer 5. Select the...


