Technical Brief (Impact Printers)
Page 4
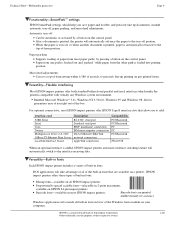
... slots that are the property of their respective owners. Versatility-Built-in 2-point increments, available on EPSON 24-pin impact printers Barcode fonts-available on the control panel. Bundled Microsoft Windows® 3.1x, Windows NT 3.51/4.0, Windows 95 and Windows 98 drivers guarantees ease of use right out of -form position. After a document is loaded into printing position...
... slots that are the property of their respective owners. Versatility-Built-in 2-point increments, available on EPSON 24-pin impact printers Barcode fonts-available on the control panel. Bundled Microsoft Windows® 3.1x, Windows NT 3.51/4.0, Windows 95 and Windows 98 drivers guarantees ease of use right out of -form position. After a document is loaded into printing position...

User Manual
Page 2
... install the correct driver for printer driver installation instructions. Insert the floppy disk containing the driver into your printer's name in your User's Guide with the new information below . for Microsoft windows use/s If Microsoft Windows is open. 2. The printer driver installs automatically. 6. Type A: SETUP (or B: SETUP); Click OK. then click Run. 4. Copyright © 1996 by Seiko Epson Corporation, Nogano...
... install the correct driver for printer driver installation instructions. Insert the floppy disk containing the driver into your printer's name in your User's Guide with the new information below . for Microsoft windows use/s If Microsoft Windows is open. 2. The printer driver installs automatically. 6. Type A: SETUP (or B: SETUP); Click OK. then click Run. 4. Copyright © 1996 by Seiko Epson Corporation, Nogano...
User Manual
Page 3
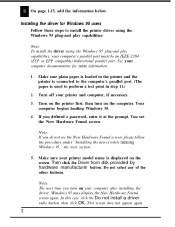
...manufacturer button. Note: The next time you turn on your printer model name is used to install the printer driver using the Windows 95 plug-and play capabilities: Note: To install the driver using the Windows 95 plug-and play capabilities, your printer and computer, if necessary. 3. In this case, click ...after installing the driver, Windows 95 may display the New Hardware Found screen again. On page 1-15, add the information below. If you do not see the New Hardware Found screen. then click OK. Make sure plain paper is loaded in the printer and the printer is connected to...
...manufacturer button. Note: The next time you turn on your printer model name is used to install the printer driver using the Windows 95 plug-and play capabilities: Note: To install the driver using the Windows 95 plug-and play capabilities, your printer and computer, if necessary. 3. In this case, click ...after installing the driver, Windows 95 may display the New Hardware Found screen again. On page 1-15, add the information below. If you do not see the New Hardware Found screen. then click OK. Make sure plain paper is loaded in the printer and the printer is connected to...

User Manual
Page 4
.... If you assign. In the next screen, select YES to the Printers folder using the printer name you inserted the disk in the Copy manufacturer's files from box and click OK. 9. Insert the Windows printer driver disk in the test page confirmation dialog if the page printed correctly. ...To access the driver, see the Install From Disk screen. 7. 6. Choose Yes in a disk drive....
.... If you assign. In the next screen, select YES to the Printers folder using the printer name you inserted the disk in the Copy manufacturer's files from box and click OK. 9. Insert the Windows printer driver disk in the test page confirmation dialog if the page printed correctly. ...To access the driver, see the Install From Disk screen. 7. 6. Choose Yes in a disk drive....
User Manual
Page 5
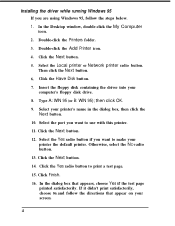
...Click Finish. 16. In the dialog box that appear on your printer the default printer. In the Desktop window, double-click the My Computer icon. 2. Double-click the Printers folder. 3. Insert the floppy disk containing the driver into your printer's name in the dialog box, then click the Next button. 10... follow the steps below. 1. Otherwise, select the NO radio button. 13. Click the Next button. 5. Select the Local printer or Network printer radio button. then click OK. 9. Click the Next button. 14. Installing the driver while running Windows 95 If you want to make your screen. 4
...Click Finish. 16. In the dialog box that appear on your printer the default printer. In the Desktop window, double-click the My Computer icon. 2. Double-click the Printers folder. 3. Insert the floppy disk containing the driver into your printer's name in the dialog box, then click the Next button. 10... follow the steps below. 1. Otherwise, select the NO radio button. 13. Click the Next button. 5. Select the Local printer or Network printer radio button. then click OK. 9. Click the Next button. 14. Installing the driver while running Windows 95 If you want to make your screen. 4

User Manual
Page 6
...Select Settings; On page 1-16, add the information below. If you select. 7. Select the paper size you are using Windows 3.1, refer to the information in the printer from the Paper size list on the screen changes according to select the appropriate settings. 1. Select the paper source. 8.... Make any other settings you wish, and click OK when you have loaded in your User's Guide. Checking the printer driver settings If you select. 6. Choose Properties. 5. Select Portrait or Landscape orientation. The diagram on the Paper menu. Right-click on your ...
...Select Settings; On page 1-16, add the information below. If you select. 7. Select the paper size you are using Windows 3.1, refer to the information in the printer from the Paper size list on the screen changes according to select the appropriate settings. 1. Select the paper source. 8.... Make any other settings you wish, and click OK when you have loaded in your User's Guide. Checking the printer driver settings If you select. 6. Choose Properties. 5. Select Portrait or Landscape orientation. The diagram on the Paper menu. Right-click on your ...
User Manual
Page 7
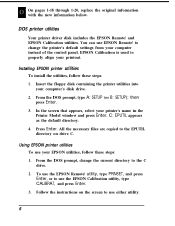
...DOS printer utilities Your printer driver disk includes the EPSON Remote! You can use your EPSON utilities, follow these steps: 1. then press Enter. 3. In the screen that appears, select your printout. Using EPSON printer utilities To use EPSON Remote! From the DOS prompt, change the printer's default... on the screen to properly align your printer's name in the Printer Model window and press Enter. Press Enter. Follow the instructions on drive C. To use the EPSON Remote! EPSON Calibration is used to use the EPSON Calibration utility, type CALIBRAT, and press Enter...
...DOS printer utilities Your printer driver disk includes the EPSON Remote! You can use your EPSON utilities, follow these steps: 1. then press Enter. 3. In the screen that appears, select your printout. Using EPSON printer utilities To use EPSON Remote! From the DOS prompt, change the printer's default... on the screen to properly align your printer's name in the Printer Model window and press Enter. Press Enter. Follow the instructions on drive C. To use the EPSON Remote! EPSON Calibration is used to use the EPSON Calibration utility, type CALIBRAT, and press Enter...
User Manual
Page 17
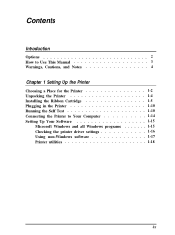
Contents Introduction Options 2 How to Use This Manual 3 Warnings, Cautions, and Notes 4 Chapter 1 Setting Up the Printer Choosing a Place for the Printer 1-2 Unpacking the Printer 1-4 Installing the Ribbon Cartridge 1-5 Plugging in the Printer 1-10 Running the Self Test 1-10 Connecting the Printer to Your Computer 1-14 Setting Up Your Software 1-15 Microsoft Windows and all Windows programs 1-15 Checking the printer driver settings 1-16 Using non-Windows software 1-17 Printer utilities 1-18 ix
Contents Introduction Options 2 How to Use This Manual 3 Warnings, Cautions, and Notes 4 Chapter 1 Setting Up the Printer Choosing a Place for the Printer 1-2 Unpacking the Printer 1-4 Installing the Ribbon Cartridge 1-5 Plugging in the Printer 1-10 Running the Self Test 1-10 Connecting the Printer to Your Computer 1-14 Setting Up Your Software 1-15 Microsoft Windows and all Windows programs 1-15 Checking the printer driver settings 1-16 Using non-Windows software 1-17 Printer utilities 1-18 ix

User Manual
Page 26
Chapter 1 Setting Up the Printer Choosing a Place for the Printer 1-2 Unpacking the Printer 1-4 Installing the Ribbon Cartridge 1-5 Plugging in the Printer 1-10 Running the Self Test 1-10 Connecting the Printer to Your Computer 1-14 Setting Up Your Software 1-15 Microsoft Windows and all Windows programs 1-15 Checking the printer driver settings 1-16 Using non-Windows software 1-17 Printer utilities 1-18 Setting Up the Printer 1-1
Chapter 1 Setting Up the Printer Choosing a Place for the Printer 1-2 Unpacking the Printer 1-4 Installing the Ribbon Cartridge 1-5 Plugging in the Printer 1-10 Running the Self Test 1-10 Connecting the Printer to Your Computer 1-14 Setting Up Your Software 1-15 Microsoft Windows and all Windows programs 1-15 Checking the printer driver settings 1-16 Using non-Windows software 1-17 Printer utilities 1-18 Setting Up the Printer 1-1

User Manual
Page 40
... that comes with the program. Insert the EPSON driver disk into your printer. Select LQ-2170 as described in the documentation that the Main window is open. 2. Setting Up the Printer 1-15 Microsoft Windows and all your Windows programs, such as Word for Windows, Lotus® 1-2-3" for your computer's diskette drive slot. 3. The printer driver installs automatically. 6. Then follow the steps below...
... that comes with the program. Insert the EPSON driver disk into your printer. Select LQ-2170 as described in the documentation that the Main window is open. 2. Setting Up the Printer 1-15 Microsoft Windows and all your Windows programs, such as Word for Windows, Lotus® 1-2-3" for your computer's diskette drive slot. 3. The printer driver installs automatically. 6. Then follow the steps below...
User Manual
Page 41
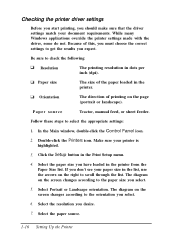
... to scroll through the list. Follow these steps to the paper size you should make sure that the driver settings match your printer is highlighted. 3. In the Main window, double-click the Control Panel icon. 2. Make sure your document requirements. Click the Setup button in ... Setup menu. 4. Select the resolution you expect. Double-click the Printers icon. While many Windows applications override the printer settings made with the driver, some do not. Select the paper source. 1-16 Setting Up the Printer Paper source Tractor, manual feed, or sheet feeder. Paper size The...
... to scroll through the list. Follow these steps to the paper size you should make sure that the driver settings match your printer is highlighted. 3. In the Main window, double-click the Control Panel icon. 2. Make sure your document requirements. Click the Setup button in ... Setup menu. 4. Select the resolution you expect. Double-click the Printers icon. While many Windows applications override the printer settings made with the driver, some do not. Select the paper source. 1-16 Setting Up the Printer Paper source Tractor, manual feed, or sheet feeder. Paper size The...

User Manual
Page 42
... printer driver. Windows software Most DOS software programs include drivers for instructions on selecting the driver. 8. You can control dithering by clicking the arrow to see if there is not available, select the first printer driver available in the list, contact your printer driver is an update. Using non- LQ-870/1170 LQ-850+/ 1050+ LQ-85011050 LQ-510/550/1010 LQ-200 LQ-500 LQ...
... printer driver. Windows software Most DOS software programs include drivers for instructions on selecting the driver. 8. You can control dithering by clicking the arrow to see if there is not available, select the first printer driver available in the list, contact your printer driver is an update. Using non- LQ-870/1170 LQ-850+/ 1050+ LQ-85011050 LQ-510/550/1010 LQ-200 LQ-500 LQ...

User Manual
Page 164
..., 2-29 Power cord, 1-4 plugging in, 1-10 Power supply problems, 6-2-3, Print head warning, 2-11 Print quality problems, 6-4-7 Printer drivers DOS software, 1-17-18 installing, 1-15 settings, 1-15-16 Printer functions table, 3-8-9 Printer stand, 1-3 Printer utilites, 1-18-20 Problem solving, 6-1-11 Protective materials, saving, 1-4 Pull tractor, 2-3, 2-8, 2-19-21, 4-8 Push tractor,...27 postcards, 2-29 removing from top, 2-3-5 Skip-over-perforation, 3-11 Software DOS, 1-17-18 setting up, 1-15-16 Windows, 1-15-16 Special paper, 2-25-29 Specifications, A-1-39 Index IN-3 P Paper, continuous.
..., 2-29 Power cord, 1-4 plugging in, 1-10 Power supply problems, 6-2-3, Print head warning, 2-11 Print quality problems, 6-4-7 Printer drivers DOS software, 1-17-18 installing, 1-15 settings, 1-15-16 Printer functions table, 3-8-9 Printer stand, 1-3 Printer utilites, 1-18-20 Problem solving, 6-1-11 Protective materials, saving, 1-4 Pull tractor, 2-3, 2-8, 2-19-21, 4-8 Push tractor,...27 postcards, 2-29 removing from top, 2-3-5 Skip-over-perforation, 3-11 Software DOS, 1-17-18 setting up, 1-15-16 Windows, 1-15-16 Special paper, 2-25-29 Specifications, A-1-39 Index IN-3 P Paper, continuous.

User Manual
Page 165
T Tear Off/Bin button, 3-5 light, 3-2 Tear off feature, 3-16-17 auto tear off, 3-16-17 Testing the printer, 1-10-13 Tractor positions changing, 2-9-11 front push, 2-3, 2-8, 2-12-15 pull, 2-3, 2-8, 2-19-21, 4-8 push/pull, 2-8, 2-22-23, 4-8-9 rear push, 2-3, 2-8, 2-15-18 selecting, 2-8-9 Transporting the printer, 5-4 Troubleshooting, 6-2-12 Unidirectional printing, 3-10 Unpacking the printer, 1-4 Utilities EPSON Calibration, 1-20 EPSON Remote!, 1-18 V Voltage, caution, 1-4, 1-10 W Weight, A-9 Windows, 1-1 1-15-16 installing printer driver, 1-15 IN-4 Index
T Tear Off/Bin button, 3-5 light, 3-2 Tear off feature, 3-16-17 auto tear off, 3-16-17 Testing the printer, 1-10-13 Tractor positions changing, 2-9-11 front push, 2-3, 2-8, 2-12-15 pull, 2-3, 2-8, 2-19-21, 4-8 push/pull, 2-8, 2-22-23, 4-8-9 rear push, 2-3, 2-8, 2-15-18 selecting, 2-8-9 Transporting the printer, 5-4 Troubleshooting, 6-2-12 Unidirectional printing, 3-10 Unpacking the printer, 1-4 Utilities EPSON Calibration, 1-20 EPSON Remote!, 1-18 V Voltage, caution, 1-4, 1-10 W Weight, A-9 Windows, 1-1 1-15-16 installing printer driver, 1-15 IN-4 Index


