
Technical Brief (Impact Printers)
Page 5
..., and download the settings to the user. Start UP Utility Ver. 1.22 Copyright (C) SEIKO EPSON CORP. 1992 Printer: FX-2180 Mode: ESC/P Port: LPT1 Font : Roman Pitch : 10CPI Print Quality : LQ Character Table : PC 437 Continuous Rear : 11 inch Continuous Rear : 8.5mm Continuous Front :...10s Input Buffer : ON Auto Tear off : OFF Auto Line Feed : OFF Control Code : ESC/P 0 slash : OFF Buzzer : ON Roll Paper : OFF F1 : Execute F10: Previous F2 : Quit CR : Select item F3 : Default F4 : Change Port Printer Status Monitor Utility The Printer Status Monitor provides Windows...
..., and download the settings to the user. Start UP Utility Ver. 1.22 Copyright (C) SEIKO EPSON CORP. 1992 Printer: FX-2180 Mode: ESC/P Port: LPT1 Font : Roman Pitch : 10CPI Print Quality : LQ Character Table : PC 437 Continuous Rear : 11 inch Continuous Rear : 8.5mm Continuous Front :...10s Input Buffer : ON Auto Tear off : OFF Auto Line Feed : OFF Control Code : ESC/P 0 slash : OFF Buzzer : ON Roll Paper : OFF F1 : Execute F10: Previous F2 : Quit CR : Select item F3 : Default F4 : Change Port Printer Status Monitor Utility The Printer Status Monitor provides Windows...

User Manual
Page 4
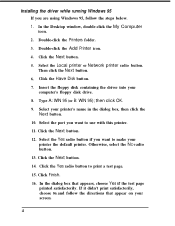
... test page confirmation dialog if the page printed correctly. We recommend that you can type a unique name for Windows 95 applications, select Yes. (No is the default setting.) 10. You see "Checking the printer driver settings," page 5 of this supplement. 3 The program will copy the files to your hard disk and...'s files from box and click OK. 9. If it did not print correctly, choose NO and follow the directions on the screen. 6. Insert the Windows printer driver disk in drive A, click OK. Click the Next button. 11. At the next screen you keep the model name as the default...
... test page confirmation dialog if the page printed correctly. We recommend that you can type a unique name for Windows 95 applications, select Yes. (No is the default setting.) 10. You see "Checking the printer driver settings," page 5 of this supplement. 3 The program will copy the files to your hard disk and...'s files from box and click OK. 9. If it did not print correctly, choose NO and follow the directions on the screen. 6. Insert the Windows printer driver disk in drive A, click OK. Click the Next button. 11. At the next screen you keep the model name as the default...
User Manual
Page 5
.... 10. Then click the Next button. 6. Click the Next button. 12. Click Finish. 16. Select the Yes radio button if you want to use with this printer. 11. Select the Local printer or Network printer radio button. Otherwise, select the NO radio button. 13. In the Desktop window,...you want to print a test page. 15. Double-click the Add Printer icon. 4. Insert the floppy disk containing the driver into your printer the default printer. Installing the driver while running Windows 95 If you are using Windows 95, follow the directions that appears, choose Yes if the test page ...
.... 10. Then click the Next button. 6. Click the Next button. 12. Click Finish. 16. Select the Yes radio button if you want to use with this printer. 11. Select the Local printer or Network printer radio button. Otherwise, select the NO radio button. 13. In the Desktop window,...you want to print a test page. 15. Double-click the Add Printer icon. 4. Insert the floppy disk containing the driver into your printer the default printer. Installing the driver while running Windows 95 If you are using Windows 95, follow the directions that appears, choose Yes if the test page ...
User Manual
Page 17
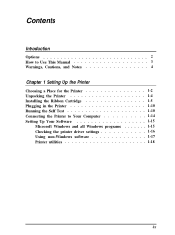
Contents Introduction Options 2 How to Use This Manual 3 Warnings, Cautions, and Notes 4 Chapter 1 Setting Up the Printer Choosing a Place for the Printer 1-2 Unpacking the Printer 1-4 Installing the Ribbon Cartridge 1-5 Plugging in the Printer 1-10 Running the Self Test 1-10 Connecting the Printer to Your Computer 1-14 Setting Up Your Software 1-15 Microsoft Windows and all Windows programs 1-15 Checking the printer driver settings 1-16 Using non-Windows software 1-17 Printer utilities 1-18 ix
Contents Introduction Options 2 How to Use This Manual 3 Warnings, Cautions, and Notes 4 Chapter 1 Setting Up the Printer Choosing a Place for the Printer 1-2 Unpacking the Printer 1-4 Installing the Ribbon Cartridge 1-5 Plugging in the Printer 1-10 Running the Self Test 1-10 Connecting the Printer to Your Computer 1-14 Setting Up Your Software 1-15 Microsoft Windows and all Windows programs 1-15 Checking the printer driver settings 1-16 Using non-Windows software 1-17 Printer utilities 1-18 ix

User Manual
Page 26
Chapter 1 Setting Up the Printer Choosing a Place for the Printer 1-2 Unpacking the Printer 1-4 Installing the Ribbon Cartridge 1-5 Plugging in the Printer 1-10 Running the Self Test 1-10 Connecting the Printer to Your Computer 1-14 Setting Up Your Software 1-15 Microsoft Windows and all Windows programs 1-15 Checking the printer driver settings 1-16 Using non-Windows software 1-17 Printer utilities 1-18 Setting Up the Printer 1-1
Chapter 1 Setting Up the Printer Choosing a Place for the Printer 1-2 Unpacking the Printer 1-4 Installing the Ribbon Cartridge 1-5 Plugging in the Printer 1-10 Running the Self Test 1-10 Connecting the Printer to Your Computer 1-14 Setting Up Your Software 1-15 Microsoft Windows and all Windows programs 1-15 Checking the printer driver settings 1-16 Using non-Windows software 1-17 Printer utilities 1-18 Setting Up the Printer 1-1

User Manual
Page 163
...G Graphics character tables, A-32-39 H Handshake timing, 4-14 High capacity cut-sheet feeder, 4-2-5 High speed draft, 3-10 I IBM emulation, 1, 3-10 Interface cards, 4-12-14 International character sets, A-32 Italic character table, A-39 L Labels, 2-28 Letter quality, 3-19...Location for printer, 1-2-3 M Microsoft Windows. See Windows Micro Adjust button, 3-4 Micro adjust feature, 3-13-14 Moving the printer, 5-2 Multipart forms, 2-27 N Non-Windows software, 1-17 0 Operate button, 3-4-5 Options, 2,4-2-14 IN-2 Index See Load/Eject button Envelopes, 2-29, 4-7 EPSON Calibration, 1-20 EPSON Remote!, ...
...G Graphics character tables, A-32-39 H Handshake timing, 4-14 High capacity cut-sheet feeder, 4-2-5 High speed draft, 3-10 I IBM emulation, 1, 3-10 Interface cards, 4-12-14 International character sets, A-32 Italic character table, A-39 L Labels, 2-28 Letter quality, 3-19...Location for printer, 1-2-3 M Microsoft Windows. See Windows Micro Adjust button, 3-4 Micro adjust feature, 3-13-14 Moving the printer, 5-2 Multipart forms, 2-27 N Non-Windows software, 1-17 0 Operate button, 3-4-5 Options, 2,4-2-14 IN-2 Index See Load/Eject button Envelopes, 2-29, 4-7 EPSON Calibration, 1-20 EPSON Remote!, ...

User Manual
Page 164
...postcards, 2-29 removing from top, 2-3-5 Skip-over-perforation, 3-11 Software DOS, 1-17-18 setting up, 1-15-16 Windows, 1-15-16 Special paper, 2-25-29 Specifications, A-1-39 Index IN-3 See Paper release lever Ribbon cartridge installing 1-5-9 replacing...3-5 Placement of printer, 1-2-3 Plugging in the printer, 1-10 Postcards, 2-29 Power cord, 1-4 plugging in, 1-10 Power supply problems, 6-2-3, Print head warning, 2-11 Print quality problems, 6-4-7 Printer drivers DOS software, 1-17-18 installing, 1-15 settings, 1-15-16 Printer functions table, 3-8-9 Printer stand, 1-3 Printer utilites, 1-18-...
...postcards, 2-29 removing from top, 2-3-5 Skip-over-perforation, 3-11 Software DOS, 1-17-18 setting up, 1-15-16 Windows, 1-15-16 Special paper, 2-25-29 Specifications, A-1-39 Index IN-3 See Paper release lever Ribbon cartridge installing 1-5-9 replacing...3-5 Placement of printer, 1-2-3 Plugging in the printer, 1-10 Postcards, 2-29 Power cord, 1-4 plugging in, 1-10 Power supply problems, 6-2-3, Print head warning, 2-11 Print quality problems, 6-4-7 Printer drivers DOS software, 1-17-18 installing, 1-15 settings, 1-15-16 Printer functions table, 3-8-9 Printer stand, 1-3 Printer utilites, 1-18-...

User Manual
Page 165
T Tear Off/Bin button, 3-5 light, 3-2 Tear off feature, 3-16-17 auto tear off, 3-16-17 Testing the printer, 1-10-13 Tractor positions changing, 2-9-11 front push, 2-3, 2-8, 2-12-15 pull, 2-3, 2-8, 2-19-21, 4-8 push/pull, 2-8, 2-22-23, 4-8-9 rear push, 2-3, 2-8, 2-15-18 selecting, 2-8-9 Transporting the printer, 5-4 Troubleshooting, 6-2-12 Unidirectional printing, 3-10 Unpacking the printer, 1-4 Utilities EPSON Calibration, 1-20 EPSON Remote!, 1-18 V Voltage, caution, 1-4, 1-10 W Weight, A-9 Windows, 1-1 1-15-16 installing printer driver, 1-15 IN-4 Index
T Tear Off/Bin button, 3-5 light, 3-2 Tear off feature, 3-16-17 auto tear off, 3-16-17 Testing the printer, 1-10-13 Tractor positions changing, 2-9-11 front push, 2-3, 2-8, 2-12-15 pull, 2-3, 2-8, 2-19-21, 4-8 push/pull, 2-8, 2-22-23, 4-8-9 rear push, 2-3, 2-8, 2-15-18 selecting, 2-8-9 Transporting the printer, 5-4 Troubleshooting, 6-2-12 Unidirectional printing, 3-10 Unpacking the printer, 1-4 Utilities EPSON Calibration, 1-20 EPSON Remote!, 1-18 V Voltage, caution, 1-4, 1-10 W Weight, A-9 Windows, 1-1 1-15-16 installing printer driver, 1-15 IN-4 Index


