

Technical Brief (Impact Printers)
Page 1
...and the number of an EPSON's impact printer tells you if it has a narrow or wide carriage: LLL L Nine-pin printers all begin with FX, LX, or DFX Twenty-four pin printers all begin with tireless printheads and superior quality ribbons. Contents This technical brief provides...Twenty-four-pin impact printers - or a 24-pin printer, and whether it is a registered trademark of Seiko Epson Corporation. 1/00 Other trademarks are capable of their reliability with LQ FX-980-Nine-pin narrow carriage Wide carriage printers have 4 number in their names EPSON Sales Training EPSON is a 9- ...
...and the number of an EPSON's impact printer tells you if it has a narrow or wide carriage: LLL L Nine-pin printers all begin with FX, LX, or DFX Twenty-four pin printers all begin with tireless printheads and superior quality ribbons. Contents This technical brief provides...Twenty-four-pin impact printers - or a 24-pin printer, and whether it is a registered trademark of Seiko Epson Corporation. 1/00 Other trademarks are capable of their reliability with LQ FX-980-Nine-pin narrow carriage Wide carriage printers have 4 number in their names EPSON Sales Training EPSON is a 9- ...

Technical Brief (Impact Printers)
Page 6
...dot matrix printers Ultra Letter Quality Keeps the cartridge from warping during times of the print head = First Character = 2,000,000 th Character vs. Because the carriage does not have to move the ribbon with the print head, and therefore has a longer life. L EPSON's stationary ribbon...use and extreme temperature changes L L Easy to sell with every printer Adds profit to the less expensive compatible ribbons. EPSON's stationary ribbon cartridge offers the following benefits: L L The stationary ribbon cartridge can achieve faster print speeds. This lower weight on the ...
...dot matrix printers Ultra Letter Quality Keeps the cartridge from warping during times of the print head = First Character = 2,000,000 th Character vs. Because the carriage does not have to move the ribbon with the print head, and therefore has a longer life. L EPSON's stationary ribbon...use and extreme temperature changes L L Easy to sell with every printer Adds profit to the less expensive compatible ribbons. EPSON's stationary ribbon cartridge offers the following benefits: L L The stationary ribbon cartridge can achieve faster print speeds. This lower weight on the ...
Product Information Guide
Page 1
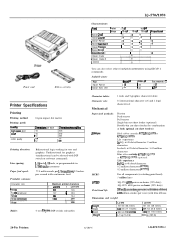
...ribbon) Dimensions and weight: i Height I Width II Deoth Weight I La-570 151 mm (5.8 Inches) 434 mm (17 1 Inches) 368 mm (14.5 Inches I 1 6.1 kg (13.4 lb) I LQ-1070 , 151 mm (5.9 Inches) / 609 mm (24 0 Inches) : I366 mm 114.5 inches) ! 16.4 kg (18.5 lb) 24-Pin Printers 8/20/91 LQ-570/1070-l Scalable fonts: Font Epson Roman / Epson... selected with DIP switch or software command). Power cord Ribbon cartridge Printer Specifications Printing Printing method: Printing speed: Quellly Mgh-speed draft DraR I Letter quality 24-pin impact dot matrix Chemcten per Inch 10 10 / 12 110 ! 12...
...ribbon) Dimensions and weight: i Height I Width II Deoth Weight I La-570 151 mm (5.8 Inches) 434 mm (17 1 Inches) 368 mm (14.5 Inches I 1 6.1 kg (13.4 lb) I LQ-1070 , 151 mm (5.9 Inches) / 609 mm (24 0 Inches) : I366 mm 114.5 inches) ! 16.4 kg (18.5 lb) 24-Pin Printers 8/20/91 LQ-570/1070-l Scalable fonts: Font Epson Roman / Epson... selected with DIP switch or software command). Power cord Ribbon cartridge Printer Specifications Printing Printing method: Printing speed: Quellly Mgh-speed draft DraR I Letter quality 24-pin impact dot matrix Chemcten per Inch 10 10 / 12 110 ! 12...

User Manual
Page 9
... 4-1 Cut-Sheet Feeders 4-2 Pull Tractor 4-12 Interface Cards 4-14 Chapter 5 Maintenance and Transportation 5-1 Cleaning the Printer 5-2 Replacing the Ribbon Cartridge 5-3 Transporting the Printer 5-4 Chapter 6 Troubleshooting 6-1 Problems and Solutions 6-2 Power Supply 6-3 Printing 6-4 Paper Handling 6-8 Options 6-10 Chapter 7 Technical Specifications 7-1 Printer Specifications 7-2 Interface Specifications 7-10 Option Specifications 7-14 Initialization 7-16 Chapter 8 Command Summary 8-1 Using the Command...
... 4-1 Cut-Sheet Feeders 4-2 Pull Tractor 4-12 Interface Cards 4-14 Chapter 5 Maintenance and Transportation 5-1 Cleaning the Printer 5-2 Replacing the Ribbon Cartridge 5-3 Transporting the Printer 5-4 Chapter 6 Troubleshooting 6-1 Problems and Solutions 6-2 Power Supply 6-3 Printing 6-4 Paper Handling 6-8 Options 6-10 Chapter 7 Technical Specifications 7-1 Printer Specifications 7-2 Interface Specifications 7-10 Option Specifications 7-14 Initialization 7-16 Chapter 8 Command Summary 8-1 Using the Command...
User Manual
Page 11
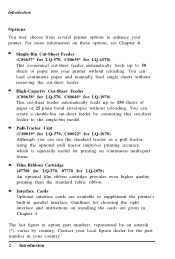
...C80638* for LQ-570, C80640* for LQ-1070) An optional film ribbon cartridge provides even higher quality printing than the standard fabric ribbon. Pull-Tractor Unit (C80019* for LQ-570, C80022* for LQ-1070) This economical cut -sheet feeder. Guidlines for the part number in your printer without removing... -sheet feeder by country, Contact your local Epson dealer for choosing the right interface and instructions on these options, see Chapter 4 . Introduction Options You may choose from several printer options to supplement the printer's built-in parallel interface. For more information ...
...C80638* for LQ-570, C80640* for LQ-1070) An optional film ribbon cartridge provides even higher quality printing than the standard fabric ribbon. Pull-Tractor Unit (C80019* for LQ-570, C80022* for LQ-1070) This economical cut -sheet feeder. Guidlines for the part number in your printer without removing... -sheet feeder by country, Contact your local Epson dealer for choosing the right interface and instructions on these options, see Chapter 4 . Introduction Options You may choose from several printer options to supplement the printer's built-in parallel interface. For more information ...
User Manual
Page 14
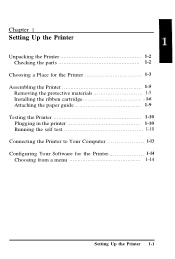
Chapter 1 Setting Up the Printer Unpacking the Printer 1-2 Checking the parts 1-2 Choosing a Place for the Printer 1-3 Assembling the Printer 1-5 Removing the protective materials 1-5 Installing the ribbon cartridge 1-6 Attaching the paper guide 1-9 Testing the Printer 1-10 Plugging in the printer 1-10 Running the self test 1-10 Connecting the Printer to Your Computer 1-13 Configuring Your Software for the Printer 1-14 Choosing from a menu 1-14 Setting Up the Printer 1-1
Chapter 1 Setting Up the Printer Unpacking the Printer 1-2 Checking the parts 1-2 Choosing a Place for the Printer 1-3 Assembling the Printer 1-5 Removing the protective materials 1-5 Installing the ribbon cartridge 1-6 Attaching the paper guide 1-9 Testing the Printer 1-10 Plugging in the printer 1-10 Running the self test 1-10 Connecting the Printer to Your Computer 1-13 Configuring Your Software for the Printer 1-14 Choosing from a menu 1-14 Setting Up the Printer 1-1
User Manual
Page 15
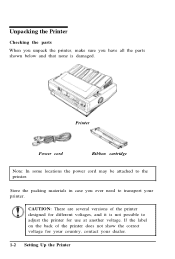
Printer Power cord Ribbon cartridge Note: In some locations the power cord may be attached to adjust the printer for use at another voltage. If the label on the back of the printer designed for your country, contact your printer. CAUTION: There are several versions of the printer does not show ...the correct voltage for different voltages, and it is damaged. Unpacking the Printer Checking the parts When you unpack the printer, make sure you ever need to transport your dealer. 1-2 Setting Up the Printer Store the packing materials in case you have all the parts shown below ...
Printer Power cord Ribbon cartridge Note: In some locations the power cord may be attached to adjust the printer for use at another voltage. If the label on the back of the printer designed for your country, contact your printer. CAUTION: There are several versions of the printer does not show ...the correct voltage for different voltages, and it is damaged. Unpacking the Printer Checking the parts When you unpack the printer, make sure you ever need to transport your dealer. 1-2 Setting Up the Printer Store the packing materials in case you have all the parts shown below ...
User Manual
Page 19
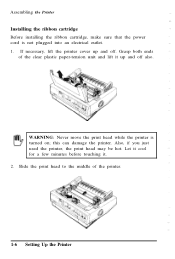
... before touching it up and off also. Assembling the Printer Installing the ribbon cartridge Before installing the ribbon cartridge, make sure that the power cord is turned on; Grasp both ends of the printer. 1-6 Setting Up the Printer WARNING: Never move the print head while the printer is not plugged into an electrical outlet. 1. Also, if...
... before touching it up and off also. Assembling the Printer Installing the ribbon cartridge Before installing the ribbon cartridge, make sure that the power cord is turned on; Grasp both ends of the printer. 1-6 Setting Up the Printer WARNING: Never move the print head while the printer is not plugged into an electrical outlet. 1. Also, if...

User Manual
Page 20
... makes it easier to install. Use a pointed object, such as a ball point pen, to help feed the ribbon into place. 5 . Turn the ribbon-tightening knob to guide the ribbon between the print head and ribbon guide. Slide the print head from side to side to make sure it firmly down into the slots. 4 . ...then press on both ends of the arrow. Next, hold the ribbon cartridge by its handle and push it moves smoothly. This removes any slack in the direction of the cartridge to make sure the plastic hooks...
... makes it easier to install. Use a pointed object, such as a ball point pen, to help feed the ribbon into place. 5 . Turn the ribbon-tightening knob to guide the ribbon between the print head and ribbon guide. Slide the print head from side to side to make sure it firmly down into the slots. 4 . ...then press on both ends of the arrow. Next, hold the ribbon cartridge by its handle and push it moves smoothly. This removes any slack in the direction of the cartridge to make sure the plastic hooks...

User Manual
Page 21
... then lower it into place. 7. Press on the front of both sides of the unit into the slots on the printer; Note: You install the optional #7768 or #7770 film ribbons in the same way as you feel it on ordinary paper only. l Move the paper-thickness lever to the next ...lowest position. 1-8 Setting Up the Printer then lower the front of the paper-tension unit until you install the ribbon cartridge. Assembling the Printer 6. Replace the paper-tension unit by first inserting the front tabs into place. Replace the...
... then lower it into place. 7. Press on the front of both sides of the unit into the slots on the printer; Note: You install the optional #7768 or #7770 film ribbons in the same way as you feel it on ordinary paper only. l Move the paper-thickness lever to the next ...lowest position. 1-8 Setting Up the Printer then lower the front of the paper-tension unit until you install the ribbon cartridge. Assembling the Printer 6. Replace the paper-tension unit by first inserting the front tabs into place. Replace the...

User Manual
Page 44
Using Continuous Paper 5. Insert the paper into the desired paper slot (rear, front, or bottom) until the perforation between the platen and print head. 7. If you are inserting paper in the front paper slot, remove the front cover and slide the edge guide completely to the left. 6. Pull the paper up until it emerges between the first and second pages is even with the top of the printer's ribbon. Paper Handling 2-17 Make sure your paper has a clean, straight edge.
Using Continuous Paper 5. Insert the paper into the desired paper slot (rear, front, or bottom) until the perforation between the platen and print head. 7. If you are inserting paper in the front paper slot, remove the front cover and slide the edge guide completely to the left. 6. Pull the paper up until it emerges between the first and second pages is even with the top of the printer's ribbon. Paper Handling 2-17 Make sure your paper has a clean, straight edge.
User Manual
Page 51
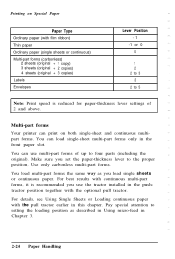
Multi-part forms Your printer can print on Special Paper Paper Type Ordinary paper (with film ribbon) Thin paper Ordinary paper (single sheets or continuous) Multi-part forms (carbonless) 2 sheets (original + 1 copy) 3 sheets (original + 2 copies) 4 sheets (original + 3 copies) Labels Envelopes Lever Position -1 -1 ...
Multi-part forms Your printer can print on Special Paper Paper Type Ordinary paper (with film ribbon) Thin paper Ordinary paper (single sheets or continuous) Multi-part forms (carbonless) 2 sheets (original + 1 copy) 3 sheets (original + 2 copies) 4 sheets (original + 3 copies) Labels Envelopes Lever Position -1 -1 ...

User Manual
Page 94
Chapter 5 Maintenance and Transportation Cleaning the Printer 5-2 Replacing the Ribbon Cartridge 5-3 Transporting the Printer 5-4 Maintenance and Transportation 5-1
Chapter 5 Maintenance and Transportation Cleaning the Printer 5-2 Replacing the Ribbon Cartridge 5-3 Transporting the Printer 5-4 Maintenance and Transportation 5-1

User Manual
Page 96
For everyday operations, use ribbon cartridge designed for nine-pin printers. Replacing the Ribbon When the printing becomes too faint, you want especially high quality printing. The following Epson ribbon cartridges are recommended: LQ-570 LQ-1070 Standard fabric #7753 #7754 Film #7768 #7770 To replace the ribbon cartridge, follow the steps in Installing the ribbon cartridge in Chapter 1. Maintenance and Transportation 5-3 l Do not use the standard ribbon cartridge. Note: l Use the optional film ribbon cartridge when you need to replace the ribbon cartridge.
For everyday operations, use ribbon cartridge designed for nine-pin printers. Replacing the Ribbon When the printing becomes too faint, you want especially high quality printing. The following Epson ribbon cartridges are recommended: LQ-570 LQ-1070 Standard fabric #7753 #7754 Film #7768 #7770 To replace the ribbon cartridge, follow the steps in Installing the ribbon cartridge in Chapter 1. Maintenance and Transportation 5-3 l Do not use the standard ribbon cartridge. Note: l Use the optional film ribbon cartridge when you need to replace the ribbon cartridge.

User Manual
Page 97
... the paper-tension unit. Attach the protective locking clip to transport your printer some distance, carefully repack it using the original box and packing materials, as described below: 1. Transporting the Printer If you need to the paper-tension unit, and then replace the paper-... and Transportation Remove the paper guide. 4. Remove the ribbon cartridge. 6. then disconnect the interface cable from the electrical outlet; Remove the optional pull tractor and cut-sheet feeder or feeders, if installed. 5. Repack the printer, ribbon cartridge, paper guide, and power cord in the original...
... the paper-tension unit. Attach the protective locking clip to transport your printer some distance, carefully repack it using the original box and packing materials, as described below: 1. Transporting the Printer If you need to the paper-tension unit, and then replace the paper-... and Transportation Remove the paper guide. 4. Remove the ribbon cartridge. 6. then disconnect the interface cable from the electrical outlet; Remove the optional pull tractor and cut-sheet feeder or feeders, if installed. 5. Repack the printer, ribbon cartridge, paper guide, and power cord in the original...
User Manual
Page 101
... Wait a few minutes; Load paper in Chapter 5. Replace the ribbon cartridge as described in the printer. If you are using the built-in Chapter 1. l The PAPER OUT light is off the printer and check for your dealer. See the section on . Press ... a paper jam, a ribbon jam, or other problems. If the printer still does not print correctly, contact your printer. Check both the printer and computer specifications. l The printer makes a strange noise, the buzzer sounds several times, and the printer stops abruptly. the printer resumes printing automatically when the...
... Wait a few minutes; Load paper in Chapter 5. Replace the ribbon cartridge as described in the printer. If you are using the built-in Chapter 1. l The PAPER OUT light is off the printer and check for your dealer. See the section on . Press ... a paper jam, a ribbon jam, or other problems. If the printer still does not print correctly, contact your printer. Check both the printer and computer specifications. l The printer makes a strange noise, the buzzer sounds several times, and the printer stops abruptly. the printer resumes printing automatically when the...

User Manual
Page 102
... loose. Dots are not what you are missing in random positions. Printed characters are missing in Chapter 1. l The font selected on ribbon installation in printed characters or graphics. The ribbon may be worn out. The print head is correctly configured for the paper you expected. Stop printing and contact your printer. Reinstall the ribbon cartridge...
... loose. Dots are not what you are missing in random positions. Printed characters are missing in Chapter 1. l The font selected on ribbon installation in printed characters or graphics. The ribbon may be worn out. The print head is correctly configured for the paper you expected. Stop printing and contact your printer. Reinstall the ribbon cartridge...
User Manual
Page 113
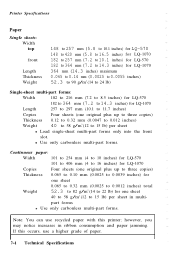
...52.3 to 82 g/m2 (14 to 22 lb) for LQ-1070 Copies Four sheets (one sheet 40 to 58 g/m2 (12 to 15 lb) per sheet in ribbon consumption and paper jamming. however, you may notice increases in multi- Printer Specifications Paper Single sheets: Width top front Length Thickness Weight... 148 to 257 mm (5.8 to 10.1 inches) for LQ-570 148 to 420 mm (5.8 to 16.5 inches) for LQ-1070 182 to 257 mm ...
...52.3 to 82 g/m2 (14 to 22 lb) for LQ-1070 Copies Four sheets (one sheet 40 to 58 g/m2 (12 to 15 lb) per sheet in ribbon consumption and paper jamming. however, you may notice increases in multi- Printer Specifications Paper Single sheets: Width top front Length Thickness Weight... 148 to 257 mm (5.8 to 10.1 inches) for LQ-570 148 to 420 mm (5.8 to 16.5 inches) for LQ-1070 182 to 257 mm ...

User Manual
Page 116
Printer Specifications Mechanical Paper-feed methods: Friction Push tractor Pull tractor Single-bin cut-sheet feeder (optional) High-capacity cut-sheet feeder (optional) Double-bin cut-sheet feeder (by combining both optional cut-sheet feeders) Ribbon: Black ribbon cartridge #7753 (LQ-570) or #7754 (LQ-1070) : Life expectancy: In LQ, at 48 dots/character: 2 million characters In draft, at...
Printer Specifications Mechanical Paper-feed methods: Friction Push tractor Pull tractor Single-bin cut-sheet feeder (optional) High-capacity cut-sheet feeder (optional) Double-bin cut-sheet feeder (by combining both optional cut-sheet feeders) Ribbon: Black ribbon cartridge #7753 (LQ-570) or #7754 (LQ-1070) : Life expectancy: In LQ, at 48 dots/character: 2 million characters In draft, at...

User Manual
Page 152
... materials replacing, 5-4 removing, 1-5 Pull tractor, 2-3, 2-11, 2-15, 4-12 Push tractor, 2-3, 2-10, 2-12 R Ribbon cartridge fabric, 1-2, 5-3, 7-7 film, 2, 5-3, 7-7 installing, 1-6 specifications, 7-7 S Safety instructions, v Scalable fonts, 3-19 Self test, 1-10 Single sheets, 2-4-8 Skip-over-perforation, 3-7, 3-11 Special paper, 2-23 Specifications, 7-1 Tractor, 2-9 installing, 2-9-11 position, 2-9 Transporting the printer, 5-4 Troubleshooting, 6-1-12 Typestyles, 3-19 U Unidirectional printing, 3-7, 3-10 Unpacking the...
... materials replacing, 5-4 removing, 1-5 Pull tractor, 2-3, 2-11, 2-15, 4-12 Push tractor, 2-3, 2-10, 2-12 R Ribbon cartridge fabric, 1-2, 5-3, 7-7 film, 2, 5-3, 7-7 installing, 1-6 specifications, 7-7 S Safety instructions, v Scalable fonts, 3-19 Self test, 1-10 Single sheets, 2-4-8 Skip-over-perforation, 3-7, 3-11 Special paper, 2-23 Specifications, 7-1 Tractor, 2-9 installing, 2-9-11 position, 2-9 Transporting the printer, 5-4 Troubleshooting, 6-1-12 Typestyles, 3-19 U Unidirectional printing, 3-7, 3-10 Unpacking the...


