Start Here - Installation Guide
Page 4
... Guide for end of Seiko Epson Corporation. • Print a network connection report to the Epson website, as described below. Then clean the print head, if necessary. Find Epson papers and Epson Genuine Ink at Epson authorized resellers. ET-16600/ET-16650 replacement inks Color Black Cyan ... other countries. Epson disclaims any gaps in my printouts. Technical support Visit www.epson.com/support (U.S.) or www.epson.ca/support (Canada) and search for Epson printers. Run a nozzle check to download drivers, view videos and manuals, get FAQs, or contact Epson. There are ...
... Guide for end of Seiko Epson Corporation. • Print a network connection report to the Epson website, as described below. Then clean the print head, if necessary. Find Epson papers and Epson Genuine Ink at Epson authorized resellers. ET-16600/ET-16650 replacement inks Color Black Cyan ... other countries. Epson disclaims any gaps in my printouts. Technical support Visit www.epson.com/support (U.S.) or www.epson.ca/support (Canada) and search for Epson printers. Run a nozzle check to download drivers, view videos and manuals, get FAQs, or contact Epson. There are ...
Users Guide
Page 8
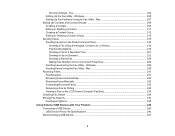
Windows 205 Setting Up Fax Features Using the Fax Utility - Mac 228 Receiving Faxes...231 Fax Reception ...231 Receiving Faxes Automatically 232 Receiving Faxes Manually...232 Forwarding Received Faxes...233 Receiving a Fax by Polling ...234 Viewing a Fax on Demand ...222 Sending a Stored Fax ...224 Dialing Fax Numbers from the Product ...
Windows 205 Setting Up Fax Features Using the Fax Utility - Mac 228 Receiving Faxes...231 Fax Reception ...231 Receiving Faxes Automatically 232 Receiving Faxes Manually...232 Forwarding Received Faxes...233 Receiving a Fax by Polling ...234 Viewing a Fax on Demand ...222 Sending a Stored Fax ...224 Dialing Fax Numbers from the Product ...
Users Guide
Page 49
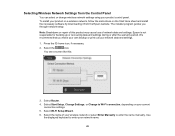
Select Router. 4. Select Wi-Fi Setup Wizard. 6. Select the name of your wireless network or select Enter Manually to enter your product control panel. Epson is not responsible for backing up or recovering data and settings during or after the warranty period. We recommend that ...you through network setup. Use the displayed keyboard to enter the name manually. Select the icon. Note: Breakdown or repair of...
Select Router. 4. Select Wi-Fi Setup Wizard. 6. Select the name of your wireless network or select Enter Manually to enter your product control panel. Epson is not responsible for backing up or recovering data and settings during or after the warranty period. We recommend that ...you through network setup. Use the displayed keyboard to enter the name manually. Select the icon. Note: Breakdown or repair of...
Users Guide
Page 62
.... If your product and the router or access point, waiting about 10 seconds, and turning them on a different network segment; If it is set to Manual, the IP address may be out of range or on again. 62 You can also try turning off your router or access point limits the...
.... If your product and the router or access point, waiting about 10 seconds, and turning them on a different network segment; If it is set to Manual, the IP address may be out of range or on again. 62 You can also try turning off your router or access point limits the...
Users Guide
Page 63
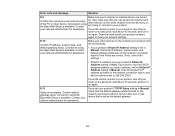
...your network administrator for assistance. Connection using the EpsonNet Setup is incomplete. If you set your product's TCP/IP Setup setting to Manual, check that the default gateway address listed on and do the following: • If your network administrator for assistance. Confirm default ...EpsonNet Setup is available. If you want to use the DHCPassigned address as a static address, set the Obtain IP Address setting to Manual, enter the product's IP address as the default gateway. 63 Connection using the EpsonNet Setup is available. Make sure other device....
...your network administrator for assistance. Connection using the EpsonNet Setup is incomplete. If you set your product's TCP/IP Setup setting to Manual, check that the default gateway address listed on and do the following: • If your network administrator for assistance. Confirm default ...EpsonNet Setup is available. If you want to use the DHCPassigned address as a static address, set the Obtain IP Address setting to Manual, enter the product's IP address as the default gateway. 63 Connection using the EpsonNet Setup is available. Make sure other device....

Users Guide
Page 64
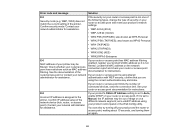
...IP address, subnet mask, and default gateway addresses are correct, if you are the same. E-13 Make sure your product's network settings to manually. this -Entered security key/password is correct may cause your router, access point, and/or hub are Confirm the following : or other ...the subnet mask and default gateway -IP address, subnet mask, or default addresses for seconds, and turn it on . gateway setup is set manually; assistance. • Download and install your product software again to reset your network settings. • If your router or access point uses WEP...
...IP address, subnet mask, and default gateway addresses are correct, if you are the same. E-13 Make sure your product's network settings to manually. this -Entered security key/password is correct may cause your router, access point, and/or hub are Confirm the following : or other ...the subnet mask and default gateway -IP address, subnet mask, or default addresses for seconds, and turn it on . gateway setup is set manually; assistance. • Download and install your product software again to reset your network settings. • If your router or access point uses WEP...
Users Guide
Page 79
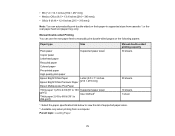
... White Paper Letter (8.5 × 11 inches Epson Bright White Premium Paper [216 × 279 mm]) Epson Multipurpose Plus Paper Thick paper 1 (25 to 43 lb [91 to 160 Supported paper sizes1 g/m2]) User defined2 Thick paper 2 (43 to 68 lb [161 to 256 g/m2]) Manual double-sided printing capacity 30 sheets 30 sheets...
... White Paper Letter (8.5 × 11 inches Epson Bright White Premium Paper [216 × 279 mm]) Epson Multipurpose Plus Paper Thick paper 1 (25 to 43 lb [91 to 160 Supported paper sizes1 g/m2]) User defined2 Thick paper 2 (43 to 68 lb [161 to 256 g/m2]) Manual double-sided printing capacity 30 sheets 30 sheets...

Users Guide
Page 89
Manually position your original facedown on the Product Related topics Scanning Copying Faxing Placing Originals in the Automatic Document Feeder You can also use the ADF ...
Manually position your original facedown on the Product Related topics Scanning Copying Faxing Placing Originals in the Automatic Document Feeder You can also use the ADF ...
Users Guide
Page 102
... the long edge. • Auto (Short-edge binding) to print your double-sided print job by automatically flipping the paper on the short edge. • Manual (Long-edge binding) to print your multi-page print job. 2-Up, 4-Up, 6-Up, 8-Up, 9-Up, and 16-Up Prints several pages on one of paper...
... the long edge. • Auto (Short-edge binding) to print your double-sided print job by automatically flipping the paper on the short edge. • Manual (Long-edge binding) to print your multi-page print job. 2-Up, 4-Up, 6-Up, 8-Up, 9-Up, and 16-Up Prints several pages on one of paper...
Users Guide
Page 107
... or Photo - Confidential jobs are cleared from the product's memory after printing. 5. Custom Color Correction Options - • Select Custom and click the Advanced button to manually adjust the color correction settings or turn off color management in the product's memory without being printed. To add a password to customize your print job...
... or Photo - Confidential jobs are cleared from the product's memory after printing. 5. Custom Color Correction Options - • Select Custom and click the Advanced button to manually adjust the color correction settings or turn off color management in the product's memory without being printed. To add a password to customize your print job...
Users Guide
Page 123
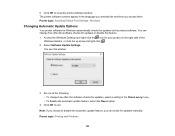
... right side of the Windows taskbar, or click the up arrow and right-click . 2. Access the Windows Desktop and right-click the icon for updates manually. You can check for your product in the Check every menu. • To disable the automatic update feature, select the Never option. 4. 5.
... right side of the Windows taskbar, or click the up arrow and right-click . 2. Access the Windows Desktop and right-click the icon for updates manually. You can check for your product in the Check every menu. • To disable the automatic update feature, select the Never option. 4. 5.
Users Guide
Page 200
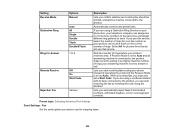
... use this service, select the number of rings your product receives a fax. Setting Receive Mode Distinctive Ring Rings to Answer Remote Receive Rejection Fax Options Manual Auto All Single Double Triple Double&Triple 1 to the product Automatically receives and prints faxes. If you are using a cordless handset with blank headers, or...
... use this service, select the number of rings your product receives a fax. Setting Receive Mode Distinctive Ring Rings to Answer Remote Receive Rejection Fax Options Manual Auto All Single Double Triple Double&Triple 1 to the product Automatically receives and prints faxes. If you are using a cordless handset with blank headers, or...
Users Guide
Page 231
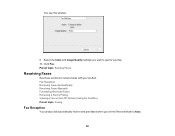
You see this window: 9. Fax Reception Receiving Faxes Automatically Receiving Faxes Manually Forwarding Received Faxes Receiving a Fax by Polling Viewing a Fax on the LCD Screen (Using the Fax Box) Parent topic: Faxing Fax Reception Your product will automatically receive and print faxes when you want to Auto. 231 Parent topic: Sending Faxes Receiving Faxes See these sections to receive faxes with your fax. 10. Select the Color and Image Quality settings you set the Receive Mode to use for your product. Click Fax.
You see this window: 9. Fax Reception Receiving Faxes Automatically Receiving Faxes Manually Forwarding Received Faxes Receiving a Fax by Polling Viewing a Fax on the LCD Screen (Using the Fax Box) Parent topic: Faxing Fax Reception Your product will automatically receive and print faxes when you want to Auto. 231 Parent topic: Sending Faxes Receiving Faxes See these sections to receive faxes with your fax. 10. Select the Color and Image Quality settings you set the Receive Mode to use for your product. Click Fax.

Users Guide
Page 232
...LCD display. 4. Select Send/Receive. 5. To change the Receive Mode, select Settings > General Settings > Fax Settings > Basic Settings > Receive Mode and select Manual. 2. If you run out of rings your fax settings before receiving a fax. 1. This allows you check for a fax tone on the connected telephone before...a call . 3. This lets you to check for a fax tone using the telephone and press a button on your product to receive faxes manually. Make sure to load paper in your product and select your answering machine is set to pick up on the fourth ring, set the product...
...LCD display. 4. Select Send/Receive. 5. To change the Receive Mode, select Settings > General Settings > Fax Settings > Basic Settings > Receive Mode and select Manual. 2. If you run out of rings your fax settings before receiving a fax. 1. This allows you check for a fax tone on the connected telephone before...a call . 3. This lets you to check for a fax tone using the telephone and press a button on your product to receive faxes manually. Make sure to load paper in your product and select your answering machine is set to pick up on the fourth ring, set the product...
Users Guide
Page 280
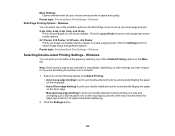
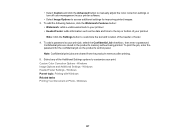
...Your Product Software Where to Get Help Checking for Software Updates It's a good idea to check Epson's support website occasionally for updates. Visit epson.com/support (U.S.), epson.ca/support (Canada), or epson.com.jm/support (Caribbean) and select your product in the right side of the Windows taskbar,... or clicking the up arrow and right-clicking . • On the Maintenance tab in the printer settings window 280 You can also manually ...
...Your Product Software Where to Get Help Checking for Software Updates It's a good idea to check Epson's support website occasionally for updates. Visit epson.com/support (U.S.), epson.ca/support (Canada), or epson.com.jm/support (Caribbean) and select your product in the right side of the Windows taskbar,... or clicking the up arrow and right-clicking . • On the Maintenance tab in the printer settings window 280 You can also manually ...

Users Guide
Page 281
.... Printer error. The ink pad is near the end of its service life. You can also update the software by selecting EPSON Software Updater in the EPSON or Epson Software program group, accessible by the Start button, or on the Start or Apps screens, depending on your version of Windows.... • OS X: You can manually update the software by opening the App Store, selecting Updates, searching for a software update option for support. ...
.... Printer error. The ink pad is near the end of its service life. You can also update the software by selecting EPSON Software Updater in the EPSON or Epson Software program group, accessible by the Start button, or on the Start or Apps screens, depending on your version of Windows.... • OS X: You can manually update the software by opening the App Store, selecting Updates, searching for a software update option for support. ...

Users Guide
Page 284
... product check: • If the page prints and the nozzle check pattern is complete, the product is operating properly. If they do not work, contact Epson. Any operation problem you may have could be caused by your printer software. • If the page prints but the nozzle check pattern has gaps... the page does not print, the product may have a problem. Check the other solutions in this : 6. The nozzle pattern prints. 7. You see a screen like this manual.
... product check: • If the page prints and the nozzle check pattern is complete, the product is operating properly. If they do not work, contact Epson. Any operation problem you may have could be caused by your printer software. • If the page prints but the nozzle check pattern has gaps... the page does not print, the product may have a problem. Check the other solutions in this : 6. The nozzle pattern prints. 7. You see a screen like this manual.
Users Guide
Page 288
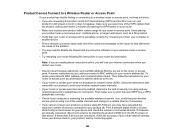
If so, verify that came with your product to enter your wireless network name manually. • If your computer is restricting the available wireless channels. Note: If you are reading these solutions: • If you are connecting the product via ...
If so, verify that came with your product to enter your wireless network name manually. • If your computer is restricting the available wireless channels. Note: If you are reading these solutions: • If you are connecting the product via ...
Users Guide
Page 291
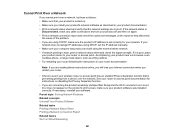
... point documentation for your product documentation. • Print a network status sheet and verify that the network settings are both using DHCP, set the IP address manually. • Make sure your wireless router or access point has an enabled Privacy Separator function that is preventing printing from a device over a network, try these...
... point documentation for your product documentation. • Print a network status sheet and verify that the network settings are both using DHCP, set the IP address manually. • Make sure your wireless router or access point has an enabled Privacy Separator function that is preventing printing from a device over a network, try these...
Users Guide
Page 297
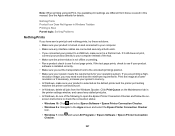
...connection port. • In Windows, delete all jobs from those covered in this manual. See the Apple website for your computer instead of the following to open the Epson Printer Connection Checker and follow the onscreen instructions to check the connection status: &#...8226; Windows 10: Click and select Epson Software > Epson Printer Connection Checker. • Windows 8.x: Navigate to the Apps screen and select the Epson Printer Connection Checker icon. • Windows 7: Click and select All Programs > Epson Software > Epson Printer Connection Checker. 297 Note: When printing ...
...connection port. • In Windows, delete all jobs from those covered in this manual. See the Apple website for your computer instead of the following to open the Epson Printer Connection Checker and follow the onscreen instructions to check the connection status: &#...8226; Windows 10: Click and select Epson Software > Epson Printer Connection Checker. • Windows 8.x: Navigate to the Apps screen and select the Epson Printer Connection Checker icon. • Windows 7: Click and select All Programs > Epson Software > Epson Printer Connection Checker. 297 Note: When printing ...


