

User Manual
Page 3
... Connecting the Audio Cable 9 Connecting the Cable for Remote Mouse Control . . . . . 9 Connecting to a Desktop Macintosh 10 Connecting the Computer Cable 11 Connecting the Audio Cable 13 Connecting the Cable for Remote Mouse Control . . . . 13 Turning the Projector On and Off 14 Turning On Other Equipment 16... B Using the Projector Menus Changing Menu Settings 18 Video Menu (Computer Image Source 20 Video Menu...
... Connecting the Audio Cable 9 Connecting the Cable for Remote Mouse Control . . . . . 9 Connecting to a Desktop Macintosh 10 Connecting the Computer Cable 11 Connecting the Audio Cable 13 Connecting the Cable for Remote Mouse Control . . . . 13 Turning the Projector On and Off 14 Turning On Other Equipment 16... B Using the Projector Menus Changing Menu Settings 18 Video Menu (Computer Image Source 20 Video Menu...
User Manual
Page 4
C Technical Specifications Index General 33 Projection Lamp 34 Remote Control 34 Mouse Compatibility 34 Remote IR Receiver 34 Mechanical 34 Electrical 34 Environmental 34 Safety 35 CE Marking 35 Supported Monitor Displays 35 Computer Connector Pin Assignments 37 4
C Technical Specifications Index General 33 Projection Lamp 34 Remote Control 34 Mouse Compatibility 34 Remote IR Receiver 34 Mechanical 34 Electrical 34 Environmental 34 Safety 35 CE Marking 35 Supported Monitor Displays 35 Computer Connector Pin Assignments 37 4

User Manual
Page 5
...10 feet of a grounded electrical outlet or extension cord. The audio source can project any images. Connecting to control the screen cursor. The projector must be the computer, video source, or another device such as a VCR, camcorder, digital camera, DVD player, or laser disc player... connected to use the remote control's pointer to a Desktop Computer 5 Otherwise, your User's Guide. Positioning the Projector Before you can set up the projector, you need to decide where to set up the projector for one or more of the projector. s Make sure the projector is within 5 feet ...
...10 feet of a grounded electrical outlet or extension cord. The audio source can project any images. Connecting to control the screen cursor. The projector must be the computer, video source, or another device such as a VCR, camcorder, digital camera, DVD player, or laser disc player... connected to use the remote control's pointer to a Desktop Computer 5 Otherwise, your User's Guide. Positioning the Projector Before you can set up the projector, you need to decide where to set up the projector for one or more of the projector. s Make sure the projector is within 5 feet ...

User Manual
Page 7
... section for the location of the projector; Connecting to connect. L-Audio-R Audio In Computer Audio Out S-Video Video Out Audio S-Video Computer In R Audio L Video note Computer configurations vary. you may want to use the remote control as you cannot view your PC... desktop computer, you need to a Desktop Computer 7 Identifying the Projector Ports The following illustrations identify all the interface ports on the computer monitor.
... section for the location of the projector; Connecting to connect. L-Audio-R Audio In Computer Audio Out S-Video Video Out Audio S-Video Computer In R Audio L Video note Computer configurations vary. you may want to use the remote control as you cannot view your PC... desktop computer, you need to a Desktop Computer 7 Identifying the Projector Ports The following illustrations identify all the interface ports on the computer monitor.
User Manual
Page 9
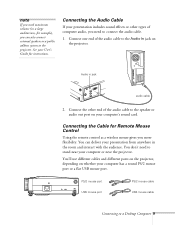
... to the speaker or audio out port on your computer's sound card. You'll use different cables and different ports on the projector, depending on the projector. Audio in the room and interact with the audience. Connect the other types of computer audio, you more flexibility. Connecting the ...Cable for instructions. Connect one end of the audio cable to the Audio In jack on whether your User's Guide for Remote Mouse Control Using the remote ...
... to the speaker or audio out port on your computer's sound card. You'll use different cables and different ports on the projector, depending on the projector. Audio in the room and interact with the audience. Connect the other types of computer audio, you more flexibility. Connecting the ...Cable for instructions. Connect one end of the audio cable to the Audio In jack on whether your User's Guide for Remote Mouse Control Using the remote ...

User Manual
Page 10
...computer. (Your computer's mouse will be projecting with audio) s Connect the mouse cable (if you want to use the remote control as a mouse) If you connect the projector to your Macintosh, you cannot view your computer manual for the cables you need to: s Connect the computer cable s ... cable to a Desktop Computer Connecting to a Desktop Macintosh To connect the projector to your desktop Macintosh,® you are using the remote control as a mouse.) note Macintosh configurations vary. See your images on the projector. Connect one end of the ports needed to the mouse port on your...
...computer. (Your computer's mouse will be projecting with audio) s Connect the mouse cable (if you want to use the remote control as a mouse) If you connect the projector to your Macintosh, you cannot view your computer manual for the cables you need to: s Connect the computer cable s ... cable to a Desktop Computer Connecting to a Desktop Macintosh To connect the projector to your desktop Macintosh,® you are using the remote control as a mouse.) note Macintosh configurations vary. See your images on the projector. Connect one end of the ports needed to the mouse port on your...

User Manual
Page 13
... don't need to connect the audio cable. 1. Audio in a large auditorium, for Remote Mouse Control Using the remote control as a wireless mouse gives you more flexibility. You'll use different cables and different ports on the projector, depending on the projector. Connecting the Cable for example), you can deliver your presentation includes sound effects...
... don't need to connect the audio cable. 1. Audio in a large auditorium, for Remote Mouse Control Using the remote control as a wireless mouse gives you more flexibility. You'll use different cables and different ports on the projector, depending on the projector. Connecting the Cable for example), you can deliver your presentation includes sound effects...
User Manual
Page 17
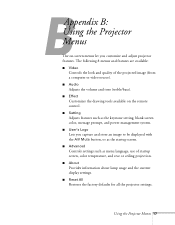
... screen color, message prompt, and power management system. s Audio Adjusts the volume and tone (treble/bass). s Reset All Restores the factory defaults for all the projector settings. s Setting Adjusts features such as menu language, use of the projected image (from a computer or video source). Using the...
... screen color, message prompt, and power management system. s Audio Adjusts the volume and tone (treble/bass). s Reset All Restores the factory defaults for all the projector settings. s Setting Adjusts features such as menu language, use of the projected image (from a computer or video source). Using the...

User Manual
Page 18
Volume + You see the following: menus 18 Using the Projector Menus Video menu options To access the menu system, open the cover on the remote control to change a menu setting: 1. Freeze A/V Mute E-Zoom Power R/C ON OFF 3 2 5 4 1 Enter Menu button Esc Menu Help Comp S-Video Video Auto Resize P in P - To change menu settings. Changing Menu Settings You use the Menu, Enter and Esc buttons on the lower part of the remote control and press the Menu button.
Volume + You see the following: menus 18 Using the Projector Menus Video menu options To access the menu system, open the cover on the remote control to change a menu setting: 1. Freeze A/V Mute E-Zoom Power R/C ON OFF 3 2 5 4 1 Enter Menu button Esc Menu Help Comp S-Video Video Auto Resize P in P - To change menu settings. Changing Menu Settings You use the Menu, Enter and Esc buttons on the lower part of the remote control and press the Menu button.

User Manual
Page 19
... it between your thumb and finger and tilt it down ) to change the setting. 6. The settings available in some submenus vary, depending on the remote to go back to scroll through the options. 5. Press the right or left side of the Enter button (or grasp it between your thumb and...the right. 3. Press the Esc button on whether the current image source is highlighted, press the center of the menus are described below. Using the Projector Menus 19 Press the bottom of options appears to the main menu display. As you want to go back to the right. 2. Your changes are...
... it between your thumb and finger and tilt it down ) to change the setting. 6. The settings available in some submenus vary, depending on the remote to go back to scroll through the options. 5. Press the right or left side of the Enter button (or grasp it between your thumb and...the right. 3. Press the Esc button on whether the current image source is highlighted, press the center of the menus are described below. Using the Projector Menus 19 Press the bottom of options appears to the main menu display. As you want to go back to the right. 2. Your changes are...
User Manual
Page 24
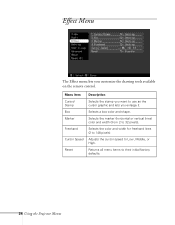
Menu item Cursor/ Stamp Box Marker Freehand Cursor Speed Reset Description Selects the stamp you want to Low, Middle, or High. Adjusts the cursor speed to use as the cursor graphic and lets you customize the drawing tools available on the remote control. Selects the color and width for freehand lines (2 to 32 pixels). Effect Menu The Effect menu lets you enlarge it. Selects the marker (horizontal or vertical lines) color and width (from 2 to 148 pixels). Returns all menu items to their initial factory defaults. 24 Using the Projector Menus Selects a box color and shape.
Menu item Cursor/ Stamp Box Marker Freehand Cursor Speed Reset Description Selects the stamp you want to Low, Middle, or High. Adjusts the cursor speed to use as the cursor graphic and lets you customize the drawing tools available on the remote control. Selects the color and width for freehand lines (2 to 32 pixels). Effect Menu The Effect menu lets you enlarge it. Selects the marker (horizontal or vertical lines) color and width (from 2 to 148 pixels). Returns all menu items to their initial factory defaults. 24 Using the Projector Menus Selects a box color and shape.
User Manual
Page 26
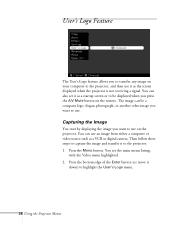
...'s Logo feature allows you to transfer any image on your computer to the projector, and then use it as a startup screen or to be a company logo, slogan, photograph, or another other image you want to use on the remote. You can use an image from either a computer or video source such as... a VCR or digital camera. You can also set it as the screen displayed when the projector is not receiving a signal. Then follow these steps to capture the...
...'s Logo feature allows you to transfer any image on your computer to the projector, and then use it as a startup screen or to be a company logo, slogan, photograph, or another other image you want to use on the remote. You can use an image from either a computer or video source such as... a VCR or digital camera. You can also set it as the screen displayed when the projector is not receiving a signal. Then follow these steps to capture the...

User Manual
Page 27
A selection box displays over the image. 5. Using the Projector Menus 27 You see the following : 7. Use the Enter button on the remote control to select a zoom rate (display size), and then press Enter. When you see the following message: 4. If you have selected the entire area, press ...Enter. 6. You see the message "Do you want to select this image?" Use the Enter button on the remote control to use this feature. select Yes and press Enter. Select Yes and press Enter. Once you want to select the area of the image...
A selection box displays over the image. 5. Using the Projector Menus 27 You see the following : 7. Use the Enter button on the remote control to select a zoom rate (display size), and then press Enter. When you see the following message: 4. If you have selected the entire area, press ...Enter. 6. You see the message "Do you want to select this image?" Use the Enter button on the remote control to use this feature. select Yes and press Enter. Select Yes and press Enter. Once you want to select the area of the image...
User Manual
Page 34
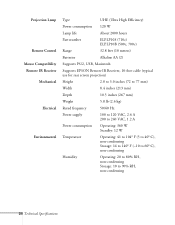
... W Lamp life About 2000 hours Part number ELPLP10S (710c) ELPLP10B (500c, 700c) Range 32.8 feet (10 meters) Batteries Alkaline AA (2) Supports PS/2, USB, Macintosh Supports EPSON Remote IR Receiver, 10-foot cable (typical use for rear screen projection) Height 2.8 to 3.0 inches (72 to 77 mm) Width 8.4 inches (213 mm) Depth 10.5 inches...
... W Lamp life About 2000 hours Part number ELPLP10S (710c) ELPLP10B (500c, 700c) Range 32.8 feet (10 meters) Batteries Alkaline AA (2) Supports PS/2, USB, Macintosh Supports EPSON Remote IR Receiver, 10-foot cable (typical use for rear screen projection) Height 2.8 to 3.0 inches (72 to 77 mm) Width 8.4 inches (213 mm) Depth 10.5 inches...
User Manual
Page 38
... connecting desktop, 9, 13 menu, 23 B Brightness, 33 Brightness setting, 20, 22 Buttons, remote control, 18 to 19 C Camcorder, adjusting the projected image, 22 CE Marking, 35 Ceiling, hanging the projector from, 30 Color setting, 21, 22 Color Temp setting, 30 Computer connector pin assignments, 37..., 10 to 14 to a desktop PC, 7 to 9 Contrast setting, 20, 22 D DIP switches, 12 Display formats, supported, 35 to 36 Distance from projector to screen, 5 to 6 Drawing tools, 24 E Effect menu, 24 Electrical specifications, 34 Environmental specifications, 34 to 35 F Formats, supported display, 35 to...
... connecting desktop, 9, 13 menu, 23 B Brightness, 33 Brightness setting, 20, 22 Buttons, remote control, 18 to 19 C Camcorder, adjusting the projected image, 22 CE Marking, 35 Ceiling, hanging the projector from, 30 Color setting, 21, 22 Color Temp setting, 30 Computer connector pin assignments, 37..., 10 to 14 to a desktop PC, 7 to 9 Contrast setting, 20, 22 D DIP switches, 12 Display formats, supported, 35 to 36 Distance from projector to screen, 5 to 6 Drawing tools, 24 E Effect menu, 24 Electrical specifications, 34 Environmental specifications, 34 to 35 F Formats, supported display, 35 to...
User Manual
Page 39
...consumption, 34 management, 25 supply, 34 Projector distance to screen, 6 hanging from the ceiling, 30 lamp specifications, 34 positioning, 5 to 6 positioning the screen image, 20, 22 setting up, 5 turning off, 16 turning on, 14 R Rear projection, 30 Remote control buttons, 18 to 19 specifications, 34...25 Sharpness setting, 21, 22 Speakers, adjusting sound, 23 Specifications electrical, 34 environmental, 34 to 35 general, 33 lamp, 34 mechanical, 34 remote control, 34 safety, 35 Startup screen, 30 Sync setting, 20 T Temperature requirements, 34 Tint setting, 22 Tone setting, 23 Tracking setting, ...
...consumption, 34 management, 25 supply, 34 Projector distance to screen, 6 hanging from the ceiling, 30 lamp specifications, 34 positioning, 5 to 6 positioning the screen image, 20, 22 setting up, 5 turning off, 16 turning on, 14 R Rear projection, 30 Remote control buttons, 18 to 19 specifications, 34...25 Sharpness setting, 21, 22 Speakers, adjusting sound, 23 Specifications electrical, 34 environmental, 34 to 35 general, 33 lamp, 34 mechanical, 34 remote control, 34 safety, 35 Startup screen, 30 Sync setting, 20 T Temperature requirements, 34 Tint setting, 22 Tone setting, 23 Tracking setting, ...

User Manual
Page 42
CContents Welcome Tips for Powerful Presentations 2 Getting More Information 3 Warnings, Cautions, and Notes 4 Registering 4 Reading Your Electronic Manuals 4 1 Getting Started Unpacking the Projector 8 Installing Batteries in the Remote Control 9 Positioning the Projector 9 Choosing Your Connections 11 Connecting to a PC Laptop 12 Connecting the Computer Cable 12 Connecting the Audio Cable 13 Connecting the Cable...
CContents Welcome Tips for Powerful Presentations 2 Getting More Information 3 Warnings, Cautions, and Notes 4 Registering 4 Reading Your Electronic Manuals 4 1 Getting Started Unpacking the Projector 8 Installing Batteries in the Remote Control 9 Positioning the Projector 9 Choosing Your Connections 11 Connecting to a PC Laptop 12 Connecting the Computer Cable 12 Connecting the Audio Cable 13 Connecting the Cable...

User Manual
Page 43
...Image 28 Positioning Your Image 29 Adjusting the Image Shape 30 Using the Remote Control 30 Operating the Projector with the Remote Control . . . . 31 Using the Remote Control as a Wireless Mouse 32 Zooming Your Image with the Remote 33 Resizing Your Image 33 Turning Off the Picture 34 Working with Audio...Drawing Freehand Lines 39 What To Do When the Lights Flash 40 Using the On-Screen Help 41 Shutting Down the Projector 42 3 Fine-Tuning Your Projector Using the Menus 46 Changing Menu Settings 47 Adjusting the Image 48 Repositioning the Image 48 Adjusting Image Appearance 49 ...
...Image 28 Positioning Your Image 29 Adjusting the Image Shape 30 Using the Remote Control 30 Operating the Projector with the Remote Control . . . . 31 Using the Remote Control as a Wireless Mouse 32 Zooming Your Image with the Remote 33 Resizing Your Image 33 Turning Off the Picture 34 Working with Audio...Drawing Freehand Lines 39 What To Do When the Lights Flash 40 Using the On-Screen Help 41 Shutting Down the Projector 42 3 Fine-Tuning Your Projector Using the Menus 46 Changing Menu Settings 47 Adjusting the Image 48 Repositioning the Image 48 Adjusting Image Appearance 49 ...

User Manual
Page 44
... Mute Button 57 Viewing Information 58 Cleaning the Lens 60 Cleaning the Projector 60 Cleaning the Air Filter 61 Replacing the Lamp 62 Transporting the Projector 64 Projector Operation Problems 65 Problems with the Remote Control 67 Image or Sound Problems 68 Where To Get Help 71... Telephone Support Services 72 Important Safety Instructions 73 Remote Control Information 75 Declaration of Conformity 76 ...
... Mute Button 57 Viewing Information 58 Cleaning the Lens 60 Cleaning the Projector 60 Cleaning the Air Filter 61 Replacing the Lamp 62 Transporting the Projector 64 Projector Operation Problems 65 Problems with the Remote Control 67 Image or Sound Problems 68 Where To Get Help 71... Telephone Support Services 72 Important Safety Instructions 73 Remote Control Information 75 Declaration of Conformity 76 ...
User Manual
Page 45
... outputs, for zooming in rooms light enough to offer powerful 3-LCD performance. A special 800 number and your projector creates bright images that can be easily seen in on your projector. You operate your projector through a hand-held remote control, with a projector support specialist-fast. The EPSON PrivateLineSM Technical Support program will connect you need it. WWelcome Your...
... outputs, for zooming in rooms light enough to offer powerful 3-LCD performance. A special 800 number and your projector creates bright images that can be easily seen in on your projector. You operate your projector through a hand-held remote control, with a projector support specialist-fast. The EPSON PrivateLineSM Technical Support program will connect you need it. WWelcome Your...


