User Manual
Page 3
... Your Documentation 3 Getting More Information 3 Registration and Warranty 4 Unpacking the Projector 5 Additional Components 6 Optional Accessories 7 Setting Up the Projector 9 Positioning the Projector 10 Connecting to a Laptop Computer 12 Connecting the Computer Cable 12 Connecting the Cable for Remote Mouse Control . . . . 13 Amplifying Computer Audio 14 Connecting to Video Sources 15 Connecting the RCA Video...
... Your Documentation 3 Getting More Information 3 Registration and Warranty 4 Unpacking the Projector 5 Additional Components 6 Optional Accessories 7 Setting Up the Projector 9 Positioning the Projector 10 Connecting to a Laptop Computer 12 Connecting the Computer Cable 12 Connecting the Cable for Remote Mouse Control . . . . 13 Amplifying Computer Audio 14 Connecting to Video Sources 15 Connecting the RCA Video...
User Manual
Page 4
...Turning Off the Picture and Sound 33 Stopping Action 33 Zooming Your Image 33 Using the Remote Control as a Wireless Mouse 34 Replacing the Battery 35 Fine-tuning the Projector 37 Using the Projector's Menu System 38 Changing Menu Settings 39 Adjusting the Image 40 Repositioning the Image 40... the Sound 42 Creating Your Own Startup Screen 43 Capturing the Image 43 Selecting When the Image Displays 44 Customizing Projector Features 45 Setting Advanced Features 46 Viewing Lamp Usage and Other Information 48 Restoring the Default Settings 49 Maintaining and Transporting the...
...Turning Off the Picture and Sound 33 Stopping Action 33 Zooming Your Image 33 Using the Remote Control as a Wireless Mouse 34 Replacing the Battery 35 Fine-tuning the Projector 37 Using the Projector's Menu System 38 Changing Menu Settings 39 Adjusting the Image 40 Repositioning the Image 40... the Sound 42 Creating Your Own Startup Screen 43 Capturing the Image 43 Selecting When the Image Displays 44 Customizing Projector Features 45 Setting Advanced Features 46 Viewing Lamp Usage and Other Information 48 Restoring the Default Settings 49 Maintaining and Transporting the...
User Manual
Page 5
... 63 Solving Problems with the Image or Sound 65 Solving Problems with the Remote Control 71 Where To Get Help 72 Telephone Support Services 72 Appendix A: Connecting to Additional Equipment 75 Installing the Projector 76 Connecting to a PC Desktop Computer 76 Connecting the Computer Cable 77 ...Cable 82 Connecting the Audio Cable 83 Connecting to a High-End Workstation 84 Appendix B: Notices 85 Important Safety Instructions 85 Remote Control Information 87 Declaration of Conformity 88 FCC Compliance Statement 89 Warranty 90 Appendix C: Technical Specifications 93 Index 99 v
... 63 Solving Problems with the Image or Sound 65 Solving Problems with the Remote Control 71 Where To Get Help 72 Telephone Support Services 72 Appendix A: Connecting to Additional Equipment 75 Installing the Projector 76 Connecting to a PC Desktop Computer 76 Connecting the Computer Cable 77 ...Cable 82 Connecting the Audio Cable 83 Connecting to a High-End Workstation 84 Appendix B: Notices 85 Important Safety Instructions 85 Remote Control Information 87 Declaration of Conformity 88 FCC Compliance Statement 89 Warranty 90 Appendix C: Technical Specifications 93 Index 99 v
User Manual
Page 8
... Quick Setup sheet or page 12 of the projector's features can only be accessed with the remote control. For details, see page 34. ■ Including sound in the remote control storage compartment beneath the side of the projector. By connecting an additional cable, you can ...also use the projector's built-in to your projector. Getting the Most from Your Projector Depending on your presentation includes sound, you click ...
... Quick Setup sheet or page 12 of the projector's features can only be accessed with the remote control. For details, see page 34. ■ Including sound in the remote control storage compartment beneath the side of the projector. By connecting an additional cable, you can ...also use the projector's built-in to your projector. Getting the Most from Your Projector Depending on your presentation includes sound, you click ...
User Manual
Page 11
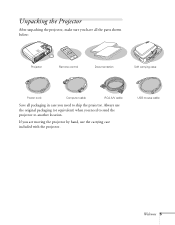
...included with the projector. USB mouse cable Welcome 5 Unpacking the Projector After unpacking the projector, make sure you have all the parts shown below: Projector Page down Page up Computer Power S-Video/Video Color Mode A/V Mute Freeze Menu E-Zoom Enter ESC Auto Remote control Documentation ...Soft carrying case Power cord Computer cable RCA A/V cable Save all packaging in case you need to send the projector to ship the projector. If you are moving the projector by hand, use the original packaging...
...included with the projector. USB mouse cable Welcome 5 Unpacking the Projector After unpacking the projector, make sure you have all the parts shown below: Projector Page down Page up Computer Power S-Video/Video Color Mode A/V Mute Freeze Menu E-Zoom Enter ESC Auto Remote control Documentation ...Soft carrying case Power cord Computer cable RCA A/V cable Save all packaging in case you need to send the projector to ship the projector. If you are moving the projector by hand, use the original packaging...
User Manual
Page 19
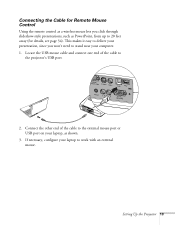
Connect the other end of the cable to the projector's USB port. 2. Setting Up the Projector 13 Connecting the Cable for details, see page 34). This makes it easy to deliver your presentation, since you click through slideshow-style presentations, such ... the cable to the external mouse port or USB port on your computer. 1. If necessary, configure your laptop to 20 feet away (for Remote Mouse Control Using the remote control as a wireless mouse lets you won't need to stand near your laptop, as PowerPoint, from up to work with an external mouse...
Connect the other end of the cable to the projector's USB port. 2. Setting Up the Projector 13 Connecting the Cable for details, see page 34). This makes it easy to deliver your presentation, since you click through slideshow-style presentations, such ... the cable to the external mouse port or USB port on your computer. 1. If necessary, configure your laptop to 20 feet away (for Remote Mouse Control Using the remote control as a wireless mouse lets you won't need to stand near your laptop, as PowerPoint, from up to work with an external mouse...

User Manual
Page 25
This chapter covers the following: ■ Turning on using the remote. See Chapter 3 for instructions on the projector and other equipment ■ Adjusting the image ■ Shutting down the projector Using the Projector 19 Although you can operate the projector without it, the remote control lets you 're ready to turn it on, adjust the image, and give your presentation. 1 Using the Projector Once you've set up the projector, you use additional features.
This chapter covers the following: ■ Turning on using the remote. See Chapter 3 for instructions on the projector and other equipment ■ Adjusting the image ■ Shutting down the projector Using the Projector 19 Although you can operate the projector without it, the remote control lets you 're ready to turn it on, adjust the image, and give your presentation. 1 Using the Projector Once you've set up the projector, you use additional features.

User Manual
Page 27
... on in about 40 seconds. This can damage your video source. Shutting down the projector as the projector warms up Power Computer S-Video/Video Color Mode Menu A/V Mute Freeze E-Zoom Enter Auto ESC Projector Remote control The power light flashes green as described on focusing and making other device. Page... Page up , and the projection lamp comes on . The power light stays green. 5. Using the Projector 21 Do one of the projector or the S-Video/Video button on the remote control to switch to page 25 for instructions on page 29. warning Never look into the lens when the...
... on in about 40 seconds. This can damage your video source. Shutting down the projector as the projector warms up Power Computer S-Video/Video Color Mode Menu A/V Mute Freeze E-Zoom Enter Auto ESC Projector Remote control The power light flashes green as described on focusing and making other device. Page... Page up , and the projection lamp comes on . The power light stays green. 5. Using the Projector 21 Do one of the projector or the S-Video/Video button on the remote control to switch to page 25 for instructions on page 29. warning Never look into the lens when the...
User Manual
Page 31
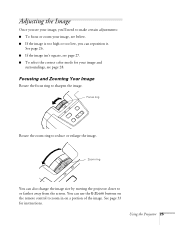
...ring Rotate the zoom ring to sharpen the image. You can reposition it. Using the Projector 25 Focusing and Zooming Your Image Rotate the focus ring to reduce or enlarge the image...below. ■ If the image is too high or too low, you can use the E-Zoom buttons on the remote control to zoom in on a portion of the image. Adjusting the Image Once you see your image, you'll ... or zoom your image and surroundings, see page 28. Zoom ring You can also change the image size by moving the projector closer to or farther away from the screen. See page 26. ■ If the image isn't square, see page...
...ring Rotate the zoom ring to sharpen the image. You can reposition it. Using the Projector 25 Focusing and Zooming Your Image Rotate the focus ring to reduce or enlarge the image...below. ■ If the image is too high or too low, you can use the E-Zoom buttons on the remote control to zoom in on a portion of the image. Adjusting the Image Once you see your image, you'll ... or zoom your image and surroundings, see page 28. Zoom ring You can also change the image size by moving the projector closer to or farther away from the screen. See page 26. ■ If the image isn't square, see page...

User Manual
Page 33
...Projector 27 Use the directional buttons to highlight Auto Keystone and to select the Setting menu, then press Enter. You can also perform electronic keystone correction using ceiling or rear projection.) ■ To manually adjust the keystone correction value, press the or side of the Keystone button on the remote... on the Auto Keystone feature or by pressing the Menu button. (Auto Keystone is not available when you 've placed the projector off to correct the shape of the image. After correction, your image looks like or , the Auto Keystone feature has been disabled.
...Projector 27 Use the directional buttons to highlight Auto Keystone and to select the Setting menu, then press Enter. You can also perform electronic keystone correction using ceiling or rear projection.) ■ To manually adjust the keystone correction value, press the or side of the Keystone button on the remote... on the Auto Keystone feature or by pressing the Menu button. (Auto Keystone is not available when you 've placed the projector off to correct the shape of the image. After correction, your image looks like or , the Auto Keystone feature has been disabled.

User Manual
Page 34
...mode is Normal, which is appropriate for the image you're projecting and the surroundings in the Video menu (see page 40). 28 Using the Projector Use when you're projecting video games in bright rooms. For video or S-Video images, the default color mode is Theatre, which you're ...in which optimizes video images using their original tints, without any color enhancements. To change the color mode, press the Color Mode button on the remote control. You can also select one of the screen. Color Mode Page down Page up Power Computer S-Video/Video Color Mode Menu A/V Mute Freeze ...
...mode is Normal, which is appropriate for the image you're projecting and the surroundings in the Video menu (see page 40). 28 Using the Projector Use when you're projecting video games in bright rooms. For video or S-Video images, the default color mode is Theatre, which you're ...in which optimizes video images using their original tints, without any color enhancements. To change the color mode, press the Color Mode button on the remote control. You can also select one of the screen. Color Mode Page down Page up Power Computer S-Video/Video Color Mode Menu A/V Mute Freeze ...

User Manual
Page 35
... turns off . If you are done using the projector, unplug the power cord. Press the P Power button again. If you want to start projecting again, press the P Power button. 3. To turn the projector on the projector or remote control. The power light flashes orange for 30 minutes..., it off the projector, press the P Power button on again, wait until the orange light stops flashing. This conserves ...
... turns off . If you are done using the projector, unplug the power cord. Press the P Power button again. If you want to start projecting again, press the P Power button. 3. To turn the projector on the projector or remote control. The power light flashes orange for 30 minutes..., it off the projector, press the P Power button on again, wait until the orange light stops flashing. This conserves ...
User Manual
Page 37
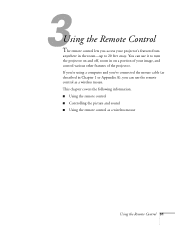
... Appendix A), you access your image, and control various other features of your projector's features from anywhere in the room-up to 20 feet away. 1 Using the Remote Control The remote control lets you can use the remote control as a wireless mouse Using the Remote Control 31 This chapter covers the following information: ■ Using the...
... Appendix A), you access your image, and control various other features of your projector's features from anywhere in the room-up to 20 feet away. 1 Using the Remote Control The remote control lets you can use the remote control as a wireless mouse Using the Remote Control 31 This chapter covers the following information: ■ Using the...

User Manual
Page 38
...off the picture and sound, freeze the action, or zoom in the remote control storage compartment beneath the side of the projector. Using the Remote Control Before using the remote control, stand within 20 feet of the projector. See the following pages for a moment before the image appears. ...32 Using the Remote Control Tape When using the remote control, pull out the tape from...
...off the picture and sound, freeze the action, or zoom in the remote control storage compartment beneath the side of the projector. Using the Remote Control Before using the remote control, stand within 20 feet of the projector. See the following pages for a moment before the image appears. ...32 Using the Remote Control Tape When using the remote control, pull out the tape from...
User Manual
Page 39
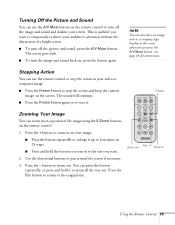
...screen goes dark. ■ To turn off the image and sound and darken your screen. Stopping Action You can use the A/V Mute button on the remote control to turn off the picture and sound, press the A/V Mute button. button to the original size. note You can also have an image, such... on the screen whenever you want to temporarily re-direct your audience's attention without the distraction of the image using the E-Zoom buttons on the remote control. 1. You can press the button repeatedly, or press and hold the button to zoom in to the size you press the A/V Mute button. ...
...screen goes dark. ■ To turn off the image and sound and darken your screen. Stopping Action You can use the A/V Mute button on the remote control to turn off the picture and sound, press the A/V Mute button. button to the original size. note You can also have an image, such... on the screen whenever you want to temporarily re-direct your audience's attention without the distraction of the image using the E-Zoom buttons on the remote control. 1. You can press the button repeatedly, or press and hold the button to zoom in to the size you press the A/V Mute button. ...

User Manual
Page 40
... drag, press down on the Enter button and use the remote control as a wireless mouse, you have connected the mouse cable between the projector and your computer as PowerPoint) from up or Enter button on the remote control. To control your computer with the remote, make sure you can control your computer to 20...
... drag, press down on the Enter button and use the remote control as a wireless mouse, you have connected the mouse cable between the projector and your computer as PowerPoint) from up or Enter button on the remote control. To control your computer with the remote, make sure you can control your computer to 20...
User Manual
Page 41
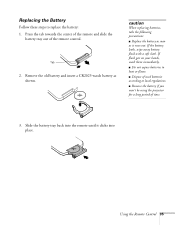
...2. Slide the battery tray back into the remote until it runs out. If the battery leaks, wipe away battery fluid with a soft cloth. Replacing the Battery Follow these steps to local regulations. ■ Remove the battery if you won't be using the projector for a long period of time. 3. If... fluid gets on your hands, wash them immediately. ■ Do not expose batteries to heat or flame. ■ Dispose of the remote control.
...2. Slide the battery tray back into the remote until it runs out. If the battery leaks, wipe away battery fluid with a soft cloth. Replacing the Battery Follow these steps to local regulations. ■ Remove the battery if you won't be using the projector for a long period of time. 3. If... fluid gets on your hands, wash them immediately. ■ Do not expose batteries to heat or flame. ■ Dispose of the remote control.

User Manual
Page 42
36 Using the Remote Control
36 Using the Remote Control
User Manual
Page 43
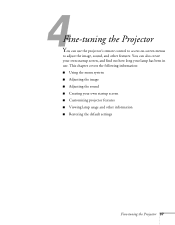
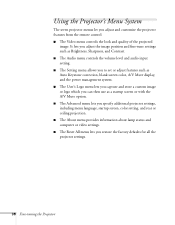
You can use . This chapter covers the following information: ■ Using the menu system ■ Adjusting the image ■ Adjusting the sound ■ Creating your lamp has been in use the projector's remote control to access on-screen menus to adjust the image, sound, and other information ■ Restoring the default settings Fine-tuning the Projector 37 1 Fine-tuning the Projector You can also create your own startup screen, and find out how long your own startup screen ■ Customizing projector features ■ Viewing lamp usage and other features.
You can use . This chapter covers the following information: ■ Using the menu system ■ Adjusting the image ■ Adjusting the sound ■ Creating your lamp has been in use the projector's remote control to access on-screen menus to adjust the image, sound, and other information ■ Restoring the default settings Fine-tuning the Projector 37 1 Fine-tuning the Projector You can also create your own startup screen, and find out how long your own startup screen ■ Customizing projector features ■ Viewing lamp usage and other features.
User Manual
Page 44
...image or logo which you can then use as a startup screen or with the A/V Mute option. ■ The Advanced menu lets you specify additional projector settings, including menu language, startup screen, color setting, and rear or ceiling projection. ■ The About menu provides information about lamp status and computer... or video settings. ■ The Reset All menu lets you adjust and customize the projector features from the remote control: ■ The Video menu controls the look and quality of the projected image. Using the...
...image or logo which you can then use as a startup screen or with the A/V Mute option. ■ The Advanced menu lets you specify additional projector settings, including menu language, startup screen, color setting, and rear or ceiling projection. ■ The About menu provides information about lamp status and computer... or video settings. ■ The Reset All menu lets you adjust and customize the projector features from the remote control: ■ The Video menu controls the look and quality of the projected image. Using the...


