User Manual
Page 7
3 Using the Projector Menus 59 Accessing the Main Menu 60 Changing a Menu Setting 61 Video Menu (Image Source = Computer 63 Video Menu (Image Source = Video 65 Audio Menu ... 69 Storing a User Logo 69 Assigning the Logo to the AV/Mute Button 71 Effect Menu 72 About Menu 73 Reset All Menu 74 4 Using the ELP Link III Software 75 Connecting the ELP Link III Cables 77 Connecting to a PC Desktop Computer 78 Connecting to a PC Laptop Computer 80 Connecting to a Desktop...
3 Using the Projector Menus 59 Accessing the Main Menu 60 Changing a Menu Setting 61 Video Menu (Image Source = Computer 63 Video Menu (Image Source = Video 65 Audio Menu ... 69 Storing a User Logo 69 Assigning the Logo to the AV/Mute Button 71 Effect Menu 72 About Menu 73 Reset All Menu 74 4 Using the ELP Link III Software 75 Connecting the ELP Link III Cables 77 Connecting to a PC Desktop Computer 78 Connecting to a PC Laptop Computer 80 Connecting to a Desktop...

User Manual
Page 70
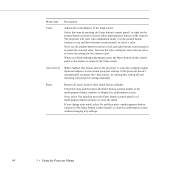
q The Reset All menu returns all settings to hide the menu. 60 3 • Using the Projector Menus The Main menu appears: Press the Menu button again to their factory defaults. Accessing the Main Menu To display the Main menu, press the Menu button on the control panel or the remote control. q The About menu provides information about H/V (Horizontal/Vertical) frequency, computer selection, and lamp hours.
q The Reset All menu returns all settings to hide the menu. 60 3 • Using the Projector Menus The Main menu appears: Press the Menu button again to their factory defaults. Accessing the Main Menu To display the Main menu, press the Menu button on the control panel or the remote control. q The About menu provides information about H/V (Horizontal/Vertical) frequency, computer selection, and lamp hours.
User Manual
Page 74
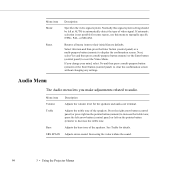
... and down buttons (control panel) to the current projector settings. Auto Set Up When enabled, this item and then press the Enter button (control panel) or the multi-purpose button (remote) to their initial factory defaults. Reset Returns all menu items to display the confirmation screen.... Select this feature allows the projector to sense the computer signal input and adjust it to select a color. Menu item Description...
... and down buttons (control panel) to the current projector settings. Auto Set Up When enabled, this item and then press the Enter button (control panel) or the multi-purpose button (remote) to their initial factory defaults. Reset Returns all menu items to display the confirmation screen.... Select this feature allows the projector to sense the computer signal input and adjust it to select a color. Menu item Description...
User Manual
Page 76
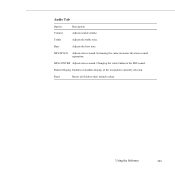
...to clear the confirmation screen without changing any settings. Increasing the value widens the sound. 66 3 • Using the Projector Menus Menu item Mode Reset Description Specifies the video signal system. Select this signal system setting should be left on the pointer button (remote) to increase...their initial factory defaults. Normally this item and then press the Enter button (control panel) or a multi-purpose button (remote) to reset the Video Menu. Bass Adjusts the bass tone of the speakers. SRS SPACE Adjusts stereo sound. Press the right arrow button (control ...
...to clear the confirmation screen without changing any settings. Increasing the value widens the sound. 66 3 • Using the Projector Menus Menu item Mode Reset Description Specifies the video signal system. Select this signal system setting should be left on the pointer button (remote) to increase...their initial factory defaults. Normally this item and then press the Enter button (control panel) or a multi-purpose button (remote) to reset the Video Menu. Bass Adjusts the bass tone of the speakers. SRS SPACE Adjusts stereo sound. Press the right arrow button (control ...
User Manual
Page 77
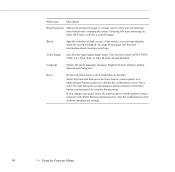
...item and then press the Enter button (control panel) or a multi-purpose button (remote) to clear the confirmation screen without changing any settings. Reset Returns all menu items to decrease the color temperature value. Next, select Yes and then press a multi-purpose button (remote) or the Enter button...). Menu item Prompt Color Temperature Ceiling Description Temporarily displays a message on , while OFF turns it looks correct when you're hanging the projector upside-down from the ceiling. Setting Menu 67 Adjusts the whiteness of the screen. Select this feature on the...
...item and then press the Enter button (control panel) or a multi-purpose button (remote) to clear the confirmation screen without changing any settings. Reset Returns all menu items to decrease the color temperature value. Next, select Yes and then press a multi-purpose button (remote) or the Enter button...). Menu item Prompt Color Temperature Ceiling Description Temporarily displays a message on , while OFF turns it looks correct when you're hanging the projector upside-down from the ceiling. Setting Menu 67 Adjusts the whiteness of the screen. Select this feature on the...
User Manual
Page 78
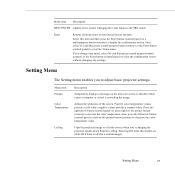
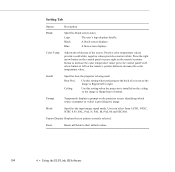
...106 for a normal image). Select this item and then press the Enter button (control panel) or a multi-purpose button (remote) to reset the Setting menu. Next, select Yes and then press a multi-purpose button (remote) or the Enter button (control panel) to display ...the confirmation screen. Video Signal Specifies the input image signal mode. Reset Returns all menu items to clear the confirmation screen without changing any settings. 68 3 • Using the Projector Menus Language Selects the menu language: Japanese, English, French, German, Italian, Spanish ...
...106 for a normal image). Select this item and then press the Enter button (control panel) or a multi-purpose button (remote) to reset the Setting menu. Next, select Yes and then press a multi-purpose button (remote) or the Enter button (control panel) to display ...the confirmation screen. Video Signal Specifies the input image signal mode. Reset Returns all menu items to clear the confirmation screen without changing any settings. 68 3 • Using the Projector Menus Language Selects the menu language: Japanese, English, French, German, Italian, Spanish ...

User Manual
Page 82
Cursor Speed Set the cursor speed to their factory defaults. Reset Return all effect functions to Low, Middle, or High. Next, select Yes and then... Set the pointer icon and size. Marker Set the marker color and width. If you have the optional ELP Link III software, you can reconfigure the Effects button with different functions. Clear This effect button cannot be ... Select this item and then press the Enter button (control panel) or a multi-purpose button (remote) to reset the Effect menu. If you change the cursor speed. Box Set the box color. Effect Menu Use the Effect...
Cursor Speed Set the cursor speed to their factory defaults. Reset Return all effect functions to Low, Middle, or High. Next, select Yes and then... Set the pointer icon and size. Marker Set the marker color and width. If you have the optional ELP Link III software, you can reconfigure the Effects button with different functions. Clear This effect button cannot be ... Select this item and then press the Enter button (control panel) or a multi-purpose button (remote) to reset the Effect menu. If you change the cursor speed. Box Set the box color. Effect Menu Use the Effect...

User Manual
Page 84
It does not change or delete any user logo you may have stored. You will be prompted to reset all menus to their factory defaults. Select Yes or No, then press the top or bottom multi-purpose button (remote) or the Enter button (control panel) to confirm the reset action. Reset All Menu Selecting the Reset All menu option resets the settings in all the settings. 74 3 • Using the Projector Menus
It does not change or delete any user logo you may have stored. You will be prompted to reset all menus to their factory defaults. Select Yes or No, then press the top or bottom multi-purpose button (remote) or the Enter button (control panel) to confirm the reset action. Reset All Menu Selecting the Reset All menu option resets the settings in all the settings. 74 3 • Using the Projector Menus
User Manual
Page 111
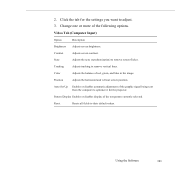
... the horizontal and vertical screen position. Change one or more of red, green, and blue in the image. Contrast Adjusts screen contrast. Reset Resets all fields to remove vertical lines. 2. Color Adjusts the balance of the following options. Using the Software 101 Tracking Adjusts tracking to their...from the computer to optimize it for the settings you want to remove screen flicker. Click the tab for the projector. Sync Adjusts the sync (synchronization) to adjust. 3. Auto Set Up Enables or disables automatic adjustment of the test pattern currently selected.
... the horizontal and vertical screen position. Change one or more of red, green, and blue in the image. Contrast Adjusts screen contrast. Reset Resets all fields to remove vertical lines. 2. Color Adjusts the balance of the following options. Using the Software 101 Tracking Adjusts tracking to their...from the computer to optimize it for the settings you want to remove screen flicker. Click the tab for the projector. Sync Adjusts the sync (synchronization) to adjust. 3. Auto Set Up Enables or disables automatic adjustment of the test pattern currently selected.
User Manual
Page 112
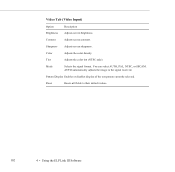
Color Adjusts the color density. Mode Selects the signal format. Pattern Display Enables or disables display of the test pattern currently selected. Reset Resets all fields to the signal received. Contrast Adjusts screen contrast. AUTO automatically adjusts the image to their default values. 102 4 • Using the ELP Link III Software Sharpness Adjusts screen sharpness. Video Tab (Video Input) Option Brightness Description Adjusts screen brightness. Tint Adjusts the color tint (NTSC only). You can select AUTO, PAL, NTSC, or SECAM.
Color Adjusts the color density. Mode Selects the signal format. Pattern Display Enables or disables display of the test pattern currently selected. Reset Resets all fields to the signal received. Contrast Adjusts screen contrast. AUTO automatically adjusts the image to their default values. 102 4 • Using the ELP Link III Software Sharpness Adjusts screen sharpness. Video Tab (Video Input) Option Brightness Description Adjusts screen brightness. Tint Adjusts the color tint (NTSC only). You can select AUTO, PAL, NTSC, or SECAM.
User Manual
Page 113
Increasing the value increases the stereo sound separation. Pattern Display Enables or disables display of the test pattern currently selected. Reset Resets all fields to their default values. Using the Software 103 Bass Adjusts the bass tone. Audio Tab Option Volume Description Adjusts sound volume. SRS SPACE Adjusts stereo sound. Changing the value balances the SRS sound. Treble Adjusts the treble tone. SRS CENTER Adjusts stereo sound.
Increasing the value increases the stereo sound separation. Pattern Display Enables or disables display of the test pattern currently selected. Reset Resets all fields to their default values. Using the Software 103 Bass Adjusts the bass tone. Audio Tab Option Volume Description Adjusts sound volume. SRS SPACE Adjusts stereo sound. Changing the value balances the SRS sound. Treble Adjusts the treble tone. SRS CENTER Adjusts stereo sound.
User Manual
Page 114
.... Color Temp Adjusts the whiteness of a screen so the image is being used: Rear Proj. Install Specifies how the projector is flipped left on the ceiling so the image is providing the image. negative values provide a warmer white. Use this setting when ...the projector is installed on the remote's pointer button to bottom. Prompt Temporarily displays a prompt on the remote's pointer button to their default values. 104 4 • Using the ELP Link III Software Reset Resets all fields to increase the color temperature value; ...
.... Color Temp Adjusts the whiteness of a screen so the image is being used: Rear Proj. Install Specifies how the projector is flipped left on the ceiling so the image is providing the image. negative values provide a warmer white. Use this setting when ...the projector is installed on the remote's pointer button to bottom. Prompt Temporarily displays a prompt on the remote's pointer button to their default values. 104 4 • Using the ELP Link III Software Reset Resets all fields to increase the color temperature value; ...
User Manual
Page 152
... specifications, 128 Language menu option, 68 Laptop, connecting to, 24 to 26, 80 to 81 Launching the ELP Link III software, 88 to 90 Lens, cleaning, 110 Lights, status, 56 to 57, 119 to 121...Link set (cables and software), 2, 75 to 108 Logo, creating, 106 to 108 Lumens, 127 M Macintosh connecting projector to, 27 to 34, 82 to 85 installing software, 87 Main menu, displaying and hiding, 60 Mechanical specifications,...Menus About, 60, 73 accessing, 60 Audio, 59, 66, 67 changing settings, 61 to 62 Effect, 59, 72 Reset All, 60, 74 User's Logo, 59, 69 to 71 Video, 59, 63 to 66 Mode, video signal, 65...
... specifications, 128 Language menu option, 68 Laptop, connecting to, 24 to 26, 80 to 81 Launching the ELP Link III software, 88 to 90 Lens, cleaning, 110 Lights, status, 56 to 57, 119 to 121...Link set (cables and software), 2, 75 to 108 Logo, creating, 106 to 108 Lumens, 127 M Macintosh connecting projector to, 27 to 34, 82 to 85 installing software, 87 Main menu, displaying and hiding, 60 Mechanical specifications,...Menus About, 60, 73 accessing, 60 Audio, 59, 66, 67 changing settings, 61 to 62 Effect, 59, 72 Reset All, 60, 74 User's Logo, 59, 69 to 71 Video, 59, 63 to 66 Mode, video signal, 65...
User Manual
Page 153
Projector calculating distance to screen, 19, 45 to 46 changing ELP Link III settings, 99 to 103 connecting, ... turning on and off, 41 to 42 using the Quick Change Toolbar, 99 Projector case, cleaning, 110 Projector Control window, 99 to 103 Projector Setting window, 98 to 99 Prompt menu option, 67, 103 Q Quick Change... Toolbar, 99 R Rear projection, 68, 103 Remote control buttons, 51 to 53, 61 customizing the Effects buttons, 91 to 97 functions, 52 to 53 problems, 122 range, 51, 128 Replacing the lamp, 112 to 114 Reset...
Projector calculating distance to screen, 19, 45 to 46 changing ELP Link III settings, 99 to 103 connecting, ... turning on and off, 41 to 42 using the Quick Change Toolbar, 99 Projector case, cleaning, 110 Projector Control window, 99 to 103 Projector Setting window, 98 to 99 Prompt menu option, 67, 103 Q Quick Change... Toolbar, 99 R Rear projection, 68, 103 Remote control buttons, 51 to 53, 61 customizing the Effects buttons, 91 to 97 functions, 52 to 53 problems, 122 range, 51, 128 Replacing the lamp, 112 to 114 Reset...
