Product Information Guide
Page 9
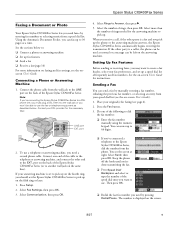
... on the answering machine. Do one end of the following to a DSL phone line, you must plug a DSL filter into the wall jack or you won't be left on faxing and fax settings, see the screen at a time. Select Send, then press OK. Epson Stylus CX9400Fax Series Faxing a Document or Photo Your Epson Stylus CX9400Fax Series lets you send faxes by entering fax numbers or...
... on the answering machine. Do one end of the following to a DSL phone line, you must plug a DSL filter into the wall jack or you won't be left on faxing and fax settings, see the screen at a time. Select Send, then press OK. Epson Stylus CX9400Fax Series Faxing a Document or Photo Your Epson Stylus CX9400Fax Series lets you send faxes by entering fax numbers or...
Product Information Guide
Page 10
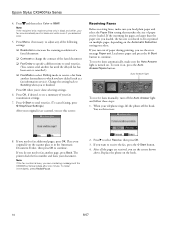
...Faxes Before receiving faxes, make sure the Auto Answer light is reduced to receive the fax, press the x Start button. 4. Place your telephone rings, lift the phone off the Auto Answer light and follow these steps: 1. If you do not need to see a summary of paper you see this screen: 8. Press r to continue. Epson Stylus CX9400Fax Series... dialed (such as a fax information service). Press and then select Color or B&W. Change the setting back to continue. If the incoming fax pages are larger than the paper size you need to fax another fax machine to change the contrast...
...Faxes Before receiving faxes, make sure the Auto Answer light is reduced to receive the fax, press the x Start button. 4. Place your telephone rings, lift the phone off the Auto Answer light and follow these steps: 1. If you do not need to see a summary of paper you see this screen: 8. Press r to continue. Epson Stylus CX9400Fax Series... dialed (such as a fax information service). Press and then select Color or B&W. Change the setting back to continue. If the incoming fax pages are larger than the paper size you need to fax another fax machine to change the contrast...

Quick Reference Guide
Page 13
... ■ "Setting Up Fax Features" on page 14 ■ "Sending a Fax" on page 19 ■ "Receiving Faxes" on page 21 For more information on faxing and fax settings, see the on the back of the CX9400Fax Series. See these sections: ■ "Connecting a Phone or Answering Machine" below . Note: If you're connecting the CX9400Fax Series to a DSL phone line, you must plug...
... ■ "Setting Up Fax Features" on page 14 ■ "Sending a Fax" on page 19 ■ "Receiving Faxes" on page 21 For more information on faxing and fax settings, see the on the back of the CX9400Fax Series. See these sections: ■ "Connecting a Phone or Answering Machine" below . Note: If you're connecting the CX9400Fax Series to a DSL phone line, you must plug...

Quick Reference Guide
Page 14
... the other party is a fax and you should set up on the answering machine. Select Fax Settings, then press OK. 3. 2. Connect one end of rings needed for the answering machine to pick up the phone or the answering machine answers, the CX9400Fax Series automatically begins receiving the transmission. If your fax preferences, and set the CX9400Fax Series to Answer, then press r. 5. Select more...
... the other party is a fax and you should set up on the answering machine. Select Fax Settings, then press OK. 3. 2. Connect one end of rings needed for the answering machine to pick up the phone or the answering machine answers, the CX9400Fax Series automatically begins receiving the transmission. If your fax preferences, and set the CX9400Fax Series to Answer, then press r. 5. Select more...
Quick Reference Guide
Page 16
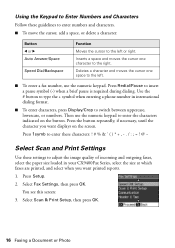
... the numeric keypad. You see this screen: 3. Use the # button to type the + symbol when entering a phone number in your CX9400Fax Series, select the size at which faxes are printed, and select when you want printed reports. 1. Press the button repeatedly, if necessary, until the character you... space, or delete a character: Button l or r Auto Answer/Space Speed Dial/Backspace Function Moves the cursor to insert a pause symbol (-) when a brief pause is required during dialing. Select Scan & Print Setup, then press OK. 16 Faxing a Document or Photo Press Redial/Pause to the left . &#...
... the numeric keypad. You see this screen: 3. Use the # button to type the + symbol when entering a phone number in your CX9400Fax Series, select the size at which faxes are printed, and select when you want printed reports. 1. Press the button repeatedly, if necessary, until the character you... space, or delete a character: Button l or r Auto Answer/Space Speed Dial/Backspace Function Moves the cursor to insert a pause symbol (-) when a brief pause is required during dialing. Select Scan & Print Setup, then press OK. 16 Faxing a Document or Photo Press Redial/Pause to the left . &#...

Quick Reference Guide
Page 21
... rings, lift the phone off the Auto Answer light and follow these steps: 1. Load more paper and press the x Start button to select Receive, then press OK. 3. If you run out of rings before the CX9400Fax Series answers, see page 16). Press r to continue. Receiving Faxes Before receiving faxes, make sure the Auto Answer light is reduced to...
... rings, lift the phone off the Auto Answer light and follow these steps: 1. Load more paper and press the x Start button to select Receive, then press OK. 3. If you run out of rings before the CX9400Fax Series answers, see page 16). Press r to continue. Receiving Faxes Before receiving faxes, make sure the Auto Answer light is reduced to...
Start Here
Page 5
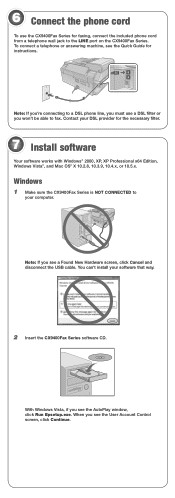
To connect a telephone or answering machine, see the Quick Guide for faxing, connect the included phone cord from a telephone wall jack to your computer. Windows 1 Make sure the CX9400Fax Series is NOT CONNECTED to the LINE port on the CX9400Fax Series. Note: If you see the AutoPlay window, click Run... cable. When you won't be able to a DSL phone line, you must use the CX9400Fax Series for instructions. Contact your software that way. 2 Insert the CX9400Fax Series software CD. Note: If you're connecting to fax. 6 Connect the phone cord To use a DSL filter or you see the...
To connect a telephone or answering machine, see the Quick Guide for faxing, connect the included phone cord from a telephone wall jack to your computer. Windows 1 Make sure the CX9400Fax Series is NOT CONNECTED to the LINE port on the CX9400Fax Series. Note: If you see the AutoPlay window, click Run... cable. When you won't be able to a DSL phone line, you must use the CX9400Fax Series for instructions. Contact your software that way. 2 Insert the CX9400Fax Series software CD. Note: If you're connecting to fax. 6 Connect the phone cord To use a DSL filter or you see the...


