

Epson Scan ICM Updater v1.20 (PSB.2008.07.001)
Page 1
... PSB.2008.07.001 Authorization: TE08-0061 Rev A Total Pages: 1 All Scanners and All-in-One's using Epson Scan Epson Scan ICM updater v.1.20 for Epson Scan-affects all driver versions up to complete the installation. Note: Installation completes in Epson Scan when Adobe's Color Management Module (CMM) has also been installed on the filename. Select...
... PSB.2008.07.001 Authorization: TE08-0061 Rev A Total Pages: 1 All Scanners and All-in-One's using Epson Scan Epson Scan ICM updater v.1.20 for Epson Scan-affects all driver versions up to complete the installation. Note: Installation completes in Epson Scan when Adobe's Color Management Module (CMM) has also been installed on the filename. Select...
Product Information Guide
Page 3
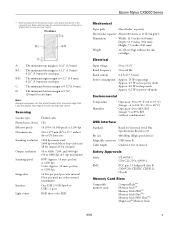
.... 10 msec per line at 1200 dpi Color: Approx. 30 msec per line at 1200 dpi 16 bits per pixel per color internal 8 bits per pixel per color external (maximum) One USB 2.0 Hi-Speed or USB 1.1 port RGB three color LED Epson Stylus CX5000 Series Mechanical Paper path Sheet feeder, top ...°C) Operation: 20 to 80% RH Storage: 5 to confirm printout quality. Scanning Scanner type Photoelectric device Effective pixels Document size Scanning resolution Output resolution Scanning speed Image data Interface Light source Flatbed color CIS 10,200 × 14,040 pixels at 1200 dpi 216 × 297 mm...
.... 10 msec per line at 1200 dpi Color: Approx. 30 msec per line at 1200 dpi 16 bits per pixel per color internal 8 bits per pixel per color external (maximum) One USB 2.0 Hi-Speed or USB 1.1 port RGB three color LED Epson Stylus CX5000 Series Mechanical Paper path Sheet feeder, top ...°C) Operation: 20 to 80% RH Storage: 5 to confirm printout quality. Scanning Scanner type Photoelectric device Effective pixels Document size Scanning resolution Output resolution Scanning speed Image data Interface Light source Flatbed color CIS 10,200 × 14,040 pixels at 1200 dpi 216 × 297 mm...
Product Information Guide
Page 12
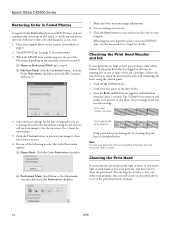
...you will use your printout, you may be clogged or ink may need to -life color and sharpness as you scan. 1. See the on -screen User's Guide). Size your original photo on the scanner as described above) to preview your image(s), then select your image(s). Click the Preview... head nozzles and remaining ink levels using Status Monitor (see if the print head needs cleaning. 12 6/06 Epson Stylus CX5000 Series Restoring Color in Faded Photos Using the Color Restoration feature in EPSON Scan, you can automatically transform an old, faded, or badly exposed photo into one or more of the...
...you will use your printout, you may be clogged or ink may need to -life color and sharpness as you scan. 1. See the on -screen User's Guide). Size your original photo on the scanner as described above) to preview your image(s), then select your image(s). Click the Preview... head nozzles and remaining ink levels using Status Monitor (see if the print head needs cleaning. 12 6/06 Epson Stylus CX5000 Series Restoring Color in Faded Photos Using the Color Restoration feature in EPSON Scan, you can automatically transform an old, faded, or badly exposed photo into one or more of the...
Product Information Guide
Page 14
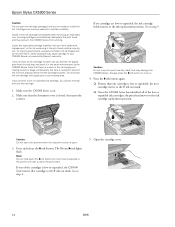
... dry out. Note: Do not hold down the B ink button for later use, protect the ink supply area from printing. Epson Stylus CX5000 Series Caution: Do not open the scanner when the document cover is on. 2. this may cause damage to install the ink. Do not touch the ink cartridge ink...hand; Make sure the CX5000 Series is open the scanner. Always press the B ink button to the _ ink out mark. Press the B ink button again. ❏ If more than one cartridge is low or expended, the CX5000 Series moves that cartridge to move the print head by Epson's warranty. Install a new...
... dry out. Note: Do not hold down the B ink button for later use, protect the ink supply area from printing. Epson Stylus CX5000 Series Caution: Do not open the scanner when the document cover is on. 2. this may cause damage to install the ink. Do not touch the ink cartridge ink...hand; Make sure the CX5000 Series is open the scanner. Always press the B ink button to the _ ink out mark. Press the B ink button again. ❏ If more than one cartridge is low or expended, the CX5000 Series moves that cartridge to move the print head by Epson's warranty. Install a new...
Product Information Guide
Page 15
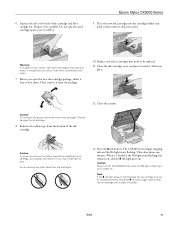
...front of the ink cartridge. Dispose of it . Close the ink cartridge cover and press it until it clicks into place. 6/06 15 Close the scanner. Note: If the B ink light stays on your eyes, flush them thoroughly with water. 7. Press the B ink button again and reinstall the...This can damage the ink cartridge. 8. 6. Squeeze the tab at the back of the cartridge and lift it from the bottom of the cartridge. Epson Stylus CX5000 Series 9. Warning: If ink gets on (not flashing), the ink cartridge may not be installed correctly. Caution: If you do not remove the ...
...front of the ink cartridge. Dispose of it . Close the ink cartridge cover and press it until it clicks into place. 6/06 15 Close the scanner. Note: If the B ink light stays on your eyes, flush them thoroughly with water. 7. Press the B ink button again and reinstall the...This can damage the ink cartridge. 8. 6. Squeeze the tab at the back of the cartridge and lift it from the bottom of the cartridge. Epson Stylus CX5000 Series 9. Warning: If ink gets on (not flashing), the ink cartridge may not be installed correctly. Caution: If you do not remove the ...
Product Information Guide
Page 17
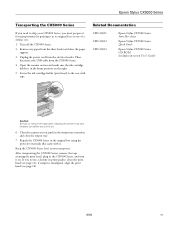
... transportation by packing it in its new location, but before you turn it . Open the scanner section and make sure the ink cartridge holder is misaligned, align the print head (see page 12); Epson Stylus CX5000 Series Transporting the CX5000 Series If you need to remove the tape after installing the printer in its original...
... transportation by packing it in its new location, but before you turn it . Open the scanner section and make sure the ink cartridge holder is misaligned, align the print head (see page 12); Epson Stylus CX5000 Series Transporting the CX5000 Series If you need to remove the tape after installing the printer in its original...
Quick Reference Guide
Page 20
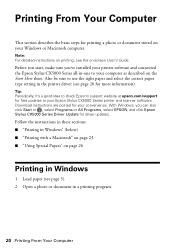
...the on-screen User's Guide. Tip: Periodically, it's a good idea to check Epson's support website at epson.com/support for free updates to your Epson Stylus CX5000 Series printer and scanner software. Before you start, make sure you can also click Start or , select ...Programs or All Programs, select EPSON, and click Epson Stylus CX5000 Series Driver Update for driver updates. Note: For detailed instructions on...
...the on-screen User's Guide. Tip: Periodically, it's a good idea to check Epson's support website at epson.com/support for free updates to your Epson Stylus CX5000 Series printer and scanner software. Before you start, make sure you can also click Start or , select ...Programs or All Programs, select EPSON, and click Epson Stylus CX5000 Series Driver Update for driver updates. Note: For detailed instructions on...
Quick Reference Guide
Page 35
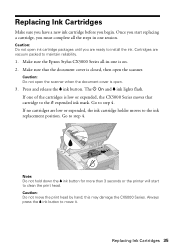
Make sure the Epson Stylus CX5000 Series all the steps in -one of the cartridges is closed, then open . 3. Caution: Do not open the scanner when the document cover is on. 2. The P On and B ink lights flash. If no cartridges are vacuum packed to maintain reliability. 1. Cartridges are ... replacement position. Replacing Ink Cartridges Make sure you have a new ink cartridge before you are ready to install the ink. If one is open the scanner. Always press the B ink button to clean the print head. Once you must complete all -in one session. Go to step 4. Note: Do...
Make sure the Epson Stylus CX5000 Series all the steps in -one of the cartridges is closed, then open . 3. Caution: Do not open the scanner when the document cover is on. 2. The P On and B ink lights flash. If no cartridges are vacuum packed to maintain reliability. 1. Cartridges are ... replacement position. Replacing Ink Cartridges Make sure you have a new ink cartridge before you are ready to install the ink. If one is open the scanner. Always press the B ink button to clean the print head. Once you must complete all -in one session. Go to step 4. Note: Do...

Quick Reference Guide
Page 38
Close the ink cartridge cover and press it until it clicks into place. 10. Close the scanner. 38 Maintaining Your CX5000 Series All-in-One 9. Replace any other cartridges that need to be replaced. 11. Place the new ink cartridge into the cartridge holder and push it down until it clicks into place. 12.
Close the ink cartridge cover and press it until it clicks into place. 10. Close the scanner. 38 Maintaining Your CX5000 Series All-in-One 9. Replace any other cartridges that need to be replaced. 11. Place the new ink cartridge into the cartridge holder and push it down until it clicks into place. 12.
Quick Reference Guide
Page 43
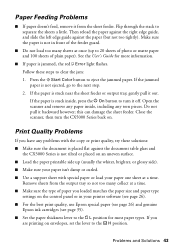
... slide the left edge guide against the document table glass and the CX5000 Series is placed flat against the paper (but not too tightly). ...collect at a time. ■ Make sure the type of plain paper). Open the scanner and remove any paper inside , press the P On button to separate the sheets a...have any torn pieces. Remove sheets from the sheet feeder. Press the x Start Color button to the ^ H position. If the paper is stuck inside , including... For the best print quality, use Epson special paper (see page 26) and genuine Epson ink cartridges (see page 35). ■ Set the paper thickness...
... slide the left edge guide against the document table glass and the CX5000 Series is placed flat against the paper (but not too tightly). ...collect at a time. ■ Make sure the type of plain paper). Open the scanner and remove any paper inside , press the P On button to separate the sheets a...have any torn pieces. Remove sheets from the sheet feeder. Press the x Start Color button to the ^ H position. If the paper is stuck inside , including... For the best print quality, use Epson special paper (see page 26) and genuine Epson ink cartridges (see page 35). ■ Set the paper thickness...
Quick Reference Guide
Page 44
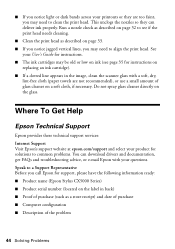
... of purchase (such as described on page 33. ■ If you notice jagged vertical lines, you call Epson for support, please have the following information ready: ■ Product name (Epson Stylus CX5000 Series) ■ Product serial number (located on a soft cloth, if necessary. Run a nozzle check as...store receipt) and date of purchase ■ Computer configuration ■ Description of glass cleaner on the label in the image, clean the scanner glass with your User's Guide for instructions. ■ The ink cartridges may need to common problems. You can deliver ink properly. ...
... of purchase (such as described on page 33. ■ If you notice jagged vertical lines, you call Epson for support, please have the following information ready: ■ Product name (Epson Stylus CX5000 Series) ■ Product serial number (located on a soft cloth, if necessary. Run a nozzle check as...store receipt) and date of purchase ■ Computer configuration ■ Description of glass cleaner on the label in the image, clean the scanner glass with your User's Guide for instructions. ■ The ink cartridges may need to common problems. You can deliver ink properly. ...

Quick Reference Guide
Page 46
... cm) away from the wall. ■ Do not open the scanner section while the CX5000 Series is copying, printing, or scanning. ■ Do not spill liquid on the CX5000 Series. ■ Except as specifically explained in your Epson Stylus CX5000 Series all-in-one, read and follow these safety instructions: ■...; Be sure to follow all devices plugged into the extension cord does not exceed the cord's ampere rating. Also, make sure the total ampere rating of the CX5000 Series is at ...
... cm) away from the wall. ■ Do not open the scanner section while the CX5000 Series is copying, printing, or scanning. ■ Do not spill liquid on the CX5000 Series. ■ Except as specifically explained in your Epson Stylus CX5000 Series all-in-one, read and follow these safety instructions: ■...; Be sure to follow all devices plugged into the extension cord does not exceed the cord's ampere rating. Also, make sure the total ampere rating of the CX5000 Series is at ...


