

Epson Scan ICM Updater v1.20 (PSB.2008.07.001)
Page 1
... (under Color tab in Epson Scan when Adobe's Color Management Module (CMM) has also been installed on the computer. EPSON PRODUCT SUPPORT BULLETIN Date: PSB #: Reference: Product(s): Subject: 07/08/2008 Originator: RY PSB.2008.07.001 Authorization: TE08-0061 Rev A Total Pages: 1 All Scanners and All-in-One's using Epson Scan Epson Scan ICM updater v.1.20 for Epson Scan-affects...
... (under Color tab in Epson Scan when Adobe's Color Management Module (CMM) has also been installed on the computer. EPSON PRODUCT SUPPORT BULLETIN Date: PSB #: Reference: Product(s): Subject: 07/08/2008 Originator: RY PSB.2008.07.001 Authorization: TE08-0061 Rev A Total Pages: 1 All Scanners and All-in-One's using Epson Scan Epson Scan ICM updater v.1.20 for Epson Scan-affects...
Product Information Guide
Page 3
...0.20" (5.0 mm) for envelopes. D The minimum bottom margin is 0.12" (3.0 mm). Scanning Scanner type Photoelectric device Effective pixels Document size Scanning resolution Output resolution Scanning speed Image data Interface Light source Flatbed color CIS 10,200 × 14,040 pixels at 1200 dpi 216 × 297 mm (8.5... msec per line at 1200 dpi Color: Approx. 30 msec per line at 1200 dpi 16 bits per pixel per color internal 8 bits per pixel per color external (maximum) One USB 2.0 Hi-Speed or USB 1.1 port RGB three color LED Epson Stylus CX5000 Series Mechanical Paper path Sheet feeder,...
...0.20" (5.0 mm) for envelopes. D The minimum bottom margin is 0.12" (3.0 mm). Scanning Scanner type Photoelectric device Effective pixels Document size Scanning resolution Output resolution Scanning speed Image data Interface Light source Flatbed color CIS 10,200 × 14,040 pixels at 1200 dpi 216 × 297 mm (8.5... msec per line at 1200 dpi Color: Approx. 30 msec per line at 1200 dpi 16 bits per pixel per color internal 8 bits per pixel per color external (maximum) One USB 2.0 Hi-Speed or USB 1.1 port RGB three color LED Epson Stylus CX5000 Series Mechanical Paper path Sheet feeder,...

Product Information Guide
Page 7
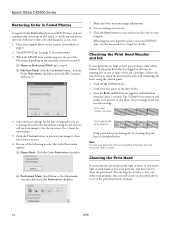
... is turned on the document cover, and do not press too hard and be careful not to close the document cover. 3. To make a color copy, press the x Start Color button. When you are printed with a small white border. 8. Be sure to the output tray. You may not be ejected automatically to close... sheets of copies in the Copies window. Place the photo on the glass as described on the glass as the original. Epson Stylus CX5000 Series Placing Large or Thick Documents When you scan a large or thick document, you can select up . Just open it and pull it will be exactly the same size as...
... is turned on the document cover, and do not press too hard and be careful not to close the document cover. 3. To make a color copy, press the x Start Color button. When you are printed with a small white border. 8. Be sure to the output tray. You may not be ejected automatically to close... sheets of copies in the Copies window. Place the photo on the glass as described on the glass as the original. Epson Stylus CX5000 Series Placing Large or Thick Documents When you scan a large or thick document, you can select up . Just open it and pull it will be exactly the same size as...

Product Information Guide
Page 9
...on your card. Epson Stylus CX5000 Series 4. Printing an Index Sheet You can select which is like a photographer's contact or proof sheet) to see small "thumbnail" images of the index sheet is not flashing, then pull the card straight out of the page. 2. Press the x Start Color button. Place the...of all the photos on the Index Sheet 1. Selecting Photos on the card (see page 10) When you want to print, scan the sheet, and let the CX5000 Series automatically print the selected photos. 1. Note: If you may take a few minutes.) For multiple index sheets, the pages ...
...on your card. Epson Stylus CX5000 Series 4. Printing an Index Sheet You can select which is like a photographer's contact or proof sheet) to see small "thumbnail" images of the index sheet is not flashing, then pull the card straight out of the page. 2. Press the x Start Color button. Place the...of all the photos on the Index Sheet 1. Selecting Photos on the card (see page 10) When you want to print, scan the sheet, and let the CX5000 Series automatically print the selected photos. 1. Note: If you may take a few minutes.) For multiple index sheets, the pages ...
Product Information Guide
Page 11
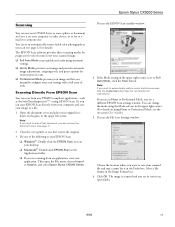
...: Choose the location where you want to automatically restore a color photo as you scan, click the Customize button (see the next section for instructions). You can even automatically restore faded color photographs as ArcSoft PhotoImpression™-using automatic settings. ❏ ...select Epson Stylus CX5000 Series. Or you manually configure your scan settings with a full array of control over your scanned image: ❏ Full Auto Mode scans quickly and easily using EPSON Scan. The image is set to Full Auto Mode, click the Scan button. Note: If you see the EPSON Scan standby...
...: Choose the location where you want to automatically restore a color photo as you scan, click the Customize button (see the next section for instructions). You can even automatically restore faded color photographs as ArcSoft PhotoImpression™-using automatic settings. ❏ ...select Epson Stylus CX5000 Series. Or you manually configure your scan settings with a full array of control over your scanned image: ❏ Full Auto Mode scans quickly and easily using EPSON Scan. The image is set to Full Auto Mode, click the Scan button. Note: If you see the EPSON Scan standby...
Product Information Guide
Page 12
... need to step 4. ❏ Full Auto Mode: click the Customize button, click the Color Restoration checkbox, and click OK. Cleaning the Print Head If your printouts are clean: 4. Epson Stylus CX5000 Series Restoring Color in Faded Photos Using the Color Restoration feature in EPSON Scan, you can automatically transform an old, faded, or badly exposed photo into one...
... need to step 4. ❏ Full Auto Mode: click the Customize button, click the Color Restoration checkbox, and click OK. Cleaning the Print Head If your printouts are clean: 4. Epson Stylus CX5000 Series Restoring Color in Faded Photos Using the Color Restoration feature in EPSON Scan, you can automatically transform an old, faded, or badly exposed photo into one...
Quick Reference Guide
Page 1
Epson Stylus® CX5000 Series Quick Guide Basic Copying, Printing, and Scanning Maintaining Your Epson Stylus CX5000 Series All-in-One Solving Problems
Epson Stylus® CX5000 Series Quick Guide Basic Copying, Printing, and Scanning Maintaining Your Epson Stylus CX5000 Series All-in-One Solving Problems
Quick Reference Guide
Page 2
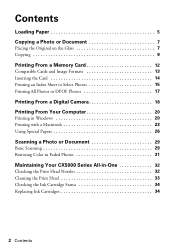
... 18 Printing From Your Computer 20 Printing in Windows 20 Printing with a Macintosh 23 Using Special Papers 26 Scanning a Photo or Document 29 Basic Scanning 29 Restoring Color in Faded Photos 31 Maintaining Your CX5000 Series All-in-One 32 Checking the Print Head Nozzles 32 Cleaning the Print Head 33 Checking the Ink...
... 18 Printing From Your Computer 20 Printing in Windows 20 Printing with a Macintosh 23 Using Special Papers 26 Scanning a Photo or Document 29 Basic Scanning 29 Restoring Color in Faded Photos 31 Maintaining Your CX5000 Series All-in-One 32 Checking the Print Head Nozzles 32 Cleaning the Print Head 33 Checking the Ink...
Quick Reference Guide
Page 4
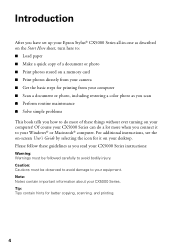
...Print photos directly from your camera ■ Get the basic steps for printing from your computer ■ Scan a document or photo, including restoring a color photo as you read your CX5000 Series instructions: Warning: Warnings must be followed carefully to your equipment. For additional instructions, see the on...you connect it on your CX5000 Series. Introduction After you have set up your Epson Stylus® CX5000 Series all-in-one as described on the Start Here sheet, turn here to: ■ Load paper ■ Make a quick copy of these guidelines as you scan ■ Perform routine ...
...Print photos directly from your camera ■ Get the basic steps for printing from your computer ■ Scan a document or photo, including restoring a color photo as you read your CX5000 Series instructions: Warning: Warnings must be followed carefully to your equipment. For additional instructions, see the on...you connect it on your CX5000 Series. Introduction After you have set up your Epson Stylus® CX5000 Series all-in-one as described on the Start Here sheet, turn here to: ■ Load paper ■ Make a quick copy of these guidelines as you scan ■ Perform routine ...

Quick Reference Guide
Page 8
If you need to press the document flat while you copy or scan it, do not twist it straight up. You may damage the document cover. If you need to move it. Note: Do not use excessive force on the document cover, and do not press too hard and be careful not to copy or scan a thick or large document, you are done, replace the document cover by inserting the tabs back into the slots. 8 Copying a Photo or Document Just open it and pull it . When you can remove the document cover.
If you need to press the document flat while you copy or scan it, do not twist it straight up. You may damage the document cover. If you need to move it. Note: Do not use excessive force on the document cover, and do not press too hard and be careful not to copy or scan a thick or large document, you are done, replace the document cover by inserting the tabs back into the slots. 8 Copying a Photo or Document Just open it and pull it . When you can remove the document cover.
Quick Reference Guide
Page 15
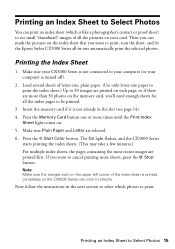
...sheets of all the pictures on your computer is not connected to your computer (or your card. If you want to print, scan the sheet, and let the Epson Stylus CX5000 Series all-in-one or more times until the Print Index Sheet light comes on. 5. Make sure Plain Paper and Letter ...Press the Memory Card button one automatically print the selected photos. Press the x Start Color button. Note: Make sure the triangle mark on the upper left corner of the index sheet is printed completely so the CX5000 Series can scan it is like a photographer's contact or proof sheet) to see page 14). 4....
...sheets of all the pictures on your computer is not connected to your computer (or your card. If you want to print, scan the sheet, and let the Epson Stylus CX5000 Series all-in-one or more times until the Print Index Sheet light comes on. 5. Make sure Plain Paper and Letter ...Press the Memory Card button one automatically print the selected photos. Press the x Start Color button. Note: Make sure the triangle mark on the upper left corner of the index sheet is printed completely so the CX5000 Series can scan it is like a photographer's contact or proof sheet) to see page 14). 4....

Quick Reference Guide
Page 16
... sheet is on the Index Sheet 1. Load up to 100 sheets of plain paper or up to change your selected photos. 5. once it has been scanned you want (1, 2, or 3).
... sheet is on the Index Sheet 1. Load up to 100 sheets of plain paper or up to change your selected photos. 5. once it has been scanned you want (1, 2, or 3).
Quick Reference Guide
Page 29
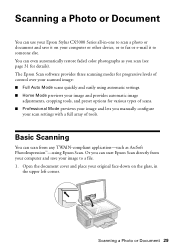
...faded color photographs as you can start Epson Scan directly from any TWAIN-compliant application-such as ArcSoft PhotoImpression™-using automatic settings. ■ Home Mode previews your image and provides automatic image adjustments, cropping tools, and preset options for details). Or you scan (...see page 31 for various types of scans. ■ Professional Mode previews your image and lets you manually configure your image to a file. 1. Scanning a Photo or Document You can use your Epson Stylus CX5000 Series all-in the upper left ...
...faded color photographs as you can start Epson Scan directly from any TWAIN-compliant application-such as ArcSoft PhotoImpression™-using automatic settings. ■ Home Mode previews your image and provides automatic image adjustments, cropping tools, and preset options for details). Or you scan (...see page 31 for various types of scans. ■ Professional Mode previews your image and lets you manually configure your image to a file. 1. Scanning a Photo or Document You can use your Epson Stylus CX5000 Series all-in the upper left ...

Quick Reference Guide
Page 30
... where you see page 8). 2. If the Mode setting in an open the File menu, choose Import or Acquire, and select Epson Stylus CX5000 Series. For details, see the Epson Scan standby window: 4. The image is scanned and you want to automatically restore a color photo as you don't move the original. 3. Click OK. Note: If you need to...
... where you see page 8). 2. If the Mode setting in an open the File menu, choose Import or Acquire, and select Epson Stylus CX5000 Series. For details, see the Epson Scan standby window: 4. The image is scanned and you want to automatically restore a color photo as you don't move the original. 3. Click OK. Note: If you need to...

Quick Reference Guide
Page 31
.... Professional Mode Scroll down to -life color and sharpness as you scan. Restoring Color in Epson Scan's Full Auto, Home, and Professional Mode screens: Full Auto Mode Click the Customize button, click the Color Restoration button, click OK, and click Scan. Restoring Color in Faded Photos You can also click... Help on the Epson Scan screen for more information about Full Auto Mode settings, see the on using...
.... Professional Mode Scroll down to -life color and sharpness as you scan. Restoring Color in Epson Scan's Full Auto, Home, and Professional Mode screens: Full Auto Mode Click the Customize button, click the Color Restoration button, click OK, and click Scan. Restoring Color in Faded Photos You can also click... Help on the Epson Scan screen for more information about Full Auto Mode settings, see the on using...

Quick Reference Guide
Page 46
... 4 inches (10 cm) away from the wall. ■ Do not open the scanner section while the CX5000 Series is copying, printing, or scanning. ■ Do not spill liquid on the CX5000 Series. ■ Except as specifically explained in -one, read and follow these safety instructions: ■ Be... sure to follow all warnings and instructions marked on the CX5000 Series. ■ Use only the type of another cord may cause fires or shock. Notices Important Safety Instructions Before using your Epson Stylus CX5000 Series all-in your documentation, do not attempt to service the...
... 4 inches (10 cm) away from the wall. ■ Do not open the scanner section while the CX5000 Series is copying, printing, or scanning. ■ Do not spill liquid on the CX5000 Series. ■ Except as specifically explained in -one, read and follow these safety instructions: ■ Be... sure to follow all warnings and instructions marked on the CX5000 Series. ■ Use only the type of another cord may cause fires or shock. Notices Important Safety Instructions Before using your Epson Stylus CX5000 Series all-in your documentation, do not attempt to service the...


