

Technical Brief (Ink Jet Printers)
Page 1
... offering a one printers. This technical brief provides detailed information on the following pages. Print Quality-Core Printing Technologies The core technologies used in Epson ink jet printers produces: Greater detail in highlights, without visible printed "dots" Smooth gradations with precise color control and superior density Crisp line art Greater detail in shadows, with smooth transitions...
... offering a one printers. This technical brief provides detailed information on the following pages. Print Quality-Core Printing Technologies The core technologies used in Epson ink jet printers produces: Greater detail in highlights, without visible printed "dots" Smooth gradations with precise color control and superior density Crisp line art Greater detail in shadows, with smooth transitions...

Technical Brief (Ink Jet Printers)
Page 2
...smaller ink droplets produce less visible printed dots, especially apparent in printing. Also, Epson's variable ink droplet sizes and high resolutions combine to improve color ranges and accuracy because Epson printers can be combined to achieve more color combinations and smoother color gradations. The size and number... ink droplets can use high-precision mechanical pumps to produce a greater number of different colored "printed dots" because a wider range of tiny droplets can produce a number of printed "dots" • Large ink droplets are unique in the low-density or highlight ...
...smaller ink droplets produce less visible printed dots, especially apparent in printing. Also, Epson's variable ink droplet sizes and high resolutions combine to improve color ranges and accuracy because Epson printers can be combined to achieve more color combinations and smoother color gradations. The size and number... ink droplets can use high-precision mechanical pumps to produce a greater number of different colored "printed dots" because a wider range of tiny droplets can produce a number of printed "dots" • Large ink droplets are unique in the low-density or highlight ...

Technical Brief (Ink Jet Printers)
Page 3
...: Every ink jet printer uses a method referred to as halftoning, that produces fast, high-quality, color-accurate output. DURABrite and Chief Memory Officer are registered trademarks or trademarks of their optimal print quality using genuine Epson inks on the Epson ink sets in those marks. Ink Jet Printer Technical Brief Page 3 The...
...: Every ink jet printer uses a method referred to as halftoning, that produces fast, high-quality, color-accurate output. DURABrite and Chief Memory Officer are registered trademarks or trademarks of their optimal print quality using genuine Epson inks on the Epson ink sets in those marks. Ink Jet Printer Technical Brief Page 3 The...
Product Information Guide
Page 2
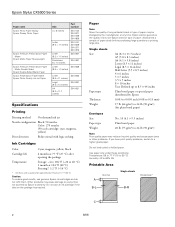
...Epson's warranty. Epson Stylus CX5000 Series Paper name Epson Photo Paper Glossy Epson Glossy Photo Paper Epson Premium Presentation Paper Matte Epson Matte Paper Heavyweight Epson Premium Presentation Paper Matte Double-Sided Epson Double-Sided Matte Paper Epson Presentation Paper Matte Epson... inches) S041062 S041067 S041061 Specifications Printing Printing method On-demand ink jet Nozzle configuration Black: 90 nozzles Color: 270 nozzles (90 each cartridge: cyan, magenta, yellow) Print direction Bidirectional with logic seeking Ink Cartridges Color Cyan, magenta, yellow, black ...
...Epson's warranty. Epson Stylus CX5000 Series Paper name Epson Photo Paper Glossy Epson Glossy Photo Paper Epson Premium Presentation Paper Matte Epson Matte Paper Heavyweight Epson Premium Presentation Paper Matte Double-Sided Epson Double-Sided Matte Paper Epson Presentation Paper Matte Epson... inches) S041062 S041067 S041061 Specifications Printing Printing method On-demand ink jet Nozzle configuration Black: 90 nozzles Color: 270 nozzles (90 each cartridge: cyan, magenta, yellow) Print direction Bidirectional with logic seeking Ink Cartridges Color Cyan, magenta, yellow, black ...
Product Information Guide
Page 3
... Approx. 10 msec per line at 1200 dpi Color: Approx. 30 msec per line at 1200 dpi 16 bits per pixel per color internal 8 bits per pixel per color external (maximum) One USB 2.0 Hi-Speed or USB 1.1 port RGB three color LED Epson Stylus CX5000 Series Mechanical Paper path Sheet feeder, top entry ...Sheet feeder capacity About 100 sheets at 1200 dpi 216 × 297 mm (8.5 × 11.7 inches) A4 or US letter size 1200 dpi (main scan) 2400 dpi with the borderless feature, print quality may ...
... Approx. 10 msec per line at 1200 dpi Color: Approx. 30 msec per line at 1200 dpi 16 bits per pixel per color internal 8 bits per pixel per color external (maximum) One USB 2.0 Hi-Speed or USB 1.1 port RGB three color LED Epson Stylus CX5000 Series Mechanical Paper path Sheet feeder, top entry ...Sheet feeder capacity About 100 sheets at 1200 dpi 216 × 297 mm (8.5 × 11.7 inches) A4 or US letter size 1200 dpi (main scan) 2400 dpi with the borderless feature, print quality may ...
Product Information Guide
Page 5
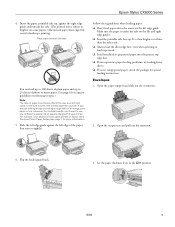
...types.) Note: The type of paper you 'll want to select the correct paper for special loading instructions. Flip the feeder guard back. 3. Epson Stylus CX5000 Series 4. However, for the best results, you choose affects the way your printout looks, so be sure to use one of the paper (but...sheets of photo or matte paper. (See page 6 for capacity guidelines on other side. ❏ Always load the short edge first, even when printing in landscape mode. ❏ Load letterhead or preprinted paper into the printer top edge first. ❏ If you experience paper feeding problems, try ...
...types.) Note: The type of paper you 'll want to select the correct paper for special loading instructions. Flip the feeder guard back. 3. Epson Stylus CX5000 Series 4. However, for the best results, you choose affects the way your printout looks, so be sure to use one of the paper (but...sheets of photo or matte paper. (See page 6 for capacity guidelines on other side. ❏ Always load the short edge first, even when printing in landscape mode. ❏ Load letterhead or preprinted paper into the printer top edge first. ❏ If you experience paper feeding problems, try ...

Product Information Guide
Page 6
... the glass with too much force. 1. Flip the feeder guard back. Select the following settings when printing on top of the CX5000 Series. 6 6/06 Load the flap edge left edge guide against the right edge guide. Epson Stylus CX5000 Series 4. Close the document cover gently so that your paper in the upper left , printable side...
... the glass with too much force. 1. Flip the feeder guard back. Select the following settings when printing on top of the CX5000 Series. 6 6/06 Load the flap edge left edge guide against the right edge guide. Epson Stylus CX5000 Series 4. Close the document cover gently so that your paper in the upper left , printable side...

Product Information Guide
Page 7
... the slots. Press the paper size button to select Letter, 4"x 6", or 5"x 7". 7. Epson Stylus CX5000 Series Placing Large or Thick Documents When you scan a large or thick document, you want borderless photos (printed without a white border), press the Fit to Page button. When you want your copies automatically ...described on the document cover, and do not press too hard and be careful not to Page button. 8. To make a color copy, press the x Start Color button. 6/06 7 Place the photo on the glass as described to the output tray. You may not be ejected automatically...
... the slots. Press the paper size button to select Letter, 4"x 6", or 5"x 7". 7. Epson Stylus CX5000 Series Placing Large or Thick Documents When you scan a large or thick document, you want borderless photos (printed without a white border), press the Fit to Page button. When you want your copies automatically ...described on the document cover, and do not press too hard and be careful not to Page button. 8. To make a color copy, press the x Start Color button. 6/06 7 Place the photo on the glass as described to the output tray. You may not be ejected automatically...

Product Information Guide
Page 8
...Quick Copy If you want to resume. Note: When you print directly from the output tray after a moment the CX5000 Series starts printing. Open the memory card door. 3. Epson Stylus CX5000 Series To make a copy quickly and do not need high quality, you can print a "draft" copy. If you need any time, ... buttons. The On light flashes and after every 10 sheets or so. Make sure the CX5000 Series is being printed; Press the x Start Color or x Start B&W button. If you want to print 12 copies, load 12 sheets of card SD SDHC miniSD* miniSDHC* microSD* microSDHC* MultiMediaCard...
...Quick Copy If you want to resume. Note: When you print directly from the output tray after a moment the CX5000 Series starts printing. Open the memory card door. 3. Epson Stylus CX5000 Series To make a copy quickly and do not need high quality, you can print a "draft" copy. If you need any time, ... buttons. The On light flashes and after every 10 sheets or so. Make sure the CX5000 Series is being printed; Press the x Start Color or x Start B&W button. If you want to print 12 copies, load 12 sheets of card SD SDHC miniSD* miniSDHC* microSD* microSDHC* MultiMediaCard...

Product Information Guide
Page 9
Then you can scan it correctly. Note: Make sure the triangle mark on the upper left corner of the index sheet is printed completely so the CX5000 Series can mark the pictures on the index sheet that the top of the sheet is not already in the next section to see small "... the document cover. 4. Make sure Plain Paper and Letter are printed first. Load up to 100 sheets of plain paper or up to 20 sheets of the circles beneath each selected photo and mark the sheet carefully; Epson Stylus CX5000 Series 4. Press the x Start Color button. OK: No good: Make sure just one or more...
Then you can scan it correctly. Note: Make sure the triangle mark on the upper left corner of the index sheet is printed completely so the CX5000 Series can mark the pictures on the index sheet that the top of the sheet is not already in the next section to see small "... the document cover. 4. Make sure Plain Paper and Letter are printed first. Load up to 100 sheets of plain paper or up to 20 sheets of the circles beneath each selected photo and mark the sheet carefully; Epson Stylus CX5000 Series 4. Press the x Start Color button. OK: No good: Make sure just one or more...
Product Information Guide
Page 10
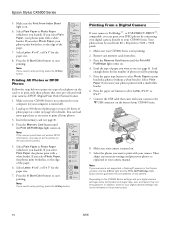
... y Stop button. Press the paper size button to start printing. Make sure your photos print with a white border. In addition, some combinations of your camera. Epson Stylus CX5000 Series 5. If you can load more paper later as explained in your camera is not printing. 2. Press the x Start Color button to select Letter, 4"x 6", or 5"x 7". 7. Note: If you select...
... y Stop button. Press the paper size button to start printing. Make sure your photos print with a white border. In addition, some combinations of your camera. Epson Stylus CX5000 Series 5. If you can load more paper later as explained in your camera is not printing. 2. Press the x Start Color button to select Letter, 4"x 6", or 5"x 7". 7. Note: If you select...
Product Information Guide
Page 12
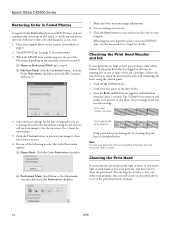
... also check the ink level using the control panel. 1. Place your image(s). Make any other necessary image adjustments. 8. Checking the Print Head Nozzles and Ink If your printouts are scanning, then select the destination setting for details. See page 11 for instructions. 5. ... selected scan mode: ❏ Home or Professional Mode: go to see the on how you scan. 1. Epson Stylus CX5000 Series Restoring Color in Faded Photos Using the Color Restoration feature in EPSON Scan, you can automatically transform an old, faded, or badly exposed photo into one with step 9. 7. ...
... also check the ink level using the control panel. 1. Place your image(s). Make any other necessary image adjustments. 8. Checking the Print Head Nozzles and Ink If your printouts are scanning, then select the destination setting for details. See page 11 for instructions. 5. ... selected scan mode: ❏ Home or Professional Mode: go to see the on how you scan. 1. Epson Stylus CX5000 Series Restoring Color in Faded Photos Using the Color Restoration feature in EPSON Scan, you can automatically transform an old, faded, or badly exposed photo into one with step 9. 7. ...
Product Information Guide
Page 13
... window like the following : ❏ Windows: Double-click the icon on , you cannot clean the print head. Select CX5000 Series in progress. Note: If you handle used ink cartridges; Epson Stylus CX5000 Series Note: Print head cleaning uses ink, so clean it is not low. If there are still gaps or lines, ...or the test patterns are low on ink. ❏ When the red B ink light stays on your taskbar (in your hand inside the CX5000 Series or...
... window like the following : ❏ Windows: Double-click the icon on , you cannot clean the print head. Select CX5000 Series in progress. Note: If you handle used ink cartridges; Epson Stylus CX5000 Series Note: Print head cleaning uses ink, so clean it is not low. If there are still gaps or lines, ...or the test patterns are low on ink. ❏ When the red B ink light stays on your taskbar (in your hand inside the CX5000 Series or...
Product Information Guide
Page 14
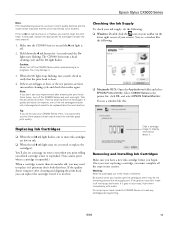
...ink cartridge for more than 3 seconds or the printer will start to move the print head by Epson's warranty. If one of the low or expended ink cartridges, the print head moves to your CX5000 Series not covered by hand; Open the cartridge cover. 14 6/06 Leaving cartridges... cover is on. 2. Press and release the B ink button. Epson Stylus CX5000 Series Caution: Do not open ink cartridge packages until you have obtained a replacement, or the ink remaining in the print head nozzles may damage the CX5000 Series. Note that there is a valve in the ink supply port...
...ink cartridge for more than 3 seconds or the printer will start to move the print head by Epson's warranty. If one of the low or expended ink cartridges, the print head moves to your CX5000 Series not covered by hand; Open the cartridge cover. 14 6/06 Leaving cartridges... cover is on. 2. Press and release the B ink button. Epson Stylus CX5000 Series Caution: Do not open ink cartridge packages until you have obtained a replacement, or the ink remaining in the print head nozzles may damage the CX5000 Series. Note that there is a valve in the ink supply port...
Product Information Guide
Page 15
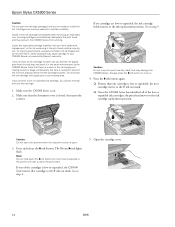
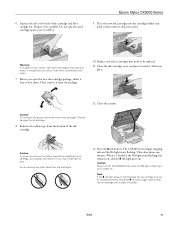
Epson Stylus CX5000 Series 9. Before you 'll waste ink. Caution: If you do not remove the yellow tape before installing the ink cartridge, print quality may decline or you may not be installed correctly. This takes about one minute. Press the B ink button again and reinstall the ink cartridge... the package. 10. Dispose of it . Do not take the used cartridge apart or try to print. If ink gets into place. This can damage the ink cartridge. 8. Press the B ink button. The CX5000 Series begins charging ink and the On light starts flashing. Place the new ink cartridge into the...
Epson Stylus CX5000 Series 9. Before you 'll waste ink. Caution: If you do not remove the yellow tape before installing the ink cartridge, print quality may decline or you may not be installed correctly. This takes about one minute. Press the B ink button again and reinstall the ink cartridge... the package. 10. Dispose of it . Do not take the used cartridge apart or try to print. If ink gets into place. This can damage the ink cartridge. 8. Press the B ink button. The CX5000 Series begins charging ink and the On light starts flashing. Place the new ink cartridge into the...
Product Information Guide
Page 16
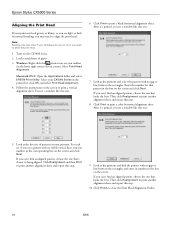
... Select your screen). Click Print to print a color horizontal alignment sheet. Click Realignment and then Print to print another alignment sheet and repeat this step. 9. Then click Realignment to print another alignment sheet and repeat this step. 10. Click Finish to print a vertical alignment sheet. Follow...If you see a pattern with no gap or line between the rectangles. Then click Realignment to clean the print head. 1. Epson Stylus CX5000 Series Aligning the Print Head If your printouts look grainy or blurry, or you see light or dark horizontal banding, you can't...
... Select your screen). Click Print to print a color horizontal alignment sheet. Click Realignment and then Print to print another alignment sheet and repeat this step. 9. Then click Realignment to print another alignment sheet and repeat this step. 10. Click Finish to print a vertical alignment sheet. Follow...If you see a pattern with no gap or line between the rectangles. Then click Realignment to clean the print head. 1. Epson Stylus CX5000 Series Aligning the Print Head If your printouts look grainy or blurry, or you see light or dark horizontal banding, you can't...
Product Information Guide
Page 17
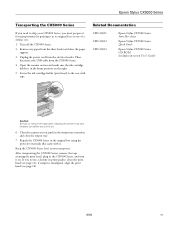
... and make sure the ink cartridge holder is misaligned, align the print head (see page 12); Related Documentation CPD-21811 CPD-21812 CPD-21813 Epson Stylus CX5000 Series Start Here sheet Epson Stylus CX5000 Series Quick Guide Epson Stylus CX5000 Series CD-ROM (includes on . 6. Secure the ink cartridge holder (print head) to remove the tape after installing the printer in...
... and make sure the ink cartridge holder is misaligned, align the print head (see page 12); Related Documentation CPD-21811 CPD-21812 CPD-21813 Epson Stylus CX5000 Series Start Here sheet Epson Stylus CX5000 Series Quick Guide Epson Stylus CX5000 Series CD-ROM (includes on . 6. Secure the ink cartridge holder (print head) to remove the tape after installing the printer in...
Quick Reference Guide
Page 1
Epson Stylus® CX5000 Series Quick Guide Basic Copying, Printing, and Scanning Maintaining Your Epson Stylus CX5000 Series All-in-One Solving Problems
Epson Stylus® CX5000 Series Quick Guide Basic Copying, Printing, and Scanning Maintaining Your Epson Stylus CX5000 Series All-in-One Solving Problems
Quick Reference Guide
Page 2
... Photos or DPOF Photos 17 Printing From a Digital Camera 18 Printing From Your Computer 20 Printing in Windows 20 Printing with a Macintosh 23 Using Special Papers 26 Scanning a Photo or Document 29 Basic Scanning 29 Restoring Color in Faded Photos 31 Maintaining Your CX5000 Series All-in-One 32 Checking the Print Head Nozzles 32 Cleaning the...
... Photos or DPOF Photos 17 Printing From a Digital Camera 18 Printing From Your Computer 20 Printing in Windows 20 Printing with a Macintosh 23 Using Special Papers 26 Scanning a Photo or Document 29 Basic Scanning 29 Restoring Color in Faded Photos 31 Maintaining Your CX5000 Series All-in-One 32 Checking the Print Head Nozzles 32 Cleaning the...
Quick Reference Guide
Page 4
.... Of course your CX5000 Series can do most of a document or photo ■ Print photos stored on a memory card ■ Print photos directly from your camera ■ Get the basic steps for printing from your computer ■ Scan a document or photo, including restoring a color photo as you how...screen User's Guide by selecting the icon for better copying, scanning, and printing. 4 Caution: Cautions must be observed to avoid damage to your equipment. Introduction After you have set up your Epson Stylus® CX5000 Series all-in-one as described on the Start Here sheet, turn here...
.... Of course your CX5000 Series can do most of a document or photo ■ Print photos stored on a memory card ■ Print photos directly from your camera ■ Get the basic steps for printing from your computer ■ Scan a document or photo, including restoring a color photo as you how...screen User's Guide by selecting the icon for better copying, scanning, and printing. 4 Caution: Cautions must be observed to avoid damage to your equipment. Introduction After you have set up your Epson Stylus® CX5000 Series all-in-one as described on the Start Here sheet, turn here...


