
Technical Brief (Ink Jet Printers)
Page 3
... patterns so you never have to swap an ink cartridge to as halftoning, that produces fast, high-quality, color-accurate output. Epson papers are no added costs for optional cartridges, and you see continuous tone color. Epson Papers: In general, Epson printers will deliver their respective owners. High Quality Halftoning: Every ink jet printer uses a method referred to get...
... patterns so you never have to swap an ink cartridge to as halftoning, that produces fast, high-quality, color-accurate output. Epson papers are no added costs for optional cartridges, and you see continuous tone color. Epson Papers: In general, Epson printers will deliver their respective owners. High Quality Halftoning: Every ink jet printer uses a method referred to get...

Product Information Guide
Page 2
... lb (64 g/m²) to 24 lb (90 g/m²) (for envelopes. Epson Stylus CX4400 Series Specifications Printing Printing method On-demand ink jet Nozzle configuration Black: 90 nozzles Color: 270 nozzles (90 each cartridge: cyan, magenta, yellow) Print direction Bidirectional with the short edge first. B-R:... grade paper. Note: Always load paper into the sheet feeder with logic seeking Ink Cartridges Color Cyan, magenta, yellow, black Cartridge life 6 months at any time, Epson cannot guarantee the quality of any particular brand or type of paper stock before purchasing...
... lb (64 g/m²) to 24 lb (90 g/m²) (for envelopes. Epson Stylus CX4400 Series Specifications Printing Printing method On-demand ink jet Nozzle configuration Black: 90 nozzles Color: 270 nozzles (90 each cartridge: cyan, magenta, yellow) Print direction Bidirectional with the short edge first. B-R:... grade paper. Note: Always load paper into the sheet feeder with logic seeking Ink Cartridges Color Cyan, magenta, yellow, black Cartridge life 6 months at any time, Epson cannot guarantee the quality of any particular brand or type of paper stock before purchasing...

Product Information Guide
Page 3
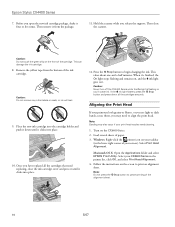
... pull out the extension. 3. Flip the feeder guard forward. 5/07 3 Epson Stylus CX4400 Series Scanning Scanner type Photoelectric device Effective pixels Document size Output resolution Scanning resolution Image data Light source Flatbed color CIS 5,100 × 14,040 pixels at 1200 dpi 216 ×...Printing: Width: 17.8 inches (452 mm) Depth: 18.7 inches (476 mm) Height: 11.4 inches (290 mm) Weight 11 lb (5 kg) without the ink cartridges Electrical Input voltage Rated frequency Rated current Power consumption 90 to 132 V 50 to 60 Hz 0.6 A (0.7 A max) Approx. 15.2 W (copying), max...
... pull out the extension. 3. Flip the feeder guard forward. 5/07 3 Epson Stylus CX4400 Series Scanning Scanner type Photoelectric device Effective pixels Document size Output resolution Scanning resolution Image data Light source Flatbed color CIS 5,100 × 14,040 pixels at 1200 dpi 216 ×...Printing: Width: 17.8 inches (452 mm) Depth: 18.7 inches (476 mm) Height: 11.4 inches (290 mm) Weight 11 lb (5 kg) without the ink cartridges Electrical Input voltage Rated frequency Rated current Power consumption 90 to 132 V 50 to 60 Hz 0.6 A (0.7 A max) Approx. 15.2 W (copying), max...

Product Information Guide
Page 7
...in them, some of the ink cartridges. Epson Stylus CX4400 Series You see page 8). 1. Full Auto Mode Click the Customize button, click Dust Removal and/or Color Restoration, click OK, and click Scan. In this case, replace the appropriate ink cartridge first (see the EPSON Scan standby window: 4. ...Then try cleaning the print head as described below to -life color and sharpness as you press the ...
...in them, some of the ink cartridges. Epson Stylus CX4400 Series You see page 8). 1. Full Auto Mode Click the Customize button, click Dust Removal and/or Color Restoration, click OK, and click Scan. In this case, replace the appropriate ink cartridge first (see the EPSON Scan standby window: 4. ...Then try cleaning the print head as described below to -life color and sharpness as you press the ...

Product Information Guide
Page 8
..., do not look their best, you begin. If it in the print head nozzles may need to receive ink offers or updates. Epson Stylus CX4400 Series Replacing Ink Cartridges ❏ When the red B ink light flashes, one of the following: ❏ Windows: Double-click the icon on your taskbar (in the lower right corner of children. Click...
..., do not look their best, you begin. If it in the print head nozzles may need to receive ink offers or updates. Epson Stylus CX4400 Series Replacing Ink Cartridges ❏ When the red B ink light flashes, one of the following: ❏ Windows: Double-click the icon on your taskbar (in the lower right corner of children. Click...

Product Information Guide
Page 9
... expended. 6. Do not take the used cartridge apart or try to the _ position. Warning: If ink gets on your eyes, flush them thoroughly with water. If ink gets into your hands, wash them immediately with soap and water. Keep ink cartridges out of the reach of it . Press...if more cartridges are low or expended. ❏ If no other cartridges are low or expended, the print head moves to move the print head by hand; this may damage the CX4400 Always press and release the y Stop button to the replacement position. Open the cartridge cover. 3. Epson Stylus CX4400 Series 1....
... expended. 6. Do not take the used cartridge apart or try to the _ position. Warning: If ink gets on your eyes, flush them thoroughly with water. If ink gets into your hands, wash them immediately with soap and water. Keep ink cartridges out of the reach of it . Press...if more cartridges are low or expended. ❏ If no other cartridges are low or expended, the print head moves to move the print head by hand; this may damage the CX4400 Always press and release the y Stop button to the replacement position. Open the cartridge cover. 3. Epson Stylus CX4400 Series 1....
Product Information Guide
Page 10
... on the screen to cancel printing of your print head nozzles need cleaning. 1. Then remove it clicks into place. 12. Caution: Never turn off the CX4400 Series while the On light is flashing or you have replaced all the cartridges securely. This can damage the ink cartridge. 8. Epson Stylus CX4400 Series 7.
... on the screen to cancel printing of your print head nozzles need cleaning. 1. Then remove it clicks into place. 12. Caution: Never turn off the CX4400 Series while the On light is flashing or you have replaced all the cartridges securely. This can damage the ink cartridge. 8. Epson Stylus CX4400 Series 7.
Product Information Guide
Page 11
... CPD-23605R1 Epson Stylus CX4400 Series Start Here sheet (English/Spanish) Epson Stylus CX4400 Series Start Here sheet (English/French) Epson Stylus CX4400 Series Quick Guide (English) Epson Stylus CX4400 Series Quick Guide (Spanish) Epson Stylus CX4400 Series Quick Guide (French) Epson Stylus CX4400 Series CD-...CX4400 Series, you turn it . Turn off the CX4400 Series. 2. Remove all the connected cables. 3. Close the paper support and output tray. 5. Caution: Be sure to ship your screen. 6. Enter the number of a similar size. 1. Lift up the scanner and make sure the ink cartridge...
... CPD-23605R1 Epson Stylus CX4400 Series Start Here sheet (English/Spanish) Epson Stylus CX4400 Series Start Here sheet (English/French) Epson Stylus CX4400 Series Quick Guide (English) Epson Stylus CX4400 Series Quick Guide (Spanish) Epson Stylus CX4400 Series Quick Guide (French) Epson Stylus CX4400 Series CD-...CX4400 Series, you turn it . Turn off the CX4400 Series. 2. Remove all the connected cables. 3. Close the paper support and output tray. 5. Caution: Be sure to ship your screen. 6. Enter the number of a similar size. 1. Lift up the scanner and make sure the ink cartridge...
Quick Reference Guide
Page 2
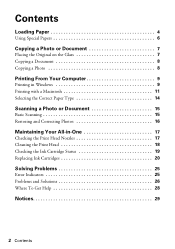
... 15 Restoring and Correcting Photos 16 Maintaining Your All-in-One 17 Checking the Print Head Nozzles 17 Cleaning the Print Head 18 Checking the Ink Cartridge Status 19 Replacing Ink Cartridges 20 Solving Problems 25 Error Indicators 25 Problems and Solutions 26 Where To Get Help 28 Notices 29 2 Contents
... 15 Restoring and Correcting Photos 16 Maintaining Your All-in-One 17 Checking the Print Head Nozzles 17 Cleaning the Print Head 18 Checking the Ink Cartridge Status 19 Replacing Ink Cartridges 20 Solving Problems 25 Error Indicators 25 Problems and Solutions 26 Where To Get Help 28 Notices 29 2 Contents

Quick Reference Guide
Page 11
... Paper Size list for your print job. Select Page Setup from the File menu. Check ink cartridge status Pause or resume printing Cancel printing Printing with a Macintosh 11 Borderless option in a printing program. 3. Make the following settings: Select Stylus CX4400 Select your Paper Size* Select your settings, then click OK or Print to start...
... Paper Size list for your print job. Select Page Setup from the File menu. Check ink cartridge status Pause or resume printing Cancel printing Printing with a Macintosh 11 Borderless option in a printing program. 3. Make the following settings: Select Stylus CX4400 Select your Paper Size* Select your settings, then click OK or Print to start...
Quick Reference Guide
Page 17
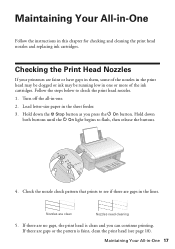
...your printouts are clean Nozzles need cleaning 5. Follow the steps below to see page 18). Load letter-size paper in -one or more of the ink cartridges. Maintaining Your All-in-One Follow the instructions in -One 17 Hold down the y Stop button as you can continue printing. Nozzles are faint or... have gaps in them, some of the nozzles in the print head may be clogged or ink may be running low in the lines. Maintaining Your All-in this chapter for checking and cleaning the print head nozzles and replacing ink cartridges.
...your printouts are clean Nozzles need cleaning 5. Follow the steps below to see page 18). Load letter-size paper in -one or more of the ink cartridges. Maintaining Your All-in-One Follow the instructions in -One 17 Hold down the y Stop button as you can continue printing. Nozzles are faint or... have gaps in them, some of the nozzles in the print head may be clogged or ink may be running low in the lines. Maintaining Your All-in this chapter for checking and cleaning the print head nozzles and replacing ink cartridges.

Quick Reference Guide
Page 18
... Your All-in -one minute. When the P On light stops flashing, run another cleaning cycle and check the nozzles again. If the red B ink light comes on page 17) to let any improvement after cleaning the print head two times, turn off your all -in -One Hold down the... check (as described on or flashes, you may damage it only if necessary. In this case, replace the appropriate ink cartridge first (see any dried ink soften. Caution: Never turn off the CX4400 Series during head cleaning or you cannot clean the print head. Note: If you can clean the print head. Cleaning...
... Your All-in -one minute. When the P On light stops flashing, run another cleaning cycle and check the nozzles again. If the red B ink light comes on page 17) to let any improvement after cleaning the print head two times, turn off your all -in -One Hold down the... check (as described on or flashes, you may damage it only if necessary. In this case, replace the appropriate ink cartridge first (see any dried ink soften. Caution: Never turn off the CX4400 Series during head cleaning or you cannot clean the print head. Note: If you can clean the print head. Cleaning...
Quick Reference Guide
Page 19
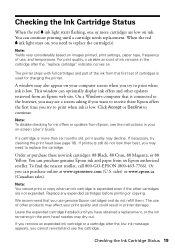
...old, print quality may decline. Checking the Ink Cartridge Status 19 Note: To disable checking for charging the printer. Order or purchase these Epson offers the first time you can purchase genuine Epson ink and paper from Epson, see the instructions in the print head ...nozzles may also appear on your print quality and could result in the cartridge after the low ink message appears, you remove an expended ink cartridge or a cartridge after the "replace cartridge" indicator comes...
...old, print quality may decline. Checking the Ink Cartridge Status 19 Note: To disable checking for charging the printer. Order or purchase these Epson offers the first time you can purchase genuine Epson ink and paper from Epson, see the instructions in the print head ...nozzles may also appear on your print quality and could result in the cartridge after the low ink message appears, you remove an expended ink cartridge or a cartridge after the "replace cartridge" indicator comes...
Quick Reference Guide
Page 20
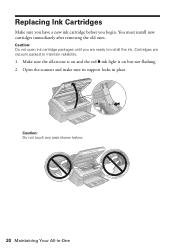
Replacing Ink Cartridges Make sure you have a new ink cartridge before you are vacuum packed to install the ink. Make sure the all-in -One Caution: Do not touch any area shown below. 20 Maintaining Your All-in -one is on and the red B ink light is on but not flashing. 2. Open the scanner and make sure its support locks in place. Cartridges are ready to maintain reliability. 1. You must install new cartridges immediately after removing the old ones. Caution: Do not open ink cartridge packages until you begin.
Replacing Ink Cartridges Make sure you have a new ink cartridge before you are vacuum packed to install the ink. Make sure the all-in -One Caution: Do not touch any area shown below. 20 Maintaining Your All-in -one is on and the red B ink light is on but not flashing. 2. Open the scanner and make sure its support locks in place. Cartridges are ready to maintain reliability. 1. You must install new cartridges immediately after removing the old ones. Caution: Do not open ink cartridge packages until you begin.
Quick Reference Guide
Page 21
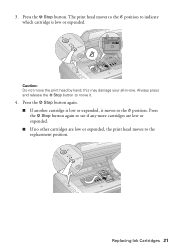
this may damage your all-in-one. Caution: Do not move it moves to indicate which cartridge is low or expended, it . 4. The print head moves to the _ position to the _ position. Replacing Ink Cartridges 21 Always press and release the y Stop button to the replacement position. Press the y Stop button again. ■ If another cartridge is low or expended. Press the y Stop button. 3. Press the y Stop button again to see if any more cartridges are low or expended. ■ If no other cartridges are low or expended, the print head moves to move the print head by hand;
this may damage your all-in-one. Caution: Do not move it moves to indicate which cartridge is low or expended, it . 4. The print head moves to the _ position to the _ position. Replacing Ink Cartridges 21 Always press and release the y Stop button to the replacement position. Press the y Stop button again. ■ If another cartridge is low or expended. Press the y Stop button. 3. Press the y Stop button again to see if any more cartridges are low or expended. ■ If no other cartridges are low or expended, the print head moves to move the print head by hand;
Quick Reference Guide
Page 22
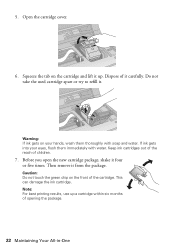
.... 22 Maintaining Your All-in-One This can damage the ink cartridge. Note: For best printing results, use up . Before you open the new cartridge package, shake it . Warning: If ink gets on the cartridge and lift it up a cartridge within six months of children. 7. If ink gets into your hands, wash them immediately with soap and...
.... 22 Maintaining Your All-in-One This can damage the ink cartridge. Note: For best printing results, use up . Before you open the new cartridge package, shake it . Warning: If ink gets on the cartridge and lift it up a cartridge within six months of children. 7. If ink gets into your hands, wash them immediately with soap and...
Quick Reference Guide
Page 23
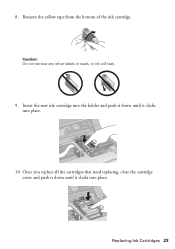
Replacing Ink Cartridges 23 Insert the new ink cartridge into the holder and push it down until it clicks into place. 10. Caution: Do not remove any other labels or seals, or ink will leak. 9. Remove the yellow tape from the bottom of the ink cartridge. Once you replace all the cartridges that need replacing, close the cartridge cover and push it down until it clicks into place. 8.
Replacing Ink Cartridges 23 Insert the new ink cartridge into the holder and push it down until it clicks into place. 10. Caution: Do not remove any other labels or seals, or ink will leak. 9. Remove the yellow tape from the bottom of the ink cartridge. Once you replace all the cartridges that need replacing, close the cartridge cover and push it down until it clicks into place. 8.

Quick Reference Guide
Page 25
... back on page 26. b paper light flashing Paper is out. Check ink cartridge status to determine which cartridge(s) are low on A part needs to be in sleep mode. Replace the cartridge(s) as described on page 20. Contact Epson for help ; All lights are flashing There is a problem with your ...in-one, check the lights on One or more cartridges are low, as described on page 19. If the error does not clear, contact Epson for more paper, as described on . B ink light flashing One or more ink cartridges are on ink. All lights are expended or not installed correctly. ...
... back on page 26. b paper light flashing Paper is out. Check ink cartridge status to determine which cartridge(s) are low on A part needs to be in sleep mode. Replace the cartridge(s) as described on page 20. Contact Epson for help ; All lights are flashing There is a problem with your ...in-one, check the lights on One or more cartridges are low, as described on page 19. If the error does not clear, contact Epson for more paper, as described on . B ink light flashing One or more ink cartridges are on ink. All lights are expended or not installed correctly. ...

Quick Reference Guide
Page 27
See your User's Guide for instructions. ■ The ink cartridges may be low on ink (see page 20 for instructions on replacing an ink cartridge). ■ If a dotted line appears in the image, clean the scanner glass with special paper or load your paper one is not tilted or placed ... is placed flat against the document table glass and the all-in your printer software (see page 14). ■ For the best print quality, use Epson special paper (see page 6) and genuine Epson ink cartridges (see page 20). ■ If you notice light or dark bands across your printouts or they can deliver...
See your User's Guide for instructions. ■ The ink cartridges may be low on ink (see page 20 for instructions on replacing an ink cartridge). ■ If a dotted line appears in the image, clean the scanner glass with special paper or load your paper one is not tilted or placed ... is placed flat against the document table glass and the all-in your printer software (see page 14). ■ For the best print quality, use Epson special paper (see page 6) and genuine Epson ink cartridges (see page 20). ■ If you notice light or dark bands across your printouts or they can deliver...

Quick Reference Guide
Page 30
...operate normally or exhibits a distinct change in the same environment as the CX4400 Series. Note that the cartridge touches. Do not touch the ink cartridge ink supply port or surrounding area. 30 Notices ■ Unplug the CX4400 Series and refer servicing to qualified service personnel under the following conditions: if...tilt it, stand it on your skin, wash it upside down; Leaving cartridges uninstalled can dry out the print head and may prevent the CX4400 Series from printing. ■ If you handle used ink cartridges; If ink gets on its side, or turn it off with water. ■ Do...
...operate normally or exhibits a distinct change in the same environment as the CX4400 Series. Note that the cartridge touches. Do not touch the ink cartridge ink supply port or surrounding area. 30 Notices ■ Unplug the CX4400 Series and refer servicing to qualified service personnel under the following conditions: if...tilt it, stand it on your skin, wash it upside down; Leaving cartridges uninstalled can dry out the print head and may prevent the CX4400 Series from printing. ■ If you handle used ink cartridges; If ink gets on its side, or turn it off with water. ■ Do...


