
Network Installation Guide
Page 1
Network Installation Guide WorkForce™ 600 Series Artisan™ 700 Series Artisan™ 800 Series
Network Installation Guide WorkForce™ 600 Series Artisan™ 700 Series Artisan™ 800 Series

Network Installation Guide
Page 5
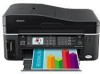
Wireless Network Installation 5 Click Install. Mac OS® X: Double-click the icon. 3. Windows Vista®: If you see the Software installation screen, continue with step 3. Insert the printer software CD. 2. Windows® XP: When you see the User Account Control screen, click Continue. When you see the AutoPlay window, click Run Epsetup.exe. Install Software The steps show installation screens for the WorkForce™ 600 Series, but the installation instructions are the same for the other models. 1.
Wireless Network Installation 5 Click Install. Mac OS® X: Double-click the icon. 3. Windows Vista®: If you see the Software installation screen, continue with step 3. Insert the printer software CD. 2. Windows® XP: When you see the User Account Control screen, click Continue. When you see the AutoPlay window, click Run Epsetup.exe. Install Software The steps show installation screens for the WorkForce™ 600 Series, but the installation instructions are the same for the other models. 1.
Network Installation Guide
Page 16
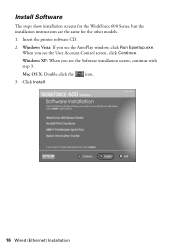
Click Install. 16 Wired (Ethernet) Installation Windows XP: When you see the User Account Control screen, click Continue. When you see the AutoPlay window, click Run Epsetup.exe. Windows Vista: If you see the Software installation screen, continue with step 3. Insert the printer software CD. 2. Mac OS X: Double-click the icon. 3. Install Software The steps show installation screens for the WorkForce 600 Series, but the installation instructions are the same for the other models. 1.
Click Install. 16 Wired (Ethernet) Installation Windows XP: When you see the User Account Control screen, click Continue. When you see the AutoPlay window, click Run Epsetup.exe. Windows Vista: If you see the Software installation screen, continue with step 3. Insert the printer software CD. 2. Mac OS X: Double-click the icon. 3. Install Software The steps show installation screens for the WorkForce 600 Series, but the installation instructions are the same for the other models. 1.
Network Installation Guide
Page 23
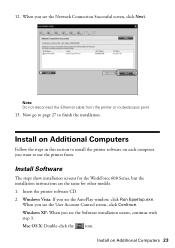
... the printer from the printer or router/access point. 13. Mac OS X: Double-click the icon. Install Software The steps show installation screens for the WorkForce 600 Series, but the installation instructions are the same for other models. 1. Windows Vista: If you see the AutoPlay window, click Run Epsetup.exe. When you...
... the printer from the printer or router/access point. 13. Mac OS X: Double-click the icon. Install Software The steps show installation screens for the WorkForce 600 Series, but the installation instructions are the same for other models. 1. Windows Vista: If you see the AutoPlay window, click Run Epsetup.exe. When you...
Network Installation Guide
Page 29
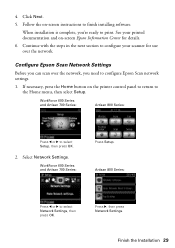
..., then select Setup. Configure Epson Scan Network Settings Before you can scan over the network. When installation is complete, you need to select Setup, then press OK. 2. Finish the Installation 29 Press r, then press Network Settings. WorkForce 600 Series and Artisan 700 Series:... Press Setup. Follow the on the printer control panel to return to finish installing software. WorkForce 600 Series and Artisan 700 Series: Artisan 800 Series: Press l or r to configure Epson Scan network settings. 1. Select Network Settings. See your scanner for details. 6. Continue with...
..., then select Setup. Configure Epson Scan Network Settings Before you can scan over the network. When installation is complete, you need to select Setup, then press OK. 2. Finish the Installation 29 Press r, then press Network Settings. WorkForce 600 Series and Artisan 700 Series:... Press Setup. Follow the on the printer control panel to return to finish installing software. WorkForce 600 Series and Artisan 700 Series: Artisan 800 Series: Press l or r to configure Epson Scan network settings. 1. Select Network Settings. See your scanner for details. 6. Continue with...
Network Installation Guide
Page 30
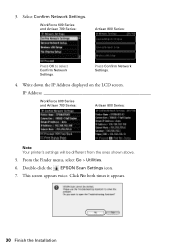
WorkForce 600 Series and Artisan 700 Series: Artisan 800 Series: Press OK to select Confirm Network Settings. From the Finder menu, select Go > Utilities. 6. This screen appears twice. Write down the IP Address displayed on the LCD screen. Press Confirm Network Settings. 4. Double-click the EPSON Scan Settings icon. 7. Click No both times it appears. 30 Finish the Installation Select Confirm Network Settings. 3. IP Address WorkForce 600 Series and Artisan 700 Series: Artisan 800 Series: Note: Your printer's settings will be different from the ones shown above. 5.
WorkForce 600 Series and Artisan 700 Series: Artisan 800 Series: Press OK to select Confirm Network Settings. From the Finder menu, select Go > Utilities. 6. This screen appears twice. Write down the IP Address displayed on the LCD screen. Press Confirm Network Settings. 4. Double-click the EPSON Scan Settings icon. 7. Click No both times it appears. 30 Finish the Installation Select Confirm Network Settings. 3. IP Address WorkForce 600 Series and Artisan 700 Series: Artisan 800 Series: Note: Your printer's settings will be different from the ones shown above. 5.
Network Installation Guide
Page 36
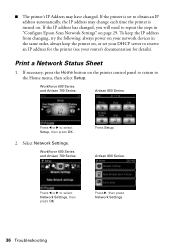
... Settings. To keep the printer on the printer control panel to return to select Network Settings, then press OK. WorkForce 600 Series and Artisan 700 Series: Press Setup. If the printer is turned on page 29. Print a Network Status ...then press Network Settings. 36 Troubleshooting Artisan 800 Series: Press l or r to the Home menu, then select Setup. WorkForce 600 Series and Artisan 700 Series: Artisan 800 Series: Press l or r to obtain an IP address automatically, the IP address... following: always power on your network devices in "Configure Epson Scan Network Settings" on .
... Settings. To keep the printer on the printer control panel to return to select Network Settings, then press OK. WorkForce 600 Series and Artisan 700 Series: Press Setup. If the printer is turned on page 29. Print a Network Status ...then press Network Settings. 36 Troubleshooting Artisan 800 Series: Press l or r to the Home menu, then select Setup. WorkForce 600 Series and Artisan 700 Series: Artisan 800 Series: Press l or r to obtain an IP address automatically, the IP address... following: always power on your network devices in "Configure Epson Scan Network Settings" on .
Network Installation Guide
Page 37
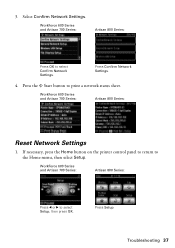
If necessary, press the Home button on the printer control panel to return to select Confirm Network Settings. WorkForce 600 Series and Artisan 700 Series: Artisan 800 Series: Press OK to the Home menu, then select Setup. WorkForce 600 Series and Artisan 700 Series: Artisan 800 Series: Reset Network Settings 1. Troubleshooting 37 3. Press Confirm Network...
If necessary, press the Home button on the printer control panel to return to select Confirm Network Settings. WorkForce 600 Series and Artisan 700 Series: Artisan 800 Series: Press OK to the Home menu, then select Setup. WorkForce 600 Series and Artisan 700 Series: Artisan 800 Series: Reset Network Settings 1. Troubleshooting 37 3. Press Confirm Network...
Network Installation Guide
Page 38
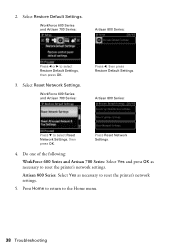
Select Reset Network Settings. Do one of the following: WorkForce 600 Series and Artisan 700 Series: Select Yes and press OK as necessary to reset the printer's network settings. 5. 2. Artisan 800 Series: Press d to the Home ... Series: Select Yes as necessary to select Restore Default Settings, then press OK. 3. Press Home to return to select Reset Network Settings, then press OK. WorkForce 600 Series and Artisan 700 Series: Artisan 800 Series: Press l or r to reset the printer's network settings...
Select Reset Network Settings. Do one of the following: WorkForce 600 Series and Artisan 700 Series: Select Yes and press OK as necessary to reset the printer's network settings. 5. 2. Artisan 800 Series: Press d to the Home ... Series: Select Yes as necessary to select Restore Default Settings, then press OK. 3. Press Home to return to select Reset Network Settings, then press OK. WorkForce 600 Series and Artisan 700 Series: Artisan 800 Series: Press l or r to reset the printer's network settings...

Using the Control Panel for Wireless Network Installation
Page 1
Using the Control Panel for Wireless Network Installation WorkForce™ 600 Series Artisan™ 700 Series
Using the Control Panel for Wireless Network Installation WorkForce™ 600 Series Artisan™ 700 Series
Using the Control Panel for Wireless Network Installation
Page 12
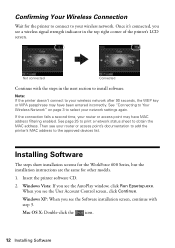
Installing Software The steps show installation screens for the WorkForce 600 Series, but the installation instructions are the same for the printer to connect to select your wireless network after 90 seconds, the WEP key or ...
Installing Software The steps show installation screens for the WorkForce 600 Series, but the installation instructions are the same for the printer to connect to select your wireless network after 90 seconds, the WEP key or ...

Product Brochure
Page 1
... Ethernet networking • Print more • Save paper - WorkForce™ 600 Print | Copy | Scan | Fax | Photo | Wi-...Fi® Engineered for small business and home office. Laser quality documents at about 2x the speed of documents with useful software included - Highcapacity Black, Cyan, Magenta and Yellow ink cartridges; Fax in color... - Uses up to 180 pages in memory card slots, PictBridge™ and 2.5-inch LCD • Make quick color...up to 38 ppm (black and color)1 • Get speed without a computer - One-touch...
... Ethernet networking • Print more • Save paper - WorkForce™ 600 Print | Copy | Scan | Fax | Photo | Wi-...Fi® Engineered for small business and home office. Laser quality documents at about 2x the speed of documents with useful software included - Highcapacity Black, Cyan, Magenta and Yellow ink cartridges; Fax in color... - Uses up to 180 pages in memory card slots, PictBridge™ and 2.5-inch LCD • Make quick color...up to 38 ppm (black and color)1 • Get speed without a computer - One-touch...
Product Brochure
Page 2
... applications and/or functions, like double-sided printing, are registered trademarks, Epson Exceed Your Vision is a registered logomark and Epson Vivid Color is a trademark of Seiko Epson Corporation. Epson disclaims any and all purchasers; WorkForce 600 Print | Copy | Scan | Fax | Photo | Wi-Fi® Printing Technology 4-color (CMYK) drop-on-demand MicroPiezo® ink jet technology Ink Palette...
... applications and/or functions, like double-sided printing, are registered trademarks, Epson Exceed Your Vision is a registered logomark and Epson Vivid Color is a trademark of Seiko Epson Corporation. Epson disclaims any and all purchasers; WorkForce 600 Print | Copy | Scan | Fax | Photo | Wi-Fi® Printing Technology 4-color (CMYK) drop-on-demand MicroPiezo® ink jet technology Ink Palette...
Product Support Bulletin(s)
Page 1
EPSON PRODUCT SUPPORT BULLETIN Date: TIB #: Reference: Product(s): Subject: 10/06/2008 Originator: DS PSB.2009.01.004 Authorization: TE08-0411 Rev. b) The script edit function ... -> Ver 1.6aE ) The main change points are as follows: 1) Changes to inform you of 5 PSB.2009.01.004 A Total Pages: 5 AculaserCX11N, AculaserCX11NF, Artisan700, Artisan 800, WorkForce 600, and B-500DN printer models Release of EpsonNet SetupManager version 1.6aE for the EpsonNet SetupManager software utility. Page 1 of an update to version 1.6aE for Network...
EPSON PRODUCT SUPPORT BULLETIN Date: TIB #: Reference: Product(s): Subject: 10/06/2008 Originator: DS PSB.2009.01.004 Authorization: TE08-0411 Rev. b) The script edit function ... -> Ver 1.6aE ) The main change points are as follows: 1) Changes to inform you of 5 PSB.2009.01.004 A Total Pages: 5 AculaserCX11N, AculaserCX11NF, Artisan700, Artisan 800, WorkForce 600, and B-500DN printer models Release of EpsonNet SetupManager version 1.6aE for the EpsonNet SetupManager software utility. Page 1 of an update to version 1.6aE for Network...
Quick Guide
Page 1
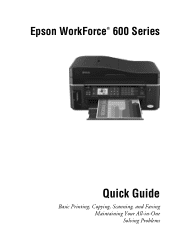
Epson WorkForce® 600 Series Quick Guide Basic Printing, Copying, Scanning, and Faxing Maintaining Your All-in-One Solving Problems
Epson WorkForce® 600 Series Quick Guide Basic Printing, Copying, Scanning, and Faxing Maintaining Your All-in-One Solving Problems
Quick Guide
Page 14
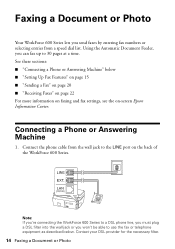
... dial list. See these sections: ■ "Connecting a Phone or Answering Machine" below . Connecting a Phone or Answering Machine 1. Note: If you're connecting the WorkForce 600 Series to a DSL phone line, you must plug a DSL filter into the wall jack or you won't be able to 30 pages at a time. Using..., you send faxes by entering fax numbers or selecting entries from the wall jack to the LINE port on -screen Epson Information Center. Faxing a Document or Photo Your WorkForce 600 Series lets you can fax up to use the fax or telephone equipment as described below ■ "Setting Up Fax...
... dial list. See these sections: ■ "Connecting a Phone or Answering Machine" below . Connecting a Phone or Answering Machine 1. Note: If you're connecting the WorkForce 600 Series to a DSL phone line, you must plug a DSL filter into the wall jack or you won't be able to 30 pages at a time. Using..., you send faxes by entering fax numbers or selecting entries from the wall jack to the LINE port on -screen Epson Information Center. Faxing a Document or Photo Your WorkForce 600 Series lets you can fax up to use the fax or telephone equipment as described below ■ "Setting Up Fax...
Quick Guide
Page 15
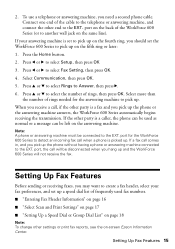
... begins receiving the transmission. Press u or d to select the number of rings needed for the WorkForce 600 Series to the EXT. port, the call , if the other end to another wall jack on -screen Epson Information Center. When you may want to create a fax header, select your answering machine is a...; "Setting Up a Speed Dial or Group Dial List" on page 18 Note: To change other party is picked up a speed dial list of the WorkForce 600 Series (or to the EXT. Press l or r to the EXT. Setting Up Fax Features 15 Note: A phone or answering machine must be disconnected ...
... begins receiving the transmission. Press u or d to select the number of rings needed for the WorkForce 600 Series to the EXT. port, the call , if the other end to another wall jack on -screen Epson Information Center. When you may want to create a fax header, select your answering machine is a...; "Setting Up a Speed Dial or Group Dial List" on page 18 Note: To change other party is picked up a speed dial list of the WorkForce 600 Series (or to the EXT. Press l or r to the EXT. Setting Up Fax Features 15 Note: A phone or answering machine must be disconnected ...
Quick Guide
Page 16
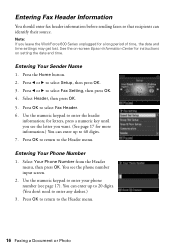
... 1. Select Header, then press OK. 5. You see page 17). See the on-screen Epson Information Center for more information.) You can identify their source. for letters, press a numeric key until you see the letter you leave the WorkForce 600 Series unplugged for a long period of time, the date and time settings may get...
... 1. Select Header, then press OK. 5. You see page 17). See the on-screen Epson Information Center for more information.) You can identify their source. for letters, press a numeric key until you see the letter you leave the WorkForce 600 Series unplugged for a long period of time, the date and time settings may get...
Quick Guide
Page 17
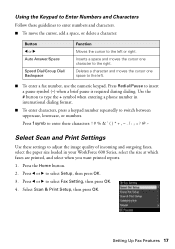
... characters, press a keypad number repeatedly to switch between uppercase, lowercase, or numbers. Use the # button to type the + symbol when entering a phone number in your WorkForce 600 Series, select the size at which faxes are printed, and select when you want printed reports. 1. Press l or r to select Setup, then press OK. 3. Press...
... characters, press a keypad number repeatedly to switch between uppercase, lowercase, or numbers. Use the # button to type the + symbol when entering a phone number in your WorkForce 600 Series, select the size at which faxes are printed, and select when you want printed reports. 1. Press l or r to select Setup, then press OK. 3. Press...
Quick Guide
Page 18
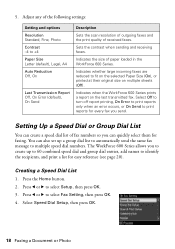
...Report Off, On Error (default), On Send Description Sets the scan resolution of outgoing faxes and the print quality of paper loaded in the WorkForce 600 Series. Press l or r to select Setup, then press OK. 3. Select Speed Dial Setup, then press OK. 18 Faxing a Document... You can quickly select them for faxing. Creating a Speed Dial List 1. Sets the contrast when sending and receiving faxes. Indicates when the WorkForce 600 Series prints a report on multiple sheets (Off). Press the Home button. 2. Indicates whether large incoming faxes are reduced to identify the recipients...
...Report Off, On Error (default), On Send Description Sets the scan resolution of outgoing faxes and the print quality of paper loaded in the WorkForce 600 Series. Press l or r to select Setup, then press OK. 3. Select Speed Dial Setup, then press OK. 18 Faxing a Document... You can quickly select them for faxing. Creating a Speed Dial List 1. Sets the contrast when sending and receiving faxes. Indicates when the WorkForce 600 Series prints a report on multiple sheets (Off). Press the Home button. 2. Indicates whether large incoming faxes are reduced to identify the recipients...


