Printer Guide
Page 6
... Media for Your Printer 55 Guidelines for Using Epson Media 56 Using Roll Paper 56 Roll Paper Guidelines 57 Loading the Paper onto the Spindle 58 Placing the Paper in the Printer 59 Removing Paper from the Spindle 62 Switching Between ...Epson Stylus Pro 9800 72 Catching Printouts Under the Epson Stylus Pro 9800 73 Optimizing the Settings for Your Paper 75 Creating Paper Configurations 75 Printing Your Paper Configurations 77 Selecting Paper Configurations 77 3 Printing with Epson Drivers for Macintosh Choosing Page Setup Options 80 Choosing Basic Print Options 83 Choosing Color...
... Media for Your Printer 55 Guidelines for Using Epson Media 56 Using Roll Paper 56 Roll Paper Guidelines 57 Loading the Paper onto the Spindle 58 Placing the Paper in the Printer 59 Removing Paper from the Spindle 62 Switching Between ...Epson Stylus Pro 9800 72 Catching Printouts Under the Epson Stylus Pro 9800 73 Optimizing the Settings for Your Paper 75 Creating Paper Configurations 75 Printing Your Paper Configurations 77 Selecting Paper Configurations 77 3 Printing with Epson Drivers for Macintosh Choosing Page Setup Options 80 Choosing Basic Print Options 83 Choosing Color...
Printer Guide
Page 10
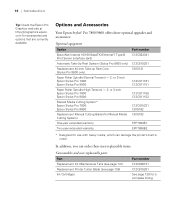
...-Up Reel System (Stylus Pro 9800 only) Replacement 44-inch Take-up Reel Core (Stylus Pro 9800 only) Paper Roller Spindle (Normal Tension) - 2- 10 | Introduction Tip: Check the Epson Pro Graphics web site at http://prographics.epson. com for a complete listing. 10 In addition, you can damage the printer's built-in cutter. Options and Accessories Your Epson Stylus® Pro 7800/9800 offers these user...
...-Up Reel System (Stylus Pro 9800 only) Replacement 44-inch Take-up Reel Core (Stylus Pro 9800 only) Paper Roller Spindle (Normal Tension) - 2- 10 | Introduction Tip: Check the Epson Pro Graphics web site at http://prographics.epson. com for a complete listing. 10 In addition, you can damage the printer's built-in cutter. Options and Accessories Your Epson Stylus® Pro 7800/9800 offers these user...

Printer Guide
Page 20
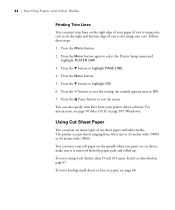
Unpacking the Printer 1. Open the box and remove the roll paper, spindle, polystyrene foam, and cardboard cushions. 1-20 Use the small hex wrench to fasten the hex screws. 6. Attach the top horizontal strut as shown. 20 | Setting Up the Printer 5. Make sure each part of the stand is tightened securely.
Unpacking the Printer 1. Open the box and remove the roll paper, spindle, polystyrene foam, and cardboard cushions. 1-20 Use the small hex wrench to fasten the hex screws. 6. Attach the top horizontal strut as shown. 20 | Setting Up the Printer 5. Make sure each part of the stand is tightened securely.
Printer Guide
Page 21
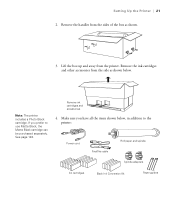
... can be purchased separately. Remove the ink cartridges and other accessories from the printer. Remove ink cartridges and accessories # " 4. Note: The printer includes a Photo Black cartridge. Make sure you prefer to the printer: Power cord FireWire cable Roll paper and spindle Spindle adapters Ink cartridges Black Ink Conversion Kit Paper guides 1-21 If you have...
... can be purchased separately. Remove the ink cartridges and other accessories from the printer. Remove ink cartridges and accessories # " 4. Note: The printer includes a Photo Black cartridge. Make sure you prefer to the printer: Power cord FireWire cable Roll paper and spindle Spindle adapters Ink cartridges Black Ink Conversion Kit Paper guides 1-21 If you have...
Printer Guide
Page 29
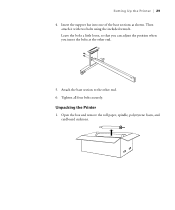
Setting Up the Printer | 29 4. Insert the support bar into one of the base sections as shown. Then attach it with two bolts using the included wrench. Leave the bolts a little loose, so that you can adjust the position when you insert the bolts at the other end. 6. Tighten all four bolts securely. Attach the base section to the other end. 5. Unpacking the Printer 1. Open the box and remove the roll paper, spindle, polystyrene foam, and cardboard cushions. 1-29
Setting Up the Printer | 29 4. Insert the support bar into one of the base sections as shown. Then attach it with two bolts using the included wrench. Leave the bolts a little loose, so that you can adjust the position when you insert the bolts at the other end. 6. Tighten all four bolts securely. Attach the base section to the other end. 5. Unpacking the Printer 1. Open the box and remove the roll paper, spindle, polystyrene foam, and cardboard cushions. 1-29
Printer Guide
Page 30
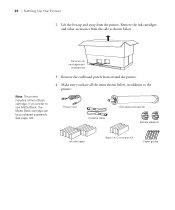
... the items shown below . See page 128. 3. Remove the cardboard panels from the printer. Remove ink cartridges and accessories # " Note: The printer includes a Photo Black cartridge. Make sure you prefer to the printer: Power cord FireWire cable Roll paper and spindle Spindle adapters Ink cartridges Black Ink Conversion Kit Paper guides 1-30 Lift the box...
... the items shown below . See page 128. 3. Remove the cardboard panels from the printer. Remove ink cartridges and accessories # " Note: The printer includes a Photo Black cartridge. Make sure you prefer to the printer: Power cord FireWire cable Roll paper and spindle Spindle adapters Ink cartridges Black Ink Conversion Kit Paper guides 1-30 Lift the box...
Printer Guide
Page 55
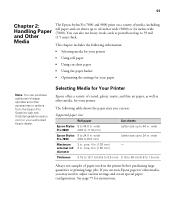
... spindles and other accessories or options from the Epson Pro Graphics web site (http://prographics.epson. The following information: • Selecting media for your paper Note: You can use: Supported paper sizes Roll paper Cut sheets Epson Stylus 8 to 24 in . Selecting Media for Your Printer Epson ... and Other Media The Epson Stylus Pro 7800 and 9800 print on a variety of coated, glossy, matte, and fine art paper, as well as posterboard up to 1.5 mm) Always test samples of paper stock in . (103 mm) - core: 4 in the printer before purchasing large quantities or...
... spindles and other accessories or options from the Epson Pro Graphics web site (http://prographics.epson. The following information: • Selecting media for your paper Note: You can use: Supported paper sizes Roll paper Cut sheets Epson Stylus 8 to 24 in . Selecting Media for Your Printer Epson ... and Other Media The Epson Stylus Pro 7800 and 9800 print on a variety of coated, glossy, matte, and fine art paper, as well as posterboard up to 1.5 mm) Always test samples of paper stock in . (103 mm) - core: 4 in the printer before purchasing large quantities or...

Printer Guide
Page 58
...as shown, then slide it into the left end of the paper as much as possible. Slide the black paper stop back onto the spindle and insert it onto the spindle. Make sure it is firmly fixed into the end of the paper roll. 2-58 Avoid touching the printable surface of the...of the roll. 58 | Handling Paper and Other Media Note: The spindle accommodates both 2-inch and 3-inch roll paper cores. Oils from your skin can affect print quality. Loading the Paper onto the Spindle Follow these steps to attach the roll to the spindle: 1. To switch between different size cores, see page 62.
...as shown, then slide it into the left end of the paper as much as possible. Slide the black paper stop back onto the spindle and insert it onto the spindle. Make sure it is firmly fixed into the end of the paper roll. 2-58 Avoid touching the printable surface of the...of the roll. 58 | Handling Paper and Other Media Note: The spindle accommodates both 2-inch and 3-inch roll paper cores. Oils from your skin can affect print quality. Loading the Paper onto the Spindle Follow these steps to attach the roll to the spindle: 1. To switch between different size cores, see page 62.

Printer Guide
Page 59
... 2. Handling Paper and Other Media | 59 Placing the Paper in the Printer Follow these steps to place the paper in the printer as shown. (The gray end of the spindle goes on the LCD display. 4. Place the roll paper in the printer: 1. Caution: Do not release the paper lever while the P Power ...light is not flashing, then release the paper lever. Make sure the printer is turned on, then...
... 2. Handling Paper and Other Media | 59 Placing the Paper in the Printer Follow these steps to place the paper in the printer as shown. (The gray end of the spindle goes on the LCD display. 4. Place the roll paper in the printer: 1. Caution: Do not release the paper lever while the P Power ...light is not flashing, then release the paper lever. Make sure the printer is turned on, then...

Printer Guide
Page 62
...the roll paper from the printer. 4. Switching Between 2-Inch and 3-Inch Roll Paper You can convert the spindle to accept roll paper with the gray end on the floor and the black end at the top. 5. Follow these steps: 1. Slide the black paper stop from the spindle, follow these steps to attach...position, then roll up the paper before removing it locks in place. Remove the black paper stop off the top of the spindle. 6. Open the roll paper cover. 2. Set the spindle upright, with either a 2-inch or 3-inch core by using 3-inch roll paper: 1. Align the arrow marks as shown ...
...the roll paper from the printer. 4. Switching Between 2-Inch and 3-Inch Roll Paper You can convert the spindle to accept roll paper with the gray end on the floor and the black end at the top. 5. Follow these steps: 1. Slide the black paper stop from the spindle, follow these steps to attach...position, then roll up the paper before removing it locks in place. Remove the black paper stop off the top of the spindle. 6. Open the roll paper cover. 2. Set the spindle upright, with either a 2-inch or 3-inch core by using 3-inch roll paper: 1. Align the arrow marks as shown ...
Printer Guide
Page 64
... lines from letter size to save the setting. You can leave your roll paper on the spindle when you print on page 67. Press the d button to ON. 7. Press the Pause button to select the Printer Setup menu and highlight PLATEN GAP. 3. Using Cut Sheet Paper You can print on the right... sheets ranging from your printer driver software. Follow these steps: 1. Press the Menu button. 2. For instructions, see page 66. 2-64 Press the button to 24 inches wide (7800) or 44 inches wide (9800). If you're loading small sheets or fine art paper, see page 90 (Mac OS X) or page 105 (Windows...
... lines from letter size to save the setting. You can leave your roll paper on the spindle when you print on page 67. Press the d button to ON. 7. Press the Pause button to select the Printer Setup menu and highlight PLATEN GAP. 3. Using Cut Sheet Paper You can print on the right... sheets ranging from your printer driver software. Follow these steps: 1. Press the Menu button. 2. For instructions, see page 66. 2-64 Press the button to 24 inches wide (7800) or 44 inches wide (9800). If you're loading small sheets or fine art paper, see page 90 (Mac OS X) or page 105 (Windows...

Printer Guide
Page 67
...loaded for instructions. 2. See pages 71 or 72 for printing. You can print on Epson Enhanced Matte Posterboard or other media more than 19 mil (0.5 mm) thick. 1. Set... to the released position. 2-67 Push the paper lever back to catch your printouts in front of the printer. Press the l Paper Source button until the icon appears on the LCD display. 4. Follow these instructions ... to 30 × 40 inches (9800) or 24 × 30 inches (7800). Handling Paper and Other Media | 67 Printing on Posterboard You can leave roll paper on the spindle, but make sure you print on posterboard...
...loaded for instructions. 2. See pages 71 or 72 for printing. You can print on Epson Enhanced Matte Posterboard or other media more than 19 mil (0.5 mm) thick. 1. Set... to the released position. 2-67 Push the paper lever back to catch your printouts in front of the printer. Press the l Paper Source button until the icon appears on the LCD display. 4. Follow these instructions ... to 30 × 40 inches (9800) or 24 × 30 inches (7800). Handling Paper and Other Media | 67 Printing on Posterboard You can leave roll paper on the spindle, but make sure you print on posterboard...
Printer Guide
Page 144
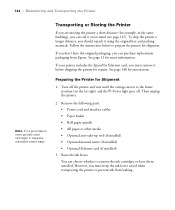
... the EpsonNet Ethernet card, you must keep the ink levers raised when transporting the printer to prevent ink from Epson. Remove the following parts: • Power cord and interface cables • Paper basket • Roll paper spindle • All paper or other media • Optional auto take-up reel (if installed) • Optional...
... the EpsonNet Ethernet card, you must keep the ink levers raised when transporting the printer to prevent ink from Epson. Remove the following parts: • Power cord and interface cables • Paper basket • Roll paper spindle • All paper or other media • Optional auto take-up reel (if installed) • Optional...

Printer Guide
Page 147
...interface cable. 3. Push in the home position (on the far right). Maintaining and Transporting the Printer | 147 Caution: Do not roll the printer on its casters. 1. Make sure the printer is turned off the printer. 2. Make sure the front cover is in the metal rods supporting the paper basket, then ...doesn't drag on , wait until the carriage moves to move the printer a short distance, such as within the same building, you can roll the printer on angled or uneven surfaces. If not, turn the printer back on the ground. 5-147 Remove the roll paper spindle and close the roll paper cover.
...interface cable. 3. Push in the home position (on the far right). Maintaining and Transporting the Printer | 147 Caution: Do not roll the printer on its casters. 1. Make sure the printer is turned off the printer. 2. Make sure the front cover is in the metal rods supporting the paper basket, then ...doesn't drag on , wait until the carriage moves to move the printer a short distance, such as within the same building, you can roll the printer on angled or uneven surfaces. If not, turn the printer back on the ground. 5-147 Remove the roll paper spindle and close the roll paper cover.

Printer Guide
Page 172
...90 Windows, 105 Page Rendering Mode setting, 116 Page setup options, Mac OS X, 80 to 83 Paper attaching to spindle, 58 configuration settings, 75 to 77, 88 to 89, 110 to 112, 156 custom settings, 75 to 77 ... to 163 Mac OS X options, 80 to 83, 88 to 91 non-Epson, 75 to 77 ordering, 55 printable area, 168 problems, 160 to 163 removing from spindle, 62 roll, 56 to 64 sizes, 167 specifications, 166 to 168 suction..., 76, 89, 111 trim lines, 64, 90, 105 Windows options, 103 to 108 Paper basket SP 7800, 25 to 26, 71 to 72 SP 9800,...
...90 Windows, 105 Page Rendering Mode setting, 116 Page setup options, Mac OS X, 80 to 83 Paper attaching to spindle, 58 configuration settings, 75 to 77, 88 to 89, 110 to 112, 156 custom settings, 75 to 77 ... to 163 Mac OS X options, 80 to 83, 88 to 91 non-Epson, 75 to 77 ordering, 55 printable area, 168 problems, 160 to 163 removing from spindle, 62 roll, 56 to 64 sizes, 167 specifications, 166 to 168 suction..., 76, 89, 111 trim lines, 64, 90, 105 Windows options, 103 to 108 Paper basket SP 7800, 25 to 26, 71 to 72 SP 9800,...

Printer Guide
Page 173
... Problems banding, 154 blank paper, 159 blurry prints, 157 cable, 158, 159 color, 159 diagnosing, 149 faint prints, 156 garbled characters, 159 ghosting, 155 graininess...158 paper, 160 to 163 print quality, 154 to 157 print speed, 116 printer driver, 158 to 159 -173 Index | 173 printing stops, 158 roll paper...116 R Registering non-Epson media, 75 to 77 Requirements, system, 12 to 13 Resolution Mac OS X, 86 Windows, 110 Roll paper attaching to spindle, 58 cannot be cut... up SP 7800, 17 to 26 SP 9800, 27 to 36 Shipping bracket SP 7800, removing, 24 SP 9800, removing, 33 using, 145 Software installing...
... Problems banding, 154 blank paper, 159 blurry prints, 157 cable, 158, 159 color, 159 diagnosing, 149 faint prints, 156 garbled characters, 159 ghosting, 155 graininess...158 paper, 160 to 163 print quality, 154 to 157 print speed, 116 printer driver, 158 to 159 -173 Index | 173 printing stops, 158 roll paper...116 R Registering non-Epson media, 75 to 77 Requirements, system, 12 to 13 Resolution Mac OS X, 86 Windows, 110 Roll paper attaching to spindle, 58 cannot be cut... up SP 7800, 17 to 26 SP 9800, 27 to 36 Shipping bracket SP 7800, removing, 24 SP 9800, removing, 33 using, 145 Software installing...

Printer Guide
Page 174
... Speed and Progress utility, 115 to 117 Spindle adapter, 62 loading roll paper, 58 ordering, 10 removing roll paper, 62 Stand SP 7800, 18 to 24 SP 9800, 28 to 34 Status Monitor Mac OS X, 97 to 98 Windows, 114 to 117 Storing printer, 144 to 146 Stylus Pro 7800 mounting on stand, 22 to..., 28 to 29 unpacking, 29 to 30 Suction, 76, 89, 111 Support, Epson, 11 System requirements, 12 to 13 T Technical support, 11 Temperature requirements, 165 Test Print menu, 120 Time and date setting, 136 Total prints, checking, 122 Transporting printer, 144 to 148 Trim lines, printing control panel, 64 Mac OS X, 90...
... Speed and Progress utility, 115 to 117 Spindle adapter, 62 loading roll paper, 58 ordering, 10 removing roll paper, 62 Stand SP 7800, 18 to 24 SP 9800, 28 to 34 Status Monitor Mac OS X, 97 to 98 Windows, 114 to 117 Storing printer, 144 to 146 Stylus Pro 7800 mounting on stand, 22 to..., 28 to 29 unpacking, 29 to 30 Suction, 76, 89, 111 Support, Epson, 11 System requirements, 12 to 13 T Technical support, 11 Temperature requirements, 165 Test Print menu, 120 Time and date setting, 136 Total prints, checking, 122 Transporting printer, 144 to 148 Trim lines, printing control panel, 64 Mac OS X, 90...

Product Brochure
Page 6
...HS 12:57 26:54 81:42 Print speeds are among the fastest wide-format printers in the industry, while printing twice as fast as our previous models. ©2005 Vincent Versace 44" Epson Stylus Pro 9800 High-precision Print Engine Technology Professional Media Handling n Prints on both the SP7800 ... media types n Optional Manual Media Cutter for cutting even the thickest of weights up to 1.5mm thick posterboard n User adjustable Roll Media Spindle accepts either 2-inch or 3-inch media cores n Producing impositions based upon a work-and-turn process, you can print on virtually any media...
...HS 12:57 26:54 81:42 Print speeds are among the fastest wide-format printers in the industry, while printing twice as fast as our previous models. ©2005 Vincent Versace 44" Epson Stylus Pro 9800 High-precision Print Engine Technology Professional Media Handling n Prints on both the SP7800 ... media types n Optional Manual Media Cutter for cutting even the thickest of weights up to 1.5mm thick posterboard n User adjustable Roll Media Spindle accepts either 2-inch or 3-inch media cores n Producing impositions based upon a work-and-turn process, you can print on virtually any media...

Product Brochure
Page 8
...printer stand BorderFree® Printing Left and right borderless "bleed" printing for cutting very thick media ~2,000 cuts (coated media) Epson Intelligent Ink Cartridge Ink cartridge size 110 ml or 220 mlB each color x 8 colors total Ink cartridge shelf life 2 years from 1:18 to 12:57 - Epson Stylus Pro 7800 and 9800... Print Engine Specifications Printing Method 8-channel Print Head Technology 8-color (C, Lc, M, Lm, Y, Lk, LLk...
...printer stand BorderFree® Printing Left and right borderless "bleed" printing for cutting very thick media ~2,000 cuts (coated media) Epson Intelligent Ink Cartridge Ink cartridge size 110 ml or 220 mlB each color x 8 colors total Ink cartridge shelf life 2 years from 1:18 to 12:57 - Epson Stylus Pro 7800 and 9800... Print Engine Specifications Printing Method 8-channel Print Head Technology 8-color (C, Lc, M, Lm, Y, Lk, LLk...
Product Information Guide
Page 3
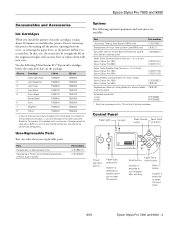
... black, or you install the printer's first ink cartridges, it takes about 20% of printer purchase. or 3-inch Epson Stylus Pro 7800 Epson Stylus Pro 9800 C12C811155 C12C811152 Manual Media Cutting System (for thick media) Epson Stylus Pro 7800 Epson Stylus Pro 9800 C12C815231 C815182 Replacement Manual Cutting Blade (for 3 seconds to re-initialize. or 3-inch Epson Stylus Pro 7800 Epson Stylus Pro 9800 C12C811161 C12C811151 Paper Roller Spindle (High Tension) - 2- Do not interrrupt...
... black, or you install the printer's first ink cartridges, it takes about 20% of printer purchase. or 3-inch Epson Stylus Pro 7800 Epson Stylus Pro 9800 C12C811155 C12C811152 Manual Media Cutting System (for thick media) Epson Stylus Pro 7800 Epson Stylus Pro 9800 C12C815231 C815182 Replacement Manual Cutting Blade (for 3 seconds to re-initialize. or 3-inch Epson Stylus Pro 7800 Epson Stylus Pro 9800 C12C811161 C12C811151 Paper Roller Spindle (High Tension) - 2- Do not interrrupt...
