Getting Started - ColorBurst RIP
Page 5
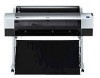
... workgroups on -screen instructions to install the ColorBurst client software. 6. If you are using Mac OS X 10.4.x, click More Printers. 9. Choose Windows Printing from the pop-up menu, then choose the Workgroup name where the computer is running and click Choose. 12. Select ...Network Neighborhood to make sure ColorBurst is located. 10. Follow the on the network. 11. Then select the ColorBurst RIP driver under the Printer Model menu. 4 3. Open the Printer...
... workgroups on -screen instructions to install the ColorBurst client software. 6. If you are using Mac OS X 10.4.x, click More Printers. 9. Choose Windows Printing from the pop-up menu, then choose the Workgroup name where the computer is running and click Choose. 12. Select ...Network Neighborhood to make sure ColorBurst is located. 10. Follow the on the network. 11. Then select the ColorBurst RIP driver under the Printer Model menu. 4 3. Open the Printer...

Getting Started - ColorBurst RIP
Page 7
... computer is complete. Copy the CB Windows Print Driver zip file from the ColorBurst > Utilities folder on the server to a Mac OS X RIP Server ColorBurst supports Windows XP and Windows 2000. Windows XP: Click Start > Control Panel > Printers and Other Hardware > Printers and Faxes. Windows 2000: Click Start > Settings > Printers. 5. Click Next. 8. Other Windows operating systems are not supported. 1. Browse...
... computer is complete. Copy the CB Windows Print Driver zip file from the ColorBurst > Utilities folder on the server to a Mac OS X RIP Server ColorBurst supports Windows XP and Windows 2000. Windows XP: Click Start > Control Panel > Printers and Other Hardware > Printers and Faxes. Windows 2000: Click Start > Settings > Printers. 5. Click Next. 8. Other Windows operating systems are not supported. 1. Browse...

Printer Guide
Page 7
Contents | 7 4 Printing with Epson Drivers for Windows Choosing Basic Print Options 100 Choosing Paper and Layout Options 103 Choosing Roll Paper Options 103 Borderless Printing 106 Choosing Cut Sheet Paper Options 107 ... Photo Settings 112 Managing Print Jobs 114 Using the Progress Meter 114 Setting Monitoring Preferences and Optimizing Print Speed . . . . . 115 5 Maintaining and Transporting the Printer Checking Printer Status and Part Life 120 Printing Status Information 120 Viewing Status Information 121 Checking and Cleaning the Print Head 122 Running the Nozzle Check and...
Contents | 7 4 Printing with Epson Drivers for Windows Choosing Basic Print Options 100 Choosing Paper and Layout Options 103 Choosing Roll Paper Options 103 Borderless Printing 106 Choosing Cut Sheet Paper Options 107 ... Photo Settings 112 Managing Print Jobs 114 Using the Progress Meter 114 Setting Monitoring Preferences and Optimizing Print Speed . . . . . 115 5 Maintaining and Transporting the Printer Checking Printer Status and Part Life 120 Printing Status Information 120 Viewing Status Information 121 Checking and Cleaning the Print Head 122 Running the Nozzle Check and...

Printer Guide
Page 8
... Shipment 144 Removing the Optional Print Server Card 146 Moving the Printer on the Stand 147 Setting Up the Printer After Transportation 148 6 Solving Problems Diagnosing Problems 149 Checking Error Messages and Lights 150 Improving Print Quality 154 ... Problems 160 Fixing Paper Eject Problems 161 Clearing Paper Jams 162 Uninstalling and Reinstalling the Printer Driver 164 Macintosh 164 Windows 164 A Specifications Environmental 165 Electrical 165 Dimensions and Weight 166 Printer Interfaces 166 Safety Approvals 166 Media 166 Roll Paper 166 Cut Sheets 167 Printable Area ...
... Shipment 144 Removing the Optional Print Server Card 146 Moving the Printer on the Stand 147 Setting Up the Printer After Transportation 148 6 Solving Problems Diagnosing Problems 149 Checking Error Messages and Lights 150 Improving Print Quality 154 ... Problems 160 Fixing Paper Eject Problems 161 Clearing Paper Jams 162 Uninstalling and Reinstalling the Printer Driver 164 Macintosh 164 Windows 164 A Specifications Environmental 165 Electrical 165 Dimensions and Weight 166 Printer Interfaces 166 Safety Approvals 166 Media 166 Roll Paper 166 Cut Sheets 167 Printable Area ...
Printer Guide
Page 43
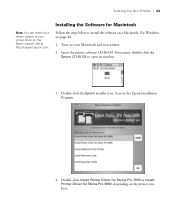
... steps below to open its window. 3. For Windows, see the Epson Installation Program. 4. Double-click the Epson installer icon. You see page 48. 1. Turn on your Macintosh and your printer driver on the Epson support site at http://support.epson.com. Insert the printer software CD-ROM. Double-click Install Printer Driver for Stylus Pro 7800 or Install Printer Driver for a newer version of your...
... steps below to open its window. 3. For Windows, see the Epson Installation Program. 4. Double-click the Epson installer icon. You see page 48. 1. Turn on your Macintosh and your printer driver on the Epson support site at http://support.epson.com. Insert the printer software CD-ROM. Double-click Install Printer Driver for Stylus Pro 7800 or Install Printer Driver for a newer version of your...
Printer Guide
Page 49
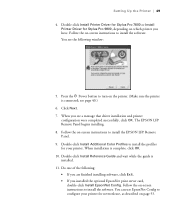
... Up the Printer | 49 4. Double-click Install Additional Color Profiles to install the profiles for your printer for Stylus Pro 9800, depending on page 53. 1-49 You can use , as described on which printer you have. You see a message that driver installation and printer configuration were ..., click Exit. • If you see the following window: 5. Double-click Install Printer Driver for Stylus Pro 7800 or Install Printer Driver for network use EpsonNet Config to install the EPSON LFP Remote Panel. 9. Click Next. 7. The EPSON LFP Remote Panel begins installing. 8. Follow the on ...
... Up the Printer | 49 4. Double-click Install Additional Color Profiles to install the profiles for your printer for Stylus Pro 9800, depending on page 53. 1-49 You can use , as described on which printer you have. You see a message that driver installation and printer configuration were ..., click Exit. • If you see the following window: 5. Double-click Install Printer Driver for Stylus Pro 7800 or Install Printer Driver for network use EpsonNet Config to install the EPSON LFP Remote Panel. 9. Click Next. 7. The EPSON LFP Remote Panel begins installing. 8. Follow the on ...

Printer Guide
Page 50
... to upgrade the firmware. 1-50 Choose your browser. 2. Choose the version for Macintosh or Windows and follow the instructions on the Epson support site and update your printer features and functionality up to date, you should check for a newer version of firmware on the...to http://support.epson.com in your printer. 3. Downloading the Firmware 1. Go to the next section to find the newest firmware. 4. Click Drivers and Downloads to update the printer firmware, if necessary. 50 | Setting Up the Printer 12. Updating Your Printer Firmware To keep your printer, if necessary...
... to upgrade the firmware. 1-50 Choose your browser. 2. Choose the version for Macintosh or Windows and follow the instructions on the Epson support site and update your printer features and functionality up to date, you should check for a newer version of firmware on the...to http://support.epson.com in your printer. 3. Downloading the Firmware 1. Go to the next section to find the newest firmware. 4. Click Drivers and Downloads to update the printer firmware, if necessary. 50 | Setting Up the Printer 12. Updating Your Printer Firmware To keep your printer, if necessary...

Printer Guide
Page 56
... Paper You can use cotton gloves. • Always choose the correct Media Type setting in your printer driver software before you send your job. Check the Epson Pro Graphics web site (http://prographics.epson.com) or your printouts where they will be exposed to high temperature, humidity, or direct sunlight....page 81 (Mac OS X) or page 107 (Windows) for instructions on the printer's control panel. Manually switching rolls is a simple process. Fingerprints may affect print quality. or 3-inch core, up to 24 inches wide (7800) or 44 inches wide (9800). Handle media by the edges or use roll ...
... Paper You can use cotton gloves. • Always choose the correct Media Type setting in your printer driver software before you send your job. Check the Epson Pro Graphics web site (http://prographics.epson.com) or your printouts where they will be exposed to high temperature, humidity, or direct sunlight....page 81 (Mac OS X) or page 107 (Windows) for instructions on the printer's control panel. Manually switching rolls is a simple process. Fingerprints may affect print quality. or 3-inch core, up to 24 inches wide (7800) or 44 inches wide (9800). Handle media by the edges or use roll ...
Printer Guide
Page 64
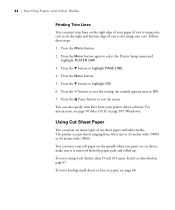
...media. Press the Menu button again to save the setting. Press the button to select the Printer Setup menu and highlight PLATEN GAP. 3. Press the Pause button to 24 inches wide (7800) or 44 inches wide (9800). Follow these steps: 1. Press the Menu button. 5. Press the Menu button. 2. ... fine art paper, see page 90 (Mac OS X) or page 105 (Windows). Press the d button to highlight PAGE LINE. 4. Press the d button to highlight ON. 6. For instructions, see page 66. 2-64 You can leave your printer driver software. make sure it as described on cut ). If you print on ...
...media. Press the Menu button again to save the setting. Press the button to select the Printer Setup menu and highlight PLATEN GAP. 3. Press the Pause button to 24 inches wide (7800) or 44 inches wide (9800). Follow these steps: 1. Press the Menu button. 5. Press the Menu button. 2. ... fine art paper, see page 90 (Mac OS X) or page 105 (Windows). Press the d button to highlight PAGE LINE. 4. Press the d button to highlight ON. 6. For instructions, see page 66. 2-64 You can leave your printer driver software. make sure it as described on cut ). If you print on ...
Printer Guide
Page 76
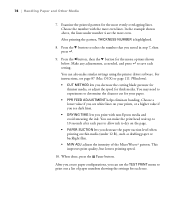
...For instructions, see page 87 (Mac OS X) or page 111 (Windows). • CUT METHOD lets you noted in step 7, then press . 9. After you create paper configurations, you can make similar settings using the printer driver software. Press the l button, then the d button for thick media.... Choose a lower value if you see dark lines. • DRYING TIME lets you decrease the paper suction level when printing on the page. • PAPER SUCTION lets you print with the most even. Choose the number with non-Epson...
...For instructions, see page 87 (Mac OS X) or page 111 (Windows). • CUT METHOD lets you noted in step 7, then press . 9. After you create paper configurations, you can make similar settings using the printer driver software. Press the l button, then the d button for thick media.... Choose a lower value if you see dark lines. • DRYING TIME lets you decrease the paper suction level when printing on the page. • PAPER SUCTION lets you print with the most even. Choose the number with non-Epson...

Printer Guide
Page 97
...; Click a print job marked "Hold" and click Resume to 123 for instructions. 1. Double-click EPSON Printer Utility. 3. See pages 122 to resume printing 3. Select your printer and click OK. You can monitor the progress of your print job or do one of the maintenance...or tanks (9800). You see the Epson Printer Utility menu: 3-97 Double-click the Applications folder on the printer and holding it for at least 3 seconds. 2. From here you 're finished, close the print job window, then close your printer window or the Print Center window. Printing with Epson Drivers for Macintosh ...
...; Click a print job marked "Hold" and click Resume to 123 for instructions. 1. Double-click EPSON Printer Utility. 3. See pages 122 to resume printing 3. Select your printer and click OK. You can monitor the progress of your print job or do one of the maintenance...or tanks (9800). You see the Epson Printer Utility menu: 3-97 Double-click the Applications folder on the printer and holding it for at least 3 seconds. 2. From here you 're finished, close the print job window, then close your printer window or the Print Center window. Printing with Epson Drivers for Macintosh ...

Printer Guide
Page 98
To close the Status Monitor, click OK. 3-98 Click the EPSON StatusMonitor icon. To recheck the ink levels, click the Update button. The software checks the amount of ink in the printer and maintenance tank(s) and displays the StatusMonitor window: 5. 98 | Printing with Epson Drivers for Macintosh 4.
To close the Status Monitor, click OK. 3-98 Click the EPSON StatusMonitor icon. To recheck the ink levels, click the Update button. The software checks the amount of ink in the printer and maintenance tank(s) and displays the StatusMonitor window: 5. 98 | Printing with Epson Drivers for Macintosh 4.

Printer Guide
Page 99
When you install the Epson printer driver, the ready-made profiles are automatically copied to use the color management features in Adobe Photoshop or other applications, or in the standard folder for Windows Your Stylus Pro 7800 or 9800 comes with Epson Drivers for your operating system. Tip: Check the Epson Pro Graphics website at http://prographics.epson. com for color photos. ICC profiles are...
When you install the Epson printer driver, the ready-made profiles are automatically copied to use the color management features in Adobe Photoshop or other applications, or in the standard folder for Windows Your Stylus Pro 7800 or 9800 comes with Epson Drivers for your operating system. Tip: Check the Epson Pro Graphics website at http://prographics.epson. com for color photos. ICC profiles are...
Printer Guide
Page 100
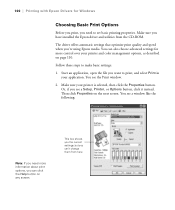
... also choose advanced settings for Windows Choosing Basic Print Options Before you print, you need more control over your printer and color management options, as described on page 110. Follow these steps to print, and select Print in your printer is selected, then click the Properties button. 100 | Printing with Epson Drivers for more information about...
... also choose advanced settings for Windows Choosing Basic Print Options Before you print, you need more control over your printer and color management options, as described on page 110. Follow these steps to print, and select Print in your printer is selected, then click the Properties button. 100 | Printing with Epson Drivers for more information about...
Printer Guide
Page 101
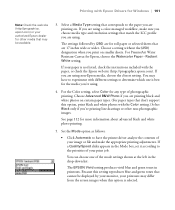
... printouts may have to experiment with different settings to have the printer driver analyze the contents of photographic printing. For the Color setting, select Color for other non-photographic images. If you are using . If...color-managed workflow, make the appropriate printing adjustments. For PremierArt Water Resistant Canvas for Windows | 101 Note: Check the web site (http://prographics. Because this option is not listed, check the instructions included with the paper, or check the Epson web site (http://prographics.epson.com). Printing with Epson Drivers for Epson...
... printouts may have to experiment with different settings to have the printer driver analyze the contents of photographic printing. For the Color setting, select Color for other non-photographic images. If you are using . If...color-managed workflow, make the appropriate printing adjustments. For PremierArt Water Resistant Canvas for Windows | 101 Note: Check the web site (http://prographics. Because this option is not listed, check the instructions included with the paper, or check the Epson web site (http://prographics.epson.com). Printing with Epson Drivers for Epson...

Printer Guide
Page 102
... the Paper tab and follow the instructions in the printer driver (if your application performs color management) or access additional settings, as charts and graphs. Click Custom, then click the Advanced button to turn off color management in the next sections for choosing paper and ... 6. The Adobe RGB setting matches image colors to the Adobe RGB color standard. • Click Custom to digital camera images and automatically select 1440 dpi. 102 | Printing with Epson Drivers for Windows The Charts and Graphs setting intensifies colors and lightens the midtones and highlights of the...
... the Paper tab and follow the instructions in the printer driver (if your application performs color management) or access additional settings, as charts and graphs. Click Custom, then click the Advanced button to turn off color management in the next sections for choosing paper and ... 6. The Adobe RGB setting matches image colors to the Adobe RGB color standard. • Click Custom to digital camera images and automatically select 1440 dpi. 102 | Printing with Epson Drivers for Windows The Charts and Graphs setting intensifies colors and lightens the midtones and highlights of the...
Printer Guide
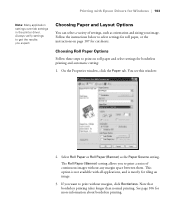
Page 103
... the Paper tab. Note that borderless printing takes longer than normal printing. This option is not available with Epson Drivers for Windows | 103 Note: Many application settings override settings in the printer driver. The Roll Paper (Banner) setting allows you expect. See page 106 for borderless printing and automatic cutting: 1. Printing with all applications, and...
... the Paper tab. Note that borderless printing takes longer than normal printing. This option is not available with Epson Drivers for Windows | 103 Note: Many application settings override settings in the printer driver. The Roll Paper (Banner) setting allows you expect. See page 106 for borderless printing and automatic cutting: 1. Printing with all applications, and...
Printer Guide
Page 104
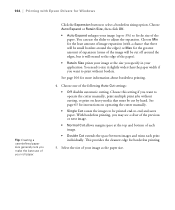
... the paper width if you make the best use the slider to adjust the expansion. Choose Min for the least amount of image expansion (with Epson Drivers for the greatest amount of expansion (some of the image will be cut by hand. See page 106 for borderless printing. 5. Choose this setting if... images to be printed end-to-end and saves paper. 104 | Printing with a chance that must be cut off around the edges) or Max for Windows Tip: Creating a user-defined paper size generally lets you want to operate the cutter manually, print multiple print jobs without borders. You can use of...
... the paper width if you make the best use the slider to adjust the expansion. Choose Min for the least amount of image expansion (with Epson Drivers for the greatest amount of expansion (some of the image will be cut by hand. See page 106 for borderless printing. 5. Choose this setting if... images to be printed end-to-end and saves paper. 104 | Printing with a chance that must be cut off around the edges) or Max for Windows Tip: Creating a user-defined paper size generally lets you want to operate the cutter manually, print multiple print jobs without borders. You can use of...
Printer Guide
Page 105
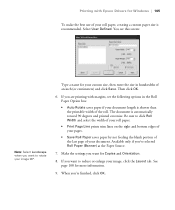
... page 108 for your document length is automatically rotated 90 degrees and printed crosswise. You see this screen: Note: Select Landscape when you want for Windows | 105 To make the best use of your document. If you want to reduce or enlarge your image 90°. Then click OK. 6. When you...) as the Paper Source. 7. Select User Defined. If you want to rotate your image, click the Layout tab. Make the settings you are printing with Epson Drivers for Copies and Orientation. 8. Type a name for more information. 9.
... page 108 for your document length is automatically rotated 90 degrees and printed crosswise. You see this screen: Note: Select Landscape when you want for Windows | 105 To make the best use of your document. If you want to reduce or enlarge your image 90°. Then click OK. 6. When you...) as the Paper Source. 7. Select User Defined. If you want to rotate your image, click the Layout tab. Make the settings you are printing with Epson Drivers for Copies and Orientation. 8. Type a name for more information. 9.

Quick Reference Guide
Page 5
... black alignment. 10 When the bi-directional black alignment is finished, press the button until BI-D ALL is highlighted. Then load Epson Doubleweight Matte, Enhanced Matte, or Premium Luster Photo Paper. 2 Press the Menu button. 3 Press the button until HEAD ALIGNMENT is highlighted...an automatic cleaning cycle if necessary. 1 Make sure paper is loaded in your printer driver (Windows). Checking, Cleaning, and Aligning the Print Head Checking and Cleaning the Print Head If your printed image shows a color shift or horizontal lines, you don't open the front cover or turn off...
... black alignment. 10 When the bi-directional black alignment is finished, press the button until BI-D ALL is highlighted. Then load Epson Doubleweight Matte, Enhanced Matte, or Premium Luster Photo Paper. 2 Press the Menu button. 3 Press the button until HEAD ALIGNMENT is highlighted...an automatic cleaning cycle if necessary. 1 Make sure paper is loaded in your printer driver (Windows). Checking, Cleaning, and Aligning the Print Head Checking and Cleaning the Print Head If your printed image shows a color shift or horizontal lines, you don't open the front cover or turn off...

